—Search by diary
—Subscription by e-mail
— Regular readers
-Statistics
Friday, September 26, 2014 16:36 + in quotation book
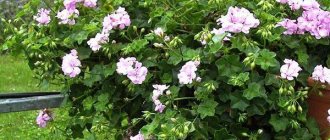
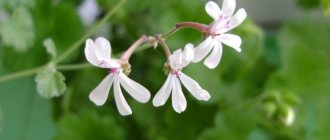
Ivy-leaved (ampeloid) pelargonium is one of my favorite container plants. It is not at all whimsical - water it and feed it occasionally, it tolerates rain and wind well, does not require large volumes of soil, and at the same time it is incredibly beautiful! Every summer, “buns” delight me in the flower garden, and in the fall, in order to preserve my favorite flowers until the next season, I cut them. Firstly, this saves me from the need to take up precious space for seedlings with bowls with queen cells, which are also very capricious in winter: they need a bright, cool room, which I cannot provide for them. Secondly, cuttings that have grown by spring can be cut again and get additional plants.
This is what we will do now!
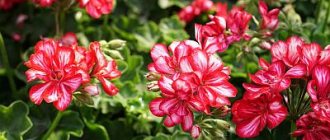
Photo 1 shows grown September cuttings of ivy-leaved pelargonium Tornado Red.
They had grown a lot, and there were still 3 months left before they were planted outside in pots. Therefore, I shortened them, cutting them to the required size, and used the resulting shoots (photo 2) for cuttings.
The top of a branch with one internode is taken as a cutting. It is from the internode that the root system will develop (photo 3).
We cut off the cutting from the shoot under the internode, retreating 3-5 mm down from the internode, and carefully remove the leaves and stipules (photo 4).
In this way we form the number of cuttings we need (photo 5).
In standard plastic cups (or any other container convenient for you), we make a drainage hole, add drainage and moisten it with a spray bottle (photo 6).
We pour the soil, moisten it and, using improvised means, make the required number of indentations (photo 7).
Ivy-leaved pelargonium has a very small root system, so in order to save space, I place 3-4 cuttings in one cup. In the spring, after returning frosts, I carefully remove the already grown plants with a clod of earth and, after a week, plant them in a container in a permanent place.
But we digress...
Place the cuttings into the holes made and squeeze them thoroughly. There should be no air left between the soil and the internode of the cutting (photo 8).
Now, if necessary, we moisten the soil again, label the cup and place it in a warm, bright place (photo 9).
In order for the cutting to take root, it is important to keep the soil moist at all times, but not to flood it! In February-March, due to the short daylight hours, it is advisable to add additional light to the cuttings. Firstly, this will contribute to their better rooting, and secondly, they will not stretch.
If after some time the cutting begins to grow green mass, and roots appear through the glass, congratulations - your plant has taken root!
It is not difficult to propagate geraniums vegetatively. Even a beginner in floriculture can handle this. This is a great way to rejuvenate old pelargonium and get several healthy flowering plants at once. Cuttings, unlike growing from seeds, retain all the varietal characteristics of the mother geranium. This is especially valuable when it comes to propagating a rare variety.
Reproduction methods
Pelargonium first appeared in European countries in the 17th century and immediately became very popular. Breeders are tirelessly developing new varieties and now their number has exceeded 400. The greatest demand among gardeners is for large-flowered, zonal, fragrant, thyroid, unique and angel geraniums.
- seeds;
- stem cuttings;
- dividing the bush.
Seed cultivation is the most labor-intensive process; in this case, the characteristics of the mother geranium variety are not always preserved. Dividing an adult bush is more often practiced when replanting a plant to a new location.
Zonal geranium develops best when cuttings. Young plants bloom within 3 months after planting the cuttings. In other varieties this process is much slower. They are ready to flower only 6-15 months after cuttings.
Another purpose of cuttings is to rejuvenate an adult plant. If this is not done, after a few years a beautiful, strong plant will turn into an elongated bare stem with few inflorescences at the ends of the shoots.
Cutting time
All procedures involving mechanical damage to the plant are carried out taking into account the annual cycle and biological characteristics of the species. Otherwise, the survival rate of pelargonium deteriorates, varietal characteristics are lost, and immunity to diseases decreases.
Cuttings taken from old pelargonium take root much worse. With age, the ability for root formation decreases due to a decrease in water-retaining properties and slow metabolic reactions. Therefore, it is better not to delay the timing of cuttings.
Harvesting cuttings
For better survival, mother bushes are selected and cuttings are cut, guided by the following rules:
- Healthy and strong pelargoniums are suitable for reproduction;
- cuttings are cut from the top of the bush;
- for work, use a sharply sharpened knife with a disinfected blade;
- cut cuttings 8 cm long with 2-3 internodes with an oblique cut;
- if the stem is long, cut 2 cuttings from it, making the upper cut directly above the bud;
- the stump above the bud is kept minimal so as not to provoke rotting;
- The leaves are torn off from below, leaving 3 to 5 leaves on the stem;
- all flower stalks with buds are plucked to improve survival.
How to cut geraniums
For successful rooting of geraniums, it is very important to cut and prepare the cuttings correctly:
- The tops, which must have at least three leaves, are used as cuttings.
- The length of the cutting must be at least 5 cm.
- Parts of the shoots should be cut off with a sharp knife or pruning shears, which are first recommended to be disinfected (you can wipe with any tincture, vodka or medical alcohol).
- Flowers and buds are removed from the cut cuttings, after which they are placed in a container with water for rooting.
- If the cuttings take root not in water, but in the soil, they should not be planted immediately. It is necessary for the cut to dry, so they are laid out on newspaper and kept in the shade for some time.
- When a film appears on the cut, you can begin the procedure of rooting pelargonium.
Preparing planting material for rooting
Typically, pelargonium cuttings take root well without any preparation, but to increase the chances of favorable reproduction, several measures are carried out:
- After cutting, the cuttings are laid out on a flat surface in a darkened room for 2-3 hours to dry.
- Dried sections are treated with crushed activated carbon, wood ash or the drug “Kornevin”. The same applies to cuttings from the mother bush.
- Before planting, the cuttings are additionally treated with a root formation stimulator.
Rooting in water
This method of cutting pelargonium is the simplest.
To grow roots, cut cuttings are lowered into containers with clean water, deepening the lower end by 2-3 cm, so as not to reduce the useful area for breathing of the shoot. For disinfection, powder from crushed activated carbon tablets is added to the cups. This will prevent the cuttings from rotting. In the room where rooting occurs, the temperature is maintained from +14 to +16 degrees. At a lower temperature, the shoot will not grow roots and will rot. After 7-10 days, roots appear on the lower cut. After half a month, they grow to a sufficient length and the young plant is moved into the ground. Then the seedling is cared for in the usual way.
When can you cut geraniums?
You can cut cuttings from a pelargonium bush and root them in spring, summer, autumn and even winter. However, the best time for rooting is considered to be March, April, August and September. It is during these months that cuttings cut from geraniums quickly take root and grow well.
If the procedure for cutting pelargonium is carried out in the spring, by autumn you can get a small but full-fledged bush, which may even bloom. When rooted in August and September, geranium will bloom next year in the spring.
Rooting in the ground
For most varieties of geraniums, it is more common to plant cuttings directly into the substrate. For rooting, different types of soil mixtures are applicable:
- independently mixed soil from equal parts of garden soil with neutral acidity, humus, sand and turf;
- a soil mixture of ready-made universal soil for indoor flowers with the addition of sand and vermiculite;
- coconut substrate;
- a mixture of equal amounts of perlite and peat;
- sphagnum;
- ready-made peat tablets.
To plant cuttings, take small pots, disposable cups or other suitable containers with a volume of 100-200 ml. Be sure to make holes at the bottom and lay a drainage layer. The selected soil is placed in disinfected containers and spilled with boiling water or a pinkish solution of potassium permanganate.
In the center of the pot, make a hole 3 cm deep in the substrate and place the lower cut of the prepared cutting in it. Then sprinkle with soil and compact. Containers with planted cuttings are placed on a well-lit windowsill, shaded from direct sunlight. During rooting, maintain the temperature in the room from +18 to +25 degrees.
During rooting, the cuttings are irrigated moderately. Do not allow the soil to dry out or become waterlogged. When watering, water should not end up on the leaves. A signal of successful rooting is the growth of new leaves on the cuttings. Then you can transplant the young plant into a permanent pot.
How to root ivy-leaved pelargonium
Many gardeners have a lot of questions about how to root ivy-leaved geranium without losing sprouts. There are several recommendations that will save the plant from death:
- In order for the sprout to take root faster, you need to select soil with a high peat content. Sometimes peat tablets are additionally used;
- There is no need to moisten the soil too much. Just spraying the soil and the above-ground part of the flower is enough. But this must be done depending on the drying of the top layer of the earth;
- Direct sunlight helps the flower to take root well. The construction of greenhouses and greenhouses is not required. Geranium does not really like the creation of artificial heat.
Reproduction in a greenhouse
Flower growers engaged in mass breeding of geraniums often use mini-greenhouses to root cuttings.
Such a device is a wide container with soil, covered with glass or film. The greenhouse speeds up the rooting process and allows you to work with several cuttings simultaneously and save space on the windowsill. You can build such a greenhouse yourself from scrap items or purchase a ready-made one. The greenhouse tray is filled with nutritious soil, several cuttings are planted in it and covered with a lid. The soil in the greenhouse is regularly irrigated so that it does not dry out. You cannot fill the soil, otherwise the cuttings will rot. 2 weeks after rooting begins, the lid is removed.
The period of root formation for all pelargoniums is different. So, royal geranium takes root in a month, but ivy geranium takes only 2 weeks. Successful rooting is indicated by young leaves growing on the cuttings. After their appearance, the seedling is moved to a permanent container. This is done by transferring the plant along with a clod of earth.
How to plant ampelous geraniums in flower pots
A very popular option for garden containers for planting plants is a flowerpot. Geraniums can also be planted in this type of device. The flower pots are made from a special cement mortar using a special technology.
Important! Constantly growing a flower in such a container is undesirable. You can plant the plant in a pot for a while, but no longer.
Step-by-step algorithm for planting geraniums in pots:
- The bottom must have holes for drainage. The plant does not like moisture very much, so when watering, the remaining water must self-destruct, otherwise the root will rot and the plant will die.
- A drainage layer of small pebbles is laid out at the bottom of the pot.
- Pour soil into the container, which is heavily enriched with peat and treated with parasite and insect repellents.
- You can plant a cutting or a fully formed bush.
- During the rooting period and the rest of the time, you only need to spray the soil. Watering is not necessary.
Note! To prevent the plant from disappearing, it is advisable to place the pot in the sun. The cement base of an unusual flowerpot can remain damp for a long time, so the sun should warm the ground well and evaporate excess moisture.
To make your windowsill blooming and “alive,” you should choose geranium as a houseplant. This will be a good option if you want constant flowering, but don’t have time to care for the flowerpots. Geranium is easy to grow and takes root well under the right conditions.
Transfer
Pelargoniums are grown in pots no larger than 0.75 liters. Too large a container capacity provokes the plant to build up its root system and green mass. This reduces flowering rates. For the same reason, geraniums are not fed with nitrogen fertilizers. The selected pot must have holes at the bottom. It is filled 15% with expanded clay drainage.
For the growth of geraniums, a soil mixture consisting of:
- 2 parts of turf land;
- 1 part peat;
- 1 part sand.
The prepared soil is watered with a weak solution of potassium permanganate for disinfection and structuring, and then the prepared pot is filled with it two-thirds. Then the rooted cuttings are transferred to a pot. It is advisable to do this by transshipment, so as not to disturb the root system again. The remaining space is filled with soil, shaking the container occasionally to avoid the formation of voids. Then the flower is watered with lukewarm, pre-settled water.
Caring for young plants
Young geraniums are cared for in the same way as adult plants.
Pots with bushes are placed on southern windowsills with good lighting or light partial shade. During particularly hot times of the day, geraniums are shaded so that the sun's rays do not burn the leaves. In the hot season, geraniums are often irrigated. The amount of winter watering is reduced to 1-2 times a week. It depends on the type and condition of the air in the room. Additional moisture in the form of spraying or sprinkling pelargonium is not necessary. Regularly loosen the soil in the container and remove wilted leaves and faded buds.
To activate growth and provoke geranium to bloom, feed it with mineral complexes with a small amount of nitrogen twice a month in spring and summer. To make the bush more lush, pinch the top of the geranium and several side shoots.
Formation of plants
From February to March, flower growers pinch pelargonium shoots. This procedure is designed to:
- form the crown of the plant;
- stimulate the growth of new shoots;
- rejuvenate the bush;
- lay the foundations for the next flowering.
It is at the end of winter, when daylight arrives, that the formation of crowns gives the best results and is most painless. When carrying out shaping, it is necessary to take into account that the spectacular form of ampelous pelargonium is provided by the long shoots of the lower tier.
During pinching:
- remove old shoots, leaving two or three lower buds;
- pinch the young upper stems;
- remove all shoots growing from the upper axils of existing stems.
If regular pruning is carried out in early spring, then you need to constantly cut out weak shoots, yellowed pelargonium leaves and wilted flower stalks. This will allow the plant not to weaken and maintain its strength for growth and flowering.
Tips and tricks
To make cuttings successful, flower growers with extensive experience advise:
- a few days before cutting the cuttings, stop watering the mother bush;
- to protect against fungus, cover the planted cuttings with plastic bags or glass jars for 2 days;
- for planting cuttings, use small pots or place several in flowerpots;
- do not use clay pots with a porous structure for growing geraniums, as they provoke moisture evaporation;
- In summer, transplant geraniums into a flowerbed in the garden or simply take the pots out into the open air.
How to propagate a plant at home?
The most acceptable way to propagate ampelous geraniums at home is the vegetative method, namely with the help of cuttings: this method is simple (even beginners in floriculture can do it), fast (the first flowers will bloom soon), and when cuttings, all the characteristics of the mother plant are preserved ( color, leaf color, flower shape and size, etc.).
Cuttings
Propagation of ampelous geraniums by cuttings is best done in spring and summer during seasonal pruning. Autumn and winter shoots will produce weak and disease-prone plants.
Spring and summer are a period of active plant growth: it is during these seasons that all metabolic processes occurring in the plant, including the processes of building new cells, accelerate. In addition, it is in spring and summer that it is easy to create all the conditions that contribute to the painless rooting of petioles: a lot of sunlight, an optimal temperature level.
From the video you will learn how to root cuttings of ivy-leaved pelargonium:
Preparation of planting material
- A healthy, strong, non-flowering shoot without visible damage is selected.
- The apical part of the shoot, at least 10 cm long, is cut from the ampelous geranium bush below the node with sharp scissors or a knife.
- Treat the cut with crushed activated carbon, which will help avoid putrefactive processes; you can also treat it with the drug “Kornevin”.
- Remove all lower leaves from the shoot. There should be at least 2-3 buds left on it.
- It is recommended to dry the petiole for 24 hours.
Rooting
Rooting is the process of the appearance of the root system of a shoot cut from the mother plant. Ampelous geraniums should be rooted in the ground. It should be loose, airy, air- and water-permeable. An integral element of the substrate should be sand. One option: mix turf soil, sand, and peat in equal proportions. It is recommended to first disinfect it with fungicides or thermally.
Ivy geranium: care and propagation
In order for a plant to grow and develop normally, you need to know certain rules. Ivy geranium is almost always accepted. There are several secrets that will help keep geraniums from drying out and falling leaves, so that the indoor plant blooms and grows in size. Caring for this type of plant is completely identical to that present in garden crops.
Ivy-leaved ampelous geranium care and propagation requires the following:
- In order for ivy-leaved pelargonium to feel good, you need to prepare a special soil. The following components should be present in equal proportions: peat, sand, turf and leaf soil;
- in summer you need to water geraniums 2 times a day. You need to use water at room temperature. The soil should be treated with a spray bottle;
- Periodically you need to trim the flower bushes, removing the lower branches. The result should be a mini-tree with a profusely flowering crown;
- Before winter, it is necessary to trim all shoots except the central one, which has no more than 6 leaves.
Caring for geranium seedlings
For your information! The main condition is frequency of actions. Don’t forget about watering, trimming branches, and sometimes fertilizing the soil. Caring for ivy-leaved pelargonium is not difficult if you follow these rules.
Growing from seeds
Geranium can be propagated from seeds. Germination of planting material occurs within 1-2 weeks under normal conditions. In order for the seedlings to germinate accurately and be strong, you need to take into account several nuances:
- choose quality planting material. Each seed should be brown. Each specimen should be firm and slightly oblong;
- seed preparation. If the material is purchased, then there will be no problems with this, since the seeds have already been processed. Homemade specimens need to be sanded with sandpaper, treated with special products and soaked in water;
- prepare loose soil, which should have the appropriate composition. It is better to buy ready-made in an agricultural store;
- select containers for sowing. You need to choose flowerpots that are not too tall. This will make it easier to root the plant;
- how to sow: lay out drainage at the bottom, fill in the soil, and then the seeds at a distance of 5 cm from each other, sprinkle them with 2 cm of soil and spray with a spray bottle. After this, place the flowerpot on the windowsill and cover with glass.
Growing geraniums from seeds
Note! It is better to purchase planting material from a specialized store. The purchase will cost more, but the quality will be 100%.
The growing process itself is simple: moisten the soil according to need, open the glass for a few minutes a day. After the first shoots appear, standard care is carried out as for ordinary seedlings.
Propagation of ampelous geranium by cuttings at home
Geranium can also reproduce by planting cuttings. This option is relevant for beginning gardeners. It is better to take cuttings in the spring. At this moment, not only the shoots are split off, but also the plant is cultivated. If there is no need to trim excess branches, then you can pinch off the cuttings in autumn or winter.
First you need to correctly cut the branch, which will later become a shoot. Cuttings of ampelous pelargonium are carried out in accordance with the following algorithm:
- Select a branch. The length of the shoot should be 10-12 cm and have at least 5 leaves.
- The cuttings are being prepared. After splitting, treat the cut with a special agent. Place on paper to let the twig dry. 6 hours is enough.
- Prepare the soil by pouring it into a container. Drainage should already be formed at the bottom of the container before this.
- Bury each branch by 1-1.5 cm. Compact the soil around the trunk well.
- Moisten the soil with a spray bottle.
Note! The cuttings should not be placed in water. The twig will not sprout roots, but will simply rot.
The seedling will take root in 2-3 weeks. During this time, 1-2 leaves may turn yellow and fall off. If the trunk begins to dry out, the plant is receiving too much moisture.
Possible problems
The appearance of signs of infectious diseases
To prevent this phenomenon, it is recommended to disinfect the soil and pot in which cuttings will be planted or seeds will be sown (fungicide treatment, heat treatment). You can also disinfect seeds by placing them in a weak solution of potassium permanganate for a while.
Rotting of cuttings
This phenomenon is possible with excessive watering and irrigation.
Seeds don't sprout
This is possible if the seed was of poor quality or had been lying around for a long time. It is important to check the expiration date of seeds purchased in the store.
The plant does not bloom
After rooting the cuttings, geraniums should throw out the first flowers in the first summer.
The plant will bloom in full force after wintering. If the flowers were never released, then most likely the problem, oddly enough, is in the pot. An excessively large pot will encourage the geranium to actively develop its root system and grow foliage rather than buds. Therefore, it is necessary to transplant the flower into a smaller pot. And this fact must be taken into account when choosing a pot for planting a young plant.
How to pinch ampelous geraniums
If you had to take cuttings from a bush of a certain variety of geranium, then you don’t have to throw away the branches, but graft them onto another bush. The result is a plant that, at the time of flowering, will produce buds of different colors and shapes. The question arises: is it necessary to pinch ivy-leaved pelargonium?
You can, and in some cases even need to pinch, the plant. If the bush is powerful and large, but quickly loses leaves and for some reason does not bloom, then the procedure can save the situation. It is worth choosing autumn or winter for this purpose, so that the flower does not lose a lot of juice at the time of cutting.
Rules for pinching geraniums
You need to cut the branch and dry it slightly, treat it with a special product. Next, you should make a small notch into which a twig cut at an acute angle is inserted. Cover the area with a cloth adhesive tape. You will get homemade versions of the plant with original flowering.
Aftercare
It is recommended to grow ampelous geranium seedlings transplanted into individual pots in a bright place, but without direct sunlight on the foliage. The ideal option is north, north-west, north-east windows. The young plant is watered moderately and little by little.
Fertilizing is done with complex mineral fertilizers purchased in flower shops, from spring to autumn 2 - 3 times a month. The elements necessary for it are potassium, phosphorus, magnesium. It is not recommended to add organic fertilizers to containers with geraniums.
Propagation by cuttings and seeds are the two most popular methods of propagating ampelous geraniums, which also do not require special financial investments. The main conditions for success in this are the desire of the grower himself, the creation of comfortable conditions and proper care of the young plant.
Feeding ampelous pelargonium for lush flowering
After pruning, as well as during the active growing season, the plants must be fed with liquid mineral and organic fertilizers. And here you need to remember that the quality of flowering largely depends on the choice of mixture.
Nitrogen stimulates the growth of greenery and shoots. Sometimes, complaining that for some reason the leaves of pelargonium have turned yellow or the flower refuses to form buds, flower growers themselves are to blame for the problem by overfeeding the plants with nitrogen.
The “diet” for the formation of lush inflorescences is potassium and phosphorus. In addition, magnesium sulfate is a good help for pelargonium flowering. It turns out that the substance containing magnesium and sulfur not only has a beneficial effect on the quality of the harvest of garden crops, but also promotes the formation of lush, numerous inflorescences on all varieties of geraniums.
Fertilizers for pelargoniums are applied from spring until the beginning of the “wintering” period, when the plants are moved to a cool place.