The gloxinia flower reproduces in different ways. Seed allows you to breed a species plant and industrial cultivars. The author's varieties inherit the characteristics of the mother bush when rooting any vegetative organs. Gloxinia is most easily propagated by leaves or stem cuttings; dividing the tuber is a little more difficult. Planting flower stalks usually ends with the appearance of children only from specialists.
Ways to propagate a plant
The most recognized methods:
- Reproduction by leaf petioles.
- Propagation by seeds.
- Reproduction by dividing the tuber.
- Reproduction by peduncles.
Attention : A common method of propagation is rooting the leaf petiole.
Is it possible to plant Gloxinia outdoors in open ground?
Often, gardeners, with the onset of warm days, plant their home plants in the garden so that they decorate it with their unique and lush flowering. Is it possible to plant Gloxinia outdoors in open ground?
- Yes, you can. In open ground it is planted near light-loving plants, which shade the plant a little.
- Then the Gloxinia tubers do not need to be dug up; they overwinter in the ground.
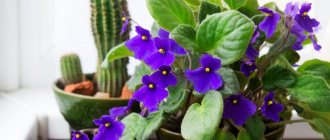
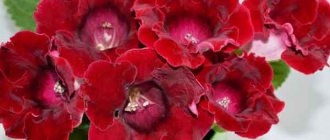
The Gloxinia flower is very beautiful. If you plant several pieces of different shades, then you will have a whole front garden on your windowsill or stand - beautiful and original. All your guests will admire and be delighted. It looks so gentle and unique.
Preparation
It is better to propagate synnengia by leaf in early summer, because... Fresh leaves have more strength at a given time. In addition, a young plant has a greater opportunity to form a tuber .
Preparation for propagation and cultivation at home:
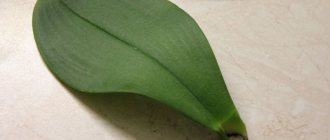
- From a healthy adult plant, cut a leaf taken from the base. (Petiole length is up to 5 centimeters.)
- Cut the petiole exactly across with a sterile blade or a sharp knife, so as not to introduce microbes and damage the plant itself, dip the tip in the phytohormone solution.
- Before planting, disinfect the soil with a solution of potassium permanganate or spill boiling water.
Choosing a pot
The pot in which the plant will be placed should have a diameter 4-5 centimeters wider than the tuber itself. Both clay and plastic pots are suitable for growing. The shape can be absolutely any. It is better not to plant tubers in a pot that is too wide or too narrow . If the container is too narrow, the plant will often dry out, since there is not enough soil in it. If, on the contrary, it is too wide, the plant will increase its leaf and root mass, postponing flowering for a long time.
You can read more about the rules for choosing a pot for gloxinia here.
Soil selection
The soil must be loose and have liquid permeability. Many gardeners prefer soil for violets. You should not use regular peat with a high degree of acidity, because gloxinia will grow poorly and will not produce flowers. Optimal:
- 1 part leaf soil;
- 0.5 parts of river sand;
- 1 part deoxidized peat.
Read about proper soil preparation for gloxinia in a separate article.
Possible difficulties
Even if, when propagating gloxinia by any of the possible methods, everything is done as correctly and step by step as possible, difficulties may still arise in the further growth and development of young plants.
Let's consider the most common problems of gloxinia reproduction:
- The rooted leaf petiole withers;
- the divisible leaf dries up;
- the leaf petiole produces roots, but does not form tubers;
- rotting of the root and ground parts of the plant due to deep penetration into the soil;
- drying of small tubers.
Step-by-step instructions on how to propagate correctly?
- We make drainage holes in a plastic cup and fill it with soil.
- We moisten the substrate and make indentations there at an angle of 45º using a pencil or an ice cream stick. (You can simply place the leaf in the soil at a 45º angle).
- We press down the earth around. We place the sheet so that the bottom surface faces the wall of the pot, and the base of the plate does not touch the soil.
- Cover the top of the glass with a bag without damaging the leaf.
- We place the mini-greenhouse in a bright, warm place without the risk of direct sunlight. The soil temperature should not fall below 16ºС.
- We ventilate the greenhouse once a day and water it when the soil dries out.
We recommend watching a video about propagating gloxinia using leaves:
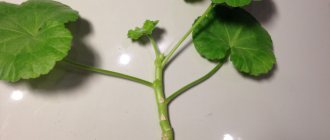
Reproduction of indoor gloxinia by stepsons
It happens that indoor gloxinia, during its emergence from hibernation, forms many basal shoots. And sometimes such sprouts - stepchildren - appear in the axils of the leaves. If you leave them all, the plant will not have enough strength and nutrition to develop normally and bloom magnificently. The strongest stepsons are left, 2 - 3 pieces, and the rest are removed.
Extra shoots are very good for propagating a bush, try rooting it.
You can place it in water until the roots appear, as when propagating with a peduncle. Or you can root immediately in a 50 ml cup of soil. The soil should be loose, moisture and breathable. Insert the stepson into slightly moistened soil, no deeper than 1 cm, cover the glass with film. Further rooting is similar to the previously described method using cuttings.
You can root the stepson in a peat tablet. Prepare a tablet, soak it in water, use a toothpick or a match to deepen a hole in the upper part of the tablet, and insert the gloxinia stepson into it to a depth of 1 cm. Keep the tablet in a greenhouse on a bright, warm window until signs of rooting appear.
Home care
In the first 1.5 - 2 months, the plant does not need to be fed. In the future, you can feed once every 10 days, but the concentration of the solution should be weaker.
Gloxinia is fed in cloudy weather or in the evening. An hour after watering, we apply fertilizer, trying not to get it on the leaves or at the growing point. Make sure that after fertilizing the plant is not in the sun .
Before the buds appear, organic fertilizers alternate with nitrogen fertilizers (ammonium nitrate); after the buds appear, organic fertilizers alternate with phosphorus fertilizers (potassium phosphate, superphosphate).
- Nitrogen fertilizers promote vegetative growth, but excess nitrogen can cause root rot. Therefore, such fertilizers are given only at the beginning of growth.
- Phosphorus - enhance flowering, but excess phosphorus leads to chlorosis of the plant.
- Microelements - affect the color and number of buds, the size of flowers.
Limited fertilizer - bird droppings.
After the third or fourth pair of leaves, young buds appear. The amount depends on the conditions and weight of the tuber. If the first flowering was early, gloxinia may bloom again . In such a case, cut off the above-ground part (flowers, leaves), leaving a shoot 2 centimeters long. Repeated flowering is not typical for all plant species and varieties.
In the fall, when it is clear that the soil does not dry out for a long time, we gradually reduce watering, and when yellowness appears on the leaves, we stop watering completely. When the above-ground part of the tuber dies, the plant enters a dormant period that lasts 3-4 months.
Tip : The tuber pot is placed in a cool place (+10 - +15 ºС). During the winter, the soil is moistened several times; if the storage temperature is higher, it needs to be moistened more often.
You can read about the wintering features of gloxinia here.
What to do before boarding
You can first achieve the appearance of roots. To do this, pour some boiled water into a small glass, where the leaf is placed.
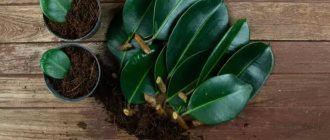
However, there is a second option, when landing occurs immediately. It is often recommended to choose this method. First, the leaf (if it is very large) is divided into three parts, or at least in half. The substrate should be slightly moistened.
When the leaf fragments are planted in a cup, it is best to organize greenhouse conditions for them by covering them with a plastic cup. Thanks to the moist soil, watering and ventilation are not necessary - the cuttings can live like this for about a month.
Thus, you can be sure that gloxinia will definitely be accepted, and at the same time not think about caring for it.
Young sprouts from fragments may appear as early as 1.5 months after planting. When there are no children for a long time, it is very simple to speed up this process as follows (only perhaps this is not earlier than a few months after rooting): the leaf breaks off so that about one centimeter remains on the tuber.
Then the glass is completely “hidden” in a plastic bag and placed in the place in the house where there is the most light. After germination of the sprout, the bag is removed.
Watering
During active growth, gloxinia is watered with settled water at room temperature , but you need to be careful, since the plant does not tolerate moisture due to its susceptibility to fungal diseases. Depending on the storage location, during the dormant period, watering is reduced or not moistened at all.
How to water young shoots?
Young shoots need to be watered with soft water (melt, rain, partially boiled). When watering, make sure that water does not get on the leaves or in the center of the tuber. Water is 2-3ºС warmer than the ambient temperature. We reduce watering in cloudy, cold, rainy weather, as well as during the dormant period.
Thus, now you know how to propagate gloxinia from leaves at home. When breeding Sinningia, it is very important to be patient and carefully care for the grown flower. Then, with careful care, creation of suitable conditions and timely feeding, the plant will delight you with delicate and velvety flowers, and will also reproduce successfully.
Problems you may encounter
- If the leaves of a flower turn yellow, you need to pay attention to watering, perhaps it is excessive. This can also be affected by a lack of nitrogen and too hard water.
- When leaves are discolored, this indicates a lack of magnesium.
- When spots appear on the leaves, you need to move the gloxinia further from the light, as this indicates excessive lighting. It could also be because it is watered with too cold water.
- If it doesn't bloom, it may be too saturated with nitrogen. In addition, this problem may arise due to lack of lighting or cold.
So, if you decide to grow this very beautiful flower on your windowsill, don’t be afraid, everything will definitely work out. Share the article with your friends on social networks - let there be even more beauty in this world. And by subscribing to my blog, you will definitely not miss the following interesting articles.
Marina Makarova
When is the best time to perform the procedure?
When exactly can you replant a houseplant after flowering? It is best to replant gloxinia in February or March, when the tubers begin to wake up. The kidneys are a signal that they have begun to wake up. If the plant was dormant in its own pot, then the first signal that it needs to be replanted is the appearance of the top. If gloxinia has just faded and needs to be replanted, then you need to either wait until the leaves wilt or carefully trim them with a sterile blade.