12/16/2018 Irina Malinina
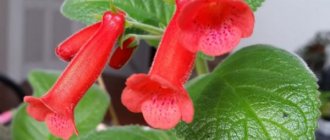
Delicate leaves and large flowers resembling bells are why flower growers love gloxinia. However, the plant does not always reciprocate, blooms little and sparsely, and sometimes simply dies. That is why caring for gloxinia must take into account a number of conditions and characteristics of the beautiful southern guest.
Our tips will help you design a living environment that is as close to natural conditions as possible. You can also learn how to properly care for this beauty so that it delights you with its lush, velvety foliage and clusters of bright inflorescences, and also outshines your other neighbors on the windowsill.
Content
- Place for gloxinia
- Soil for gloxinia
- Planting a tuber
- Growing temperature
- Air humidity
- Watering gloxinia
- Feeding with fertilizers
- Gloxinia flowering
- The rest period of gloxinia
- Reproduction of Gloxinia
- Growing problems
- Gloxinia diseases
- Gloxinia pests
From a botanical point of view, Gloxinia Sinningia, the taxonomy of Gesneriaceae has changed, but among flower growers, their favorite flowers are still called Gloxinia, Gloxinia and Gloxinia. Therefore, in order not to create confusion, we will keep the outdated name, but remember that its name is Sinningia the Beautiful - a popular indoor plant, unpretentious, blooming profusely.
Difference between Gloxinia and Synnengia
The reason for the confusion between Gloxinia and Sinningia is their strong external similarity.
The first name was given to the flower, discovered in 1785, in honor of the German botanist Benjamin Peter Gloksin. This type of plant had a scaly rhizome.
A few years later, another species of perennials from the Gesneriev family (with a tuberous root) was discovered. It got its name in honor of the Bonn gardener Wilhelm Sinning.
The reason for the confusion was the discovery of another plant species, which seemed to botanists to be similar to Gloxinia. It was called Gloxinia beautiful, despite the fact that it had a tuber instead of a scaly root.
Botanist's opinion
The only difference between Gloxinia and Synnigia is the type of root. In gloxinias, the root is a rhizome covered with scales, and in Sinningias it is a tuber.
Years later, it was decided to place it in the genus Sinningia due to the shape of the root. But by that time, many varieties for home breeding had been developed on its basis, all of them containing the name gloxinia in their names.
Therefore, today these two botanical terms are actually perceived as synonyms, although they are not so in essence. To combat confusion, the designation floristic gloxinia was invented.
Tydea are also sometimes classified as Gloxinias. But scientists have separated these flowers into an independent genus. The differences between them and gloxinias are in the shape of buds and roots.
Place for gloxinia
Gloxinia is photophilous, but it is better not to place it in direct sun, especially in the flowering phase, the flowers quickly fade and the flowering duration is greatly reduced.
In the spring, when the sun is not yet too hot, it will feel good on a southern window, but with the onset of June-July (depending on the climate zone), the plant will need to be moved to eastern or even western windows, or shaded from direct sunlight.
I do this: until the gloxinia grows and lays buds, it is in the brightest place, and when the first flowers bloom, I put it in a less lit and cooler place.
Gloxinia is a long-day plant; for normal growth and development it needs 12-14 hours of lighting of at least 5000 lux. With insufficient lighting, especially during the period of early growth, the plants become very elongated, which subsequently negatively affects the number of buds laid. There will be few of them, or maybe none at all. After the tuber has rooted and the leaves appear, the lighting should be as bright as possible, then the plant stem will be shorter, a lot of buds will form and gloxinia will delight you with abundant flowering. The intensity of the color of future flowers also depends on the illumination; in bright light, the flowers have a rich color, and in low light the color is noticeably paler.
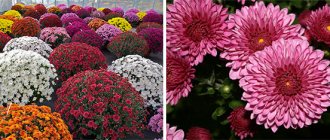
Gloxinia line 'Brocade'
Gloxinia line 'Brocade'
Gloxinia line 'Brocade'
Caring for gloxinia at home
Growing conditions
If you decide to grow gloxinia, provide it with a spacious place where bright, diffused light will fall: it needs twelve to fourteen hours of daylight, so during long nights, be prepared to provide the plant with additional lighting. There is an easy way to tell if a flower has enough light: if the dark green leaves are horizontal and the stem is short, there is no need to worry, but if the leaves and stem stretch upward, then the plant is not getting enough light.
However, remember: caring for gloxinia involves, first of all, protection from direct sunlight, which is detrimental to the plant.
And one more important point: no drafts! If you decide to keep the flower on the windowsill, you will have to forget about frequent ventilation. And the air humidity that gloxinia needs will have to be increased artificially by placing containers of water around the flower, since the plant does not like moisture on the leaves and flowers, which cannot be avoided when spraying.
As for the temperature, during the growing season gloxinia will be satisfied with the usual room temperature for this time of year, but during the dormant period it needs coolness - about 10 ºC. Observe the plant, and it will tell you what changes in care it needs: overheating causes gloxinia leaves to stretch upward, but if the leaves are lowered below the edge of the pot, the flower freezes.
Watering
During the growing season, water gloxinia in a tray or by overhead watering, being careful not to wet either the leaves or flowers. Between waterings, the top layer of the substrate should dry out. At the end of August, the intervals between waterings are increased so that the plant gradually enters a dormant period until the end of October. Both overwatering and underwatering should be avoided. Water the gloxinia with settled or filtered water a degree or two warmer than room temperature.
- Bacopa: growing from seeds, types and varieties
Fertilizer
During the period of active growth, gloxinia is fed once a decade with a complete complex fertilizer for ornamental flowering plants. In mid-August, feeding is stopped. If you neglect the application of fertilizers, problems may arise with both growth and flowering: growth slows down, the buds become smaller, the color of the flowers fades, causing the decorative appearance of the plant to suffer, and the flowering period becomes much shorter.
Sometimes the plant suffers from a lack of boron. This becomes noticeable in the summer with maximum daylight: deep notches appear along the edge of the leaf blade. In this case, you need to foliar feed gloxinia with a two percent borax solution. And let me remind you that excess fertilizer is much more dangerous for the plant than its lack, so try to observe moderation in this matter.
Landing
Every year, at the end of the rest period, the gloxinia is transplanted into a new pot. The soil mixture used is the same as for begonias and violets. It can be purchased at the store, or you can make it yourself from two parts of leaf, one part of humus soil and one part of sand.
So, in February, gloxinia tubers are taken out of the pot along with a lump of earth and transferred to a new pot, slightly larger than the previous one, in which a layer of drainage is first laid, and a layer of soil is placed on top of it. Then the substrate is gradually added and compacted. As a result, the tuber should only be buried halfway into the substrate. The same principle applies to the initial planting of gloxinia.
Gloxinia has faded - what to do?
When gloxinia has bloomed (usually this happens in May-June), cut off the stem and almost all the leaves, leaving only 2-4 lower leaves on the plant, in the axils of which stepsons will soon appear, of which you will leave a couple of the strongest ones and remove the rest . At this time, it is advisable to fertilize the flower with fertilizers for growth, and a month later, when the buds appear, you need to introduce fertilizers for flowering.
The second bloom most likely won't be as lush as the first, but that's normal. Sometimes gloxinia blooms all summer, and the question of re-blooming disappears. When gloxinia has completely faded, you need to gradually reduce watering and stop feeding, wait until the leaves turn yellow and dry, then cut off the tops, leaving a stump of 1-2 cm above the tuber.
Soil for gloxinia
You can use a mixture of leaf, peat soil and sand (1:1:0.5), but the composition may be different, the main condition is that the soil is loose and breathable. Acidity pH 5.5 - 6.5; gloxinia grows poorly on more acidic soils and for this reason pure, non-deoxidized peat is not suitable for it. Before planting the plant, I strongly recommend disinfecting the soil. Now I use the drug Maxim (1 ampoule per 2 liters of water).
Wide and shallow dishes are more suitable for growing gloxinia. For young tubers, pots with a diameter of 7-10 cm are suitable, and for larger and older ones 11-15 cm. Pots can be either plastic or clay.
Transfer
The indoor gloxinia flower requires replanting every year when the dormant period begins. We need to prepare a new pot. The soil used for transplanting violets and begonias is suitable. Ready-made soil can be purchased at a flower shop. If desired, prepare the soil mixture yourself. To do this, you will need to mix one part of humus and sand with two parts of leaf soil.
It is best to transplant in January or February. The plant is removed from the old pot along with a lump of earth at the roots. It needs to be transferred to a new prepared container. The container should be only slightly larger than the original pot.
A high-quality drainage layer is created at the bottom. A thin layer of prepared soil is poured onto it. Next, the plant is installed in the pot. Its roots are sprinkled with substrate, slightly compacting the soil. They should only be half immersed in the ground. The same principle applies to the initial planting of a flower.
Planting a tuber
In February - March, less often January (it all depends on the storage temperature) the tuber begins to germinate. If it was stored in a pot with old soil, you need to take it out and clean it of the remnants of last year’s roots and soil. Disinfect in a pink solution of potassium permanganate (30 min) or in any fungicide solution. For faster root formation, the tuber is soaked in a heteroauxin solution for 18-24 hours (making sure that the solution does not get into the recess of the tuber), but this is not necessary. The tuber is planted in the ground with the depression upward and sprinkled with soil no more than 1 cm. There must be drainage at the bottom of the pot (foam plastic, expanded clay, crushed stone chips, etc.). The higher the pot, the more drainage (up to 1/3).
During the period of tuber germination there are always the greatest losses and they are associated with waterlogging of the soil, as a result of which the tuber rots. Since the development of roots is preceded by the formation of the above-ground part, watering should be very careful along the edge of the pot or into the tray and only until the soil is lightly moistened. To avoid unwanted losses I do this:
I plant the tuber in moist soil level with it, place the pot in a bag and place it in a bright place without direct sunlight (22-25 degrees). I ventilate once a day for 10-15 minutes. After the first pair of leaves appear, I open the top of the bag and acclimate the young plant to room conditions for 3-4 days, then remove the bag completely. As the stem grows, I add soil and cover the tuber by 1-2 cm. While the plant is in the bag, there is no need to water it, the soil remains evenly moist and loose, increased air humidity and heat are maintained, the roots grow faster and there is almost no loss.
Gloxinia - brief characteristics of the plant
The homeland of the perennial Gesneriev family is South and Central American territories. In the wild, the plant lives on rocks, along river banks, and in damp deciduous forests. In general, where it is warm, humid and very light.
The flower was named in honor of Benjamin Gloksin, a famous German botanist. In the scientific literature you can find another name for the plant - Sinningia - named after the American breeder Wilhelm Sinning, to whom we owe the variety of varieties of domestic flowers.
The indoor plant has small shoots, a tuberous root, and velvety leaves of a rich green color. The flowers are shaped like bells, grow singly or in bunches, and can be regular or double. The color is varied: from white to purple. Some varieties have speckles, others have a noticeable edging of the petals.
The buds themselves are quite large - up to 5 cm in length, up to 7 cm in diameter. The number of flowers on one small shrub can reach 40 pieces. That is, a real bouquet in one pot! Currently, there are about 25 varieties of gloxinia, but gardeners most often work with two species.
Gloxinia regal
The small bush has thickened 10-centimeter shoots. The leaves are dark green, with an edge, at the top they are dotted with silver veins, at the bottom - light red. The leaves are oval-shaped, large (up to 200 mm in length), arranged oppositely in four to six pieces.
Bell flowers are also impressive in size (diameter up to 7 cm). Their color is usually dark purple, although there are hybrid varieties with inflorescences of other shades.
Gloxinia is beautiful
This variety is distinguished by a dense, scaly rhizome, very small shoots (which makes the plant look squat), and wide, oval-shaped leaves that begin to taper towards the base. The leaf blades are usually light green in color.
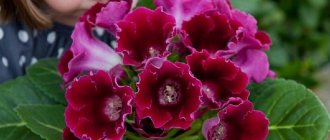
However, the most important thing is, of course, the flowers. They can be different - large and small, drooping and sticking up, bell-shaped and funnel-shaped... The riot of colors is also amazing: red, white, purple, lilac, etc.
The flower has a huge number of hybrid forms, differing, among other things, in the color of the buds. Thus, Gloxinia Scarlet enchants with scarlet flowers, Red Storm amazes with dark red buds reminiscent of roses. There is also Zephyr with soft pink petals and Southern Night with almost black inflorescences.
Growing temperature
At the stage of tuber germination after a dormant period, it is necessary to maintain a temperature of about +25 degrees. After rooting and with the beginning of the growth of the vegetative mass, the temperature is reduced to +22 degrees during the day and +18 at night. Lowering the temperature is necessary so that in conditions of insufficient light (in February-March there is not enough light) the plants do not grow too rapidly and do not stretch out. The temperature does not need to be reduced, but in this case the plants need additional lighting.
During the growing season, the temperature should not fall below 18 degrees Celsius. Lower temperatures (from +15 - +20) slow down the growth and development of the plant. The optimal temperature for the growth and development of gloxinia ranges from +22 to +26 degrees.
During the active growing season, a short-term increase in temperature to +28 degrees is allowed, but at higher temperatures few buds are formed. If elevated temperatures persist for a long time, then gloxinia begins a period of stagnation, i.e. growth and development stop, and blooming flowers last no more than 3 days. Thus, we can conclude that high temperatures for gloxinia are even more destructive than excess lighting.
Gloxinia line 'Avanti'
Gloxinia line 'Avanti'
Gloxinia line 'Avanti'
Air humidity
Air humidity should be in the range of 70-80%, but gloxinia feels good even at a lower humidity of 50%, however, even lower humidity is undesirable, the plant develops poorly, growth slows down and deformation of the leaves occurs. The edges of the leaf blade are bent downwards.
To increase air humidity, you can place the plant on trays with wet expanded clay, moss, water, but gloxinia itself cannot be sprayed because brown, dry spots form. However, away from light and drafts, gloxinia tolerates water treatments very well. At night, you can take it into the bathroom, spray it or wash it with warm water and leave it there with the doors closed and the lights off until the water on the leaves has completely dried.
Possible difficulties and problems
Unfortunately, it is not always possible to immediately “make friends” with a capricious southern beauty. Sometimes some difficulties arise, and at various stages of cultivation. It is necessary to prepare for possible problems and know how to solve them.
Table 2. Possible problems and solutions.
| Problem | Possible reason | Solutions |
| Tuber does not wake up after hibernation | Improper storage, as a result of which the tuber dies. | Remove the tuber from the soil or bag and inspect. If it wrinkles or turns dark brown, it is better to throw it away. The living rhizome is pinkish in color. |
| Pulling out shoots | Too high temperature and lack of light. | Spray the air next to the pot more often, place the container on a tray with moistened expanded clay. Place the flower in a more illuminated place. |
| Slow growth | Cool indoor climate or poor soil quality. | Replant the bush in new soil and increase the temperature in the room. |
| Flowers don't bloom | Lack of nutrients or drafts in the room. | Feed the plant regularly, and also remove the pot to a place protected from drafts. |
| Lack of flowers | Excess nitrogen compounds in the soil, lack of light. | Avoid fertilizers that contain nitrogen. If this does not help, then move the pot to a bright place. |
| The foliage dries and fades | Rare watering or tuber rotting. | Increase the amount of watering. If this is not the reason, then inspect the tuber and remove the affected areas. |
Watering gloxinia
For irrigation, you need to use soft water (melt, rain, filtered or partially boiled), chlorinated tap water must first be left for at least a day.
It is better to water from a tray or carefully along the edge of the pot, avoiding water getting on the leaves and in the center of the tuber (where the sprouts come from). in most cases, not from the roots, but from above, from the growing point, the tuber begins to rot. The water for irrigation should be warm, but if gloxinia is at a temperature of +18 degrees, this does not mean at all that you need to water it with water at a temperature of +25 degrees, nothing good will come of it. The water should be 2-3 degrees higher than the ambient air temperature. 20-30 minutes after watering, drain the remaining water from the tray.
Between waterings you need to dry out the soil. It is necessary to reduce the frequency of watering in rainy, cloudy and cold weather. At this time, the soil does not dry out for a long time, and the roots can rot from excess moisture.
Diseases and pests
Gloxinia, like other decorative indoor flowers, are susceptible to various diseases that arise as a result of improper care or infection with infectious agents. You need to know your enemies by sight, so let's look at the most common diseases of houseplants.
- Anthracnose. This disease is the result of fungal activity. Signs of the disease are the appearance of brown spots on the leaves and shoots of the plant. Most often, this problem occurs due to a lack of minerals, high humidity, and injury to the flower. The affected gloxinia is treated with drugs (Cuproxate, copper oxychloride). If the disease has gone too far, the plant is destroyed.
- Powdery mildew. Another disease of a fungal nature. It appears as a powdery whitish coating on the foliage and stems. Reasons: excessive moisture, hypothermia, damp climate, untreated equipment. If the symptoms are not too severe, fungicides will help. In advanced situations, only destroying the flower will help.
- Phyllosticosis. This disease appears as dark round spots with a brown core. Then, ruptures form at the site of the affected areas. The main reason is excess moisture. The plant must be dried and then treated with copper-based products (vitriol, copper oxychloride, etc.).
- Late blight. This is the most dangerous disease. Risk factors include fungal-contaminated soil, tools, seeds or shoots, rainwater, and high humidity. Signs: brown spots with a greenish edging, mold on the leaves, drying of the leaf blades, wilting of the stems. It is impossible to cure the disease; the infected plant will have to be destroyed.
Pests can also harm gloxinia. The most popular of them are thrips. These small insects infect the leaves of the plant, which dies without proper treatment. In addition to thrips, the southern guest is attacked by cyclamen and spider mites.
Feeding with fertilizers
After planting the tuber, there is no need to feed gloxinia for the first 1.5 - 2 months. Fertilizers are applied an hour after the main watering, along the edges of the pot, making sure that the solution does not get on the leaves or at the growing point. It is advisable to do this in cloudy weather or in the evening, so that after feeding the plant is not in the sun. Fertilizing with complete mineral fertilizer alternates with organic fertilizers every two weeks, but the first fertilizing should be mineral.
Lack of iron in gloxinia (photo by Tideya)
You can feed once every 10 days, but then make the solution concentration weaker.
Before the appearance of buds, organic matter is alternated with nitrogen: (potassium nitrate, ammonium nitrate). With the appearance of buds, organic matter is alternated with phosphorus: superphosphate, potassium phosphate), if this is not done, dormant vegetative buds will awaken, which will lead to a suspension of the normal development of the plant.
- Nitrogen fertilizers cause increased vegetative growth; if they are in excess, flower buds are almost not formed. Excess nitrogen can also cause root rot. For this reason, nitrogen fertilizers are given only at the beginning of growth.
- Phosphorus fertilizers - enhance flowering, but their... excess causes premature aging of leaves and leads to chlorosis of the plant.
- Potassium fertilizers improve flowering. Excess leads to the formation of shortened peduncles, yellowing of the lower leaves, and deterioration of flower color.
- Microelements - affect the size of flowers, their color and the number of buds.
Organic fertilizers for tuberous flowers
Bird droppings
Manure is a very potent fertilizer and when using it, the concentration should be strictly observed. Pour 1 tablespoon of litter into 2 liters of water, close the lid and place in a warm and dark place. Over the next 3-4 days, stir with a stick until fermentation begins (bubbles appear on the surface). After the fermentation process is complete (about a week), the bubbles disappear, solid particles settle to the bottom of the jar, and the solution becomes lighter. It is now ready for use.
250 ml of concentrated solution is poured into 1 liter of water and mixed well; the plants are watered with this solution after preliminary moistening. (one hour after the main watering).
You can simply buy ready-made organic fertilizer.
Mineral fertilizer for tuberous flowers
for 10 liters of water take:
- 10 g simple superphosphate
- 10 g potassium chloride
- 4 g ammonium nitrate
- 5 g magnesium sulfate
- 0.1 g ferric chloride
- 0.07 g boric acid
- 0.004 g copper sulfate
- 0.05 g manganese sulfate
- 0.008 g of zinc sulfate.
If you can’t or are too lazy to look for everything separately, then just buy phosphorus-potassium mineral fertilizer and microelements.
I use Uniflor - flower, Uniflor-bud or Baby (dry, granulated for peppers and tomatoes) as phosphorus-potassium, Uniflor - growth, Uniflor - green leaf as nitrogen and Uniflor-micro as microelements.
After flowering, feed 2 times with potassium-phosphorus fertilizers with an interval of 14 days. This will help the tuber regain strength and survive the dormant period well.
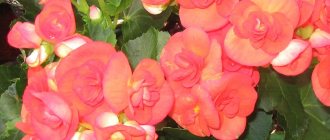
Gloxinia hybrids F1
Gloxinia hybrids F1
Gloxinia hybrids F1
Gloxinia flowering
In a properly grown plant, buds are formed after the third or fourth pair of leaves. Their quantity depends primarily on the mass of the tuber and growing conditions (light, temperature, humidity).
Gloxinia can bloom again (for example, hybrids “Avanti” and “Brocade”) if the first flowering was early. In this case, the above-ground part (stem and leaves) is cut off, leaving a shoot about 2 cm high. Soon, gloxinia develops side shoots of the second generation (second growth) on which buds are laid, the plants bloom, but not as profusely as during primary flowering. Flowers are smaller in size.
Repeated flowering is not typical for all species and varieties of gloxinia; for example, the side shoots of the summer generation of the Kaiser Friedrich variety develop slowly, by the end of summer they manage to acquire leaves, but do not enter the budding and flowering phase.
The rest period of gloxinia
In the fall (September - October), when it becomes clear that the soil does not dry out for a long time after watering, watering is reduced, and after the leaves begin to turn yellow or dry out, they stop watering altogether. After the above-ground part of the plant completely dies off, the tuber goes into a dormant state, which lasts 3-4 months depending on the storage temperature.
Tubers are stored in several ways:
- The pot with the tuber is placed in a cool place with a temperature of +10 to +15 degrees. During the winter, the soil is slightly moistened several times so that the tubers do not dry out and become very wrinkled, especially if the tubers are small, they are stored worse because they dry out quickly. If the storage temperature is higher, then you need to moisten more often.
- 2 weeks after the above-ground mass has completely died, the tubers are dug up, cleaned of remaining roots and placed in damp sand and stored in a cool place. This method is convenient because at any time you can easily remove the tubers from the sand and inspect their condition.
This is how I store them: I dig up the tubers, place them in damp sawdust or sand and store them on the bottom or middle shelf of the refrigerator door.
Once a month I take out and inspect the tubers; if the sawdust dries out, I lightly moisten them and place the tubers there again. According to literary data, as well as based on data from Internet resources, storage temperatures below +8 degrees are detrimental for gloxinia. Based on my many years of experience, I cannot agree with this, the refrigerator is only +5, but I have never had any losses. The main condition is not to over-moisten the substrate in which the tubers are stored; it should only be slightly damp, and the sand can be completely dry.
Reproduction of Gloxinia
Gloxinias are easily propagated by seeds, leaf and stem cuttings, part of the leaf blade, peduncle and tuber division. Seed propagation is mainly for gloxinia species; you can get a lot of young plants at once and it is not advisable for varietal and hybrid ones; Character splitting may occur at the genetic level, which manifests itself in the external appearance of the plant. There is no guarantee that you will receive a plant with the original parental characteristics.
Sowing Gloxinia seeds
Sowing is carried out at the end of January - February (with mandatory additional lighting with fluorescent lamps) or in March. Seeds germinate in the light, they are sown superficially on a moist substrate (the composition is the same as for planting tubers), lightly pressed against it and covered with glass or film. The bowl with the crops is placed in a bright place. At a temperature of 24-26 degrees, germination begins 12-14 days from the moment of sowing; at lower temperatures it takes up to one month or even longer. Caring for crops comes down to maintaining temperature and humidity, preventing the soil from drying out. If there is a need to moisten the soil, this should be done from a pallet. There is no need to water from above because the seeds are small and can be easily washed off with water.
About a month after the appearance of the cotyledons, you can make the first pick, especially if the crops are thickened. They dive according to the 2*2 cm pattern into light soil. Another month, after the first pair of true leaves appear, the young plants are picked again or immediately planted in separate pots with a diameter of 6 cm (cactus). The temperature is maintained at least +20 degrees. Gloxinia tolerates picking well, and after it begins to grow intensively.
I do this: if the seeds are granular, I place them at a distance of 4*4 cm from each other in order to avoid picking in the cotyledon phase in the future. I put the bowl with the crops in a transparent cake box, and they remain there until 1-2 pairs of true leaves appear. After that, I plant them in separate pots and again put them in this mini greenhouse for 2 weeks for rooting and survival. In the future, I will accustom them to the open air of the room and, if necessary, transfer them to larger pots. My seedlings bloom 4-5 months after germination. Gloxinias grown from seeds may not have a dormant period in the first year, and will vegetate (continue to grow) all winter.
How to get gloxinia seeds
On the second day of flowering, after the flower blooms, take a soft brush and transfer the pollen to the stigma. The next day, to better guarantee pollination, repeat this procedure. If pollination has occurred, the perianth falls off after a few days, the ovary begins to grow, and along with it the receptacle noticeably thickens. The former flower, now an unripe dark green fruit, does not dry out for a long time. Seed ripening lasts 1.5 - 2 months and it is uneven, i.e. the seeds do not ripen at the same time in the box. After the fruit (box) opens, bring a piece of paper and, tapping the peduncle, shake out the seeds. After a couple of days, collect the seeds again. The seeds are very small, dust-like. Germination remains for 2-3 years. Germination is good. Normally, a plant should have no more than 3 seed capsules. If the plant is young or the tuber is of insufficient weight and size, limit yourself to one fruit and remove the excess ones.
Vegetative propagation of gloxinia
Vegetative propagation is the most common method; it is the simplest and most accessible. If rooting occurs in spring or in the first half of summer, then flowering can be seen from the resulting young plants in the same season.
Propagation of gloxinia by leaf cuttings
In the budding phase or during flowering, cut off the leaf of the lower tier of the rosette (young, upper leaves should not be taken). It is desirable that the petiole be short and thick; the size of the resulting tuber will depend on the diameter of the petiole. Next, you can proceed in a way convenient for you:
- Immerse the cutting in water to a depth of 1 - 1.5 cm and hold it until roots form (there is no need to change the water, just add if necessary), then plant it in the ground to a depth of 2-2.5 cm. For better survival of the cutting in the soil, it can be cover with a jar or bag.
- The cuttings are dipped in charcoal powder and planted in moist soil. Cover the top with a glass jar. At a temperature not lower than +22 degrees, rooting occurs within 2-3 weeks, then the jar can be removed. A little trick: if you only have one leaf, but you need to get two tubers, split the base of the petiole lengthwise to a length of 1 - 1.5 cm; after rooting, 2 smaller nodules will form.
Propagation of gloxinia by stem cuttings
If a gloxinia tuber has many side shoots, leave 1-2 and break out the rest. Stem cuttings are essentially finished plants, but without roots. They are rooted in the same way as leafy ones and they bloom in the same season.
Reproduction of gloxinia by leaf blade
- Cut off the large leaf at the base of the rosette. On the back of the leaf blade, make cuts across the protruding veins in the thickest places. Place the sheet on moist soil, press it to the soil in the places where the cuts are made and cover it with a bag or place it in a greenhouse. Roots will soon appear in the places where the cuts are made, and then nodules will form. It is important to maintain high humidity.
- The leaf plate is cut crosswise into 2-3 parts depending on the size of the leaf and each part is planted in soil or sand, covered with a jar or bag to maintain moisture. Root at a temperature not lower than +22 degrees. Optimal is about +25.
Reproduction of gloxinia by peduncle
It should be mentioned that not all gloxinia varieties can be propagated in this way. Some varieties take root well with peduncles, while others do not take root at all.
After the corolla has withered, the peduncle is broken out and placed 1 - 1.5 cm in water and care is taken that it does not touch the walls of the vessel. Do not change the water, add as it evaporates. After about a month, roots and a nodule form on it. After this, the peduncle is planted in moist soil to a depth of 1.5 - 2 cm. Care as for leaf cuttings.
Reproduction of gloxinia by tuber division
Large tubers that have more than two sprouts can be divided. The tuber is cut into pieces so that each of them contains at least one sprout. Sections of parts of the tuber are sprinkled with crushed charcoal, dried for 3-4 days in a dark place at room temperature and then planted in moist soil. Further care is similar to caring for a whole tuber after planting.
Types and hybrid varieties of gloxinia: photos, names and descriptions
Under natural conditions, up to 25 species of gloxinia flowers grow, but only two of them are cultivated by gardeners - gloxinia beautiful and gloxinia royal.
Distinctive features of Gloxinia beautiful are the absence of a pronounced stem, as well as wide, oval-shaped leaves located on not very long petioles, painted in a bright green color. On their surface there is dense, short-length pubescence, and clearly visible relief “patterns” of veins. The flowers of the plant are tubular, wide, directed upward. In appearance they resemble bells.
They are painted in shades of white, blue, pink, violet, purple, and come in double and non-double.
Various color variations of this species of gloxinia are presented in the photo - look and appreciate their unsurpassed tenderness and charm.
Representatives of Gloxinia royal , unlike the previous species, have thickened stems that rise 10-15 cm. Each stem contains 4-6 pairs of leaves, which, like Gloxinia beautiful, have the shape of wide ovals, a rich green tint and a velvety surface.
The flowers of wild plants resemble slightly drooping bells and are exclusively purple in color. In hybrid forms bred by breeders, flowers have different shapes and shades. The maximum length of the peduncle can be about 20 cm.
Representatives of the Gloxinia flower species with the name royal can be seen in the photos below:
It was from the plants of the two species described above that breeders obtained the modern varietal variety of these delicate flowers. Work on developing new hybrids does not stop today.
In addition to scientists, amateur gardeners are also working on creating exclusive forms of gloxinia. Hybrid varieties are usually classified as follows:
- By size: tall (over 30 cm), medium tall (approximately 30 cm), short (less than 30 cm).
- By type of color: with a uniform monochromatic color, with a calico color (the petals are dotted with contrasting spots of the same size), with a tiger color (the petals in the central part are covered with dots, have a bright frame along the rim).
- According to the texture of the petals: terry, non-double (simple).
Descriptions of hybrid gloxinia varieties, their names and photos are presented to your attention below - read the information provided and choose the most successful specimens for your home greenhouse:
Josephine is the name of a hybrid gloxinia variety that is incredibly popular among amateur and professional gardeners. The color of the plant is not double. Gramophone flowers are large, painted red and white, with slightly ruffled petals at the edges. The color of the variety is always abundant - about 20 incredibly beautiful buds bloom simultaneously on one bush.
Yesenia is a Dutch hybrid that is cultivated on a massive scale in many countries around the world. The bushes are medium-sized and large, reaching a height of 30 cm or more. Rosettes are formed from leaves on short petioles. Above them are peduncles.
The description of the flowers of this variety of gloxinia is as follows: they are similar in shape to roses, double, colored in crimson and crimson tones. When they open completely, a pink or white border becomes visible along the edge of each petal.
Hollywood is a Gloxinia hybrid, the hallmark of which is velvet flowers with the finest petals. They have a dark or light purple color. The neck of the tubular flower is deep and, regardless of the tone of the petals, it always has a lemon color and is dotted with purple dots. The Hollywood plant blooms very luxuriantly and abundantly. The color rises proudly above a rosette of bright green leaves.
Study the specifics of this gloxinia variety with the help of photos and make sure of its high decorative value.
Kaiser Wilhelm is a variety of non-double flowers of a rich purple hue, in which the core is light, dotted with dark spots, and the edges of the petals are decorated with a white frame. Peduncles rise above a rosette of velvety foliage, not very dense in structure. When the bud finally opens, it has a wavy appearance. If the plant is properly cared for, it will delight its owner with abundant flowering.
As you can see in the photo, the Gloxinia variety called Kaiser Wilhelm slightly changes its color under bright lighting - the purple color becomes less rich and deep.
Prince Albert is a hybrid, like the previous one, having simple non-double flowers. But despite this, they look incredibly impressive; it’s not for nothing that the plant received the name of one of the representatives of the royal dynasty. The flowers are tubular, have deep necks, and are painted a thick purple-black color along their entire length. Only in the very center of the neck is a light yellow spot dotted with purple patches.
The petals have wavy edges. Peduncles rise above a rosette of leaves, the diameter of which is about 25 cm.
After reading the description of the Gloxinia Prince Albert variety, look at the photo to study in detail the specifics of the plant and its unique color.
Cleopatra is a representative of hybrid varieties whose double flowers have a spectacular chintz color. Their petals are corrugated at the edges, large in size, painted white, dotted very densely with peas - lilac and purple. The neck has a slightly pink tint, decorated with crimson-crimson spotting.
The peduncles are short, the leaves are large. If the care of the indoor ornamental plant - Gloxinia variety Cleopatra - is correct, then it pleases the eye with abundant bouquet flowering.
Anfisa is a hybrid variety belonging to the tiger family. Flowers are a true masterpiece of breeding work. They have a pinkish tint, each petal has a berry-red border. Both the petals and the neck are abundantly dotted with spots of various sizes. The peduncles are short, the rosette is low, and has insignificant volume.
The variety of hybrids created by breeders is not limited to those described above. Among the popular names of gloxinia varieties bred from the species discussed at the very beginning are:
Winter cherry
Shagane
Violacea
Blanche de Meru
Black Hollywood
Scarlet
And many others. These Gloxinia hybrids delight gardeners with single and double flowers of red, white, various shades of pink and purple, as well as two-color combinations.
Possible failures when growing gloxinia
A tuber has not formed - this can happen when planting a very long stem cutting or if the cutting was planted very deeply and was watered abundantly.
The buds turn black and die - the reason is a lack of micronutrients and shortened daylight hours.
Redness of the leaves is a lack of phosphorus.
Yellowing of leaves - lack of nitrogen or overwatering.
Leaf discoloration is a magnesium deficiency.
Curling leaves - insufficient air humidity.
Spotting (non-infectious). There are yellow or brown spots of indefinite shape on the leaves - too bright lighting, drafts or watering with cold water.
Curling of flowers, slowing down of plant growth - temperature below +15 degrees.
Curling of the edges of the leaves and their arching, the formation of deformed flowers and shortened pedicels is an excess of moisture in the soil.
Rotting of petioles and buds - excessive soil acidity, excess nitrogen fertilizers, waterlogging of the soil.
The plant does not bloom - insufficient lighting, lack of nutrition, dry or cold air, improper maintenance during the dormant period, excess nitrogen fertilizers.
Possible errors and their consequences
Let's consider the consequences of improper feeding of gloxinia:
An excess of nitrogen leads to the growth of abundant greenery and lack of flowering, and exposes plants to fungal infections and putrefactive processes.- Lack of nitrogen makes the plant frail and underdeveloped.
- An excess of any mineral contributes to stunted growth, death of leaves and inability of roots to absorb.
- A lack of one or another mineral leads to poor development, changes in leaf color, fungal diseases and lack of flowering (read about what leaf diseases there are in gloxinia and how treatment is carried out here).
If too large a dose of fertilizer is mistakenly applied, then you need to transplant the gloxinia into another soil (you can find out in what cases it is necessary to transplant gloxinia and how to do it correctly here).
Our experts have prepared other materials on growing gloxinia, as well as methods of flower propagation:
- leaf cuttings;
- seeds.
Gloxinia diseases
- Tuber rotting. Occurs when overwatering. At the initial stage, the disease is manifested by a decrease in leaf turgor; after watering, turgor is not restored. If the tuber is severely damaged, gloxinia droops completely. Leaf cuttings need to be cut and re-rooted. If the tuber has rotted away from the growing point, then the rotten parts are cut off to healthy tissue, disinfected in a strong solution of potassium permanganate or another fungicide, powdered with crushed coal and dried for 2-3 days, after which they are planted again in moist soil.
- Late blight. It is the most common disease of the Gesneriaceae family. It develops quickly and leads to the sudden death of gloxinia. It begins with slight wilting, then the growth of the stem stops and its color changes. After watering, the leaves wither even more, the base of the stem begins to rot, spreading to the petioles and leaves. An attempt to preserve the plant is unsuccessful; cut leaf cuttings do not take root and quickly turn black and rot. The plant must be destroyed along with the soil.
- Fusarium. The plant becomes infected through the soil. Leaves turn brown, curl and wilt. Dark stripes and cracks form on the stem. The defeat of a plant by fusarium is promoted by excessive watering and constant soil moisture.
More details fusarium
general information
Gloxinia belongs to the large Gesneriaceae family, which includes Chrysothemis, Koleria, Gesneria and Streptocarpus. This is a spectacular tropical perennial that came to us from Central and South America. Most often in its natural environment it is found in Brazilian and Peruvian forests, in the mountains of Mexico and in the Andes.
Gloxinia received its unusual name in honor of the physician and botanist from Alsace, Benjamin Gloxin. The second name is Sinningia, and this is another most important name in the history of floriculture. Wilhelm Sinning is a horticulturist at Boston University who has developed many new varieties and species of flowering plants, including the domestic hybrid Gloxinia.
Photo: 2sotki.ru