The peculiarities of orchid reproduction are inherent in the structure of its seed and the complex development cycle of the plant in nature. This knowledge, coupled with patience and hard work, will help you grow this beautiful tropical flower at home.
How consistent are they with the fact that these are orchid seeds? Well-known Chinese websites offer seeds that, even in appearance, cannot be classified as orchid seeds :
- They are large and small;
- Black and brown, etc.
“Orchid seeds” from China often turn out to be seeds of completely different plants.
In order not to be deceived in your expectations, you need to know what orchid seeds look like .
Is it possible to cultivate like this?
If you are lucky enough to get real orchid seeds from a Chinese website, then theoretically you can grow an orchid from it. But, unfortunately, this is a very long and labor-intensive process. You will have to purchase the necessary equipment and materials, maintain sterility and the desired temperature. Some gardeners jokingly call all this a real laboratory. In addition, you will have to wait a long time for the result.
REFERENCE: a planted seed can turn into a full-fledged adult orchid flower in 4-6 years.
Peculiarities
When ordering seeds from China, you can often encounter unscrupulous sellers who pass off seeds of other plants and even lawn grass or weed seeds as orchid seeds.
In this case, many people feel sorry for the time and labor spent on trying to grow, and they become disillusioned with this idea. But, fortunately, they are inexpensive and if you have a strong desire to try growing them, you can order them again. After all, if you manage to grow a flower yourself, you will receive incomparable pleasure watching its growth, and then a beautiful adult blooming orchid.
Reviews
Anna. On the Weekend deal website (China) I saw orchid seeds of all colors. I decided to try growing it myself! The order arrived quickly, but the seeds were clearly not orchids, just some small balls. She planted it in the ground and began to wait. After about a week, shoots appeared. They grew and it became clear that these were not orchids.
Christina. There are no traces of orchid seeds on Aliexpress!
Olga. You can now buy anything you want via the Internet. I ordered orchid seeds and they arrived. I planted it, but something incomprehensible grew, just some new species, but definitely not the orchid that I expected!
How do they look?
Orchid seeds are very small and can easily be mistaken for dust. Their size is 15 thousand times smaller than the size of a wheat grain. In addition, they, unlike other seeds of most crops that have a reserve of nutrients or endosperm, have it in negligible quantities in the embryo.
How do such vulnerable seeds exist in nature and enable orchids to reproduce? It's a matter of their quantity. One orchid flower can produce from 3 to 5 million seeds and due to their small weight and size, they are easily carried by the wind, settling on the bark of trees. However, not all of them will be destined to turn into adult flowers; only a few of those attached to the tree will do this. Such is the harshness of natural selection.
How to check the authenticity of a purchase?
After receiving the seeds, open the package and study the received material before properly planting the seeds at home. Remember that real seeds should:
- be very small, resembling dust (their sizes range from 0.35-3.30 mm in length and 0.08-0.30 mm in width);
- cream, beige or light brown;
- have a narrow, elongated shape.
IMPORTANT! If, after unpacking the seeds received from China, you find grains similar to buckwheat or any other shape, size, color other than those described above, alas, they sold you a fake and an orchid will definitely not grow from them.
Also, when looking at them through a microscope or a very powerful magnifying glass, you can see that these are seeds that resemble wheat grains in shape and size, but many times smaller.
Often, buyers who are excited about the idea of growing a flower from seeds make a purchase after reading rave reviews from other buyers and paying attention to the seller’s high rating. However, most often, this delight is associated with the speed of delivery or the quality of packaging of the material. It is extremely rare for buyers to attach a photo of what has grown from seeds, and even more so of a finished flower, because, as you know, it takes years to grow it.
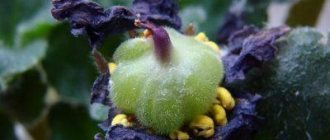
Some flower lovers cherish the hope that the resulting seeds are a seed capsule, open it, and, most often, do not find small seeds in it. It should be remembered that the seed capsule of orchids is narrow and about 3 cm long, green in color . In nature, it opens itself precisely at the moment when the seeds are ripe and ready for planting. Therefore, you are unlikely to get a closed seed pod.
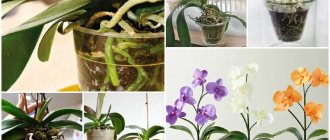
Transplanting orchid seedlings from a jar
If the seeds are well ripened and viable, you can observe the process of their germination after 2-3 weeks. Seedlings develop slowly, over about six months. All this time you need to maintain the desired temperature and light the jars. Under no circumstances should you open them prematurely (ventilate or water them).
Opening a jar of seedlings can take place when they have grown roots of sufficient length and 2-3 leaves. Removing seedlings is done as follows:
- the jar is opened;
- under a stream of warm, but not hot water, the nutrient medium is washed away;
- the seedlings pour out along with the water.
Then cups are prepared for planting them. At first, it is very convenient to use ordinary plastic, disposable ones, 2 pieces per seedling. In one, many holes are made in the bottom and walls. A substrate consisting of finely chopped pine bark and sphagnum moss is laid in it. A seedling is planted in the substrate. A little expanded clay is poured into the bottom of the second cup, and the “leaky” cup is inserted into it.
Transplanted seedlings need to be provided with good light, warm air and moderate humidity. They are not fed until they are completely rooted. You can give a weak fertilizer solution only after the seedlings begin to grow in a new place.
Step-by-step instructions on how to plant
Since orchid seeds are very capricious, when planting them yourself, it is very important to properly prepare the equipment, nutrient medium, sow and care for the seedlings. Even under ideal conditions, only a small percentage of seeds can turn into real flowers. Therefore, if you neglect at least one of the points, you risk not growing a single plant at all.
Equipment and its sterilization
For planting, you need to prepare glass laboratory test tubes 15 cm long and 1.5 cm wide, a tripod, and cotton-gauze stoppers for the test tubes. If you do not have test tubes or they are difficult or expensive to purchase, you can use glass baby food jars with screw caps. Remember that the entire process of planting seeds must take place almost in laboratory conditions, so test tubes or jars along with lids must be sterilized in an autoclave, pressure cooker or medical sterilizer at a temperature of 120 degrees for 30 minutes.
Preparation of the nutrient medium
For planting, you can use either a purchased nutrient medium or one you make yourself. Let's take a closer look at the second option. You can prepare the nutrient medium as follows:
- Boil 0.5 liters of distilled water.
- Add 10 g fructose.
- 10 g glucose.
- 8 g agar-agar. Cook over low heat, stirring constantly, until the agar-agar has completely dissolved.
Heat another 0.5 liters of water in another container.- As soon as it boils, remove it, add 5 drops of root-forming phytostimulant, 1.5 g of complex nitrogen-phosphorus-potassium fertilizers, 1 g of activated carbon.
- Mix well and combine both solutions.
- We bring the acidity to the desired level.
- To lower the pH, you can use a solution of potash, to increase it - orthophosphoric acid. Orchid seeds require acidity in the range of 4.8-5.2 pH.
- Pour 30 mg of hot nutrient substance into sterilized flasks.
- We close the flasks with stoppers and sterilize the nutrient medium for half an hour.
- We monitor the flasks with the medium for 4-5 days. If mold has appeared in them during this time, they are not suitable for planting seeds.
Watch a video on how to prepare a nutrient medium for growing seeds.
Sowing
ATTENTION! Seeds also need to be sterilized. To do this, prepare the 10th solution of bleach, shake, filter, hold the seeds there for 10 minutes and plant immediately.
For sowing, a device is used that additionally sterilizes the seeds. Sowing occurs like this:
- Place a wire rack on the container with water, and the substrate in the flask on it.
- After sterilization, draw the seeds out of the solution with a pipette and place them on the surface of the substrate.
- Next, cover the flasks or jars with cotton swabs or lids and set them for germination.
- You should monitor the temperature at all times: it should be 18-23 degrees Celsius, the duration of daylight should be on average 12-14 hours.
Sowing seeds
Before sowing, seeds are disinfected to prevent the spread of bacterial and fungal diseases. Seeds can be irradiated with an ultraviolet lamp. For disinfection, immerse in a 1% solution of potassium permanganate for 20 minutes or in a 2% solution of hydrogen peroxide for 5-10 minutes. Some sources recommend treating seeds in a solution of bleach (per 100 ml - 15 g of bleach) for 10 minutes.
But this processing method requires great caution, since chlorine belongs to substances of the second class of danger and has an irritating effect on the skin and mucous membranes of the respiratory tract. After processing, the seeds are laid out on filter paper until completely dry.
It is better to carry out the sowing process itself over steam, since under its influence harmful microorganisms die. A metal grill is installed above the steam container. Test tubes or jars with nutrient medium are placed on it.
Using a sterilized pipette, the seeds are collected and transferred to the mixture in a test tube, which it is advisable to shake evenly for good distribution of the seed material over the entire surface. Then the test tube or jar is tightly closed and placed in a place with diffused light at a temperature of 18-23 degrees. It is desirable that the seedlings be illuminated for at least 12 hours a day. The appearance of white plaque or mucus on the walls of containers indicates that harmful microorganisms have entered the environment. If sowing is successful, no additional inclusions will develop.
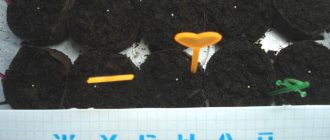
Photo
Next, you can see a photo of what the seeds look like and what grew from them:
Care
After a few weeks or months, changes begin to occur in the crops. Green balls appear on them, then the first leaves. After two or three leaves appear, roots begin to appear. Only after a year can the seedlings be transplanted into a pot. To fill the pot, a suitable substrate of moss, fern roots and pine bark is suitable.
The soil should be as fine as possible. The sprouts are removed from the flask as carefully as possible with tongs, washed in water and transplanted into a substrate, which is first poured with boiling water for 30 minutes. Plants need light and high humidity all the time.
Basic rules for caring for sprouts
What grows from orchid seeds from Aliexpress? If the seller turns out to be a deceiver, then anything will grow, but not orchids. Well, if they actually sent you orchid seeds in a box, then it depends on your skill in planting and germinating the seeds. Either small orchids will grow, or colonies of other microorganisms that have won the fight for the nutrient medium.
Further care for the seedlings will ensure their good growth and development.
Required environmental conditions
The seeded containers are placed in diffused light at a temperature of 20-23℃. The duration of light should be at least 12 hours.
The appearance of the first signs of germination
The germination period of orchid seeds depends on the type of plant and can last from 4-6 weeks to 6-9 months:
- The first to develop is a small green ball with thread-like processes - rhizoids. They absorb water with dissolved mineral salts and hold the seedling tightly on the surface;
Each type of orchid produces seeds at different times. - Then the seedling develops its first leaves, after which true roots form.
Containers with plants are not opened; strict sterility is observed .
Care during development and subsequent transplantation
Being in sterile conditions, orchid sprouts do not require special care .
After what time is it possible to transplant the sprouts into a separate container? After 10-12 months, the grown plants are transplanted into a steamed substrate from :
- 1 part crushed pine bark (fine fractions);
- 1 part sphagnum moss;
- And 1 part of fern rhizome.
Powdered activated carbon is added to the mixture (10 tablets per liter of soil):
- A layer of drainage (expanded clay, small pebbles) is laid on the bottom of plastic cups, then the prepared substrate;
- Carefully remove the seedlings from the container using circular movements and wash the roots;
- In another method, a container with plants is filled with a small amount of water, then everything is poured into a wide vessel. Add a 0.5% solution of Fundazol (2 ml) there, leave for about 10 minutes, then carefully remove the seedlings, cleaning the roots with a brush;
- The seedlings are planted in the prepared substrate;
- After planting, the plants are not watered; they are regularly sprayed with water at room temperature. Make sure the soil always remains moist.
After six months, young orchids are transplanted into a standard substrate.
Problems and difficulties
Problems when growing orchids from seeds can occur at any stage. However, the most common reason for low germination is poor-quality seeds, the slightest flaws in sterility , and failure to comply with temperature and humidity conditions. The result is the death of seeds or seedlings and the absence of a result in the form of a beautiful flower. When starting this process, it is worth analyzing your conditions, availability of time and money, as well as a lot of patience, so as not to be disappointed by difficulties.
Orchid lovers should know that these plants can be grown from a bulb, from a baby, in water or in a closed system, but the article about the Thai orchid may also be interesting.
Orchid artificial pollination technology
There are only two ways to obtain normal orchid seed material:
- meet an orchid collector and order seeds from him;
- pollinate the plant yourself and collect the seeds.
The first method is suitable for those who do not have their own flowering orchids or want to grow some variety from seeds that is not in their own collection. The second route can be taken by orchid owners who want to experiment with artificial pollination.
Artificial pollination is a fairly simple procedure if you know what to do and get a little practice. It is produced using the following technology:
- The flower has a column - a reproductive organ in the form of a small “spout” (“stigma”) in the center of the flower. Translucent spots are usually visible at its top - these are pollen grains that have ripened inside the column.
- Take a toothpick or wooden skewer. Its tip gently lifts the column and removes the pollen grains.
- Pollen grains are transported deep into the column, into its lower open axil.
The inner surface of the column axil is sticky, like the pollen grains themselves.
Therefore, there is no need to be afraid that they will fall out of there. If pollination fails, after 2-3 days the flower will simply wither and fall off. If pollination is successful, on the second day you will notice that the column axil begins to close. This process will last several days, after which the petals will wither, but the flower itself will not fall off. Its peduncle will begin to turn green and thicken - this is how the ovary is formed. From this moment on, you need to be patient, because the ripening of the fruit in orchids takes as long as in humans - up to 9 months.