How to tell if an orchid's roots have rotted
Rotting of underground and aerial roots is a common disease of domestic plants due to improper care or damage by harmful insects. This process begins, most often, in winter, when daylight hours decrease and temperatures drop.
If the damage is not very advanced, it can be treated. To understand whether a flower is sick or not, it is necessary to distinguish healthy roots from those susceptible to rotting. There are several principles for recognizing them.
By external signs
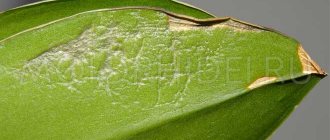
The first way is to determine by general appearance and touch.
Healthy (left) and diseased (right) orchid roots
The root system of the orchid should be:
- dense consistency;
- silvery in color in the normal state and green when moistened (chloroplasts, the main participants in photosynthesis, begin to show through), in old plants - yellow or simply brown;
- smooth and elastic.
If putrefactive processes have begun, the following signs appear:
- dark color, almost black;
- liquid, mucus;
- mold;
- putrid odor;
- filamentous form.
Experienced method
The viability of the roots is determined not only by external signs; you can also remove the plant from the pot, immerse it in water and leave for 3 hours. Healthy roots will be nourished, acquire elasticity and richness; if the shoots are still sluggish and pale, then they are infected.
If the roots and leaves are rotting
Since the orchid is a resident of the tropics, many people mistakenly believe that it needs intensive watering and bright sun. This is absolutely wrong. In the first case, the roots will begin to rot, and the flower will not receive enough nutrients. In the second, sunburn of an orchid will lead to damage to the leaves and serious stress for the flower, which can also result in death.
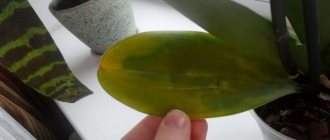
Figure 2. Root rot can be caused by overwatering.
To prevent your orchid from turning yellow and drying out, you need to develop the correct care schedule. First of all, this concerns watering. To prevent the orchid's roots from rotting, you do not need to fill it with water. It should be remembered that in the natural environment this crop parasitizes trees and absorbs moisture from natural precipitation, so it does not need to be watered too often (Figure 2).
Note: You can determine the watering time visually and by touch. In the first case, carefully inspect the walls of the pot. If condensation has accumulated on them, the plant still has enough moisture. If you are not sure, touch the soil: its top layer should be completely dry. Only after this can watering begin.
If the orchid's roots still rot, remove it from the old pot, carefully cut off the damaged parts of the roots and transplant the flower into a new container. You will have to refrain from watering for the next few days.
Lack or excess of moisture is not the only reason why an orchid withers. Slow death of the plant can also be caused by improper placement. It should be remembered that in nature the flower is illuminated by scattered sun, so you should not place the pot on a southern windowsill.
Orchid resuscitation options
It is important to detect diseases at an early stage, in which case it will be easier to revive the flower.
First you need to determine the level of decay. Based on this, choose a method for bringing the orchid back to life.
Minor part damaged
If only some small areas of the roots are affected by the disease and new shoots are formed, the method of changing the regime is used:
- The orchid is removed from the pot and carefully freed from the soil by washing.
- The affected areas are identified, removed, and the sections are treated with coal or fungicides, Kornevin.
- Allow to dry, as a rule, this takes 3 hours.
- Place the plant in a small pot (6-7 cm) with a substrate consisting of moss and expanded clay, and create conditions that differ from the previous placement. Place in a more illuminated place or provide illumination, lengthening the daylight hours (at least 12 hours). The temperature regime is also increased (+22…+25 °C).
- Moisten as the soil dries. You can do this by immersing the container with the plant in water for half an hour, making sure that the top layer is wet, but the water does not remain at the bottom.
Severe damage
When a large part rots, a method of growing orchid roots in greenhouse conditions is used.
The initial stage of rehabilitation is the same as in the first case:
- The plant is removed from the pot, the rotten roots are cut off, very carefully. The remaining affected areas can undo all efforts, causing a new wave of rot.
- Afterwards, the cuts are treated with fungicides or coal. If mold is detected, the flower is placed in a weak solution of potassium permanganate for 20 minutes.
- Then the flower is placed on a special vessel with a convex bottom, soft filtered water is poured into it so that the rosette of leaves does not touch it, and the lower part is immersed in it. Sugar syrup or honey is often added to the water, and the plant itself is treated with a growth stimulant - Kornevin.
- After 6-7 hours, the plant is released and dried.
- The method itself consists of creating a closed space for the diseased flower, where accumulated carbon dioxide stimulates chloroplasts to form new cells. At the same time, they provide a comfortable temperature of +25 °C and a constant humidity of at least 70%. Such conditions can be created using any glass container. The greenhouse is ventilated periodically. Water in doses.
- Be sure to provide the orchid with good lighting for at least 12-14 hours a day.
- Once a month, feed with fertilizers (Epin, honey solution).
We remove the affected areas
Without this stage, all further manipulations will be useless. It is necessary to clean all affected areas, cutting off rotten roots and even part of the rosette if the rot has already spread there.
After cleaning, the orchid must be dried, leaving it on the table for a couple of hours. And cover all cut areas with crushed activated carbon or wood ash. After this, to speed up root formation, the remainder of the rosette is placed for an hour in a solution of a growth stimulator.
Time frame for orchid revival and actions after resuscitation
The recovery period for a plant can last from a month to a year, even if everything is done correctly.
The best time to resuscitate a flower is spring or autumn. In winter, the chances of salvation are much less.
When the external characteristics of the orchid improve, when the leaves turn green and new aerial roots begin to grow, fertilization is stopped and watering is reduced.
Compliance with the rules of care is not a very labor-intensive process, especially if it is an unpretentious Phalaenopsis orchid; you just need to monitor the plant more closely in order to take corrective actions in time.
The role of hydration
Moisturizing is the most important thing in plant care. Both a lack and an excess of water are detrimental to it.
The most important condition for watering is maintaining fluid balance. In flower shops you can only find hybrids of tropical orchids. Specimens from the wild forest are extremely rare.
Plants from stores prefer woody substrate and high humidity. Many orchid growers make the following mistakes when watering :
- Use hard tap water.
- Collect melt or rain water.
- Acidify the water with oxalic acid.
Important! Cold tap water is not suitable for orchids. The liquid must be purified from impurities by filtering or boiling. There are many reasons that influence healthy development and flowering. All this is the result of following the rules of watering.
Rooting baby
The baby is transplanted only when its roots reach 5 cm in length . But if for some reason the baby was removed earlier, it can be grown to the required size in a greenhouse in sphagnum moss .
For this purpose, take a food container and place wet sphagnum moss on the bottom. The baby is placed on it and sealed with a lid. After which the container is placed in a place where there is a lot of diffused sunlight.
Growing baby roots in moss.
IMPORTANT! The temperature in the room where the extension is taking place should not fall below 22 degrees Celsius.
Read more about how to root a baby in this article.
When is the best time to perform the procedure?
It is advisable to change the “place of residence” of the orchid once every 2–3 years, without taking into account the factors for emergency transplantation. Regarding newly purchased plants, it is best to plant them in a new pot only after flowering.
The best time for this purpose is spring. It is very important to correctly determine the time for transplantation, as this promises the orchid to quickly adapt to new conditions and the composition of the substrate. Let's look at each stage in more detail.
Correctly chosen time for transplantation is the key to beautiful flowering
Planting in the absence of a root system
For the extension to be successful, the flower must be secured with wire or strong thread in the substrate so that it does not fall on its side. This is done because it is impossible to bury an orchid when planting , and if it is lightly placed on the bark, the plant with a large amount of leaf mass will simply fall out of the pot.
The pot is filled with a standard substrate - bark.
You can get more information about planting an orchid without roots here.
In the substrate
This rooting method is suitable for orchids that have at least a small part of the roots remaining. In this case, moss, vermiculite or a mixture of them can be used as a substrate. They proceed as follows:
- Select a wide, closing container. For example. You can use an empty aquarium or build an impromptu greenhouse from a plastic container or a large cut-off bottle.
- A layer of expanded clay is poured onto its bottom.
- A layer of pre-moistened moss is laid on top of the expanded clay.
- The orchid is placed on the moss so that its root collar is exposed to the air, and the intended place of root formation is in contact with the moist substrate.
When rooted, moss is an almost ideal substrate; it easily releases and accumulates moisture, the main thing is not to over-moisten it. The degree of moisture content can be determined as follows: a small amount of moss is squeezed in a fist. If moisture begins to release, it should be squeezed out. If your hand remains slightly damp, then everything is fine.
In the absence of moss, vermiculite is used as a substrate. It is also capable of releasing and storing water well. It allows you to quickly grow roots without the development of pathogenic microflora. This method can also be used if you need to grow the roots of a baby orchid.
Experienced gardeners also use special root formation stimulants. For example, kornevin is very suitable for rooting orchids. This product is available in powder form. It's very easy to use. A small amount of root is simply applied to the intended location of root formation.
Another secret to successful rooting on the substrate is high air humidity. That is why the rooted plant should be placed in a greenhouse. If, despite this, the orchid's leaves still begin to wrinkle, it needs to be helped by providing nutrition through the leaves. To do this, the orchid is immersed in warm, clean water with the addition of a small amount of sugar for several hours. After removal from the water, before placing it in a greenhouse, the plant should be dried.
Dendrobium transplant
Features of dendrobium transplantation
This variety of orchid is also very fastidious for replanting. The process has its own characteristics:
- Dendrobium needs to be planted in a new substrate when young shoots begin to grow.
- The container should not be too large. The best option is a clay flowerpot.
- Before planting, you need to lay a drainage layer of heavy pebbles on the bottom of the pot, then add foam or expanded clay balls.
- The bark is laid on top and the plant is transferred from the old container to the new one. There is no need to clean and dry the roots.
- The free space is filled with fresh substrate.
The usual composition for dendrobium is pine bark, coconut chips, charcoal, sphagnum moss.