Streptocarpus. Home care: propagation, fertilization, watering, soil.
Most species are lithophytes in nature (in rare cases epiphytes). They are conventionally divided into two groups:
Streptocarpus produces rather dense peduncles with 2-3 flowers. On an adult plant you can see up to 100 flowers at the same time.
Streptocarpus varieties with photos and names
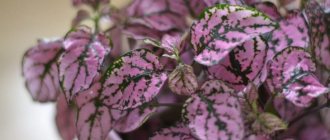
It is rare to find wild streptocarpus in homes, as breeders have developed many beautiful hybrids. Streptocarpus is classified as a rosette plant. Its stem is short, and the leaves are lanceolate, green, sometimes variegated. Breeders and nature itself offer over 130 varieties. Among them there are stem ones with small flowers, rosette ones with large leaves and single-leaved ones. You can choose varieties with different colors and textures of petals. The soft pink color of Streptocarpus Betula is beautiful.
Streptocarpus. Care.
If you successfully grow violets, then you will definitely make friends with Streptocarpus. But even though they belong to the Gesneriaceae family, caring for Streptocarpus has its own characteristics.
Lighting. Temperature. Streptocarpus grows well in both natural and artificial light. You can place plants on any window. They love fresh air, slightly increased humidity, but cannot tolerate direct sunlight.
If you want to enjoy flowering all year round, use fluorescent lamps. Daylight hours should be 12 hours or more. But even if there is no opportunity or desire to install lamps, Streptocarpus will retire for a couple of months, and with the arrival of the spring sun they will again delight with flowering.
Rooting cuttings and young plants are kept at 22-25°C. But they tolerate even significant short-term increases in air temperature without problems.
The soil. Airtight soil combined with abundant watering is detrimental to plants. Streptocarpus, like other representatives of the Gesneriaceae, breathe through roots, so not only drainage is required, but also a light, breathable soil mixture with an acidity pH of 6.5-6.9. Primer for violets with the addition of perlite up to 40% of the total volume is perfect. If you prepare the soil yourself, then take the following components in equal parts: high-moor peat, black soil, vermiculite, pine humus, perlite plus crushed charcoal (1 cup). Chernozem is not added to children and young plants.
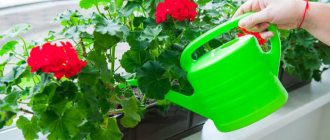
Watering after drought helps to quickly restore leaf turgor. Therefore, it is better to dry it than to over-moisten it. Periodic short-term drying of the earthen clod helps prevent the development of late blight and other fungi that cannot fully exist without moisture.
Fertilizer. Caring for Streptocarpus necessarily includes feeding. A fertilizer with nitrogen, phosphorus and potassium in equal parts is ideal if we are talking about young samples. A solution with a predominance of phosphorus and potassium is needed by adult plants before flowering begins. During the dormant period, Streptocarpus does not need feeding.
Possible difficulties during cultivation
Growing streptocarpus can be accompanied by some problems. Most of them can be resolved easily and quickly:
- Withered leaves. If the soil is dry, urgent watering is needed. Wet soil with dry leaves signals rotting of the roots. You can try to replant the plant using leaves.
- Yellow leaves and stems. This indicates sunburn, a dry climate in the apartment, or a very cramped pot. The plant is transferred to a larger container and provided with moist soil.
- "Rusty" spots on the leaves. Over-watering or over-fertilizing. The plant is given a little rest from water and feeding.
- Lack of flowering. Streptocarpus will not bloom if the daylight hours are not long enough. It is necessary to provide the flower with additional lighting.
Artificial flower lighting
Tips for growing streptocarpus
In conclusion, some tips on growing streptocarpus from experienced gardeners:
- The soil for growing new flowers should be loose and nutritious. It should pass oxygen well and retain liquid. The optimal solution is to use violet soil mixed with peat.
- The soil can be prepared at home. To do this, take rotted grass, tree bark, sand and peat. All ingredients are mixed in approximately equal proportions.
- Experts advise using the wick method of watering for streptocarpus. However, in this situation, cold should be excluded, otherwise the rhizome will rot.
- Old leaves need to be trimmed regularly. This starts the process of new foliage and fresh flower buds forming.
Wick method of watering indoor plants
Peat prices
peat
Streptocarpus is a very beautiful exotic plant. With proper care, it can delight the owner with its unusual flowers all year round. Each leaf axil is capable of producing about 10 peduncles, and several flowers may appear on each. Therefore, streptocarpus bloom very profusely.
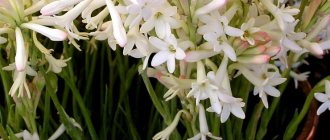
Pale yellow streptocarpus flowers
Reproduction of Streptocarpus.
Streptocarpus reproduces in three ways:
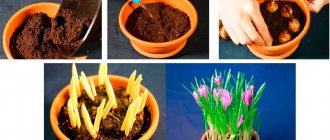
During the process of growth and development, Streptocarpus produces lateral stepsons, which grow and also bloom. But for more abundant flowering, they are planted in a separate container. To do this, remove the old flower stalks, then pull the plant out of the pot, carefully remove the substrate, cut it into pieces with a clean knife or blade so that each of them has its own roots, treat the cut areas with activated carbon and plant them in containers.
It takes about four weeks for roots to appear. The same amount will be needed for the first baby leaves to appear. Young children are planted when the second leaf appears.
Streptocarpus is also propagated by seeds. To get them, pollen from one variety is pollinated by another flower.
Plants are prone to self-pollination, which is why many of them have a spiral-shaped seed box, which after 1.5-2 months. from the moment it appears it turns brown. When ripe, the box bursts and the seeds scatter to the sides. To collect seeds, the capsule is removed from the peduncle when it begins to dry out. Then they are wrapped in a napkin or paper and sent for ripening.
Sowing seeds is possible regardless of the time of year. To produce offspring, daylight hours must be at least 12 hours. For sowing, use a small flat container with a moistened earthen substrate. The seeds are not sprinkled on top. After sowing, the container is covered with glass. Ventilation is carried out every day (15-20 minutes is enough). Condensate is removed in a timely manner. Germination temperature 22-25°C.
The first shoots are expected in 12-20 days. As a rule, after another month the seedlings sprout. After the second pick, each plant gets its own place, for example, a 100-gram glass. The pots should be increased gradually. Each next one is a couple of centimeters larger than the previous one. First, drainage is placed in each container, then a light soil mixture, then a young plant is planted.
When Streptocarpus is grown by seeds, hybrids are obtained that do not repeat the color and shape of the mother plant.
Source
Soil for streptocarpus
In order to choose the right soil for a plant, you should always first ask where and how it grows in natural conditions.
Many descriptions of plants begin with an indication of its “homeland”. This information should not be neglected, but should be taken into account. Another variety is xerophytes that can tolerate prolonged drought. Xerophytic species of streptocarpus can be distinguished by their wide, fleshy leaves, in which they accumulate moisture for future use. Some types of streps have the ability to restore leaf turgor after watering.
There are species (with long and thin leaves) that do not tolerate dry periods well. They originate in humid forests with more nutritious soil.
As you can see, streptocarpus can be very different. And although hybrid streptocarpus grow on our windowsills, they have a lot in common with their ancestors. Despite this, we plant all our pets in the same soil and often do not understand why some of them grow poorly, because the care for all is the same. And the reason is that their genes “mix a lot of different blood” and the microclimate in our houses and apartments is different. Therefore, it is not surprising that for one collector streptocarpus grow well and bloom when planted in moist forest moss, while for others they develop in high-moor peat, a substrate for orchids, or are kept on wick watering.
My streptocarpus collection is now in its fifth year. During this time, many different varieties of these plants passed through my hands. We tried many different growing soils. But, nevertheless, I settled on high-moor peat as a base; the ingredients and leavening agents may change. And first of all, it depends on the time of year.
The soil for growing streptocarpus must have good air permeability to access the root system. Be moisture-absorbing, but not conducive to water stagnation. Under no circumstances should the substrate be nutritious. The root system of streptocarpus is superficial, consisting of thin hairs that are able to absorb from moisture all the substances necessary for the plant. In humus-rich soil, the root system suffocates and rots. As a result, the plant dies. I buy neutralized (deoxidized) high-moor peat in gardening stores, in large professional packages. It is red in color, pH 5.5-6.2.
You cannot buy soil in supermarkets; the bag may contain waste soil from greenhouses. Even if you buy a small package of peat, don’t be too lazy to do it in a specialized store. Although I can’t vouch for anyone.
I prefer medium fraction peat.
Soil for streptocarpus
Before use, I sift the peat in a basket designed for storing bulbous peat.
A basket with large cells and peat spills out well through its holes. After sifting, I throw away large elements.
Soil for streptocarpus
Soil for streptocarpus
Heavily crushed peat requires more raising agents. Without them, it cakes and compacts very quickly, and does not dry out well after watering. As a result, plants have to be replanted more often. High-moor peat is a poor substrate; a healthy root system grows quickly and well in it. Lowland peat (it is black) is not suitable for growing streptocarpus. When planting in a pot, I add a few granules of Osmokot fertilizer.
I use prepared coconut briquettes and perlite as soil looseners; I have been successfully using foam balls for a long time. You need to understand well why this or that baking powder is added, taking into account your microclimate in the apartment. Coconut substrate moisturizes the substrate well; I add it as a component in the summer. His faction is also different. I prefer coconut of a larger fraction, it does not cake and additionally performs the function of air exchange, the peat does not compact.
Soil for streptocarpus
If you have increased dampness in your apartment, then it is dangerous to use baking powder that retains moisture; you can flood the plant. For this reason, I do not use sphagnum moss as a soil additive. Sphagnum absorbs water very well and then releases it to the plant. Even with extensive experience in growing streptocarpus, it can be difficult to determine the required volume of water when watering. In my growing conditions, sphagnum is not suitable as a leavening agent. For about the same reason I don’t use vermiculite. This is especially dangerous in the off-season, when the radiators do not work and the soil in the pots does not dry out well.
I have successfully used foam balls as a baking powder. Actually, they replaced perlite for me. The balls do not accumulate any harmful substances and do not absorb water; they are larger than perlite and clearly perform their function in this case. This is what a healthy streptocarpus root system looks like in the ground using foam balls.
Soil for streptocarpus
If you have any questions, ask them in the comments. I will be happy to answer them.
Source
The main problems when growing streptocarpus
PROBLEM OF UNDEVELOPED ROOT AND BAY
for some reason it is believed that streptocarpus is easy to fill. In fact, it is very difficult to fill streptocarpus with a good root, in the correct volume and with the correct soil mixture. What needs to be done to ensure that the striper has a good root system. First, you need to raise your child correctly. Many greenhouse babies, being in conditions of high humidity, do not grow roots well. Moreover, their roots are very superficial and easily die (a significant part of them) when transferred to indoor conditions. Especially during the heating season. Therefore, it would be a good idea to raise the baby until planting in a pot in a transparent 100 ml glass until that moment. until the root literally clogs the entire surface of the coma. After this, the baby is transferred to a larger pot (about the size of a plastic coffee cup), and after good growth in this volume, into a larger pot.
It happens that a child does not want to grow a good root. This often happens when children are treated with insecticides/acaricides such as Fitoverm (I don’t know, due to the alcohol in it or something else, such as detergents). Moreover, it has two or three leaves and even produces flower stalks. Planting such a baby in a large volume of soil will doom it to death or to a state: no matter what - it sits, does not grow, does not die... for the time being.
PEST PROBLEM
The most common pests that cause rapid death of the collection are mites. Several types of stripes are damaged. Firstly, flat mites. They can be seen with the naked eye on the underside of the leaf. Ticks have a reddish body. They are clearly visible under a microscope. On the affected plant, the leaves turn inward; in case of severe infection, this happens:
Photo: website https://frauflora.ru, user
Valery
Mites spread very easily in collections.
Secondly: greenhouse mites. These attack the growing point, just like violets. However, according to my observations, violets are much more resistant to these mites. In these plants, infection can lead to shredding of the central leaves of the rosette, and the violet will not yet have time to die. In streptocarpus, infestation with a greenhouse mite can cause rapid death of the plant. Sometimes lovers of straps write that the plant bloomed beautifully and beautifully and then died in just a week. According to my observations, in young streptocarpus, mite infestation often stimulates the formation of a huge number of peduncles, while the young leaves are pale-yellowish and do not grow. The plant, indeed, flourishes very brightly and, indeed, can die quickly after this, having exhausted its reserves (flowering uses up the reserves of nutrients in the thick leaves of the straps on which the peduncle is formed). Another sign of mite infestation is the appearance of burgundy spots on young leaves, especially at the tips (in dark-flowered and red-flowered varieties). In fact, under a microscope it is clear that chlorophyll-containing cells have died in this place and a stable red pigment from chromoplasts remains. The mites themselves are very small, hiding only in the center of the outlet. Finding them, even under a microscope, is quite difficult. Yellowing of old leaves throughout the leaf blade also accompanies tick infestation. Just browning of old leaves (not total, but one leaf, gradually... this is just aging of the leaves. They need to be removed and that’s it.
And finally, the so-called putrefactive mites. These live in the soil, it is especially easy to introduce them with sphagnum, unripe organic matter in peat or humus. When air humidity is high, as this summer, for example, favorable conditions are created for their reproduction. They move onto the leaves of the straps and begin their harmful activities. According to my observations, such mites are accompanied by bacterial leaf rot, which causes brown spots to appear and the leaf to quickly disappear. I’ll write right away that these mites are not completely eliminated; only proper agricultural technology can control their numbers and harmfulness. Sometimes you have to use drugs.
Soil for growing streptocarpus
Soil for growing streptocarpus
Post by Gaume » April 18, 2013, 5:36 pm
I also plant violets in the same soil. For both plants I add perlite to the soil.
What kind of soil do you plant streptocarpus in?
Re: Soil for growing streptocarpus
Post by Zinaida » Oct 18, 2013, 02:11 pm
Re: Soil for growing streptocarpus
Post by Gaume » Oct 18, 2013 5:37 pm
Re: Soil for growing streptocarpus
Post by Zinaida » Oct 19, 2013, 5:16 pm
Re: Soil for growing streptocarpus
Post by Gaume » 19 Oct 2013, 17:55
Re: Soil for growing streptocarpus
Post by Zlata » 07 Nov 2013, 19:55
Re: Soil for growing streptocarpus
Post by Gaume » 07 Nov 2013, 20:31
Re: Soil for growing streptocarpus
Post by Zlata » 07 Nov 2013, 20:45
Re: Soil for growing streptocarpus
Post by anaconda » 07 Nov 2013, 21:38
Hello! In February I will have a planned transplant of violets and everything growing and blooming. For violets I will prepare the following mixture:
Is this mixture suitable for streps? I also wanted to add charcoal, but couldn’t find it. Maybe I was looking in the wrong place? Nobody knows where I can buy it?
Re: Soil for growing streptocarpus
Post by anaconda » 07 Nov 2013, 21:41
Zinaida wrote: Don’t you use the famous and vaunted Greenwald?
Re: Soil for growing streptocarpus
Post by Gaume » 08 Nov 2013, 07:46
I’ll take a photo of the soil for Biolan violets during the day and show you.
How to use perlite for plants?
In plant growing, perlite is used to loosen and retain moisture in the soil. You can root individual parts of the plant in perlite. This includes rooting leaf cuttings, which grow a good root system in perlite. This is one of the so-called “root in landless mixture” methods. Perlite has a sterile environment in which mold and pathogenic fungi do not form. Perlite is also used as drainage.
Perlite is sold in Riga in the Price Clubs store. But the price there is a little high. It is better to look for perlite in small shops. They sell already packaged perlite (per liter). At one time, the Depot store sold broken glass under the name “perlite” (in white buckets). It has nothing in common with perlite. I buy packaged perlite (2 liters, I think) for about 0.45 cents.
Re: Soil for growing streptocarpus
Post by Gaume » 08 Nov 2013, 08:12
anaconda wrote: Hello! In February I will have a planned transplant of violets and everything growing and blooming. For violets I will prepare the following mixture:
Is this mixture suitable for streps? I also wanted to add charcoal, but couldn’t find it. Maybe I was looking in the wrong place? Nobody knows where I can buy it?
I have no experience working with Lithuanian. I bought a large package of their moss in September (it says HIGH PEAT on the pack), but in fact there was no high peat inside. She took it to the dacha and poured it into the beds. I have a question for you? Why mix so many things? Coconut and vermiculite. just one thing is needed. It is generally dangerous to add coconut to the soil for streps, if only a little. It retains moisture very well (just like vermiculite) and if you overwater it a little, the plant will bend in such soil.
I’ll write about vermiculite and coconut substrate later.
Re: Soil for growing streptocarpus
Post by anaconda » 08 Nov 2013, 09:42
Well, since it’s not suitable for straps, I’ll knead another one.
Re: Soil for growing streptocarpus
Post by anaconda » 08 Nov 2013, 09:53
Source
How to plant streptocarpus with seeds
Freshly harvested seeds will give the best germination. They should be handled with the utmost care, including during the process of germination. When it's time to water, don't use a regular bottle or watering can. The use of a sprayer should also be controlled, i.e. spraying is done not with a stream, but with a spray. Otherwise, seeds and sprouts may be damaged.
Deadlines
It is better to plant in the spring, from about the end of February to April. The fact is that the plant needs warmth to germinate. The gradually warming spring sun will promote their best growth. However, streptocarpus will take root well under an artificial sun, which can be an ordinary incandescent lamp, since it not only illuminates, but also provides warmth.
If planted correctly, the first shoots can sprout within a week. It is noteworthy that the gardener may not notice them, since they are very small. Therefore, it is recommended to get a magnifying glass at least for the first time. After a month, tiny petals are visible to the naked eye. Ultimately, the first seedlings bloom after 9 months, sometimes later.
Preparing containers and soil
If the grower intends to prepare the soil himself, then there are several options for compositions, taking into account the proportions:
- deciduous soil, peat, sand in a ratio of 2:1:1;
- peat, perlite, sphagnum moss in proportions 1:1:1;
- high-moor peat, leaf humus, perlite or vermiculite, sphagnum moss in a ratio of 2:1:0.5:0.5.
Lighting
Daylight hours for streptocarpus should last 12-14 hours.
He loves bright, but diffused light: it is important to protect the plant from direct rays of the sun. If streptocarpus is illuminated with phytolamps in autumn and winter, flowering is guaranteed all year round.
The optimal place for streptocarpus is window sills facing west and east. On the northern window, the lighting will in any case be insufficient, and on the southern window, shading will be required.
If lighting is created using a phytolamp, streptocarpus can be placed even in the depths of the room.
Description
Streptocarpus is a perennial herbaceous plant of the Gesneriev family. A special feature of the plant is the shape of the fruit, which looks like a spirally curved seed pod.
The leaves are wrinkled, elongated, they form a basal rosette from which shoots grow. Streptocarpus flowers can be double, semi-double or simple, of various colors. Their size varies from 2 to 9 cm in diameter. The smaller the flowers, the more there are on the peduncle. The petals have different shapes and wavy or rounded edges.
Streptocarpus bloom from spring to autumn , and with high-quality lighting they can delight with their flowers all year round.
Temperature
Streptocarpus loves warmth. In summer, the optimal temperature for it will be 20-25 degrees . As the temperature rises, it is necessary to proportionally increase the air humidity.
Caring for streptocarpus in winter: for ordinary varieties of streptocarpus, the best temperature will be 15-18 degrees, and for hybrid varieties - 18-20.
The flower is afraid of drafts, so it is important to carefully protect it from them. It is not recommended to take him out into the open sky; he is most comfortable in indoor conditions.
Watering
A very important aspect of care is streptocarpus and watering. The water needs to be soft, settled or melted, a little warmer than room temperature.
Streptocarpus tolerates a lack of moisture better than its excess. Therefore, it is extremely undesirable to flood streptocarpus - it can quickly die.
Watering should be moderate. It is better to carry out the next moistening after the middle layer of soil in the pot has dried.
The best way is to water from a tray or along the edge of the pot. After watering, after 10-20 minutes, the remaining water from the pan should be poured out.
When watering, water should not get on the leaves and flowers.
Steptocarpus prefers high air humidity. This goal can be achieved by placing containers of water near the flower.
It is strictly forbidden to moisten the above-ground parts of the plant directly.
Diseases and pests
Under favorable growing conditions, streptocarpus resists various diseases quite well. If a plant has problems, it will immediately react with its appearance:
- Streptocarpus leaves wither and curl from lack of moisture or excess sunlight;
- yellow streptocarpus may appear due to sunburn;
- dried tips of streptocarpus leaves and their blanching appear from a lack of moisture and mineral nutrition;
- does not grow and does not produce young leaves if there is insufficient lighting, depleted soil or inappropriate pot size;
- Streptocarpus roots rot due to excessive watering, low temperatures and drafts.
The development of fungal and bacterial diseases most often results from a violation of the temperature regime due to excessive watering and contact of vegetative organs with water. When the first symptoms of the disease appear, it is necessary to:
- removal of damaged areas;
- spraying with a fungicide or a solution of laundry soap;
- change in conditions of detention.
The soil
The soil for streptocarpus should be loose, well permeable to air and moisture.
A perfect substrate for violets , to which you can add a little peat or perlite.
If you prepare the mixture yourself, you can choose one of the options for the composition of the soil for streptocarpus:
It is recommended to add a little crushed charcoal to any prepared substrate. It will prevent stagnation of moisture in the soil and, accordingly, will help avoid rotting of the root system.
Sometimes a mixture of peat and vermiculite in equal parts is used to grow streptocarpus. Some people plant the plant in the peat itself. In such cases, watering should be more frequent so that the peat does not turn into one monolithic dry piece.
It is important to sterilize both the self-prepared soil mixture and the purchased substrate before planting the flower.
Fertilizer
From spring to autumn, streptocarpus needs regular feeding: once every 7-10 days. It is better to use liquid complex fertilizers for flowering indoor plants.
For streptocarpus, you can alternate potassium and nitrogen fertilizing. The dosage indicated on the package must be halved.
Streptocarpus needs regular feeding for a beautiful decorative appearance and abundant flowering.
Young, recently rooted plants must be fertilized with nitrogen fertilizers. When buds appear, preference should be given to mixtures with a predominance of potassium and phosphorus. Of the ready-made compositions for increasing green mass, the “New Ideal” fertilizer is suitable, and for abundant flowering - “Violet”, “Superflowering”, “Kemira-lux” and others.
Fertilizers should be applied only to moist soil , preferably after watering. This will help avoid burning the plant roots.
It is important to trim the lower old leaves of streptocarpus in a timely manner, since they will no longer produce flower stalks and only take strength and nutrients from the plant.
What does the plant suffer from and methods of treatment
Diseases and pests can cause plants to feel unwell. Among the ailments characteristic of streptocarpus are:
- Thrips are a pest that attacks buds and appears due to low humidity. To get rid of it, you need to remove all the buds of the plant and provide the plant's soil with an insecticide.
- Spider mites cause the peduncle to dry out and form a coating in the form of small cobwebs on the leaves. To save the plant, damaged leaves of the peduncle must be removed. The plant itself is completely washed and treated with an insecticide.
- Powdery mildew is a fungal disease that leaves a flour-like coating on the plant. Ulcers may appear on the leaves; in advanced cases, they die completely and lead to the death of the entire plant. The plant is treated by treating it with topaz fungicide.
- Late blight is another fungal disease that can hardly be cured on streptocarpus. The first symptom is slight wilting of the foliage. However, after watering, the foliage begins to wither more actively and the process of rotting in the stem begins.
- Gray rot appears due to high indoor humidity in the form of plaque on the leaves. It is enough to wash the flower and treat the damaged areas with a fungicide.
Reproduction
Streptocarpus can be propagated vegetatively or by seeds.
The simplest way is to divide old bushes, which is carried out in early spring during transplantation.
The streptocarpus bush is divided into no more than 3 parts with a sharp knife. The cut areas are sprinkled with crushed coal. The level of immersion in the ground is up to the root collar, shallow. To make the plants take root faster, the leaves are cut in half.
Another method of vegetative propagation of streptocarpus is by leaf.
A strong, healthy leaf is buried 1 cm into the ground and covered with a film or cap. Ventilate periodically.
At a temperature of 20-24 degrees, small “babies” appear after 1-2 months. When they have 3 leaves, they can be transplanted into separate pots.
Streptocarpus seeds are sown from April to June. They need to be scattered over the surface of the soil, moistened with a spray bottle, and covered with film or glass. After germination, diving is required twice.
Watering should only be done through a tray. The disadvantage of seed propagation is that hybrid species may not retain their varietal characteristics.
Growing streptocarpus from seeds
Let's take a closer look at growing streptocarpus from seeds at home and caring for the sprouts. When propagated by seed, young specimens do not retain the varietal characteristics of the mother plant.
This is a rather complex method of propagation, but interesting, allows you to experiment and obtain new unique specimens.
You can buy streptocarpus seeds at a seed store. You can choose the color and variety you like. It is important to pay attention to the expiration date, since the seeds quickly lose their viability.
You can also get the seeds yourself by having two plants to pollinate. If the procedure is successful, after 2-3 months the seeds ripen in the seed capsule. They are very small, like grains of sand, so it is important to be careful not to spill them.
The ideal time for sowing seeds is February - April. Wide, shallow bowls filled with a mixture of peat and sand in equal parts are suitable for sowing. Before sowing, the substrate is well moistened. The seeds are scattered over the surface of the substrate and are not covered with soil.
After sowing, the bowls are covered with glass or polyethylene and placed in a warm place with a temperature of 21-25 degrees. In order for the seeds to germinate successfully, it is important to ensure high air humidity - about 80%. Moistening the soil should be done as needed using a fine-grained spray bottle or through a tray. The greenhouse must be ventilated daily.
The first shoots should appear in 10-20 days. With the appearance of the first leaves, it is necessary to gradually accustom them to conditions outside the greenhouse. When two true leaves appear, it is necessary to carry out the first picking into a larger container and plant the seedlings so that they do not interfere with each other.
After 30-50 days, you can plant the plants in individual pots. To do this, it is recommended to prepare a substrate consisting of peat, vermiculite, perlite, moss and leaf soil in a ratio of 3:1:1:2:2.
When caring for seedlings, it is important to observe certain conditions:
Growing and planting
To successfully grow and plant a plant, several conditions must be met:
- After purchasing, wait 14 days and only then replant the flower in a plastic pot;
- plant young shoots in shallow pots to obtain lush flowering and increase green mass - the more growth points the streptocarpus has, the more flower stalks there will be;
- young plants first grow green mass and then bloom, so the emerging flower stalks should be cut off;
- It is important to maintain the humidity and air temperature suitable for the plant, to provide the necessary amount of light and moisture.
Seating of streptocarpus babies:
- grown young shoots are separated from the mother plant and planted separately;
- there is no need to immediately plant the baby in a permanent flowerpot, as the plant will immediately begin to grow green mass and flowering will not occur;
- it is necessary to gradually move the streptocarpus from a smaller container to a larger one until the time comes for planting in a permanent pot.
Transfer
The best time to transplant streptocarpus is February.
Regardless of age, the plant needs annual replanting. The best way to transplant streptocarpus is transshipment . It is important to know that the plant does not tolerate deep penetration into the ground, optimally up to the root collar.
The flower pot needs to be wide but shallow, which is explained by the peculiarity of the structure of the root system. Drainage is also necessary, which is updated annually. Expanded clay or polystyrene foam is suitable.
It is recommended to replant streptocarpus in plastic pots. This is explained by the fact that the thin roots of the plant can penetrate the pores of the walls of the clay pot and then become damaged during replanting. It is optimal that the new pot is 1-3 cm larger in diameter than the previous one.
During transplantation, streptocarpus, which has grown and has “babies,” is recommended to be divided into parts with roots and planted in individual containers.
Within 1-2 weeks after transplantation, top watering is used, then bottom watering into the pan.
Now you know everything about caring for and growing streptocarpus at home, as well as about propagating and replanting the plant.
Varieties of indoor plants with names and what they look like
Streptocarpus DS 2080 and other varieties of Dimetris selection
At the moment there are about 130 varieties of the plant. Most types of streptocarpus are suitable for growing and caring for at home.
Streptocarpus candidus
The plant has a rosette structure and wrinkled leaves. Many people note that the small white flowers exude the smell of honey. Their length is 2.5 cm. The flowers have yellow stripes and small red spots in the throat.
Streptocarpus grandis
Large streptocarpus is a plant with a single leaf, the length of which reaches 40 cm and the width - 30. On a half-meter stem there are flowers of a light lilac hue. In the throat the color is darker.
Streptocarpus cyaneus
The plant has a rosette structure and has stems 15 cm long. Each of them bears a pair of pink flowers with purple stripes and a yellow core.
Cornflower Streptocarpus
Streptocarpus wendlandii
Wendlanda originated from South Africa. Its dark green leaf with lighter veins measures 90x60 cm. The flowers are located on long peduncles about 5 cm long. Purple funnel-shaped corollas in the throat have white stripes.
Streptocarpus rocky
The plant of this variety lives in most cases on mountain slopes and embankments near the sea coast. The appearance of the inflorescences resembles a crocus - it has lilac-violet flowers on green peduncles.
Important! This species is resistant to drought and bright sunlight.