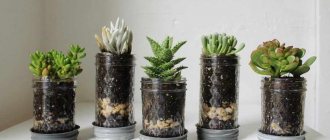
Anyone who has been involved in planting plants at home understands perfectly well that drainage for indoor plants is a prerequisite for their rapid rooting and healthy growth after planting.
It is designed to remove excess moisture from the soil and provide air access to the roots. The drainage device is made using coarse-grained bulk material.
To make effective drainage for houseplants with your own hands, you must fulfill certain requirements for its equipment:
- moisture after watering should not accumulate in the pot, for which you need to make holes in it to drain excess water;
- the drainage layer should be laid first on the empty bottom of the pot or flowerpot so that there are no intermediate layers between the bottom and the nutrient soil that retain moisture;
- the thickness of the layer, which depends on the material used, the size and number of drainage holes, should ensure good outflow of water and free flow of air to the roots;
- the degree of soil drainage for each plant is selected individually
, for example, for cacti and succulents you need fast drainage in a pot with a large number of holes and loose soil, and for a moisture-loving flower, moderate soil drainage that retains moisture is suitable; - equipment of the drainage layer should be carried out with your own hands, adhering to a certain order, starting with the coarse, then the medium and ending with the small fraction. Upon completion of installation, shake the pot to eliminate any remaining voids between the particles of material;
- After watering the seedlings, the holes in the pot should not be clogged.
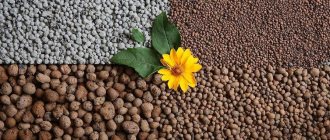
What materials are used for drainage
A variety of materials can be used for drainage, depending on their availability and accessibility. River pebbles, crushed stone, brick fragments, finely chopped polystyrene foam, gravel, expanded clay, etc. are often used for these purposes. The standard height of the drainage layer is usually 30 mm from the bottom of the pot. The flowerpot can be filled with drainage material up to 1/3 of its volume.
The most popular among gardeners for drainage is expanded clay, which can be found in every flower pavilion. The advantages of expanded clay include the following properties:
:
- good absorption of moisture from the soil and return when it dries;
- easy passage of excess water;
- light weight;
- long service life (up to 5 years);
- possibility of use as a mulching agent;
- protects the soil from crust formation and drying out;
- prevents the appearance of mold and moss formation.
Ceramic dishes and baked bricks are similar in properties to expanded clay, therefore, breaking them into small fragments with a hammer can be used as drainage material. Unlike expanded clay, crushed stone, pebbles or gravel are stronger and more durable, but they are heavy, weigh down the pots and can destroy the bottom of the flowerpot. In addition, they do not retain heat well and can overcool the soil.
Important! Vermiculite drainage perfectly absorbs liquid fertilizers and water. It can serve as flower food for several months.
You can also use crushed polystyrene foam obtained from packaging boxes as drainage. He:
This light, soft and voluminous material has the only drawback, which is that the roots of the plant, as they grow, can grow through it, complicating the transplantation process. To replace the drainage, when planting a flower in a pot, you should place small pieces of foam plastic on the bottom in a layer of 3 cm, sprinkle a light layer of sand on top, and then fill it with nutritious soil.
For house plants, drainage containing... It retains moisture well and has disinfecting properties. Moss has soft stems of light green color with needle-like soft leaves sticking out in all directions. The brought moss must be filled with warm, but not boiled, water to get rid of possible insects. Store in unsealed bags in a cool place, such as the refrigerator.
Fire hazard
Once you become interested in using polystyrene foam for flower pots, you can start collecting it anywhere and everywhere. Packaging boxes and other products are sometimes brought home literally from a landfill.
It is not worth keeping such a quantity of flammable material at home. A stack of foam plastic sheets stacked on a balcony or in the corner of a hallway is quite a fire hazard: a spark from a cigarette can easily fall on it.
What materials are not suitable for drainage?
- You cannot use, for example, tree bark, sawdust, egg or nut shells, etc. Their disadvantage is their susceptibility to rotting, the growth of mold and fungi under the influence of moisture. This affects the acidity of the renewed soil after plant transplantation, contributes to the development of various diseases in them, and can lead to their death.
- It is not recommended to use river sand, which easily becomes clogged with soil microparticles and quickly loses its drainage properties.
- It is strictly forbidden to use granite and marble chips, sawdust from slabs, which contain mineral salts that interact with water when watering and lead to alkalization of the soil.
To increase the efficiency of the drainage layer, it is necessary to remove excess water from the pan after watering to ensure air access to the roots. After each plant transplant, the drainage should be replaced with new material.
Expanded clay
It is porous clay fired in a special way. These are round or oblong granules with a diameter of 0.5 to 3 cm. Its main area of application is construction, but this material has also become widely used in indoor floriculture.
Expanded clay has unique properties - due to its porosity, it easily absorbs water and then slowly releases it to the external environment. In addition, it is a very light material that does not weigh down already heavy plant pots.
Application of expanded clay
As drainage
Expanded clay produces very good drainage, which can release some of the moisture into a lump of earth as needed. However, if expanded clay is not available, it can be easily replaced with pieces of broken ceramic pots, brick fragments, pebbles or even pieces of foam.
As a component of soil mixture
If the soil is heavy, finely granulated expanded clay is often added to it, which makes it lighter and more hygroscopic. Expanded clay granules absorb excess moisture when the plant is flooded, preventing rotting of the roots, and slowly release moisture into the soil when it dries out. Most often, expanded clay is added to the soil for cacti and succulents, which are afraid of flooding and can survive for a long time on the minimal moisture of the earthen coma.
As a filler for the surface of the soil in a pot
Expanded clay is often used to cover the surface of the soil in a pot.
- Firstly, it makes the plant decorative;
- Secondly, the layer of granules prevents the top layer of soil from quickly drying out;
- Thirdly, it does not allow the salts in the irrigation water to settle in the soil.
However, in order for this layer to work, its thickness must be at least 1 cm. In addition, every 2-3 years the expanded clay layer should be replaced with a new one.
In trays to improve air humidity
In winter, in apartments with central heating, plants suffer from excessive dry air. Some plants, such as orchids and desicoteca, tolerate dryness especially hard and may die or lose their decorative properties. Spraying does not solve the problem, since the moisture from it evaporates very quickly. A good solution to the problem is to place the pots on a tray with wet expanded clay. Wet expanded clay, soaked for several hours, is placed in the pan and filled with water. Plants are installed on it. Expanded clay slowly releases moisture into the air, maintaining a comfortable humidity level for plants.
As a medium for growing plants hydroponically
Many plants can be grown hydroponically. In fact, the presence of soil is not necessary for most plants. For a plant, the main thing is the availability of nutrients. When growing hydroponically, nutrients are supplied by fertilizers added to the water, and the medium in which the plant roots are located is precisely expanded clay.
As you can see, these nondescript granules have absolutely wonderful properties that will be very useful for your indoor plants. This is a modern material, which over time is becoming more and more widely used in indoor floriculture.
I suggest watching a short video about how an orchid is grown hydroponically in expanded clay.
Does an area with dense clay soil turn into a swamp after every rain? Needs drainage. You can remove moisture from the surface without unnecessary expenses. A system of shallow trenches dug on a slope will keep your yard dry and your garden or lawn healthy and green. If surface drainage is not enough, a system of deep lines is made. The main materials for arranging canals are geotextiles, sand, crushed stone, perforated pipes. Instead of gravel and crushed stone, you can use baked clay: expanded clay drainage is more durable, and the material is environmentally friendly.
- Open drainage: expanded clay (or backfilled with crushed stone); in the form of open concrete channels (to drain water from a yard lined with stones and tiles).
- Closed. It is installed at different depths: to drain rain moisture and reduce groundwater levels.
Drainage network on site
Common Mistakes
When installing drainage, inexperienced gardeners often make mistakes that lead to disease and even death of plants. And the most important of them is the use of inappropriate materials. There are several of them:
- sand
- tree bark, tea leaves, nut and egg shells
- marble and granite chips.
So, for example, sand at the bottom of a flower pot will not only not drain away, but will also retain water, preventing it from evaporating. And a violation of the water balance will lead to acidification of the soil and the development of putrefactive processes, which in turn will negatively affect the health of the plant. In addition, sand can completely clog the drainage hole.
Tree bark, tea leaves, nut and egg shells are components of animal and plant origin that may contain a number of pathogens. Because of this, there is a high probability of mold and other fungal diseases developing in the substrate.
Shards of granite and marble enter into a chemical reaction with water and can change the acid-base balance of the soil.
Another common mistake made by beginners is letting water stagnate in the tray of a flower pot. The fact is that if excess moisture is not drained, the drainage system simply will not work. For the vast majority of plants, the tray must be emptied of excess water 30-40 minutes after watering.
Here, perhaps, are all the nuances of arranging proper drainage in a flower pot.
Anyone who has been involved in planting plants at home understands perfectly well that drainage for indoor plants is a prerequisite for their rapid rooting and healthy growth after planting.
It is designed to remove excess moisture from the soil and provide air access to the roots. The drainage device is made using coarse-grained bulk material.
Surface drainage: types of lines and installation locations
A surface network of drainage lines and rainwater collection points is organized in areas, regardless of the type and composition of the soil, and relief features. Without a drainage system, moisture will stagnate in all natural depressions after rains. After the snow melts, water flows erode the paths and the top layer of soil. If you plan to lay a decorative covering, be sure to install several drainage branches underneath it - the yard will remain level and the tiles will not fall through.
Options for organizing surface trenches:
- Installation of ready-made trays. Plastic, polymer concrete, concrete containers with decorative lids are installed where it is undesirable to leave open channels: in the yard, on areas where there is traffic.
Ready-made trays in the drainage system
- Backfilled lines. Without concrete mortar or purchasing expensive materials, you can also make full-fledged drainage branches. Backfill materials allow moisture to pass deep into the soil, while simultaneously retaining dirt, silt, and debris. Decorated with multi-colored bedding (painted expanded clay, minerals, colored crushed stone), the channels become part of the landscape design. Fill lines are installed in open ground, where there is no risk of damage to the drainage by equipment: in the garden, on the lawn, in the vegetable garden.
Open channel with backfill
- Closed branches. Covered surface drainage lines are installed followed by covering the backfill with a layer of soil and turf. Such trenches are invisible on the surface.
Drainage ring in deep systems
In areas located on loams that poorly absorb moisture from the surface, or soils with a consistently high groundwater level that needs to be artificially lowered, deep drainage is installed.
Installation of ring drainage around the house
It is imperative to install branches around a residential building if the base of the foundation is above the groundwater level, so that the basement does not flood and the foundation walls are not destroyed by water. A drainage clip is placed in the trenches: a special perforated pipe in expanded clay (gravel, crushed stone) sprinkling and geotextile wrapping.
Diagram: drainage clip
It is advisable to install deep expanded clay drainage in the garden: reducing the water level in the soil will have a beneficial effect on the condition of the roots of fruit trees and ornamental plants. The system is formed in the form of branches connected at an angle of 45° to the main line, along which water is discharged to the “receiver” - a pond, a ditch, a drainage well.
Crushed stone or expanded clay: choice of material
To arrange drainage use:
- Geotextiles. Synthetic fabric with micropores. The holes allow moisture to pass freely, but retain solid particles. The fabric protects the drainage cage from silting, filters water coming from above, and in the lower part prevents the system from becoming clogged with eroded soil and sand from the bottom.
Options for arranging drains in geotextiles: with and without pipes
- Sand. Placed on the bottom of the channel. The sand cushion is a mandatory element, the base on which drainage layers are formed. Sand conducts moisture well and creates a barrier between the soil and the canvas.
- Perforated pipes. The optimal choice (especially for deep systems) is special corrugated hoses with factory perforation. Flexibility and ease of installation are the main advantages of drainage pipes. Economy options: you can make your own drainage pipe from a regular sewer pipe by drilling holes with a diameter of 2–4 mm in increments of 2–5 cm along the entire length and circumference. Instead of pipes, to improve outflow, use plastic bottles (without bottom or neck) laid in sprinkles; old tires, cut into 6 - 8 segments; bundles of vines or branches.
- Crushed stone or expanded clay. The size of the fraction used to form drainage backfills is medium and large. Fine backfill material is not used: too small particles clog the holes in the drainage pipe.
The backfill that is placed in the trenches must be clean: if gravel or crushed stone is used, you need to buy washed, or sift and wash the material yourself several times. Lime and dust under the influence of moisture will turn into a thick mass, gluing crushed stone and clogging the holes of fabric and pipes.
Different fractions of expanded clay
Expanded clay drainage is environmentally friendly. The main advantages of the material: lightness and low cost. When choosing backfill for drainage trenches, pay attention to the shape: expanded clay gravel - oval, smooth; crushed stone - in the form of squares, polygons. Expanded clay crushed stone particles with sharp corners and an uneven surface have the best drainage properties. Fraction – 20 – 40 mm.
The coarse fraction is used for filling in drainage networks
Another advantage of expanded clay is its low thermal conductivity; the material is used as thermal insulation in construction. Even pipes laid close to the ground surface, sprinkled with such crushed stone, will not freeze in winter.
"Sofrock" - a profitable alternative
The drainage system without crushed stone "Softrock" is elements completely ready for installation, which significantly reduce labor costs and save time when arranging high-quality and durable drainage. The system includes the following elements:
- clamps and couplings, purchased separately, are used to connect pipes;
- geotextile mesh;
- pipes (perforated, flexible), around polystyrene foam.
The length of each block is 3 m, while the pipes can be 11-20 cm in diameter, the outside diameter is 30 cm. The design itself is much more effective than any analogues using crushed stone. Foam channels improve water flow; the problem of silting is eliminated thanks to the geotextile mesh.
Connecting drainage system blocks Source udachnyi.ru
Deep drainage with expanded clay sprinkling
The main purpose of installing deep drainage is to reduce the groundwater level. Level adjustment is not required in all areas. Deep drains must be installed:
- With a strong deepening of the foundation.
- If the house is built on a slope.
- The soil is oversaturated with moisture, and the groundwater level does not decrease during drought periods.
Mandatory zones for laying a drainage network: around the foundation with an indentation of several meters, in the center of an area located on a slope, with branches diverted to the sides. It is better to entrust depth calculations to specialists: at each site, the installation depth is calculated individually.
When organizing drainage around the foundation, the depth should be below the permanent groundwater level. Indentation - up to 8 meters from the walls, minimum - 4 m. It is advisable to deepen the trenches below the freezing point
Minimum depth values for different zones:
- In a garden with fruit trees, the depth of drainage is up to 1 m.
- On the lawn and in the vegetable garden, it is enough to deepen the drainage to 70 cm.
Depth line in section: diagram
The width of the trenches is 50–60 cm. The slope of the channel is from 1 to 3 cm per meter of line. A ring is created around the house, closed in a drainage well. The highest point is selected, and lines are dug from it at an angle. The lowest point is at the connection point (drainage well).
Frost-resistant sprinkling: rules for constructing trench clips
The bottom of the dug trenches is compacted. Make a sand cushion up to 15 cm high. After compaction, be sure to check the level of the slope.
Geotextiles are laid on the sand. The canvases are spread in the center of the trench so that the edges remain free. For convenience when laying inside the channel, the free edges are fixed to the walls.
Drainage clip with expanded clay
A layer of expanded clay crushed stone is poured onto the fabric - the thickness of the drainage layer is up to 60 cm. Backfilling is carried out in 2 ways:
- Pour out the entire volume at once.
- Half of the planned height is poured, and after installing the pipe - the second half.
Pipe covered with expanded clay
Pipes are laid inside the backfill. The sections are connected with special couplings. Expanded clay is leveled around the pipe so that the thickness of the bulk material is the same on all sides. The edges of the textile are overlapped at the top. For fixation use adhesive tape.
The finished clip is covered with a dense layer of sand. The top is backfilled with soil.
Primary requirements
In principle, any material consisting of large particles and possessing certain properties can be suitable for drainage. When interacting with moisture, it should not initiate any chemical processes, collapse or compact, or rot or block the liquid. Natural components or materials specially designed for this purpose (for example, vermiculite or agroperlite), which can also filter the soil from harmful substances and excess salts, are selected as drainage. Sometimes foam and similar materials are used for the drainage system, which do the worst job, but save the roots from hypothermia.
In order for the drainage system to function successfully, attention should also be paid to the growing container. Each must have holes, the diameter of which depends on the characteristics of the “inhabitant” itself.
For example, if a plant loves moisture, then the holes should be made small - about 0.5 centimeters, but for succulents the optimal diameter reaches one centimeter. When the plant is replanted, the drainage layer should be renewed or thoroughly washed to remove the old soil, disinfected and dried. The thickness of the drainage layer is also determined depending on the plant.
If a small number of holes are made at the bottom, then quite a lot of drainage will be required - its layer should occupy almost a quarter of the entire volume of the pot. If the number of holes is average, then a smaller drainage layer will be required - about 1/5 of the total volume.
Finally, for a container with large holes present in sufficient quantities, only 1/6 of the pot is required for drainage. The minimum level of drainage forms a height of 1 to 3 centimeters, the average reaches 4-5 centimeters, and the high level is at least 5 centimeters.
Materials such as crushed stone or pebbles, which have thermal conductivity, should be additionally covered with something porous, for example, expanded clay and perlite
It is also important to add that drainage particles should not clog the holes at the bottom. The material is poured immediately before planting and must be dry.
The same can be said about the pot - it is important that it is dry and clean. If the instructions indicate the need to pre-soak the substance, this should also be done.
To distribute the particles evenly, the pot can be shaken a little or tapped vigorously on all sides.
It is recommended to sprinkle fine-grained drainage with a thin layer of soil mixture immediately before planting, but coarse-grained drainage will need to be thoroughly covered with clean sand.
Surface expanded clay drainage: installation instructions
It is difficult to overestimate the benefits of using expanded clay in the garden and beds. A universal material that does not rot, does not absorb moisture, is used not only as a drainage base, but also perfectly loosens the soil and saves plants from waterlogging.
Layout and marking of the area for trenches
Surface drainage branches are easy to plan. After the rain, it is worth taking a closer look at the streams of water. The natural direction of flow is the ideal trajectory of the main line. Bends are formed from the central branch at an angle of 45° to the required length.
Surface network: bends - at an angle to the main line
The depth of the trenches is up to 50 cm. The width is up to 60 cm. A sufficient slope is 1 cm for every meter of a straight branch. The slope is formed for both side branches and the main highway. A drainage well is installed at the lowest point.
The walls of the ditch are at an angle to the bottom
Trenches for moisture removal must be of the correct shape: with a flat and solid bottom, and walls at an angle of 30° to the bottom. This form will allow the system to work for decades: moisture will flow smoothly along the inclined surface, without eroding the clay on the walls and without washing out the holes in the bottom.
After completing the excavation work, be sure to check how the canal network copes with the flow of water. Water is supplied from the top point with a hose and the flow speed is assessed. Before laying drainage materials in the trenches, all shortcomings can be corrected by increasing the slope or widening the channel.
How to properly install drainage lines
Surface drainage is arranged without the use of perforated pipes. The channels are left open, without hard covering.
Geotextiles are laid on the bottom on top of the sand cushion, and up to 30 cm of expanded clay is poured. In the garden, it is better to use expanded clay crushed stone (large fraction) - the material does not enter into chemical reactions, does not erode, and cannot be a source of soil contamination.
The expanded clay drainage layer is wrapped with the edges of the canvas. A layer of sand is poured on top. A decorative layer is laid on top of the sand bedding.
Standard expanded clay: an aesthetic material
Standard expanded clay is produced in brown and dark gray colors. You can backfill with standard material, or buy additional gravel - large, oval-shaped expanded clay. For decoration, colored painted material is used: expanded clay retains its color for a long time, and the number of shades will allow you to choose the best option for any landscape design.
Plant protection: removal of surface moisture
Remains of expanded clay after arranging the drainage should not be thrown away. The material will be useful in the vegetable garden and flower beds, in the garden. Around fruit trees you can dig 5-10 centimeter holes with a diameter of up to 1 m. Expanded clay is poured into the hole. This bedding will protect the tree from waterlogging and the occurrence of diseases associated with excess moisture.
Removing excess moisture around plants
The material is also used to loosen and regulate the moisture content of the top fertile soil layer. Expanded clay is mixed with clay. As a result of mulching, the risk of rotting of plant roots is reduced and air circulation in the upper layer of soil is improved.
Video: comprehensive site drainage
Useful material on how to properly arrange the drainage of rain and groundwater, what materials to choose, and in what order to carry out the installation.
Surface drainage can be safely planned and installed independently. Solving the serious problems associated with high groundwater levels requires complex calculations. A specialist must calculate and design the design of the drainage network. To select the type of system, an analysis of the soil composition is carried out and the topography of the site is studied. Only after this they begin to plan the trajectory, the depth of the lines, and select materials. A poorly designed deep network cannot be corrected.
Proper drainage is essential to the health of your plants. Many plant species do not tolerate “wet feet”, i.e. constant immersion in water and die. For most plants, the ideal soil consists of: 15% air, 35% water, and the rest is solids.
When the roots of a plant are immersed in water for more than 1-2 hours, the following happens: the roots suffocate without oxygen and die. When applying fertilizer to a flower pot, excess nutrient solution, if it remains in the pot, increases the acidity of the soil, as a result of which salts will accumulate, the roots will receive a chemical burn and die.
In nature, water falling through precipitation penetrates into the soil, from where it is absorbed by plant roots. Some water is retained by the soil layers. Excess water goes deeper, enters underground streams, and is ultimately either carried out into above-ground reservoirs or accumulated in some underground cavities at great depths.
In a flower pot, everything happens according to the same scenario. Using top or bottom watering, we saturate the earthen ball with water. A small amount of water will be absorbed by the roots, part of it will be retained by the earthen lump. Excess water, under the influence of gravity, rushes to the bottom of the pot.
!!!
Basic rule
.
The flower pot must have a drainage system for excess water !
Typically, one or more holes are made at the bottom of the pot to drain water. Through these same holes, air enters the roots of the plant and the necessary aeration occurs. The holes in the bottom of the pot are called DRAINAGE HOLES.
When choosing a container (pot) for your plant, a drainage hole must be present.
. If you like a pot without a drainage hole:
1st option. Make a drainage hole;
2nd option. You can use a pot without a hole as a decorative container (plant pot) for a pot with holes. It will be much more beautiful than a saucer or tray. After watering the plant, do not forget to drain the water from such a pot (plant pot).
Another important question that constantly worries flower growers is how and from what material to make a drainage layer at the bottom of the pot?
What do many flower growers do?
The bottom of the pot is lined with filter paper, a layer of gravel (foam plastic, broken tiles, expanded clay) is poured to a height of 1-3 cm, then soil substrate is poured onto this layer, into which the plant is planted. These actions are justified by the fact that the specified layer:
a) protects roots from direct, prolonged contact with water;
b) will prevent the roots from forming a plug and closing the hole in the pot.
ALL THESE ACTIONS ARE A BIG MISCONCEPTION AND A WASTE OF TIME AND MONEY.
1st argument.
Firstly, the so-called drainage layer will not be absorbed by the roots of the plant, therefore, it will be wet for a long time. A favorable environment will be created for the development of fungal diseases and the development of pests - primarily fungus gnats (midges), which adore moisture. Secondly, the drainage layer will block the access of air from the drainage hole to the roots of the plant.
2nd argument.
Millions of potted plants are grown industrially every year. You've probably had to buy them at flower shops. You will not find a drainage layer in any pot, and at the same time all the flowers are of excellent quality.
Where is the grain of truth?
And the truth lies in a correctly composed or purchased high-quality soil substrate.
A high-quality substrate should:
Drain the soil well, i.e. When watering, water should quickly penetrate into all corners of the earthen clod, and its excess should drain completely. To do this, components such as sand, perlite, vermiculite, brick chips, etc. are added to the soil mixture.
Maintain its structure for a long time.
In addition, a substrate with the necessary (only for this plant) properties is selected for each type of plant.
How does everything happen in life? The bulk of soil mixtures that are sold in stores and garden centers (Ukraine, Russia) are prepared on the basis of peat (more than 90%). Peat quickly loses its structure; very soon your flower pot will be filled not with structural soil substrate, but with dirt. And no drainage layer compensates for the destruction of the structure of the soil substrate. In addition, many commercial substrates simply do not have drainage components. Again, no drainage layer at the bottom of the pot will compensate for this. They also offer a “Universal Mixture” in stores, which is suitable for all plants. This is generally a lie; soil mixtures with such properties cannot actually exist.
When making a mixture on their own, gardeners use sand as a drainage component, and sand is different from sand. As a soil component, coarse sand (grain size 2-3mm) should be used, and finer-grained sand is almost always used. Fine-grained sand is suitable as a construction filler for mortars, but not as a component of the soil mixture. Sand with fine grains, when watered, is quickly washed out of the earthen clod. The filter paper with which you line the bottom of the pot will retain the sand, but only in bulk, at the bottom of the pot. In this case, the sand will not perform its function.
Conclusions.
- The flower pot in which the plant is located must have a hole.
- 20-30 minutes after watering the plant, be sure to drain the water from the tray (saucer or “pot”).
- To grow a plant, make up the soil mixture correctly (see the soil mixtures section), or buy a high-quality and individually selected mixture.
P.S.
Using drainage in a pot makes sense only in one case - if you have a plant with a weak root system (for example, one of the types of cacti - mammillaria). Under natural conditions, this cactus grows in a small crack in the rock. As a result of evolution, it has formed a small-volume root system, for which a large capacity is not needed and is even harmful.
If you need to plant a plant with an underdeveloped root system, and there is no necessary shallow container, then in order to reduce the volume used for soil, you can fill the excess volume of the pot with drainage.
The health of indoor plants directly depends on the presence of drainage. Many types of flowers simply cannot tolerate the presence of constant moisture in the root system, and some may die from excess moisture.
So most flowers require that the soil composition be 15% air, 35% water and 50% solid particles. That is why it is necessary to provide special drainage, which can help create optimal conditions for the flower.
Excessive watering displaces the 15% of air that plants need so much. In an environment without oxygen, harmful bacteria begin to develop. This contributes to the rotting of the roots and the flower itself withers. Drainage is simply necessary, since this is the only way that excess water can escape and the roots of the plant can breathe.
- what do you know about this?
What climbing plants can be used to cover a gazebo? .
Why do you need holes in a pot?
It is not enough to provide drainage to the flowers; you also need to position the holes correctly, because they will ensure the outflow of moisture from the soil.
Holes that are too small will not allow excess water to escape. If the holes are too wide, there may be a lack of moisture.
Therefore, when buying a pot, pay attention to the size of the drainage holes. In addition, you should select pots with holes that will provide optimal conditions specifically for your type of flower.
Since cacti, succulents, and some types of orchids need fast drainage. For these purposes, it will be useful to buy a small pot with small holes and a porous substrate.
For plants that love constant moisture, choose a dense substrate with a minimum number of holes.
Other elements of the drainage system
In addition to the layer of bulk materials, the drainage system should also include:
- drainage holes of the container itself;
- loosening additives to the substrate, which give it a light, loose texture, prevent the soil from becoming excessively compacted.
They function in the same system and are equally important to ensure optimal conditions. When growing hydroponically, drainage completely replaces the growing substrate; in fact, the entire technology is drainage.
But even in hydroponics, the drainage holes of the container do not lose their importance, because even with an ideal drainage layer, insufficient outflow of water from the container itself will negate all efforts.
Pots and various flowerpots, no matter how attractive and stylish they are, must have at least one drainage hole. But usually the optimal size and number of holes are selected for each plant and each container individually
In plastic or polymer pots it is easy to make holes yourself, but when purchasing ceramic and terracotta pots you need to evaluate the drainage capabilities of the pots more carefully. Any container for indoor plants requires drainage holes that will allow water to drain freely, will not become clogged with soil and roots, but will also prevent the substrate and drainage fragments from falling out of the pot.
The minimum dimensions for holes for water drainage are from 0.5 cm. Holes larger than 1 cm must be covered with a mesh. But choosing the quantity is more difficult: for tall containers you need 5 evenly distributed holes, which will allow the soil to dry out evenly in the lower part, and for wide and low pots one large hole is enough. For orchids and other epiphytes, “leaky” pots are chosen, with numerous holes in the bottom and walls.
Make holes in the bottom of the pot to allow water to drain. purple sprout Lay out the required drainage layer. purple sproutFill the remaining volume of the pot with soil. purple sprout
What materials to use for drainage
It is important to know that drainage for flowers must allow water to pass through, be chemically inert, and not rot or mold.
Therefore, the following materials are suitable for drainage: broken brick, ceramic shards, crushed stone, gravel, expanded clay, or any synthetic material (for example, polystyrene foam).
Any drainage material for flowers must meet the following requirements: not damage the roots, not rot or mold.
Sometimes birch charcoal, river sand, and peat are used. For some types of plants, sphagnum moss is suitable, with disinfecting properties (often used when growing orchids).
For different types of plants, small, medium and large fractions of various materials are used.
The most popular material for drainage is expanded clay; we will consider it as a drainage material in more detail.
How to make drainage for indoor plants with your own hands
Watering indoor plants in the absence of owners for 2 weeks or a month
You can make the bottom layer for the flower using:
- brick, broken and crushed;
- ceramic pot, breaking it into small particles;
- small stones, crushed stone collected from a summer cottage;
- polystyrene left over after purchasing equipment - it must be broken into small pieces.
Important! Before transplanting the flower, you should wash and calcinate the drainage made at home. Step-by-step process for filling material:
Step-by-step process for filling material:
- The largest pieces are laid out on the bottom first, covering the holes in the bottom.
- The middle layer is medium-sized pebbles.
- The top is filled with the finest crumbs or sand.
The layer of stones should be uniform for the same distribution of water in the pot. After filling all the layers of stone, the pot is shaken and knocked on the sides.
Using expanded clay for flower drainage
Expanded clay is baked clay with a porous structure; it can be purchased at all flower shops.
Expanded clay is also used in construction as insulation and soundproofing material. The medium and small fractions are often used in floriculture.
For large plants, expanded clay of the middle fraction is selected - up to 2 cm in diameter. A layer of sand is poured on top.
The shelf life is 5-6 years, after which it turns into soil, so it needs to be changed periodically.
The main advantage is not only the removal of excess moisture, but also the absorption of it.
Behind it are detailed instructions.
What is the use of horizontal cotoneaster on the site? .
Description of Variegated Derain - how to plant, care, prune -
Other materials as drainage
shards are often used
. Sand is also sprinkled on top. It is not recommended to use shards that are too large, as sand spills through them.
Broken brick
should be used very carefully as a drainage material. Sharp edges can damage roots. White sand-lime brick, unlike red clay brick, can absorb and retain moisture in its structure and release it as it dries.
Styrofoam
also a good drainage material. Old packaging will also work. A significant drawback is the ingrowth of flower roots into its structure over time. Therefore, when transplanting, you can easily injure the roots of plants.
Transplant problem
Typically, polystyrene foam is mixed with soil substrate in a 1:2 ratio, and clean soil or mulch is poured on top. When planning to transplant an indoor crop into another container, the grower may face a problem that he has not encountered before. The roots of a plant are sometimes intertwined with a piece of foam so tightly that it is almost impossible to separate them. Then you have to leave these inclusions, which will take up some volume of the pot. This problem may occur with each subsequent transplant.