Although phalaenopsis is considered almost the most unpretentious representative among indoor orchids, there are still certain subtleties and nuances in its cultivation. This is especially true for the process of transplanting a plant to a new place, when it is easy to damage.
But you will have to replant the phalaenopsis - at least after purchasing it, because store-bought flowers usually live in small shipping pots. And at home - provided that you have created all the necessary conditions for him to live a comfortable life and he is actively growing, so that he is already cramped in the old pot.
How to transplant children, one child, a shoot of a home orchid: step-by-step instructions
Replanting a baby home orchid
An orchid growing in normal, ideal conditions can produce young shoots, or babies. This is a great opportunity to propagate the plant. What should be done? How to transplant children, one child, a shoot of a home orchid? Here are the instructions step by step:
- The baby should have fairly long roots - more than 5 cm and 3-4 leaves - these are the most suitable parameters for transplantation.
- Children usually appear on the stem or near the root collar. Using a sharp knife, you need to cut off part of the stem with the baby, stepping back to the sides at a distance of about 1 cm . Sprinkle the cut area with coal.
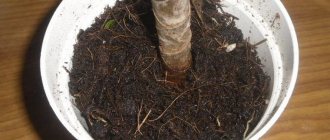
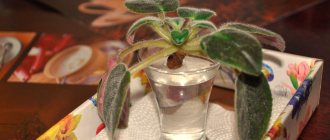
- Prepare a small glass in advance, preferably a plastic one, and add a small layer of drainage.
- Place the baby in a glass and carefully cover it with substrate. for the first 3-4 days .
- Place the glass with the baby in a place where the air humidity is high. You can simply spray the surface of the window sill where the glass is located more often. Try not to get it on the leaves.
The baby will grow in such a container for about a year, after which it can be transplanted into a larger container. An orchid grown from a child will bloom in three years .
In any case, when resuscitating an orchid, certain actions should be taken:
- Transplant the plant into a transparent container with drainage holes to drain excess water.
- Create a drainage layer from expanded clay, pine bark or coconut shavings.
- Create a layer of wet moss. Fresh star sphagnum moss is best because it has antiseptic properties and allows good air access to the roots.
- Place the orchid in the vessel so that its lower part does not touch the water.
- Place in a warm place, keep away from direct sunlight. As an additional measure to maintain the life of the orchid, wipe the leaves with a solution of succinic acid.
Folk remedies - soap solution and more
If the roots of an orchid begin to rot, it can be saved with the help of folk remedies. The most famous method is a soap solution. To prepare it, you need a bar of laundry soap, which is diluted in a container with 2–3 liters of settled water. The roots are immersed in the prepared solution for several minutes.
The next method for treating orchid roots is a solution of cyclamen tubers.
To prepare it, follow simple steps:
- chop the tubers and boil for 30–40 minutes;
- leave the broth for at least a day;
- strain, dip the roots into the prepared solution.
You can use olive oil (two tablespoons per 1 liter of water) or onion infusion. An onion decoction is used to heal orchid roots. To do this, take several onions and boil for 20 minutes, let the broth cool and leave for 12 hours. Then hold the roots of the plant in the resulting solution for 5–7 minutes. But this method is suitable only in the early stages of the disease.
Detailed instructions for pruning and treating roots before a planned transplant
All operations are performed with sterile instruments. To disinfect, the blade of a knife or pruner is treated with a disinfectant, for example, alcohol or chlorhexidine. Precaution is necessary to prevent infection of healthy tissue from diseased roots.
Trimming is done like this:
| Step 1 | Place the orchid pot in a container of water so that the substrate is well soaked. This is necessary so as not to damage the roots when removing from the pot. |
| Step 2 | Remove the orchid from the substrate and clean it. You can finally free the roots from the soil mixture by rinsing them under running warm water. |
| Step 3 | Carefully examine the root system from all sides. Roots with cracks, spots, spots, as well as dry and rotten ones must be pruned. |
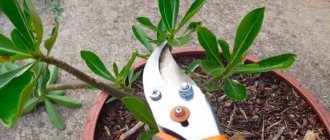
| Step 4 | Use a sharp knife (or garden pruning shears) to separate the infected part of the root. Make a cut 3 cm above the injury site, down to living tissue. |
| |
| Step 5 | To stop the flow of sap in the wound, the orchid is left for some time to dry the sections. |
| Step 5 | When the wound dries, it is treated with a protective agent. Most often used: · Activated carbon, crushed into powder. · Ground cinnamon. · Powdered wood ash. These substances will prevent infection from entering the open wound. |
| Step 6 | After treatment, plant the orchid in fresh substrate. |
If replanting is necessary in case of plant disease, then treatment with fungicides is necessary after pruning.
Chemical fungicides - all the pros and cons
Drugs in this category have a stronger effect on pathogenic microorganisms. Unlike biological agents, they are dangerous. They resort to their help when more gentle options have been exhausted. Despite their high efficiency, chemical fungicides are intended to protect open ground plants. If there is a need to treat indoor orchids, it is better to do this in the garden or on an open balcony. It is important to take all necessary precautions:
- use personal protective equipment,
- remove strangers
- keep the orchid isolated from other plants.
Experts in growing orchids recommend the following drugs for the treatment of measles diseases of orchids:
- “Pure Flower” is produced as a concentrated emulsion, packaged in hermetically sealed ampoules. To treat (soak) the root system of orchids before planting against diseases, prepare a solution - the contents of one ampoule (2 ml) per 5 liters of water. The prepared solution is not stored; it must be used within several hours.
- "Quadris" is a fungicide widely known in open-ground gardening. The drug is effectively developed and produced by one of the world leaders in the production of plant protection products -. Available as a liquid concentrated suspension. The product is designed to combat a large number of pathogens. To treat orchid roots before planting, prepare a working solution - 1 ml of suspension per 2 liters of water.
Getting inside the tissue through sections, it blocks the spread of pathogens. The result appears within 1 hour after treatment.
Features of phalaenopsis transplantation
Phalaenopsis transplant
This orchid variety does not tolerate replanting when the soil clod is destroyed. The reason for this is the fact that as a result of the disintegration of the substrate, the root hairs are torn. Therefore, if your plant is feeling well, the soil has not become salty and has not lost its structure, then it is better to transfer it to a larger container.
In this case, the free space in the pot is filled with new substrate, and the root system does not need to be buried. All procedures should be carried out after flowering has ended, in late spring or early summer.
Protective drugs against root system diseases
Fungicides are means to combat fungal diseases. The composition of drugs can be biological or chemical. At home, environmentally friendly biofungicides are preferable.
Based on materials from the book
"Rare indoor plants",
authors:
S. O. Gerasimov, I. M. Zhuravlev,
A. A. Seryapin
To prevent diseases of orchids, the following biofungicides are used:
Fitosporin - M - is produced using a live culture of Bacillus subtilis 26, which effectively suppresses the growth of many fungal pathogens. Manufacturers produce the product in the form of liquid, paste, and powder.
To soak the root system after pruning, use a working solution, which is prepared in the following proportions:
- 4 drops of liquid substance per 200 ml of water
The roots are completely immersed in the solution and left for 2-3 hours. Before planting, the root system must be dried.
Fitosporin effectively copes with the prevention of fungal and bacterial diseases of the root system of orchids.
Alirin B and Gamair
The drugs are synthesized based on other strains of the bacterium Bacillus subtilis, that is, the same species as Fitosporin.
The product goes on sale:
- in liquid form,
- in tablets (TAB),
- like powder
Also, “Gamair” is produced as a concentrated suspension.
To protect orchids, tablets are most often used.
Experts recommend the simultaneous use of three preparations for soaking the roots before planting:
- "Alirin B" – 2 tablets
- "Gamair" – 2 tablets,
- “Fitosporin M” – 1 g of powder.
All components are dissolved in 1 liter of water. The roots are soaked for 2 hours. After planting, water the substrate with this solution.
Mikosan V
A unique development of biologists using the tinder fungus. The drug copes with a large number of fungal pathogens that cause orchid diseases. The mechanism of action is systemic. That is, the substance penetrates the root tissue and protects the plant from the inside. In addition to fighting pathogens, it improves immunity.
To soak the roots:
- 10 ml per 500 ml water. The root system is immersed in the solution for 2-3 hours.
Mikosan is one of the best fungicides for protecting orchids from diseases.
Trichodermin
Biofungicide against root rot, synthesized on the basis of the antagonist fungus – Trichoderma iignorium. Available in the form of a liquid concentrate.
Orchid roots are soaked for 10-15 minutes in a solution of 20 ml per 1 liter of warm water. \
Unfortunately, biological drugs cannot cope with the advanced stage of the disease. In this case, chemical plant protection and treatment products will help.
How to know which roots need to be cut and treated
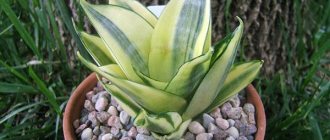
A healthy orchid root system is covered with a special spongy substance, velamen. This integumentary tissue performs a respiratory function and also supplies plants with gaseous nutrients. Healthy roots have:
- regular cylindrical shape, the same along the entire length,
- durable turgor.
- bright green color.
It is normal for a whitish coating to appear. This means that the plant needs to be watered.
But if dots, spots or islands of yellow, brown or black color are visible on the surface of the roots, then something is wrong with the orchid.
In addition to visual analysis, you can determine the condition of the roots by touch:
- Press lightly on both sides with two fingers. A healthy process is dense and elastic.
- If sap or mucus comes out and the tissue becomes wet and slippery, the root is infected and must be removed.
To save an orchid, diseased roots need to be cut off and the plant replanted in a fresh substrate.
Which pot is suitable?
When choosing a pot for transferring an orchid, the size of the root system is first taken into account.
Primary requirements:
- The presence of drainage holes for the outflow of moisture.
- Free root aeration.
- The diameter of the new container is 3-5 cm larger than the previous one.
Most gardeners agree that transparent pots made of soft, thin plastic are ideal for all orchids. This way the roots receive light, which is necessary for photosynthesis, and you can see their general condition. The root system does not grow to the plastic surface.
Ceramic ones look much more attractive, but have a number of disadvantages:
- air exchange is difficult;
- it is difficult to monitor the condition of the soil, the presence of diseases, pests;
- roots cling to porous surfaces
A new ceramic pot should be sterilized in the oven, and the old one should be kept in acidified water to dissolve salt stains.
Glass is not the best choice for planting an orchid, especially for inexperienced hobbyists. As a rule, glass pots serve as a decorative element and do not have holes for drainage.
FAQ
Orchids are quite capricious flowers, and many who want to grow them constantly have various questions and concerns.
Is it possible to disturb during flowering?
A blooming orchid can only be replanted if absolutely necessary:
- affected by rot;
- mold;
- parasitic insects.
The peduncle will have to be removed or partially shortened, otherwise it will not leave the plant the strength to survive and recover. The rest of the procedure follows all standard rules.
Is it possible to replant when the plant has flowered?
Spring and summer are the best time to transplant an orchid, when it has already bloomed. The upcoming warm season and rest period will help to quickly recover from the discomfort experienced and begin the growing season. The peduncle is removed completely or up to the first bud, leaving 2 cm of the stem above it.
If the underground part does not fit completely into the container
The orchid easily tolerates the removal of 1/3 of the root volume . Pruning is carried out on those roots that grow too thickly, compact the overall mass and prevent moisture from entering. The working tool must be disinfected after each new cutting of the appendage.
What to do with a large plant?
For a tall orchid, the diameter of the new container should be related to the size of its root system. A small container will not support the weight of the flower and will definitely tip over. The main rule is a slight crowding, but there is room for roots to grow. When transplanting, a support for the peduncle is installed in advance.
After transplantation, the orchid may take up to six months to adapt. Compliance with the frequency and all stages of this process can shorten the rehabilitation period and resume flowering as soon as possible.
Flower rejuvenation
Old plants can be successfully rejuvenated. If the trunk has become elongated because the leaves below have been naturally dying off for a long time, you can carry out a procedure for rejuvenating the phalaenopsis:
- Cut off the top so that underneath there are air layers and the beginnings of new roots. Treat the area with activated carbon.
- Prepare the substrate or bark.
- Place large pieces of bark on the bottom of the pot.
- Place a piece of foam plastic under the cut area - this technique prevents moisture from entering the cut area and rotting.
- Place the orchid and sprinkle the sides with fine bark for stability. The bark should cover the place where the root buds are located so that they begin to grow faster.
The rest of the plant with roots can also be cleaned and left in the substrate. Soon a new rosette of leaves will grow from it.
To revive an orchid with dried roots, the following actions are recommended:
- Remove dead leaves and trim dead roots. Disinfect instruments with any antiseptic and treat cut areas with charcoal.
- Rinse the surviving roots and briefly place the plant in water at room temperature. Treat the roots with a root formation stimulator.
- For several days, cover the vessel with a transparent cap, bag or film, thus building a small greenhouse.
- Place in a warm place, keep away from direct sunlight. Regularly ventilate the greenhouse and prevent excess condensation from accumulating. As an additional measure to maintain the life of the orchid, wipe the leaves with a solution of succinic acid.
Preparation
Let's start by preparing the plant and get to know the different planting methods.
Soak the orchid roots and old soil well in advance to make it softer. The rougher and more angular the bark pieces, the higher the risk of damage to the root system. Water slightly reduces the damage and makes the shoots elastic. The audit is greatly simplified.
You need to take the flower out of the old container very carefully. Usually this is not difficult: you just need to slightly push the walls of the system and hold the stem. If the roots entwine the pot or get caught in it, it is wise to cut or break the old “house”. Orchids have a hard time with the loss of living roots. Sometimes this leads to individual leaves wilting or rotting.
The next step is washing the roots. Soak the flower and substrate again in warm water. Moisture should not get into the outlet. Remove soil either directly into containers or under weak streams. If you cannot get individual pieces, it is better to leave them. In some cases, it is wise not to remove the bark, but to transfer the plant to a new container.
anti-stress to the soaking solution
.
The product will reduce the chance of infection by pests and pathogens, and will push the flower to actively gain weight. Due to the acceleration of intracellular processes, wounds will heal faster. It is especially important to use the drug during an unscheduled orchid transplant
.
Inspect the roots. It is necessary to ensure that there are no areas of rot or infection. It is customary to remove dry parts, but this must be done with great care. Flower growers often try to cut off as much as possible, which causes irreparable harm. If you are in doubt about the condition of the root, it is best to leave it. In extreme cases, it will become food for the plant. Sometimes living parts are found at the ends of dry shoots. They are still able to feed the orchid.
If there are dry yellow leaves that have almost fallen off, remove them. It is better to cut the plate in half and remove each part separately. Don't forget about treating wounds. After inspection of the roots and leaves, it is necessary to arrange drying. It usually takes 6-10 hours. Don’t worry: nothing will happen to the flower, the wounds will simply dry out and excess moisture will evaporate.
At this time, prepare the soil for the orchid
. Mix suitable pieces of the old substrate with the new one and soak in water. Dry bark should not be compacted, as it will swell when watered. This will damage the root system. When planting an orchid, try to shake the soil rather than press it.
Is it worth boiling the substrate? On the one hand, the bark may contain resin residues, parasites, and pathogens. On the other hand, beneficial microflora die during heat treatment. If you are confident in the quality, it is better not to boil it. It will be much easier for the orchid to take root.
Key points of care
A successful transplant ends with some dormancy for the plant . The orchid is sprayed with epin and left for 10-14 days in a shaded place, protected from overheating. Watering should be reduced.
It is possible that the leaves or pseudobulbs will wilt - this is a normal phenomenon after transplantation, since the procedure puts the plant in a stressful state.
Spray the plant regularly and increase the humidity around it.
Timing: when can an orchid be replanted?
Replanting an orchid at home
This operation should be carried out when the dormant period of the inflorescences and the entire plant has ended. But there are types of orchids in which the dormant period is weakly expressed, for example, phalaenopsis, which blooms almost all year round with short breaks. Therefore, if new shoots of a plant do not develop in the absence of signs of disease, it means that it is entering a dormant period. This is the best time to replant. This time usually occurs in the spring - late February and March. This is the best time to replant an orchid.
If there is no flowering after transplantation: what to do?
Lack of flowering after transplantation
After transplantation, the orchid should increase its green mass and bloom after a certain time. This usually happens after 3-4 months . But what if the inflorescences do not appear for much longer? What to do if there is no flowering after transplantation? This problem can occur for several reasons:
- The plant is overfed with nitrogen fertilizers , active leaf growth is observed, they become larger than they should be during normal development. In this case, feeding should be stopped for a month.
- The transplant was not carried out in a timely manner . For example, if for some reason an orchid was transplanted at the time when it bloomed last year, then it most likely will not bloom this year. The plant will direct all its energy to restoring its root system, and not to flowering.
- Perhaps you made mistakes during transplantation . If the plant is not firmly fixed in the substrate, then when you move the pot, it begins to dangle in it, and the roots and stems will receive microtrauma. The plant does not have the opportunity to direct its energy to flowering, experiencing constant stress.
- Insufficient lighting and low humidity . You need to move the pot to a lighter windowsill and spray its surface to increase the humidity of the surrounding air.
Follow these tips, and your flower will soon delight you with its unique blooms. It's worse when the plant begins to wilt. What to do? Read on.