Phalaenopsis hybrid
Phalaenopsis is the most common orchid in indoor floriculture. It so happened that in 95% of cases the question “Tell me!” They gave me an orchid, but I don’t know what it’s called,” it turns out that the gift was a phalaenopsis. What determines such love for this particular orchid, and not for dendrobium or, say, ascocende?
"A matter of taste!" - someone will say, and they will be right. Another will add: “It’s easy to grow!” - and he won’t be wrong either. "She's beautiful!" - and this is certain. It turns out that external attractiveness and ease of maintenance determine the popularity of a plant? Exactly!
Although this was not always the case with phalaenopsis. The fact is that until 1995, Russia was supplied mostly with species orchids, that is, natural species taken directly from natural conditions and propagated in open ground or in greenhouses. But the conditions of the premises - apartments, offices, etc. were not suitable for these orchids; there they either did not reveal their decorative potential, that is, they did not bloom or bloomed weakly, or they died very quickly. But after 1995, only hybrid orchids began to go on sale. Why? Because their removal from natural habitats, often barbarically, leads to the threat of species extinction. Hybridization has come to the rescue - the resulting hybrids are propagated in industrial conditions, hybrid orchids bloom no worse than natural species. Moreover, the breeders took care of both the duration of flowering and the fact that orchids could live better in unnatural conditions for themselves.
But you should never forget that when buying a plant, you are acquiring a living organism that requires tireless care! Unfortunately, judging by the number of questions asked on the GreenInfo.ru forum and our telephone service operators, the conclusion is disappointing - people either don’t understand this or are hoping for the eternal Russian “maybe” - maybe it will somehow grow. This is very annoying. With this approach, a person torments the plant and suffers himself, not getting what he expected. What's the end result? - disappointment. To reduce disappointment, let's change our attitude towards plants and feel that we are responsible for those we have tamed.
Let's consider the main points of caring for phalaenopsis, adhering to which you can enjoy the lush green leaves and the stunning beauty of butterfly flowers for a long time.
Phalaenopsis hybrid
Description of the flower
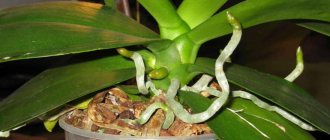
The roots are aerial, covered with soft spongy tissue that absorbs moisture from the air. Spine diameter 3-5 mm.
The leaf blade is oval, thick, durable, rich green in color, with a glossy surface. Its length reaches 30 cm, width – 15 cm.
An adult plant preparing to flower has 3-8 leaves.
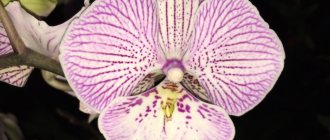
The appearance is classic for phalaenopsis. Description of the flower:
- shape – classic, similar to a butterfly;
- the color of the petals is yellow with burgundy specks;
- lip color – reddish-burgundy;
- The average flower diameter is 8 cm.
A healthy plant with proper care can produce up to 4 flowering shoots. The shoot is straight, branches well, reaches a height of 60 cm.
Features of flowering
The orchid produces shoots twice a year. Flowering lasts from 3 to 6 months.
The period of wilting of flowers is determined by the health of the plant, the degree of development of the leaves and root system. Flowers open from bottom to top.
The blooming process, based on the length and number of peduncles, can last for several days, even weeks.
The resting phase is unexpressed. If the conditions are optimal and the care is proper, then the development of leaves and roots does not stop even during the flowering period.
Transfer
Phalaenopsis hybrid
The orchid needs to change the substrate as the bark deteriorates and the substrate becomes denser. This is usually done once every 3-4 years. Special substrates “For orchids” are used. It is better to replant in the spring, when growth processes are activated and the orchid tolerates post-transplant stress more easily. The plant survives transplantation worse in the autumn-winter period and recovers more slowly. Do not replant during flowering, otherwise it will end faster.
For phalaenopsis, transparent plastic pots are a more suitable container - the roots of this orchid photosynthesize in the same way as the leaves, that is, the roots need light. When replanting, remove dry, empty, dead roots and old substrate. Very carefully separate the roots that have stuck to the walls of the pot (to do this, an hour before replanting, you need to water, thoroughly moistening the substrate and roots, then they are separated from the walls of the pot more easily). Pieces of bark to which roots have stuck do not need to be removed.
After replanting for two months, it is useful to add Zircon to the irrigation water once every 2 weeks at the rate of 2-3 drops per glass of water - this will help the orchid to take root faster. Any transplant usually delays flowering by 1.5-2 months. There are cases when an orchid blooms immediately after transplantation - stress from damage to the roots affects plants in different ways.
Read more about transplanting in the article Your favorite homemade Phalaenopsis
Landing
The future health of the plant and its ability to flower depends on how correctly the planting is carried out.
Soil selection
In flower shops you can easily choose high-quality soil for orchids. It already contains all the substances necessary for the full development of culture.
You can prepare the soil yourself. It should include:
- bark;
- expanded clay;
- coal;
- foam balls;
- sphagnum.
Selection of capacity
A transparent pot is suitable for a flower
Phalaenopsis is planted in a transparent pot with many drainage holes.
The size of the container must correspond to the volume of the root system.
- If it is too spacious, moisture will accumulate in excess, and the roots in contact with constantly moist soil will quickly rot.
- If it's too tight, the roots will crawl through the holes and get damaged.
Technology
Planting a Charmer orchid is not difficult. Step-by-step description of the procedure:
- The plant is carefully removed from the store pot. Shake off the soil.
- Inspect the roots. Remove injured ones. Powdered charcoal is applied to the cuts.
- Expanded clay drainage 2 cm thick is placed at the bottom of the selected pot.
- Place the orchid in a container and carefully straighten the roots.
- Cover with bark and coal.
- Mulch with sphagnum.
Watering
Phalaenopsis hybrid
Orchids are watered in two ways - from a watering can through the top of the pot or by immersion in a container of water.
During the flowering period, it is better to water from a watering can so as not to change the location of the plant, which can cause it to drop flowers. Watering must be carried out in such a way that the substrate and roots dry out once a week. If you keep the roots in a constantly damp or wet substrate, the risk of root rot increases, and the substrate breaks down faster.
When phalaenopsis does not bloom, it is best to water it using the immersion method - the pot is immersed in a bucket of water for 1-2 minutes (until air bubbles stop running). After such submersible watering, you need to let the excess water drain, and only after that return the orchid to its place.
The temperature of the irrigation water should be equal to the air temperature, or even better if the water is 3-4 degrees warmer than the air. The maximum water temperature is +28°C (warmer water burns and scalds the roots). The water must be allowed to stand for 24 hours and be soft.
If the water is still hard (it contains a lot of lime salts, as can be seen from the white stains on the leaves after spraying and the whitish-yellow coating on the surface of the substrate after watering), then the amount of lime in it needs to be reduced.
To do this you can:
- Boil the water for 20 minutes, and take it from a hot tap (it contains less lime than cold water, because it has already boiled at least once);
- Freeze in a plastic bottle, then cut off the bottom and drain the unfrozen water and salts;
- Add oxalic acid to 1 liter of water (at the tip of a knife). After this, the water should stand for 2-4 days until a white precipitate of salts appears at the bottom.
Features of care
The Charmer orchid grows well in a room, provided the right location is chosen, the temperature and humidity are suitable, with proper watering and fertilizing, and protection from infection and pests.
Conditions of detention
It is better to place the pot on the eastern or western windowsill. It is undesirable for the flower to be exposed to direct midday rays of the sun, otherwise a burn may form on the leaves.
If the apartment has only southern windows, the orchid is placed not on the windowsill, but on a stand near the window covered with curtains.
To prevent the flower from bending towards the light, it must be turned once every 2 to 3 weeks.
The optimal room temperature is 15-25°C. However, phalaenopsis easily tolerates a short decrease in temperature to 12°C and an increase to 35°C.
Humidity should be moderate - 30-40% and good ventilation.
Watering
Water the orchid after the soil dries. But the substrate should not be allowed to remain dry for a long time.
A transparent pot is convenient because it allows you to determine the need for watering: moistening is carried out when condensation disappears from the inner walls of the container and the roots turn pale.
Overwatering is unacceptable: the growing point will rot and the plant will die.
If the container is opaque, you will have to dig up the soil to check how dry the layer inside is.
Water is poured either from above onto the ground, avoiding contact with the leaves, or bottom watering is used, lowering the pot into a basin of water so that the roots draw the required amount of moisture through the drainage holes.
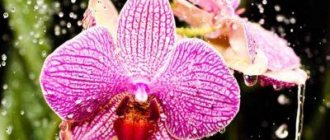
Take soft, settled, clean water. Once a month, it is advisable to spray the flower or rinse the leaves under running water.
Feeding
Fertilizers improve flowering
Suitable fertilizer is the key to full development and lush flowering.
Nutrients are absorbed by the roots, so fertilizing is carried out with liquid (water-soluble) preparations. The best option is Kemira-Lux. For phalaenopsis, reduce the dosage by half.
An orchid needs nitrogen to grow foliage. But you shouldn’t overdo it with this substance, otherwise the flower will actively produce leaves rather than peduncles.
If a flowering shoot does not appear for a long time, this is a signal that there is not enough potassium and phosphorus.
Caring for a Phalaenopsis orchid at home
Start taking care of the condition of your new pet immediately upon arriving home from the store. The flower does not tolerate a change of residence. If you have chosen a beautiful, strong plant, in which all the roots look strong and healthy, and the peduncle, tall and elastic, is strewn with flowers of extraordinary beauty, then the best thing is to leave the flower alone for a couple of weeks. How to care for Phalaenopsis at this time? No way! At this time, there is no need to water, feed, or replant the Phalaenopsis. There is also no need to place it on the windowsill next to other flowers; let it stand to the side, in partial shade, as if in quarantine. Inspect the flower regularly. If the substrate in the pot consists of large pieces of bark, the roots are gray-green, and the plant looks healthy, then it does not require replanting. Move the pot with the plant to the place of honor prepared for it among other green pets and begin to take care of it according to all the rules.
Replanting Phalaenopsis
Healthy Phalaenopsis bushes are replanted no more than once every two to three years, when its substrate turns into dust. But there are good reasons to replant a plant urgently.
For example, during quarantine, you discovered that the leaves of Phalaenopsis began to wither and sag, and the soil, as it dried out, began to look like a caked sponge. Or if the plant has black spots or other signs of rot on its roots. In both cases, Phalaenopsis should be transplanted into another pot with a new substrate, and without waiting for the end of flowering.
Remove the plant from the planting container and carefully wash its root system under a warm shower. If the soil is poorly washed, leave the orchid in a bowl of water for a while. Then free the roots from the soil and shake off the water. Trim rotten, damaged or overly long roots. Sprinkle the sections with crushed activated charcoal or charcoal. Leave the Phalaenopsis for a while, maybe overnight, in a dry basin, so that all the cuts tighten and dry. The next morning, plant the plant in a new, pre-disinfected pot in a soil mixture suitable for epiphytic plants. Place a layer of the largest pieces of substrate at the bottom of the pot, and use smaller pieces of substrate to fill the voids between the roots to the base of the rosette. Leave two to three cm free at the top of the pot, so that as the aerial roots grow there is a place to add the substrate. A large plant with dense, heavy leaves must be tied to a support and strengthened so that it does not wobble.
If the root system of a flower has been severely damaged, it will be difficult for it to recover. Help the plant. Place the flower and pot in a plastic bag for a couple of weeks to create greenhouse conditions with constant humidity and temperature for the diseased plant. Ventilate it from time to time. First cut the peduncle and place it in a vase with settled water. It is better to sacrifice a peduncle than to lose the entire flower. A cut peduncle with butterfly flowers will serve you as a consolation for a long time.
This may be interesting: Orchid Dendrobium Nobile - Care and propagation at home
Other reasons for transplanting Phalaenopsis into a new pot:
- The landing capacity is too small. This can be determined not only by the roots that stick out above the pot, but by the roots that have filled the entire pot inside and displaced the substrate. The phalaenopsis should be transplanted into a slightly larger pot so that, in addition to the roots, it can contain a sufficient amount of substrate for support. It is better to transplant after flowering.
- if all the leaves fell to one side during transportation, the peduncle with its support is also tilted, healthy roots stick out too much. Transplant the flower into a normal pot with good support, fill the voids with a suitable substrate.
If the orchid feels good, the leaves are elastic, the roots are light green and alive, we do not recommend disturbing the flower. If you want to transplant Phalaenopsis into a new beautiful flowerpot, then it is better to do this in early spring and only after the orchid has finished flowering.
In any case, after each transplant, do not water the plant for the first three to four days; allow the disturbed roots to heal their wounds.
The soil
Phalaenopsis belongs to epiphytic plants. In the wild they grow on trees. Their roots are aerial. They are used not only to strengthen the plant on the bark and branches of trees, but also to feed the plant from the air. The flower also receives moisture and oxygen through its powerful roots. Therefore, Phalaenopsis absolutely do not grow in ordinary garden or forest soil and do not tolerate prolonged flooding. They require a more loose, lightweight, moisture- and breathable substrate. Ready-made soil is suitable for epiphytic or orchid plants. We recommend that you study the composition of the soil. Sometimes it is not suitable for growing Phalaenopsis due to its high moisture holding capacity.
It is not at all difficult to prepare the soil yourself. Collect bark from fallen trees in the pine forest, dense, without resin. Grind it into pieces from 1 to 3 cm, add pieces of charcoal, polystyrene foam, and wine corks of the same size. Stir. Place in a saucepan and simmer for 10 minutes. The composition of the substrate is a little strange, but it will be suitable as a support for the Butterfly Orchid! If the air in the room is dry, you can add a little sphagnum moss to the substrate, just a little, otherwise it will fill the entire space and will not allow the roots to breathe freely. In addition, a large amount of moss will retain moisture, the excess of which can harm the roots. In any case, you should not overfill the pot with substrate, so as not to interfere with air circulation between the roots.
Humidity
Tropical beauty grows better in high ambient humidity. If there is not enough of it, Phalaenopsis may stop growing, its buds will stop opening, and the flowers will begin to dry out. It is necessary to maintain humidity in the room with the flower within 60 - 80%. The minimum permissible humidity is 30-40%. At low humidity and high temperatures, you should place the flower pot in a high tray with wet expanded clay or pebbles. Under no circumstances should the pot stand in water. Water can be poured into wide containers or plates that are placed around the orchid pot. Phalaenopsis loves regular spraying of its leaves and the surrounding air in the morning, especially during those periods of its life when the heating is turned on in houses. By night there should be no water in the leaf axils or at the growing point.
Pot for Phalaenopsis and watering
For this orchid, a not very large translucent plastic pot or similar glass container with holes in the bottom and sides, in which the condition of the substrate and root system will always be under your control, is suitable. The plant needs a pot for support. The pot size should be suitable for the plant's strong root system. In a pot that is too small, the roots will be injured and stick out, while in a pot that is too large, moisture will accumulate and the substrate will not dry out well, which will eventually lead to rotting of the roots.
A translucent pot is perfect
If you don’t really like the picture of intertwined roots in the substrate, you can hide it by placing the pot in a wide multi-colored pot. Drainage holes at the bottom of the pot are required, since water stagnation is not allowed due to the risk of root rotting. A transparent pot is also good because you will constantly watch how the substrate dries out after the next watering. At normal humidity, healthy roots are green; when they dry out, they become lighter. Dry substrate and light roots serve as a signal for the next watering.
If you nevertheless planted Phalaenopsis in a dark pot, you will have to determine the soil moisture at the depth of the pot by touch. Carefully rake the substrate one or two cm deep, try to see if it is damp there. If it's dry, you can water it again. Drain excess water from the pan. Use only settled or boiled water. Previously, they used rainwater, but with the deterioration of the environment in cities, many harmful impurities began to appear in precipitation.
How to water Phalaenopsis:
- in hot weather - every 2-3 days;
- in spring and autumn - once a week;
- in winter - once every two weeks.
If you notice that condensation often collects on the walls of the pot between waterings, then make additional holes in the walls of the pot for better air circulation.
Let's talk about another popular method of watering Phalaenopsis. The pot with the plant is placed for two to three hours in a large container with warm, settled water so that the water covers 1/3 of the pot. This bathing can be replaced by long-term watering - continuously, for 20 minutes, pour warm water into the pot until the substrate in the pot is completely wet and saturated with moisture in the required amount. The orchid's roots will noticeably turn green. After bathing, place the pot in a tray so that excess water comes out through the drainage holes. Excess water must be drained immediately.
If the air temperature in the room remains above 30 degrees for a long time, bathing is carried out once every 5 days.
We draw your attention to the fact that water quality is an important factor in the well-being of Phalaenopsis. If you water it with tap water, even warm, then over time rusty or white spots will appear on the leaves and roots, depending on the excess of salts in the water. It is possible to get rid of plaque using milk or lemon water, which should be used to wash the leaves of the plant. If you use distilled water for irrigation, which contains no salts and trace elements at all, you should add fertilizers for epiphytic plants to such water when watering. It is best to water with filtered or boiled water heated to two to three degrees. above room temperature.
This may be interesting: Types and varieties of Phalaenopsis orchids
Sometimes, to grow Phalaenopsis, special epiphytic wicker bamboo or wooden baskets are used, in which the light green roots of the flower with a silver tint develop freely, effectively wrapping around the slats of the basket, both inside and outside it.
But we do not recommend ceramic pots for growing Phalaenopsis. Powerful roots grow into the walls of such a pot and complicate the process of removing the plant from the pot when replanting. Serious damage to the root system of the flower is possible.
Location and lighting
Phalaenopsis love good lighting. The duration of daylight should be at least 12 hours. It is better to place a flower pot on a windowsill in a south-east, east or west direction. It is better not to place it on windowsills facing south - the leaves may get burned. But not far from the southern windows, on a table or hanging shelf, this orchid will grow beautifully. If you only have north-facing windows, only a place directly on the windowsill is suitable for an orchid. © FlowersAdvice.ru
From autumn to spring, the plant will need additional lighting. Don't worry - Phalaenopsis grows well in artificial light. You can use this property when choosing a place in the back of the living room. You just need to keep in mind that over time, Phalaenopsis leans toward the light with its entire body. Therefore, it must be occasionally rotated 180 degrees to prevent it from tipping over or falling out of the pot.
Lighting is especially necessary for a flower when forcing a peduncle and setting buds. At this time, it is advisable to place the pot closer to the light and not disturb it. Do not turn or move from place to place. Leave these manipulations until the last bud opens. Now, during flowering, you can move the pot deeper into the room, into well-lit partial shade.
Temperature
Summer temperature of the flower is allowed from 24 to 30 degrees. In principle, this is the usual room temperature at which we all live in the summer. If the temperature is above 32 degrees for a long time, the flower may lose its buds and flowers, and the leaves will begin to wither. Try to keep the temperature within reasonable limits by spraying the flower and surrounding area, placing the pot in a tray with wet pebbles, and using a split system. To stimulate the formation of flower buds, we recommend keeping night temperatures five to six degrees lower than daytime temperatures.
In winter, the optimal temperature for the growth of Phalaenopsis is 18 - 25 degrees. The plant will withstand a temperature of 10–15 degrees for a couple of days; if longer, it is not a fact that it will not get sick. Under the influence of low temperatures, the roots of Phalaenopsis stop absorbing moisture, and the plant begins to consume nutrients and water previously accumulated in the leaves. The leaves begin to wrinkle and lose their elasticity. Beginning flower growers think that the orchid does not have enough moisture, and they begin to water the plant intensively, which worsens the situation. Frozen roots cannot absorb water and rot. In order to avoid this situation, we recommend keeping a thermometer on the windowsill next to the pot to monitor the temperature. Place the flower pot so that it does not come into contact with the cold glass.
Phalaenopsis love fresh air. Do not forget to regularly ventilate the room, even in winter, while protecting the flower from drafts so as not to provoke any disease.
During the winter dormancy of Phalaenopsis, a couple of weeks after flowering, it is advisable to keep the flower in a cool place, at a temperature of 15 – 17 degrees. Keep in mind - the lower the temperature, the lower the humidity in the room should be, less spraying, less watering. And vice versa. Temperatures below 5 degrees are considered critical for a flower.
How to fertilize a Phalaenopsis orchid
Properly selected fertilizers for the Phalaenopsis orchid are a very important component of its growth and flowering. These orchids obtain all their nutrients from their roots. Therefore, it is worth feeding it with liquid water-soluble fertilizers for orchids. Kemira-Lux fertilizers are suitable in a dose reduced by 2 times. If the plant has few leaves, it needs to be fed with orchid fertilizers, where nitrogen predominates. But don't overdo it! Read the instructions. Otherwise, the growth of green leaves will be to the detriment of the formation of the peduncle. If there are enough leaves, from 4 to 6 in a rosette, but there is still no peduncle, then you should start feeding Phalaenopsis with fertilizers with a high content of phosphorus and potassium, until the beginning of flowering.
In flower shops, before selling Phalaenopsis, they are sometimes fed to stimulate flowering with long-lasting fertilizers in the form of small balls. These balls gradually dissolve in the substrate over time. Keep this in mind when you decide to feed your pet for the first time. First, make sure all store-bought fertilizers are dissolved. It is better to wait and give the plant a break from them for a couple of months.
The flower is usually fed once every two weeks in the summer, and once a month in the winter. There is no need to feed Phalaenopsis during flowering or dormancy!
The use of succinic acid is also very popular. Read more about this in the article: Using succinic acid for orchids.
Phalaenopsis flowering
Many people wonder how to make Phalaenopsis bloom at home? Different varieties of this butterfly orchid bloom at different ages. You need to know the age of your plant. Why isn't your Phalaenopsis orchid blooming? Perhaps because he is still young. If you bought a non-flowering bush, and at home it is clearly not going to please you with a flower shoot, do not get upset ahead of time. Some Phalaenopsis bloom at the age of one and a half years, others - when they are 3 years old. You can determine the age by counting the number of shoots. An adult plant ready for flowering has from 5 to 8 pieces. If there are fewer shoots and the orchid is gaining buds, this is not always good. It happens that a Phalaenopsis orchid that is too young does not have enough strength to recover after flowering, and it may even die. If you have such a case, and a young specimen has thrown away its peduncle, it is better to cut it off.
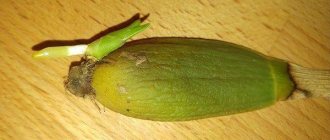
Different varieties of Phalaenopsis bloom at different times of the year. For some, the peak of flowering occurs at the end of spring - summer, for others - in winter. Some bloom for two months, while others continue to bloom for six months or more. Phalaenopsis flowers are very dense; they stay firmly on the peduncle for a month to two. The flower stalks themselves live much longer. Large-flowered Phalaenopsis bloom almost all year round due to the ability of their peduncles to lengthen, branch and produce new buds during flowering. After flowering, such flower stalks should not be cut off, because they will develop and bloom more than once. In addition, so-called air “babies” often form on them.
This may be interesting: Cattleya - orchid care at home
An adult plant produces several flower stalks a year - in mid-spring and early autumn. If the butterfly orchid shoots in autumn or winter, you should take care that the flower stalk does not die due to the short daylight hours. We recommend that you purchase a phyto lamp - a special lamp for artificial lighting of plants in the dark season. These lamps provide a lot of light without drying out the air around the flowers. Turn on such lamps when there is a need to extend daylight hours to 10–12 hours.
Another necessary condition for the flowering of some varieties of Phalaenopsis is a difference in day and night temperatures of 5–6 degrees, preferably throughout the year. Creating such conditions can be problematic. From late spring to early autumn, these orchids can be kept outdoors. Then the difference between day and night temperatures is formed naturally. At other times, when Phalaenopsis are indoors, you will have to ventilate the room with the flower well at night, not forgetting that orchids are afraid of drafts.
Rest period
Phalaenopsis has faded, what to do next? After the inflorescences fall, give the Phalaenopsis a little rest. Move the pot to a darker, cooler place. Reduce watering by three times. Do not feed, replant, or spray. Perhaps the old lower leaves will turn yellow and dry out - this is a natural process, do not be alarmed. The peduncle itself, after flowering, may dry out, then prune the orchid. In some varieties of Phalaenopsis, the peduncle remains green. In this case, the following options are possible:
- You can leave the peduncle as is. Then new buds will appear on it over time.
- You can cut the peduncle to the first bud, then over time a new peduncle will grow from this bud.
- You can cut off the peduncle completely and place it in a vase with warm, clean water. Then, over time, he may have a new kidney.
Such a period of rest is simply necessary for an adult plant in order to accumulate more strength for new flowering. In no more than three months, new buds will form on the flower and flowering will begin.
If this does not happen, the Phalaenopsis did not bloom at the right time, we need to find the reason. Read the rules for caring for Phalaenopsis from the beginning, find your mistakes and try to stimulate its flowering in a few months.
Prevention of diseases and pests
Phalaenopsis has a fairly strong immune system. Infectious diseases appear only with improper care.
In rare cases, increased air humidity contributes to the spread of pests. They are usually brought into the house with an already infected plant.
When purchasing, it is important to carefully examine the orchid for signs of insect damage.
Infectious pathologies are possible:
- fusarium;
- anthracnose;
- different types of rot;
- powdery mildew;
- viral infections.
Of the insects that can attack an orchid:
- mites;
- whitefly;
- aphid;
- woodlice;
- thrips;
- mealybug;
- thyroid gland;
- springtail.
Prevention measures
- Do not allow the soil to become waterlogged. Use soft, lukewarm water for irrigation.
- Protect the flower from prolonged heat and direct sun.
- Control the temperature in the room.
- Fertilizers are applied in the optimal dosage.
- The roots are periodically treated with anti-pest drugs in a prophylactic dose.
- To strengthen the immune system, Fitosporin and vitamin herbal preparations are used.
- Wipe the leaves with a damp cloth.