Wondering if orchids need to be sprayed? Necessarily. Not all plants need spraying, but orchids are not one of them. Representatives of tropical flora are accustomed to high air humidity and suffer in the opposite conditions.
However, “all that glitters is not gold,” that is, the spraying procedure must be approached wisely, otherwise risks and undesirable consequences are possible.
What is this procedure?
Spraying is the process of applying pesticides in liquid form. In this case, it is aeration with water in order to prevent rotting and drying of the plant. It can be used to control diseases and pests, get rid of weeds and disinfect.
If you need to treat a plant, special solutions and suspensions are often used. The effectiveness of this method depends on how toxic the pesticides are and how long they last.
Top dressing
should be fed throughout the year .
Depending on the stage of development, different feedings are required :
- Active growth stage – nitrogen;
- Maturation stage – potassium and phosphorus;
- Flowering stage – phosphorus 2 times a month.
The most convenient and recommended method for applying fertilizers by experienced gardeners is foliar through leaf spraying.
In summer, plants are fed once a week, during the rest of the period - 1-2 times a month.
In winter, the amount of fertilizing should be reduced to once a month, while increasing the amount of potassium and phosphorus.
Does the plant need to be sprayed with water?
You can and should spray orchids with water. But after completing this procedure, you must definitely go over all the leaves and flowers with a cotton swab.
Otherwise, due to increased humidity, bacteria will multiply and various diseases may develop.
Remember that it is better to spray a little than to overdo it. It is better to keep the plants on a tray with a grid - this way the excess moisture will drain on its own and will not harm the plant.
How often do you need to do this?
You need to spray depending on the type of plant, since they all have different requirements for this procedure. There are those for whom one spray for seven days is enough.
It is best to perform the procedure in the morning every day. This promotes the health of the plant. On hot days, you can repeat several times a day. But it is important to remember that the flower must dry by night . If possible, you can create a home greenhouse for the plant so as not to spray it very often.
Step-by-step instruction
The instructions for spraying an orchid are as follows:
The water should be soft. If it is too hard, boil it. If this is not done, the plant will have white stains from salts.- It is better to use a fine spray. If there are large drops on the leaves, then spraying should be stopped.
- The procedure must be carried out in the morning or afternoon. It is not recommended to do this in the evening, since moisture remaining on the leaves and in the axils can lead to the development of diseases.
- In winter, it is better to refrain from moisturizing, especially in cold weather. Otherwise, bacteria and fungus may develop.
- You should not spray the flowers - they will instantly become stained.
- You should avoid getting moisture into the growing point, as this can cause root rot.
A novice orchid grower should know that watering and spraying should be done according to a schedule and only when the plant really needs it.
When is it contraindicated?
Under no circumstances should you spray a plant standing in the sun. This can cause it to burn. In winter, it is forbidden to spray the plant itself. This can lead to hypothermia, which will make the orchid sick. It is recommended to carry out this procedure at least once a day, preferably in the morning.
So that the leaves have time to dry by evening. Otherwise, rotting may occur. In this case, the spray gun should operate in a light haze mode . It should also be remembered that not all types of orchids tolerate spraying. For example, it is not acceptable for Miltonia.
Possible problems after
If this procedure is carried out incorrectly, it can lead to the development of various diseases:
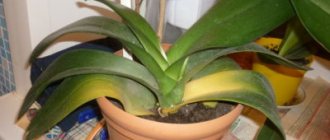
- Corrupted by rot. Symptoms can be different and depend on local conditions, air humidity levels, watering intensity and room temperature. We list the following cases: brown rot, black rot, root rot, gray rot, fusarium rot.
- Withered leaves of a black hue. This is a signal that the plant is in great danger. This can cause anthracnose, powdery mildew, and leaf spot. If the disease is diagnosed in time, there is a chance to cure the orchid. But in most cases it is no longer subject to resuscitation and treatment.
- Scale insects, mites and aphids. They have a huge impact on the development of the plant. The most common are spider mites, whiteflies, slugs, thrips, and sucking parasites. Appear due to excessive moisture.
Problems and solutions
Improper spraying procedures can lead to:
- affected by rot - brown bacterial, root, gray or black;
- lethargic leaves with a black tint;
- the appearance of pests - scale insects, aphids, mites.
There are also a number of solutions to solve these problems.
Rot
Brown bacterial rot appears as watery, gray-brown spots. Over time, they darken and merge together. It is possible to save the plant only at the stage when the disease has just appeared. To do this, you need to remove the infected parts of the plant and treat them with copper-based preparations. If the disease is noticed at a later stage, then the flower cannot be saved.- Root rot affects the roots. It causes them to become soft and spoil, and the plant dies. For prevention, the plant should be planted in suitable soil. And if infected, treat the roots and soil with a 0.2% solution of topsin or foundationazole.
- Gray rot is dark spots on the plant covered with a gray fluffy coating. To combat it, fungicides are used and damaged areas are completely removed.
- Black rot appears as black spots on the orchid. In this case, it is necessary to remove the infected parts and treat the cuts with charcoal.
Withered leaves with a black tint
Indicates that the plant is in serious danger. This is how a wide variety of diseases manifest themselves. Treatment begins after determining which one we are talking about.
If you correctly identify the disease, you can try to cure it. But it is more likely that the plant cannot be saved.
Pests
They appear in the form of aphids, scale insects and mites. Appears when there is excess humidity. It is necessary to reconsider the conditions of maintenance and watering. Treat the plant with insecticides.
- Aphid . To get rid of aphids, the plant can be treated with a soap solution or use special preparations. Perform the treatment 2 times at a certain interval.
- Shield . When scale insects appear, the plant is isolated from others. They can be removed from the plant manually, or using an ear stick soaked in alcohol using a pinpoint method. Next, the plants are bathed to wash off the sticky coating. The plant is placed in a very bright place for 2-3 weeks. You can also wash it with soapy water.
- Spider mite . If a spider mite is detected, treat the plant with a special preparation twice at intervals. If affected by root mites, remove the damaged areas of the roots. Treated with Fitoverm.
To keep your orchid healthy, it is important to know how to properly replant, feed, prune, what the temperature should be, and where it is best to place it.
Do you want to have a healthy plant at home with beautiful, abundant flowering? Then follow all the rules of care, not forgetting about spraying . The main thing is to do it correctly, without harming the plant.
Care during the flowering period
If flowers appear on the plant, follow these recommendations:
- Intensive watering. You can do it with a shower. The optimal temperature will be 35 degrees. There is no need to leave water at the growing point to prevent the plant from dying.
- At night, you need to keep the temperature at the right level.
- The plant cannot be replanted during this period.
- When flowering, it is allowed to fertilize in moderation.
- Do not move the pot from place to place, as this may affect the duration of flowering.
When the flowers dry out and turn black, they are cut off. The incision is made at the base. During the dormant period, it is better to refuse feeding or keep it minimal. In winter, watering is carried out once a month, however, spraying can be done more often. By providing such a plant with proper care, you can achieve proper and long-lasting flowering. You will find all the important information about the conditions of keeping an orchid in this article, and you will receive advice from experienced gardeners on caring for this beauty here.
Phalaenopsis orchids: when should you water an orchid?
I am often asked the question, how to care for phalaenopsis orchids? Here is a very detailed article written by Olga Beck.
The most popular question among beginners, and not only for beginners, is how many times should an orchid be watered. Sometimes they make a difference - in winter and summer. Everyone wants to know the exact answer. But there is no exact answer and there cannot be, from my point of view. After all, watering an orchid depends on a large number of conditions in which it is located. If for one orchid, watering in winter can be 2 times a week, since the heating works very hard. For another flower, the same amount can be simply destructive, since it stands in completely different conditions. Therefore, it is important to know not how many times to water an orchid, but when to water it. This is really the most important thing.
Orchid is like a person. When we are hot, we need water and drink a lot. And the flower does the same. When it's cold, we naturally drink less. It’s the same with the orchid. Only the owner of the flower can know exactly when to water his orchid. Because he knows the main thing - what condition the substrate and roots are in, whether there is enough sun, whether the orchid is blooming now and much more, which is also very important . I would like to show and tell in great detail all the stages after watering until the moment when you need to water the orchid again. How everything looks almost day by day in a clear sequence. I will analyze it using the example of soaking in water.
On the eve of watering, I collect water and let it sit for a day. They also recommend using rainwater, but I don’t have the opportunity to collect it. I dilute the water with boiling water to room temperature. I put the pot of orchids in a transparent plastic bucket (I did this specifically for the photo, in reality I pour it into the same ceramic pots in which they stand). I carefully water the substrate from all sides with a watering can. I fill it almost to the top with water. I make sure that the substrate is watered evenly everywhere. I let it sit in the water for about 20 minutes. The roots, when saturated with water, turn bright green if they are young. After twenty minutes, I take out the flower pot and let the water drain. I stand like this for at least an hour. Now there's an important difference. We have different windows in our apartment. Where there are good double-glazed windows, I can immediately install them on the window in an hour. But there are windows where there is a little draft. You cannot immediately place them on such window sills, otherwise the roots may become hypothermic (meaning the cold season). After all, after we take a swim, we don’t sit in a draft. We know that you can catch a cold this way. The same goes for the orchid. That’s why my orchids sometimes sit dry for half a day if they are from cool window sills. I work with orchids only in the morning, or at least until lunch.
This orchid was purchased already with such a root system. When soaking, the substrate is completely saturated with water everywhere. The pot becomes heavy. Try to remember offhand how much it weighs. The roots are bright green.
One day after watering. The roots are still the same bright green. On the right side of the pot, at the bottom where the roots are, condensation is visible. The substrate is dark. The greenery on the substrate can also be seen through the walls of the pot. These are the same problematic orchids I bought at a discount in November. Greens are algae. You can see better on the right side. This happens due to frequent watering. Already bought these.
Another day has passed. The upper roots began to dry out and their color began to change to silver. The substrate on top became a little lighter. But the middle of the pot is still full of moisture. The lower roots are still the same bright green. The walls of the pot are full of condensation.
On the left - another day later. Less condensation. The substrate gradually dries out. The roots in the middle are not so green anymore. But there is still more than enough moisture in the middle of the pot.
On the right - another day has passed. The roots and substrate have not yet dried completely.
Another day later - this is the photo on the left. There is still condensation. The roots on top have all dried out and become silvery in color. But it's too early to water.
The photo on the right is another day later. The roots are silvery. Some places are green. The substrate looks almost dry. Now it's important! If your orchid is blooming, then you don’t have to wait until all the condensation on the walls of the pot evaporates. For a blooming orchid, complete drying of the substrate is not necessary! This can negatively affect the flowering of the orchid. Therefore, the blooming orchid at this stage (photo on the right) needs to be watered.
If the orchid does not bloom, then it is better to wait until the substrate and roots dry completely. This is especially important at this time of year when it is cool in the apartment (either they have not yet started heating or have already stopped heating). An orchid tolerates underwatering more easily than overwatering.
That's it, this photo shows the final stage - the orchid can be watered. All roots became silvery. The substrate became light. The pot, to be honest, is very light. She specifically emphasized what happened to the leaf. When it was frosty, the sheet touched the glass. When I noticed, it was already too late. The leaf in this place froze. So be careful during frosts. Leaves should not touch the glass.
After I took a photo of an orchid in a plastic bucket, I realized that this half-liter bucket would be very suitable for replanting. It corresponds to a 14 cm pot. But you don’t always find such pots. I made the holes with a hot knitting needle. The legs are made of cork and glued with hot glue. They hold up very well. Now it is without a ceramic pot for better adaptation after transplantation. Then I’ll put it in a ceramic pot. It fits there too.
Now about the ways in which we can give our orchid water.
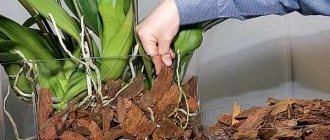
Ordinary watering. When using this method, it is good when the orchid is in exactly the same pots as in the photo, if it is a small amount of water. Due to the rim in a ceramic pot, the plastic pot does not stand at the very bottom, but is, as it were, suspended. After watering, all the water drains down the pot, but the roots are not in the water. What amount of water will be - everyone must choose for themselves. This method is good to use for the cool season, when the flower does not need a lot of water. Disadvantage: the substrate is unevenly saturated with water. Immersion method. Pour the settled water into a large container, such as a bucket. Gently lower the pot there, holding the substrate with your hands. The pot is completely immersed in water, kept there for a while and carefully removed from the bucket. Allow the water to drain. When using this method, you must be careful and ensure that water does not get into the axils of the leaves. Be sure to check them and remove the water with a napkin. Water in the axils of leaves, especially in the cold season, is fraught with rotting. It is also very dangerous for the growing point (the core of the flower). The substrate is saturated with water more evenly, but not completely.
Method of soaking orchids
Carefully water the substrate from all sides. Water is poured to the edge of the pot. Let stand for 20 minutes. In hot weather, I left it for one or two hours. What is good about this method is that the substrate is completely and evenly saturated with water. This method is best used in the hot season - in the summer and when the heating is on high. But you can use this method only when you have already changed the substrate in which the flower was when you purchased it. That is, you are sure that you have a clean substrate. Since sometimes it happens (also my personal experience) that inside the root system there is either sphagnum or foam rubber or some other moisture-intensive substrate. Naturally, we do not see what is happening inside. The roots and substrate, which are closer to the walls of the pot, dry out and we think it’s time to water. But inside the pot there is still a lot of moisture that we don’t see. As a result, we water again. The result is rotting of the roots inside.. Also, after soaking, it is necessary to check the axils of the leaves and the growing point. If water gets there, be sure to remove it with a napkin. Warm shower. About watering orchids using a warm shower, it is written in sufficient detail on the World of Orchids website in the Phalaenopsis section, you can also read about it on Russian-language forums on caring for orchids. But not a single book that I have read on caring for orchids talks about this method. There is also no information about this on German forums and on the websites of companies that sell orchids. My orchids don't have a good relationship with warm showers. Therefore, I treat this information very carefully. Maybe I'll try again, but only in the summer. I know for sure that it is definitely not recommended to water flower stalks from the shower!
About spraying orchids
First of all, spraying should benefit the flower, so you need to spray it wisely, so to speak. I used to spray often and it seemed to me that I was doing good to my orchids. But as experience has shown, there was not always benefit. After all, spraying is different from spraying. The important thing is that spraying benefits your orchid, and not that you feel reassured by spraying it! At the bottom of the leaf, the one that “faces” the substrate, there are stomata. When the lower part of the leaf is sprayed, the stomata open and increased gas exchange begins between our orchid and the environment. This works best during the day when there is enough sun. Then the stomata absorb much more carbon dioxide, which is then converted into cells for the birth of leaves, roots and flower stalks. Therefore, the best time to spray is when there is enough sun. Only with it does normal gas exchange occur. It should also be warm. If there is not enough light and it is cool on the windowsill, there will be no benefit from this, but most likely there will be harm. Spraying should be very fine, in the form of tiny droplets and at a distance of approximately 20 cm. In the hot season, you can also spray the upper side of the leaf to cool it. Drops of water from the leaf evaporate very quickly, thereby reducing its temperature. This should be done in the morning, when there are no direct rays yet, or simply temporarily remove the flower from the windowsill until all the water has evaporated, so as not to provoke a leaf burn. It is still not recommended to spray the orchid flowers themselves . There is definitely no benefit from this, but there is more than enough harm!
Watering orchids from the tap
About once a month I water all the orchids from the tap. I read about this on numerous orchid care forums. I called this method “substrate washing”. Why am I doing this? I fertilize my orchids. Any fertilizer also contains salts, which are deposited on the substrate. Therefore, once a month I thoroughly “wash” the substrate in the pot to partially wash them. I make warm water and bring it to the tap. I try to water thoroughly from all sides. Salts are also deposited if the water is hard. Therefore, the substrate should be washed periodically so that they are washed out at least partially.
I used to think that I understood my orchids... But this turned out not to be the case. I study and study and study all the time. I understood the main thing - that those watering methods that are good for the hot period are absolutely not suitable for the time when it is cool (soaking method). The finer the substrate, the longer it takes to dry. The less light, the less you need to water. I have no advice for orchid lovers - “do as I do and everything will be fine for your orchids.” Because this is not right. Everyone will choose the method of caring for orchids that is most suitable for him and his flower. After all, the most important thing is to simply understand when an orchid needs to be watered, and how to water it - everyone decides for themselves. I combine all methods, depending on the time of year and the state of development of the orchid.
From the article by Rakitsky S.E. “The general rule for watering is one. The lower the illumination, temperature and finer the substrate, the less and less often it is necessary to water, all other things being equal. For orchids, it is better to water the plant less than to overwater. For phalaenopsis in the cold season, short-term drying of the substrate is quite acceptable. At night temperatures of 10-12 degrees, you need to be especially careful with watering. During this period, it is strictly forbidden to water at night!”
About orchid fertilizers
During the period of active development of the orchid (growth of peduncles, flowering, leaf growth), the orchid needs to be fertilized. Fertilizers should only be used that are intended only for orchids. I always dilute in a proportion less than indicated, so as not to burn such growing tips. They are very gentle and the most vulnerable. A strong concentration of fertilizer can burn them. They turn black and may stop growing. For example, on my bottle of fertilizer it says 1 teaspoon of fertilizer per 2 liters of water. I always take 2.5 liters of water instead of 2 liters. It is better to play it safe for such purposes - take either more water or less fertilizer. There is also a recommendation written on the bottle - first water the orchid with plain water, moisten its roots, and only after that can it be fertilized! Since this will protect the orchid roots from burns. The same is recommended on orchid care forums.
This is my new orchid, which settled with me on February 14th. Yellow orchids are not common, so I was very glad to have another one. I also experiment with photography.
Due to the fact that I found photographs of my works (where my logos were removed) on Russian-language sites, as well as foreign ones, I decided to officially declare that I am the author of these photographs. I had to put a copyright sign on it. I hope that people, before removing my logos in Photoshop from my own works and assigning them to sites (which I don’t know about and have no connection with), will still think before doing this whether it’s worth doing.
Love your orchids and they will definitely love you back.
Love your orchids and they will definitely love you back.
Materials used:
Frank Röllke “Orchideen” Olaf Gruß, Manfred Wolff “Phalaenopsis” Joachim Erfkamp “Orchideen Handbuch” Article by Rakitsky S.E. “Culture of orchids of the genus Phalaenopsis and their hybrids in apartment conditions” - https://orchidsby.h12.ru/publicat/phalaenopsis.html Materials from the site “World of Orchids” - https://www.orchidee.ws Materials from Russian-language care forums orchids.
You can buy an orchid pot in Minsk, plants for your home and office or ]plant care[/anchor] by calling: (A1) +375(29) 171 94 42; (MTS) +375(29) 503 80 17, and we will also provide the necessary consultation. Contact us !
Leave a request or
Interesting video
Watch the video about whether you need to spray an orchid and how to do it correctly:
This exotic flower is really capricious, but it’s still worth trying to grow it at home. We will help you figure out what to do with it after purchasing it and where it is best to put it, how to care for it in autumn and winter, as well as how to properly grow, replant and prune it.
Everything you need to know about spraying orchids
When growing orchids at home, you must strictly adhere to the rules of caring for them. After all, this is what allows you to create an ideal microclimate and optimal conditions for the good development of the plant.
Spraying is an integral part of this care. And, like other stages of care, it has its own characteristics. In this article you will learn all the rules for spraying orchids, which will help you grow a healthy and strong plant.
General rules for watering orchids during flowering
Orchids in pots are watered generously. Wait for excess moisture to flow out and drain it. The required amount of water remains, excess moisture leaves, taking with it unnecessary salts.
Block orchids (living on branches, bark) are watered using the soaking method. Immerse the plant in water so that only flowers remain on the surface. This method enriches the rhizome with moisture and protects the entire orchid from rotting since water does not enter the core of the flowers. The blocks are kept in water no more than 15 m. Hanging orchids (without baskets) are carefully dipped into a container with warm water.
Attention! Orchid cobs are immersed in water with extreme caution, as they are dry and break easily. It will take 12-15 minutes for the rhizome to become saturated with moisture. Then they take out the flower, lightly shake it and hang it in place.
Excessive air humidity at low temperatures in the winter season, as well as on summer nights, is quite dangerous. The consequence of high humidity can be the appearance of brown spots on pseudobulbs and leaves, as well as their rotting.
In winter and in cloudy, cool weather there is no need to spray orchids. High indoor humidity combined with low temperature can lead to the occurrence of fungal and bacterial diseases.
Growth stimulants and vitamins
When growing phalaenopsis, you can use adaptogens and growth regulators - epin and ecosil:
- Epin increases the plant's resistance to adverse conditions and diseases. The solution is sprayed on the plant after replanting, during and after pest control, in case of flooding or frostbite of the plant. 1 ampoule in a volume of 1 ml of the drug is diluted in 5 liters of water. You cannot water the plant with epin!
- Ecosil is a growth regulator with fungicidal properties. It can be sprayed on orchids during the growth period to increase the plant's resistance to adverse conditions. A solution is prepared for spraying: 20 drops of the drug per 3 liters of water.
Spraying orchids with vitamin B1 - thiamine is aimed at increasing the size of flowers, accelerating budding, protecting the orchid from aging, and improving the movement of sap in the cells.
To prepare the solution, use 1 ampoule per 1 liter of water. Phalaenopsis is sprayed 1-2 times a month during active growth.
Pest treatment
Sometimes phalaenopsis can suffer from harmful insects:
- Scale insects;
- Mealybug;
- Green aphids.
Insects that harm phalaenopsis.
You can get rid of them by spraying the plant with special preparations:
If yellowish or reddish spots (rust) appear on the leaves, the plant should be sprayed with topaz.
If there are no negative consequences, then the plant can be treated completely. Otherwise, use traditional methods of treatment.
In order to prevent the occurrence of diseases and pests, monthly with foundationazole or oxycom.
The greatest danger is from snails and slugs. When they appear, it is necessary to treat the plant with mesurol.
Temperature for keeping orchids in winter
Heat-loving orchids tolerate winter well at room temperature. In the daytime, they are comfortable when the thermometer in the room shows about +20-22º. At night, the temperature can be 5-6 degrees lower.
Orchids should not be kept in cold, unheated rooms or on open balconies, terraces, or verandas in winter. They do not like not only frosts, but also low temperatures above zero.
If in winter you need to bring an orchid home from the store or deliver it as a gift to a friend, you will have to prepare the flower for transportation. The most convenient and hassle-free way to do this is in the car. If you have to be outside for a long time, you need to prepare:
- pack the orchid in a box, placing a couple of bottles of hot water on the bottom;
- wrap the plant in several layers of paper, securing them with tape or staples, wrap the pot in a towel or cloth;
- Place a support in the pot so that the flower branches do not break.
In winter, it is not advisable to transport orchids at temperatures of -15º and below. It is better to wait for the frost to weaken and transport the flower later.