- January 7, 2019
- Plant care
- Sergey Klimov
The home orchid is the favorite flower of any housewife who loves to do indoor gardening. Despite the fact that they are easy to care for, it is often these plants that make you think about whether it is possible to replant an orchid during flowering. Of course, here it is worth considering the type of flower, since most of them do not require replanting, but everything will depend, first of all, on the condition of the root system and the substrate in which the plant is planted.
Is it possible to replant a plant during flowering?
After purchasing it from the store
Often orchids stand in the store for a very long time, and the pot becomes too small for them . If the purchased plant has roots sticking out of the container, it needs to be replanted. You need to act as carefully as possible - the orchid is a very fragile and delicate plant.
Read more about whether an orchid transplant is necessary after purchase and how to carry out the procedure here.
Which has been at home for a long time
There are certain circumstances in which replanting is urgently necessary - this happens if the plant is sick and there is a choice, or beautiful flowers, or the death of a specimen after flowering.
Is it worth doing this?
This question cannot be answered unequivocally, since everything depends on the specific situation. For any plant, replanting is stressful, especially during flowering . So before replanting a flowering plant, you need to weigh the pros and cons.
And yet, is it possible to replant an orchid after purchase if it has released a peduncle, how can it be replanted into another pot during its growth and preserve the flower?
It is worth understanding that during flowering the plant is greatly weakened and by replanting it at this time you aggravate the situation to a critical level . Let's consider the consequences that will negatively affect the orchid:
- if the transplant is done carelessly, the orchid will not only drop its flowers, but may also die;
- the duration of flowering may be significantly reduced;
- the plant may not soon produce a second peduncle;
- the flower may stop growing and developing.
But replanting an orchid during flowering also has certain advantages:
- if the plant is affected by pests, then this is an excellent opportunity to save it from death;
- if the pot has become small, then replanting will help place the orchid in a more nutritious substrate, from which the leaf part will begin to grow and develop faster;
- the ability to protect other plants in the room from pests and infections.
Important : When a flowering orchid is transplanted, the peduncle needs to be shortened slightly. Of course, there will be fewer flowers, but the remaining ones will be large and bright, and the orchid will release the next arrow faster.
Read more about the time for transplantation here, and in more detail about whether it is possible to transplant a beauty when it has released an arrow, read this material.
How can transplanting into another pot during this period affect the culture?
If an orchid shoots out an arrow, then all its vital energy is devoted to the formation of a peduncle.
Flowering is such an energy-consuming process that it is undesirable to allow young plants to bloom - less than one and a half years old . Due to the inability to restore spent strength, “youth” can often die when finishing at the start.
You can determine whether a plant, due to its age, is ready to delight you with its butterfly flowers by the number of shoots: there should be 5-8 of them.
The root system weakens during this period, and it is this system that will be the first to suffer from the “human factor” if something goes wrong.
After an inept transplant, a plant, already subject to stress and stress, can, at a minimum, lose color, and at maximum, die.
When is the best time to move the plant?
If an orchid bought in a store is crowded in a pot, with numerous roots sticking out of it, then you can immediately move the flower to a larger pot. If you transplant the orchid carefully, without destroying the old earthen lump, then it will easily endure this procedure .
If you need to carry out the replanting process according to vital signs, then it is better to cut off the peduncle at the first dormant bud. The plant will spend energy on restoration and growth, and next time it will bloom more magnificently and beautifully.
We recommend watching a video about replanting an orchid after purchasing:
When is it necessary to urgently change the soil and pot?
There are several indicators according to which a plant is replanted urgently:
- the flower has been infected by a mite or is sick;
- the roots have grown very strongly;
- due to waterlogging of the soil, rotting of the root system began;
- upon purchase, a low-quality substrate was discovered in the pot, which caked and did not allow the plant to feed properly;
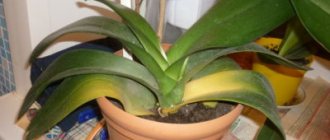
- the leaves began to turn yellow;
- the leaf mass is several times larger in volume than the pot;
- the roots have grown to the ceramic planter.
If the roots of the plant begin to rot, the peduncle must be removed so that it has the strength to take root. This transplant is very complicated, so you need to strictly follow the instructions.
If there are no indications for replanting listed above, then it is better not to touch the orchid until flowering stops . This way the flower will avoid unnecessary stress and will not get sick.
We recommend watching a video about the reasons for urgent transplantation of a blooming orchid:
You can also find out whether it is possible to replant an orchid in the fall and how to properly replant a baby orchid at home.
What does survival rate depend on?
After a planned transplant carried out according to all the rules, the orchid survives one hundred percent. Survival rate depends on many factors:
- from correctly carried out first watering;
- on the condition of the root mass;
- from the conditions created after transplantation.
If the flower is already sick and is urgently transplanted, then it is difficult to guess how much the flower wants to live, but to help it, it can be sprayed with the drug “Epin”, which will help it more easily adapt after illness and transplantation.
Basic rules for transplanting a blooming orchid
So, the decision was made to replant the orchid in bloom. Let's consider how to do this correctly, and whether it is possible with minimal damage to the plant.
Preparation
Equipment and tools must be prepared in advance:
- garden shears or small pruning shears;
- antibacterial solution or activated carbon;
- substrate;
- drainage;
- plastic pot of the required size.
Pot
The pot for the orchid must be chosen correctly; this is the only way the plant will develop well. There are types of orchids whose roots take part in photosynthesis; transparent pots are chosen for them. For the rest, you can choose any plastic or ceramic flowerpot.
To prevent water from stagnating, there must be a sufficient number of holes at the bottom of the pot . You don’t need to immediately choose a pot with a “reserve” - in this case, the orchid will begin to intensively grow green mass, and you won’t get any flowers.
When purchasing a ceramic pot, you need to choose specimens that are glazed on the inside, so the roots will not grow to the pot. If possible, buy a flowerpot with a leg, so the plant will receive a sufficient amount of oxygen and excess moisture will quietly drain through the holes.
We recommend watching a video about choosing a pot for an orchid:
Priming
The substrate is prepared based on the conditions of detention:
- if the orchid will be in a room with dry air, then the soil should be as moisture-absorbing as possible;
- good soil should dry completely in 3-4 days;
- In addition, the substrate must be very light and not caking.
If you decide to prepare the substrate yourself, it is better to take pine bark, sphagnum moss, a little peat and charcoal. You should not take bark from a tree that has been lying on the ground for a long time - it must be fresh . In addition, it must be boiled before use.
- After boiling, the bark is well dried and divided into 2 parts: one is broken into large fragments, the other is finely crushed.
- The moss is placed in water at room temperature for a day.
- A little peat and coal are needed, only to feed the plant after transplantation.
As soon as the mixture is ready, it must be disinfected by soaking for 2 hours in a weak solution of potassium permanganate . Next, the finished substrate needs to be dried a little.
We recommend watching a video about preparing soil for an orchid with your own hands:
Read more about choosing soil and pot here.
Priming
The soil for an orchid should consist of crushed tree bark with a small amount of charcoal, perlite and sphagnum moss. The amount of moss depends on the humidity level in the room. In most apartments the air is dry, so a third of the moss is added to the soil when planting. It absorbs water and gradually releases it to the roots.
Step-by-step instruction
- Before removing the plant from the old pot, you need to shorten all the flower stalks by about 3 cm. In this case, rooting will take place faster and the plant will soon produce lateral flower stalks.
Before transplanting, water the orchid well, carefully tap the sides of the pot and remove the roots along with a lump of earth. The ceramic pot should be carefully broken.- Often, the roots of an orchid grow to a clay pot - an attempt to tear off the plant will lead to its death. Do not remove clay shards stuck to the roots; plant them along with them. The plastic flowerpot can be cut.
- Clean the root system from the old substrate as carefully as possible. You can soak the earthen ball with roots for 30 minutes in warm water. After which the roots are washed in running water.
- Carefully examine the root system, cut off the blackened, rotten fragments with pruning shears or scissors - they must first be disinfected (read more about whether it is possible to trim the roots and how to do it here).
- All cut areas should be sprinkled with charcoal or other disinfectant. You can use brilliant green.
- Then the orchid is left to dry for 6 hours. At this time, prepare the substrate and flowerpot.
- If the reason for replanting the plant is an overgrown root system, then you should choose a larger pot.
If the reason is different, then take the pot of the same volume. Advice : If you use an old flowerpot, then it needs to be washed and disinfected with a dark solution of manganese, and then dried. - Drainage should be placed at the bottom of the pot, approximately 1/3 of the pots.
- Fill in a handful of substrate, then lower the roots of the orchid along with the support stick, and carefully add the missing soil. To compact, you should not press the ground, as you can damage the delicate roots; just tap a little on the edges of the flowerpot so that the substrate settles.
- Tie the flower stalks to the support peg.
We recommend watching a video about how to properly transplant a blooming orchid:
Features for different types
- Cattleya. The cattleya needs to be watered generously within a couple of hours. After transplantation, the flower does not require watering for two weeks - you can only spray it.
- Zygopetalum. For replanting, light soil is used, old and dried roots are completely removed.
- Dendrobium. After purchasing, it is recommended to replant the dendrobium immediately, using heavy clay pots rather than transparent containers.
- Wanda. During transplantation, the roots should be straightened by rinsing with warm running water.
- Cymbidium. Wounds on the roots should be treated with ground cinnamon or brilliant green. Pseudobulbs should not be buried below the previous level - this can cause rotting.
How to properly provide care after the procedure?
After transplanting an orchid, special care is required:
the air temperature must be maintained no more than +20 degrees;- do not place the flower in the sun for 10 days - the light should be diffused;
- on the 4th day you can water the plant with a small amount of water, which is boiled before watering;
- repeated watering is carried out on the 14th day;
- the orchid responds well to irrigation, but this should only be done with boiled water;
- After 30 days, you can feed the orchid for the first time with potassium-nitrogen fertilizers.