After the release of my free book about orchids, questions about difficulties in care and requests for help reviving an orchid began to come to my inbox more and more often.
Many difficult situations with plants come down to the fact that a sick orchid must be treated and placed in a greenhouse. This is where the difficulties begin. It would seem a very simple situation, but questions here begin to pour out of the sleeve: how to make it, what to make it from, what to put there, how to keep the plant there...
That is why the topic of writing a post arose on its own.
How to make a greenhouse for an orchid at home?
Orchidists keep the most demanding varieties in home florariums or orchidariums . mini-greenhouses in their homes to resuscitate damaged orchids.
This is done for the simple reason that most orchids come from the tropics, where they live in moist evergreen forests.
And the atmosphere of a human home is aggressive for them. Building a small greenhouse is quite simple, even from scrap materials.
With your own hands
The operation of a greenhouse is based on simple principles - heat radiation and heat exchange . Electromagnetic radiation, for example, from the sun or a lamp enters the greenhouse, where it is converted into heat, which is accumulated and retained by its walls. Due to the fact that the greenhouse is a closed structure , it maintains the required temperature and humidity.
The arrangement and size of the greenhouse depend on the goal you are pursuing and the result that is needed. So, you can build a greenhouse for resuscitation of one orchid from an ordinary plastic bottle . If you plan to keep a small collection of orchids in a greenhouse, you will need a larger structure: an aquarium or a terrarium cabinet.
A greenhouse can be made from a plastic bottle.
At home, greenhouses are built from scrap materials and even garbage. Any transparent container will do:
- plastic bottles;
- transparent confectionery boxes;
- transparent boxes;
- packages;
- oilcloth or stretch film.
The frame can be made of wire or wooden rods.
When there is no point in resuscitation
If the flower is left completely without roots and leaves, then it will most likely not be possible to save the dried orchid. All efforts will be in vain. If at least part of the root system has been preserved or the roots have dried out and the leaves are turning yellow, then it makes sense to try.
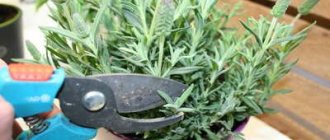
The first step is to remove all diseased leaves and roots. Then the flower is dried. The areas where the cut was made are thoroughly disinfected. You can treat the orchid roots with crushed activated carbon.
The part of the root system where new roots will form is treated with nutritious vitamin solutions. In order for the plant to recover, it needs careful care.
On a note!
A lot of time can be spent on activities to resuscitate an orchid: from 1 to 12 months. Therefore, they do not expect a quick effect.
Design options
From a plastic bottle
5-6 or 10 liter water bottle is suitable . If you don't find one, you need to find one. 2 liter bottle may be suitable .
You need to make a hole in the bottle or cut off the top or bottom to place the orchid inside . You can secure the plant with wooden twigs, thick threads or women's tights.
From transparent plastic boxes
Having such a box with a lid (or without) in your household will greatly simplify your life. As a last resort, you can buy it. Then you won’t need to cut anything, just secure one or more plants inside and close with a lid.
Polycarbonate box
If you have a pair of straight hands and material, you can make a transparent box yourself. Polycarbonate is notable for the fact that it transmits light well, is easily cut into fragments , and, unlike glass, is lighter, warmer and stronger . In addition, such a greenhouse will completely suit you with its size and shape.
From a glass, volumetric container
If you have an old aquarium or terrarium lying around at home or in the garage, you can use it as a greenhouse. It would be great if the aquarium was illuminated, but more on that later.
Greenhouse from an aquarium.
Frame covered with film
A film or oilcloth is stretched over a solid wire skeleton . A simple design that can be easily assembled and disassembled as needed.
Plastic bag
The most extreme option is to place the potted plant in a transparent bag. Such a device will not require investment or time, and is fundamentally no worse than others.
Saving a flower without roots
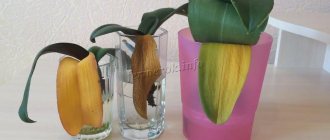
It is also possible to save an orchid without roots. There is hope for salvation only if the grower acts immediately and according to a certain algorithm. If only one stem remains from the pet, its resuscitation is carried out in water. Before immersing the flower in warm, settled water, trim damaged tissues and treat open wounds with antiseptic agents.
After immersing the remaining stem with leaves in warm water, place the container in a well-lit place. It is better to avoid exposure to direct sunlight. As the liquid level evaporates, it is topped up. Caring for an orchid that has lost all its roots can be supplemented by wiping the leaves with a solution of succinic acid prepared in the proportion of 1 tablet per 250 ml of water. To avoid hypothermia of the pet, when the air temperature drops at night, cover the container with plastic wrap or do this using a regular bag.
Under properly created conditions, the flower rarely dies. After 2-4 weeks, root growth brings the first results - new young roots appear. When the orchid has produced several of these shoots, it will have to be cut off, leaving the baby behind and transplanting it into a pot. The best soil for further rehabilitation is sphagnum moss. It absorbs moisture well, is breathable and is rarely subject to infection by various infections.
Landing
Priming. Layer structure organization
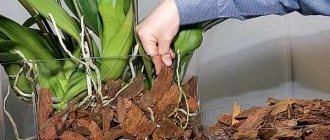
As a rule, sterilized coarse bark and sphagnum moss are placed in the greenhouse. If the design allows and there is sufficient volume, then you can put several layers of different materials.
A thin layer of small expanded clay or pebbles is placed on the bottom as drainage, then bark and sphagnum on top.
It is better to use dry moss , since you do not have to worry about maintaining its vital activity.
Important! All soil components must be disinfected. Calcine the expanded clay in the oven, the bark and sphagnum can be boiled or taken out in severe frost overnight.
Technology
When the base is prepared, you can start planting the plant. Since the reanimated orchid has no roots, there is no point in making a significant deepening:
- Make a small funnel in the moss to place the orchid in;
- Before this, soak the plant for 2 hours in epin, then powder the stump, where the roots once were, with heteroauxin or root ;
- Cover with moss. The moss should be moist but not wet;
- If necessary, the plant can be secured with wire, bamboo rods or other means.
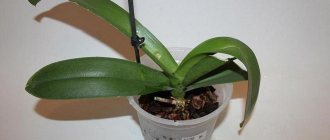
If the design of the greenhouse does not allow you to put substrate in it, use perforated orchid pots. Periodically inspect the plant for rot or mold . The greenhouse should be located in a warm, well-lit place.
The greenhouse should be located in a well-lit place.
Tips for working with a minigreenhouse
If you have a need to use a home mini-greenhouse, then you need to follow a few simple tips that will help you revive your orchid or raise a healthy baby.
- The roots of phalaenopsis, like the leaves, help the plant synthesize organic substances, i.e. participate in the process of photosynthesis, so any container that you will use for a mini-greenhouse must be transparent.
- A prerequisite is to ventilate the greenhouse (every two days) for 30-40 minutes.
- Moisten the pine bark or sphagnum moss that you place on the bottom of the greenhouse with a sprayer, after removing the baby or orchid. If you leave them, make sure that condensation after spraying does not collect in the outlet (you can then blot it with a napkin). Sphagnum moss should be constantly moist (not very damp).
- If you have moss in your mini-greenhouse, you need to monitor its condition. When I used simple moss, in the absence of sphagnum, it disappeared from my greenhouse, acquiring an ugly dirty brown color and a moldy smell. In this case, it must be immediately removed from the greenhouse.
- The mini-greenhouse should be in a warm and bright place, but in no case on the windowsill. This way you can burn your favorite flowers in the sun.
- Once every two weeks, you can dilute a specialized fertilizer for orchids (we make the concentration 10 times less than for root feeding) and spray the leaves (again, blotting the accumulated moisture in the center of the rosette).
Dear friends, that’s all I wanted to tell you. I will only add one thing: growing children or resuscitating orchids without roots does not happen as quickly as we would like. Everything takes a lot of time: the baby’s roots usually appear in a month or two. After this, the young plant, having been transplanted into the bark, must be gradually accustomed to room temperature, and this also takes at least six months. Usually a full-fledged plant can be seen only after a year.
The situation is the same with diseased orchids: at first it is necessary to stop the rotting process and only then talk about the development and growth of the diseased plant.
I wish your pets excellent health and beautiful flowering. Let them please you, bring peace and beauty to your home!
Reanimation
It is necessary to understand that since the orchid, for some reason, was left without roots , then resuscitation in a greenhouse is not suitable for it due to similar conditions.
Usually, orchids' roots rot from excess moisture. As a rule, this is due to insufficient light and is most often observed in the autumn-winter period. In order for a plant to carry out photosynthesis normally, it needs a certain amount of light.
This amount is different for all plants and may differ from one type of orchid to another. When even the minimum amount of light necessary for the photosynthesis process is received, the orchid absorbs moisture, carbon dioxide, and simply grows.
If there is not enough light, the plant goes into suspended animation , that is, it temporarily slows down its life processes, while the roots absorb a minimal amount of moisture. In the event that water continues to flow to the roots (you constantly water the plant), then the roots do not have time to absorb all the moisture , just as it does not have time to evaporate.
It turns out that the water stagnates, the walls of the root cells begin to collapse, the tissues are affected by microorganisms, and the process of rotting begins. The plant cannot neutralize this by the growth of new cells, as it simply sleeps.
Therefore, in order for the roots to start working, the plant needs a signal - bright diffused light for 12-14 hours a day.
As already mentioned, the greenhouse should be located next to a bright source of light. In this case, the temperature in the greenhouse should be maintained in the range of 22-28 °C.
Under such conditions, an optimal microclimate will be formed, similar to that in which orchids grow in the tropics. If all conditions coincide simultaneously, new root sprouts can be observed literally in the first 10-14 days.
Important! Ventilate the greenhouse daily. This must be done in order to saturate the atmosphere with carbon dioxide and prevent the appearance of mold. It is best to carry out the procedure in the evening. In summer, the greenhouse can be left open all night.
Try not to overheat or overcool the greenhouse. The temperature inside should not exceed 34 °C and fall below 22 °C. At higher temperatures, the plant overheats, experiences shock and, in an attempt to cool itself, begins to actively evaporate moisture, which is contraindicated for it. Since there are no roots, the orchid may simply wither. Hypothermia is fraught with the appearance of mold, rot, rotting of wounds and all parts of the plant.
Inspect your orchid periodically. If the slightest signs of rot appear, the plant must be dried and returned to the greenhouse, placed in such a way as to prevent a repetition of the mistake.
Be sure to inspect the orchid for rot.
When roots appear, begin spraying the plant with fertilizers at a concentration of ¼ of the concentration indicated on the package. The frequency of fertilizer application is once every 2-3 weeks. You can support the orchid with frequent (once every 3-4 days) iron supplements, as well as epin and zircon according to the instructions.
The resuscitation process can take quite a long time. On average, it is approximately 6 months . During this period, the plant grows roots (at least 4-5 cm in length) and is ready to be planted in a substrate for adult plants.
Use small, perforated pots . To prevent the orchid from falling out of the pot, it will need to be secured with wire, twigs, or tied to the pot with women's tights. Once the plant is secure in the pot, the garters can be removed.
Advice! If possible, leave the orchid in the greenhouse until it has gained a decent mass of roots.
Greenhouse: features of use
A greenhouse is needed to maintain the greenhouse effect in a certain space. Gardeners use this effect to produce seedlings and early harvest of vegetables.
Orchid growers use a mini greenhouse to raise orchid babies or to keep a diseased plant in it. In an enclosed space, orchids do not lose moisture.
Friendship between greenhouse and fungicide: how to revive an orchid
Before placing the plant in a greenhouse, it is treated with a fungicide (except for growing young orchid plants). Treatment of the plant is mandatory and is necessary in order to suppress the development of pathogens on open wounds.
Fungicides are characterized by a long-lasting protective effect. That is, being in a warm and humid environment (the favorite environment of pathogens and fungi), the treated orchid will be completely protected. This is an excellent solution when we are resuscitating orchids without roots: the fungicide helps stop the rotting processes of an already developing fungus.
Many gardening forums recommend foundationazole as such a medicinal drug. I will not advise this to my readers for one simple reason: in 2001, the production of foundationazole (original name benomyl or benlate) was stopped by its creators - the famous company Dupont de Nemours (USA) after a series of scandalous lawsuits. It turned out that benomyl benlate easily causes the reproduction and selection of resistant forms of pathogenic fungi (suppresses some, causing a number of others).
Whether or not to use foundationazole is a personal choice, but knowing these disappointing facts, I would advise you to refrain from using it, of course, not in a categorical manner. I would also like to clarify that foundationazole is very difficult to find on sale, and if you do come across it, know that in 80% of cases it is a very good fake (usually prepackaged chalk). But our flower growers still get it somewhere and use it. I read a lot of good reviews on forums, but I don’t use it myself. Maybe in vain)))
What do manufacturers now recommend to us? There are a lot of drugs, but two are recommended for use in indoor floriculture. How to revive an orchid using them will be discussed in more detail in another post.
1. "Vitaros" (JSC) - water-suspension concentrate. It can be found on sale in ampoules of 2, 10 and 50 ml.
2. “Maxim” (Switzerland) – concentrate suspension. On sale - a bottle of 40 ml or in plastic ampoules of 2 ml, 4 ml. Protected from counterfeiting with red dye. Protective effect - 12 weeks.
In addition to these drugs, colloidal sulfur, phytosporin (biofungicide) and trichopolum are also used.