In fact, the presence of soil is not a vital condition for phalaenopsis. Regular plants get their nutrients from the earth. But phalaenopsis needs soil only in order to gain a stronger foothold in it. In fact, the soil in a pot with a domesticated orchid can be replaced with anything. The main thing is that the phalaenopsis can grab onto the roots when filling the pot. Below we list several options for substances that can easily replace soil when growing home orchids. Perhaps you can add something of your own to this list.
- Expanded clay. To plant an orchid in expanded clay, you need to fill a pot with pebbles (namely a pot, not a pot, since the container must be closed, without any holes) and plant the small phalaenopsis almost directly on the stones. The plant will need time to establish itself in the pebbles, which we usually use to form a drainage layer in pots.
- Tree bark. Shredded bark can be purchased at any garden store. Bark is considered the most popular soil substitute for phalaenopsis. If the flower is small, simply fill the pot with bark, “set” it on top and leave it in that position. After a while, the plant will independently attach itself to the bark with its roots. If the phalaenopsis is an adult, fill the pot to the middle, place the flower in it, and sprinkle the rest of the “substrate” on top.
- Plain water. Yes, yes, and she too: just pour water into the container so that it literally covers 5-6 cm of the flowerpot, and lower the phalaenopsis into the liquid. It is from there, from water, that orchids will receive useful nutrients.
Please note: if you decide to use the “water” growing method, monitor the position of the roots in the pot. As soon as they reach the bottom of the container, the flower will need to be transplanted into a larger container.
Peculiarities
It is quite possible to grow an orchid without soil only if the roots of the flower are accustomed to a constant humid environment.
After all, the tree bark and other additional components play a secondary role, as they are necessary to support the orchid. But if you resort to using a skewer or something else, then there is no need for a soil mixture.
In winter, an orchid grown without soil needs to be watered less often (you can find out how to care for an orchid in the autumn-winter period here). And in the spring, when the flower begins to actively grow, increase the frequency of moisturizing. In addition, it is important to monitor the lighting.
For orchids indoors, any window is suitable, except the south one, since direct sunlight is destructive for phalaenopsis (read more about where it is better to place an orchid and where not to keep a flower).
Advantages and disadvantages
Growing an orchid without soil has the following advantages:
- You can prevent the flower from rotting or the development of parasites in the soil. This is extremely important, since rot in the root system is a common problem for orchids.
- By growing a flower without soil, you can avoid transplanting, which is a real stress for the plant.
- Dissolving useful components in liquid will prevent their shortage or excess.
- The absence of soil will allow the plant to remain strong and healthy, as it will receive the necessary amount of beneficial microelements, so the roots will not dry out.
When growing orchids, an open automatic system is used, which reduces the time spent caring for the flower.
just important not to forget to add water from the irrigation system when necessary .
Thanks to this method, the orchid will no longer need watering for 2 weeks, and it will not harm it in any way.
As for the disadvantages of the method, there is only one - it is difficult to care for. Because of this, the appearance of the flower begins to suffer, as its leaves turn yellow and fall off, and the root system rots.
Ways to keep a flower without soil
There are several technologies for cultivating plants without soil:
- hydroponics - the roots of the plant are immersed in an aqueous solution of nutrients;
- hydroculture - cultivation in an artificial environment;
- Aeroponics - the roots of the plant are in contact only with air.
In water
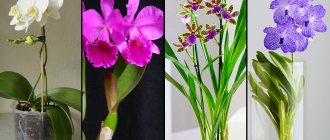
The hydroponics method successfully cultivates species such as phalaenopsis, dendrobium, cattleya, vanda, and zygopetalum.
The orchid is gradually transferred to growing in water; the “training” period can take several weeks:
- First, remove the plant from the soil, clean the roots, then immerse it in 30% water for 2 days. Then the water is drained, leaving only 1 cm.
- After a week, the orchid is left in water for five days, giving only one day to dry.
- After which the flower is left in water constantly, changing the water weekly and monitoring the condition of the roots.
- For stability, you can add drainage to the bottom: small pebbles or expanded clay.
The advantages of the method are obvious: easy care without frequent replanting, without the occurrence of diseases and pests.
The disadvantages include:
- constant addition of nutrient solutions for the root system;
- It is necessary to monitor the level and temperature of the water - it must be constantly cool.
If containment conditions are not met, problems may arise, such as:
- Root system rotting. This usually happens if the pot becomes too small for the plant or if it is watered too often.
- Limp and wrinkled leaves indicate that the water temperature is too warm.
- There is no flowering for a long period. It is necessary to ensure the difference between day and night temperatures in the range of 6-8 degrees.
Watch the video on how to transplant a flower from soil to water:
On blocks of bark
A block is one or more large pieces of bark, or even driftwood, on which orchid plants are fixed. The blocks can have a frame, hang on the wall or from the ceiling.
When making a block, the plant is attached to it with synthetic threads, after which the structure is decorated with sphagnum.
Many types of orchids grow and develop well on a bark block. The main ones:
- oncidium;
- aerangis;
- phalaenopsis;
- Cattleya;
- ascocentrum.
The best and most durable material for a block is the bark of oak, balsa wood, and Quebracho wood. Mangrove driftwood and products made from non-rotting wood are used as a frame (base).
Pine bark, at least 15 mm thick, is used for the block only after repeated boiling, in order to avoid rapid rotting and mold. Sometimes there is advice on using ordinary foam plastic as the main material for the block.
Watering plants in blocks is done by spraying water on the root system and leaves without affecting the flowers. Water is sprayed on the roots before drops begin to fall, on the leaves until their surface is covered with water dust without the formation of drops.
In a glass vase or pot without substrate and water
An orchid with exposed roots in a glass vase looks very decorative and unusual.
The most suitable species for this method are those whose roots are covered with a thick layer of velamen.
Such orchids do not require substrates and can provide their nutrition and moisture needs directly from the air. These include phalaenopsis and vanda.
Differences in cultivation:
- Phalaenopsis is placed in a glass container so that the stem and leaves are above the level of the container. In this case, for stability, the plant is fixed by the edges of the vessel with wire or bamboo sticks. Sometimes, to secure the roots of phalaenopsis, it is recommended to pour hydrogel or foam into the vessel. The presence of such a filler is too similar to growing in a substrate and does not apply to aeroponics.
- Wanda, called the “queen of the air,” does not grow laterally, but only in height. A narrow and tall glass vase (vessel) is well suited for its development. A ball of powerful roots rests on the bottom of the vessel; the vanda’s stability is ensured by the leaves touching the glass walls. In elongated glass-shaped containers made of glass, vanda can be cultivated for a very long time, until it outgrows the container so much that it begins to lose stability and fall along with the “pot”.
Advantages of the method:
- With proper care, vanda can bloom for a month and a half several times a year.
- The roots will not rot from improper watering and poor-quality substrate.
- There is no need to replant the plant - the roots are not damaged.
- It is convenient to monitor the condition of the root system.
- The refinement of glass vase shapes is not required. In a transparent round or square tall vessel with a flat bottom, the main decorative element is the vanda itself with its unusual flowers.
The main difficulty in growing vanda orchids using aeroponics is watering.
During this procedure, water is poured into a tall vessel in such an amount as to completely cover the root system. After 30-45 minutes, the water must be drained by carefully tilting the vessel.
To avoid the accumulation of plaque on the glass walls, it is sometimes recommended to remove the plant from the vessel and immerse the roots in water, and wash and clean the vessel itself. This must be done extremely carefully and carefully so as not to damage the fragile roots that sometimes grow to the glass.
If you use a glass vessel with a drainage hole in the bottom to grow an orchid, you can use a simple watering option - immersing the vessel along with the plant in water to the required level.
Watch a video about growing phalaenopsis in glass:
In hanging baskets
With this method, the plant grows in wooden or plastic baskets suspended from the ceiling or wall, with the roots hanging freely from the basket. Hanging plants are very picturesque and can decorate a mini-greenhouse or home flower corner.
Dendrobium, cattleya and vanda are grown in hanging baskets.
The aerial roots of vanda can reach a length of one meter, with the same stem height.
To prevent a mature plant from falling, its stem is additionally secured with synthetic threads to the hanging point of the basket. The best material for a basket is rot-resistant wood or polyvinyl chloride (PVC).
For decorative purposes, after placing the plant in a basket, the remaining space can be filled with sphagnum. Watering orchids in hanging baskets is done by spraying.
What is used instead of soil?
The orchid feels great even not in soil saturated with humus, but on the trunks, branches, and roots of some tree. The components necessary for the development of a flower are not obtained from the soil at all . The atmosphere remains the source of nutrition.
An orchid needs soil only so that it can somehow gain a foothold and stay in a certain area. So when choosing components to be used instead of soil, you need to take into account their permeability to moisture and air.
In most cases, the main component for a homemade soil mixture is tree bark. You can pick it with your own hands or purchase it at a specialized store. Most often, gardeners choose pine bark, although the bark of oak and conifers is excellent. To assemble it, you will have to use sawn logs or dead wood.
To ensure the safety of the plant and protect it from pests and bacteria, pieces of bark must be cleaned of softened areas and dried thoroughly .
In addition to bark, flower growers actively use sphagnum moss as soil. Its main purpose is to make the soil loose, retain moisture without compacting the soil, absorb harmful salts and have a bactericidal effect.
In addition to tree bark and moss, expanded clay and activated carbon, which also has disinfectant properties, are suitable for orchids.
We invite you to watch a video about the types of soil for growing orchids:
Significant advantages
In artificially created conditions, cultivation without soil mixtures has many advantages:
- maintenance costs are significantly reduced;
- there is no need for replanting;
- A little moisture is sufficient to maintain growth;
- there are no stagnation phenomena when spraying;
- drying out of the root system is avoided;
- the risk of infection by fungi and rot is reduced;
- In general, the content is greatly simplified.
The water system is well tolerated by unpretentious phalaenopsis (Phalaenopsis), maxillaria (Maxillaria), dendrobium (Dendrobium) - as a resuscitation and for permanent maintenance.
But not all orchids accept this method painlessly. It all depends on the actual climatic conditions - temperature, humidity. You will have to wait 3 to 6 months to see the results and decide whether it is suitable for that particular climate or not.
There are no uniform rules for cultivating orchids in aquatic conditions. All varieties behave differently, each type requires individual attention. The general recommendations are:
- Only the roots touch the liquid phase (the height of the column is 2-3 cm from the bottom). The neck, stem and bulbs should be above its surface.
- If they are of different lengths or are located too high, you need to pour it so that the longest root is immersed by 2-3 cm.
- You need to top up as the liquid evaporates or is absorbed, but always to the same height.
- The liquid should be changed as soon as it becomes cloudy. At the very beginning, you may have to do this more often due to the decay of the bike rider.
- There is no need to remove healthy green strands remaining after cleaning the root. Even without the outer shell, they nourish the plant.
- Under no circumstances should you raise the level to the young roots - they will gradually sink into it themselves. Getting ahead of events is fraught with the onset of rot. The maturity of the velomen is determined by the characteristic darkening and compaction of the part that has sunk into the aquatic environment.
- To stimulate flowering (as in the traditional version), the use of complex fertilizers is mandatory. In summer - at least once every 5-7 days, in winter - reduce to a minimum, since the growth process slows down at this time. Feeding is especially important in the off-season.
For reference! If this is a reanimated orchid, you need to fill it without reaching 1 cm to the neck. Or first grow roots in moss.
In what container should the plant be kept?
When growing an orchid without soil, the hardest part is choosing the right pot. For this plant, it is worth choosing a container of this type and structure so that the flower has a place to develop, does not dry out and is not subject to the harmful effects of dry air in the room where the plant is kept. When choosing a pot for growing without soil, you should give preference to glass vases or plastic and ceramic containers. In addition, they must meet the following criteria:
- Containers must have water drainage.
- The size of the pot and the size of the plant should match each other.
- The volume of the container should be such that the root system of the plant can be located there freely and does not touch the walls.
We invite you to watch a video about choosing a container when growing an orchid in an open system:
Transplant technology
It is necessary to free the roots from the bark
First you need to remove the plant from the pot. Shake the substrate off the roots and thoroughly wash off any remaining soil. Then cut off the rotten and dried roots and dry the roots.
Landing in water:
- The plant, cleared of substrate, is placed in water up to the root collar.
- After 1-2 days, the water is drained, leaving a layer 1-2 cm thick.
- After a week, you can add more, accustoming the crop to more water.
Attention! The roots are not completely immersed in water; most of them should be on top.
Planting in expanded clay:
- Fill the lower part of the vase with expanded clay (up to half is possible). The orchid itself will grow roots to the required depth.
- Spread the orchid roots.
- Cover with expanded clay up to the lower leaves.
- Secure the plant in a vase.
Planting in perlite:
- First, a layer of expanded clay is poured.
- Next, the orchid is placed and the roots are covered with perlite.
- Perlite is compacted by immersion in water. The plant is fixed.
- To prevent the material from floating, a layer of decorative stones is placed on top.
Planting in green mix and diatomite:
- Pour in expanded clay.
- Next is the material for the germinating root system.
- Install the orchid, cover the roots with hydroculture.
- Pour the mixture well to compact.
- Secure the orchid.
- You can put expanded clay or decorative stones on top.
Diatomite and green mix should always be moistened with water. Otherwise, they will draw moisture from the plants.
Difference in cultivation
Using this method of growing orchids, you need to take a more careful and responsible approach to the care process.
Unlike the traditional method, in this case there is no need to select soil or prepare it yourself, which reduces time and money. But there are more stringent requirements for growing conditions: suitable humidity, timely watering.
And the most important difference is that an orchid grown in soil gets sick much less often than one for which the soil mixture is not used.
We invite you to watch a video about the difference between growing orchids in closed and open systems:
How to properly care?
This interesting way of growing an orchid requires more careful care of the plant, which consists of the following:
- Avoid high humidity in the room where the flower is located.
It can withstand short droughts much more easily. To control the level of humidity, it is necessary to grow the orchid in a container with transparent walls. Then it will be possible to visually determine whether the orchid without soil needs watering. - Spray the roots and above-ground parts of the plant daily with soft water using a spray bottle. This will allow you to achieve the required level of humidity.
- Lighting is no less important for the growth and development of a flower. Daylight hours should be 10 hours. The sun's rays can be seen by artificial lighting using fluorescent lamps.
- During the day, the air temperature should be between 18-27 degrees, and at night – 13-24 degrees.
By following the recommendations presented, there should be no complications or difficulties in care , and the orchid itself will delight the eye with its flowering and luxurious appearance.
Difficulties
Any difficulties may arise if you do not follow the rules for caring for your orchid. The most common problem remains associated with the desire of the leaf blade, as a result of which the leaves simply fall off. But it’s one thing when this is a natural process and old leaves fall off, but this can happen to young ones for the following reasons:
- overmoistening - along with the yellow leaves, the process of rotting of the root system occurs;
- overdried soil is a common cause of leaf wilting; this occurs if the plant is not sprayed and the air in the room is not humidified;
- direct sunlight - in the summer can lead to the development of such a negative phenomenon;
- draft or cold room in winter.
In addition to yellowing of the foliage, problems arise in the root system. In this case, the roots begin to rot due to waterlogging. You can still save the plant if you replant it.
In order for an orchid to delight with lush flowering for many years, you first need to find out what to do after purchasing a flower, then study in detail all the available information about the purchased variety, the conditions for keeping the plant, the rules for replanting, pruning and fertilizing.
Growing an orchid without soil is an interesting activity for every gardener . But there are a number of points here, without which the flower risks dying. So only experienced people should choose this growing method to prevent problems in the future.
Possible problems
- Diseases. A common problem when growing in water is root rot. To combat it, the plant is taken out, treated with fungicides and dried for 24 hours.
- Pests. If scale insects or mites appear, the entire plant can be bathed in Fitoverm solution and repeated after a week.
- Adaptation. Orchid roots get used to new conditions within 3-6 months. Sometimes some of the roots die off, the remaining ones adapt to being in water or concentrate above it.