Caring for baby violets
Saintpaulia is ready for offspring after 1 calendar year . The countdown is from the planting of the propagation leaf to the end of the first violet flowering.
Violet babies can be obtained in different ways:
- new shoots are obtained vegetatively: from the leaf. The middle leaves of Saintpaulia are disconnected from the mother bush and planted to form children. Cuttings (3 cm from the leaf) are grown in water or in soil. Babies in soil grow into stronger specimens than in water;
- part of the sheet. The sheet is cut by 1/3. This is usually the top of the leaf with veins. The leaf is left to dry after cutting. Then, they are dipped in ash or crushed activated carbon and planted in the ground. It must be pressed tightly with soil. Each vein will produce roots and children;
- stepchildren _ The stepchildren are separated from the mother bush and transplanted into a separate pot;
- from flower stalks. Peduncles are cut off along with stipules and planted in the ground.
This is interesting! When propagated by a fragment of a leaf, the largest number of children appears. When children appear, increase daylight hours to 12 hours and water as needed. Ventilate the greenhouse once a day. They are taken out of the greenhouse at the time of transplantation. Having previously prepared them for room temperature and humidity.
Stages of development
As soon as the leaves appear, cut the leaf in half. This will provide an opportunity to develop faster. If you are going to continue to grow further shoots, then you should not do this. You'll just have to be patient and wait.
Saintpaulia goes through four growth phases before maturity:
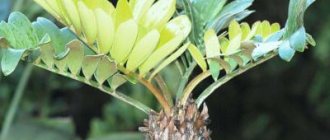
- First stage – the appearance of children;
Children of violets. - The second stage - the development of a young plant is called starter . This is the time when the rosette is a teenager, looks like an adult specimen, but is still miniature. Sometimes the color is not yet fully determined, the surface is covered with light spots. During this period, the flower should receive enough light. Turn it periodically around its axis so that the development on all sides is the same. Remove leaves that make the rosette asymmetrical;
- The next phase is a young rosette with a grown cover, bright color, ready to form buds. You can distinguish it from an adult individual by its elastic, shiny leaves;
- The fourth stage is the formation and set of buds . Saintpaulia enters the “violet on buds” stage. Cut off the first buds so that the rosette gets stronger and blooms like a cap. Also remove the stepsons, they delay flowering and make the rosette one-sided. After the flower stops throwing out buds, the plant is ready for new production of offspring.
Separation from the mother plant
The growth of Saintpaulia babies occurs in different ways. Some specimens quickly rise and become overgrown with leaves. Other offspring slow down their development.
When stepchildren appear, certain care requirements must be met. Provide 12 hours of daylight. If this is not the case, arrange additional lighting with lamps.
As soon as there are 4-5 leaves on the offspring, the height will be 4 cm , the plant is ready for transplanting.
You can replant smaller offspring with 3 leaves, but they will require more careful care. Choose the right pot, soil, provide it with consecration, normal humidity, elevated air temperature up to 24 degrees C.
It is important to know! Varieties with dark leaves require more light.
What are juvenile leaves?
The first leaves of the newly grown stepson , which over time become the lower row of Saintpaulias, are called juvenile. They differ from other counterparts in their rounded shape, thin, unexpressed veins, small size, without fluff.
Juvenile leaves are marked in red.
Over time, juvenile leaves acquire an unsightly appearance: they turn yellow and become depleted. To preserve the decorative effect of the flower, they are removed. This is done with a sharp blade or knife. Pre-disinfect the instrument. The cut area is sprinkled with activated carbon.
Some gardeners are trying to propagate violets using them. But, as a rule, babies appear for a very long time and in small numbers. Although some Saintpaulia lovers claim the opposite. This is most likely an exception to the rule.
Feeding calendar
At the moment of intensive growth, or before the release of buds, the plant needs feeding. Spring - summer is the best time to add nutrients to the soil for Saintpaulia.
At this stage, pay attention to signs that are a contraindication for feeding:
- the period of adaptation of violets after transplantation;
- dried soil;
- non-compliance with temperature conditions;
- the presence of insects on the plant;
- exposure to direct sunlight;
- rest phase.
When planting a flower, you need to take care of the correct composition of the soil and its saturation with nutrients, since the rooting period should pass without additional stress and fertilizers should not be applied to the flower for a month.
Spring is the time to build up vegetative mass before flowering. Saintpaulia is fed with fertilizers high in nitrogen. Important! Applications are made into moist soil to prevent burning of the root system.
Feeding baby violets
Saintpaulia is bred by rooting leaves. The peculiarity of these flowers is that they do not need to saturate the soil with nutrients before rooting. The natural environment for violet growth is not fertile. Poor soils are optimal conditions for creating a good root system.
Transplantation from the mother plant
The mother plant helps children and stepchildren gain useful elements for future independent life.
Stepchildren must reach a certain height and gain at least 3 leaves in order to separate from the mother plant.
As soon as all proportions are maintained, the young animals must be separated for further development.
Deadlines
In variegated violets, the babies appear in a light shade . They can be replanted into a separate pot when the leaves have gained enough green pigment. An early landing will lead to their death.
The best time for replanting is summer or autumn , when there is still plenty of daylight.
In winter, growth stops and the plant will sit for a long time without signs of growth. To speed up growth, additional lighting and warmth are installed.
Technology
The separation occurs as follows:
- The offspring, together with the maternal element (leaf, fragment, peduncle), is pulled out of the pot . Freed from the earth;
- The shoots are carefully separated from each other so as not to damage the fragile root system. Small children can be left for further growth with the mother plant;
- Each shoot must have its own root system ;
- If the stepson appears in the axils of the leaves, it is separated with a toothpick . In this case, there is no root system, and the stepson is sent into the ground to form a root.
Separation of the baby from the mother plant.
Seating process
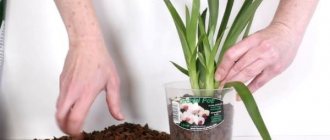
The offspring are pulled out of the pot. They are freed from the ground and separated from each other by hand. Prepare the soil, baking powder, drainage, and pots.
All children are seated in separate containers.
Features of soil and container selection
The soil for young pets should be loose . Buy ready-made soil for violets in specialized stores.
Perlite or vermiculite will help increase breathability Lay the bottom with expanded clay or foam.
The diameter of the first pot should be 3 cm. So that the soil does not become sour and the plant does not die.
The stepson is placed in vermiculite soil.
How to properly bury a violet in the ground
A hole is made in the soil, and the shoot is carefully placed and the roots are straightened. Another layer of moist, but not wet, soil is poured on top.
The growing point should be above the soil level . This is done to prevent moisture from getting into the outlet when watering.
Aftercare
The nuances of how to care for violet babies:
- the air temperature should be between 22-24 degrees C;
- Watering is done with warm, settled water in small portions. Repeated watering is done after the top layer has completely dried;
- a pot with a young plant is placed in a bag or covered with a transparent lid . For example, from under a cake. The flower is left under cover for 3-4 weeks;
Children in the greenhouse.
- as soon as new leaves appear, it means that Saintpaulia has taken root. Gradually teach your teenager to walk without shelter. Only then remove the bag;
- choose a window sill on the northwest or northeast side .
Disease Prevention
Preventive actions and proper care will help you avoid the disease
- using old pots will lead to bacterial diseases, so treat them with boiling water and disinfectants ;
- overwatering can cause the formation of rot;
- hypothermia threatens rotting of the root system and the development of infectious diseases;
- water getting on the leaves leads to the formation of gray rot, botrytis.
Mineral fertilizers
To create fertile soil, simple and complex mineral compositions are used. The forms for use are quite convenient; they can be tablets, sticks, or liquid.
If the drug is available in liquid form, you should read the instructions before use. Observing the dosage requirements, fertilizing is applied either under the root system or along the leaf.
Sticks and tablets are easy to apply. They are placed in the soil, where they decompose due to watering.
Specially developed, effective fertilizers for Saintpaulia, easy to use:
Basic nuances of caring for teenagers
The main thing in caring for teenagers is to fulfill some requirements:
- provide consecration for at least 12 hours a day, grow in diffused light;
- monitor air humidity ;
- transplant into another pot in time;
- ensure proper watering ;
- feed on time ;
- In winter, fertilizers are excluded.
Watering and fertilizing
Watering is carried out moderately. Teenagers do not like soil that is too moist . She might turn sour.
After transplanting young plants into separate pots, do not water for 24 hours . If it turns out that the soil has dried out, in this case, pour water into the pan and drain the remainder after 20 minutes.
For overhead watering, use a watering can with a long spout. If water gets on the sheet, blot it with a napkin or toilet paper. Place in the shade until the leaf dries completely. 30 minutes after watering, remove water from the pan.
In adolescence, you can feed the flower with nitrogen fertilizers . From such fertilizers the rosette will gain green mass. In the future it will throw out a large number of buds.
Rules for transplanting into a larger container as you grow
As soon as the plant envelops a lump of earth with its roots, it needs a transplant.
In this case, you need to navigate by the size of the leaves. If their diameter is twice the size of the pot, this is a signal for a new transplant .
The new pot is chosen to be 2 cm larger in diameter.
Size of violet pots.
When will the first flowering occur?
You can expect the first flowering after transplantation in 9 months. The starting point is usually taken from the planting of the propagation leaf. Depending on the variety and care, flowers may appear later. In the first case, it is impossible to bring flowering closer; in the second case, this is corrected.
At the moment of bud formation, flowers require fertilizing with phosphorus and potassium fertilizers. Nitrogen is not recommended in this case, as it will inhibit flowering.
Possible problems
After planting the shoot in a pot, the leaves change. They may be soft. This is not scary, as soon as the plant takes root, the top cover will be restored.
Lethargy after transplantation is temporary.
Sometimes young animals stretch upward, this indicates that they do not have enough light.
Prevention of diseases
- water the young animals with warm water;
- in spring and autumn, carry out preventive treatments against diseases and pests;
- Once a year, replant adult violets and young ones as needed;
- protect from drafts.
What should the water be like?
Not only can improper watering of violets harm the plants, low-quality water often leads to the death of flowers. The liquid for irrigation of Saintpaulia should be pre-settled. It is good to use melt or rain water to moisten the substrate.
Tap water is also suitable, but first you need to reduce its hardness. A high concentration of salts in such water leads to the deposition of a white coating on the walls of the pot and the surface of the soil itself.
To reduce hardness, you can use the following method: take 2 tsp per 2 liters of water. vinegar or citric acid, mix and allow to settle. After some time, the Saintpaulias are watered using the chosen method.
Or you can let the tap water sit for 2-3 days. Then it should be boiled, cooled to room temperature and proceed to moisten the soil. It is strictly prohibited to use cold water to irrigate Saintpaulias, as this will lead to the death of the flower.
Folk remedies
Amateur flower growers do not always use store-bought preparations. Handy folk methods of soil enrichment can give excellent results:
Vitamin B12
Has a positive effect on the resistance of Saintpaulia to diseases. The ampoule is diluted in water (1:10) and applied to the soil twice a season.
Yeast
Promotes intensive growth of flowers. To strengthen the condition of the flower, they are often used. To do this, yeast is combined with sugar and dissolved in heated water. After soaking for three hours, after which you can enrich the soil. In summer - once a decade, in winter - once a month.
A valuable mineral that actively participates in the growing season and flowering. During the warm season, it is recommended to saturate the soil with it. Tincture of iodine (1 drop) is mixed with water (3 l). Irrigation is carried out three times during the season.
Coffee grounds
Its remains after drinking coffee loosen the ground well. The grounds are mixed with soil, added to the plant, after which the Saintpaulia is not irrigated for several weeks. The property of the ingredient to increase Ph is also noted.
Onions help fight diseases and parasites. Thanks to beneficial inclusions, onions make the leaves juicy, thick, and flowering abundantly. To do this, boil the husks covered for half an hour. The solution is kept for 8 hours. Used for spraying and foliar feeding. Prepare before use.
Fertilizer application methods
In order for Saintpaulias to grow intensively and enjoy abundant flowering, nutritional components are added using special technologies.
Fertilizer for all varieties of violets is applied using the same method; the only difference is possible when feeding ampelous Saintpaulias, taking into account their placement: in a pot on the wall or on the windowsill.
Root feeding
Root feeding is carried out only using filtered, heated water and observing the dosage when diluting the drug. To prevent fertilizers from getting on leaves and flower buds, preference is given to liquid forms of preparations. The application of concentrates to mini-violet bushes is reduced by 2 times and fertilizing is carried out once a month.
Foliar feeding
Foliar feeding - delivers nutritional components to the plant faster. This type is useful, as fertilizers are quickly absorbed.
To get a good result, it is important to know the basic rules for applying fertilizer:
- Do not allow droplets to accumulate on the leaves, so as not to provoke the formation of burns from exposure to sunlight or areas with putrefactive processes;
- before starting the procedure, the leaves should be washed to remove dust;
- It is better to choose the time for applying fertilizers in the evening, the weather is cloudy;
- the concentration for irrigating leaves should be halved;
- Spraying of fertilizer is carried out on the back side of the leaves, since from below the leaves have more intense absorption.