From our article you will learn all the intricacies of home transplantation of dendrobium orchids. We will tell you when this procedure is required and how to carry it out correctly so as not to harm the flower. Vivid photos and detailed videos, as well as step-by-step instructions will help you move your green pet to a more comfortable environment without any mistakes. The reward will be a healthy and strong plant that decorates the house and delights the owners with lush flowering for a long time.
When should a plant be replanted?
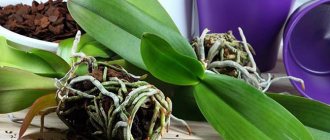
You can determine that a flower needs replanting based on several signs.:
- multiple roots displace soil from the pot;
- in the aboveground part of the plant and on the rhizomes, signs of decay or damage by pests are visible;
- the soil has lost its nutritional properties and signs of decomposition are visible (pieces of bark are crumbling, and after watering the soil does not dry out);
- a large number of babies with buds and sprouts, ready for separation.
Reasons for planting orchids
The reasons for planting orchids can be planned or emergency. The planned ones include changing the substrate every two to three years (depending on the quality) due to its compaction and decomposition. This allows you to maintain comfortable living conditions for the orchid.
Emergency reasons include the following:
- Soil decomposition occurs quickly.
- Root system rotting.
- The appearance of harmful insects in the substrate.
- The root system does not fit into the pot.
Most orchids purchased in stores are hybrids. They are adapted to growing at home and can bloom for a long time (up to six months), but they do not have a resting phase as such. That is why it is difficult to choose the most suitable time for transplantation. Most experts are inclined to believe that plants need to be replanted in the spring (this is the very beginning of the active growth stage) or after flowering (when the flowers fall and before budding).
When can it be harmful?
Replanting is stressful for the orchid, so it is carried out at home only after flowering , during the period of active flower growth (everything about the flowering of the dendrobium nobile orchid is described here). Usually it's spring. Do not disturb Dendrobium during its dormant period. Transplantation is carried out no more than once every 2-3 years.
Replacing the soil should be combined with propagation so as not to disturb the plant again.
Orchid shoots
Where do they appear?
The so-called “baby” transplant method is mainly used for orchids of the Phalaenopsis and Dendrobium genera. A shoot of a young stem can form on a peduncle, stem, or near the roots of a plant. As a rule, children most often form at the base of the roots or on the peduncle after flowering has ended. It is the second option that is the most common.
Most often, children are formed on the peduncle after flowering.
Stimulating their appearance
So, if the plant is in a dormant period (the main flowering has ended), then if certain conditions are met, the formation of a new shoot can be achieved:
- First of all, you need to remember that the faded peduncle is not cut off completely, but about 2 cm is left;
- The second condition is to ensure a sufficient level of lighting during this period (in the winter season, special fluorescent lamps are used);
- Another condition for the release of babies is high temperature conditions after the orchid blooms;
- It is also recommended to reduce the number of waterings (no more than 1 every 5-10 days). You can also use special hormonal drugs that will significantly speed up the process of creating children.
Which pot to choose?
Clay pots are perfect for dendrobium , providing the necessary stability for the flower.
Plastic containers and special orchid baskets are also suitable. The size of the pot should accommodate the root system of the plant and there should be no more than 1-2 cm of free space at the edges. If you choose a small pot, the roots will not have enough space, they will begin to climb out of the container and may be injured.
Step-by-step instructions: how to plant an adult plant and children?
Before you start planting children and an adult plant, prepare in advance everything that may be useful in the process:
- scissors or knife;
- charcoal;
- new pot;
- warm water in a basin;
- orchid substrate.
We have other information about dendrobium on our website. Read about flowering, yellowing of leaves and home care.
Removal from pot
To painlessly remove an orchid from an old pot, you need to:
- Knead it with your hands or fill the pot with water to the top for 10-30 minutes if the previous steps did not help.
- Then the Dendrobium is picked up under the leaves and removed. The action should happen without much effort.
Reference . A healthy plant is firmly attached by its roots to each other and to the pot. A weak plant can be removed immediately and without effort, due to its weak root system.
Washing the roots and getting rid of excess substrate
- It is better to carry out the washing stage by immersing the orchid in a basin of warm water. Once the roots and soil are wet, it will be easier to separate them by moving the root plexus with your fingers. Dirty water must be drained.
- You can use a shower jet under low water pressure.
Heavily ingrown particles of old substrate should not be forcibly separated from the plant, so as not to damage it.
Inspection and removal of diseased shoots
Then you should inspect the roots for the presence of:
- pests;
- rot;
- dead areas.
Healthy roots are always elastic and dense. Patients are dryish or hollow, sometimes with liquid, foul-smelling contents inside.
Before transplanting, all instruments must be disinfected with alcohol or held over a fire to avoid infection of the plant. If this is not done, an infection can occur and the plant will begin to hurt.
After removing the damaged parts of the roots, fresh sections are treated with activated carbon, garlic solution or cinnamon powder for disinfection.
Drying
Do not ignore the drying stage . This helps heal wounds caused by root pruning. In room conditions, it is enough to allocate only 2 hours for this.
Planting flowers and babies in new containers
Please note that after pruning the root system, you may find that for planting you will need a pot of the same size or even smaller if there are a lot of damaged roots.
Important ! It is advisable to disinfect the new substrate by boiling before use. Then let it dry naturally without using a stove or battery, so as not to lose its necessary qualities. The pot is also washed with hot water and detergent, followed by rinsing.
- A small drainage layer of expanded clay is laid on the bottom of the pot.
- Then some mixture.
- The plant is placed in the center and the empty space around is filled with the rest of the mixture.
- When sprinkling with substrate, you need to ensure that the roots do not move to one place if the old soil has been completely removed.
- The soil is slightly compacted.
Replanting an orchid after purchase
Bringing a flower home, putting it on the windowsill and admiring it, watering it periodically, is not all. At first, you need to keep a close eye on him. First of all, look at how the leaves or pseudobulbs behave - orchids store moisture and nutrients in these organs.
A slight loss of turgor is not critical, but if it is not caused by drying out the plant, then such a symptom may indicate problems with the roots
In general, you need to pay attention not to the plant itself, but to how it reacts to your actions. If the reaction is adequate, then everything is fine with the plant; if not, then there are some problems
A slight loss of turgor after purchase is normal.
Attention! Wilting and shedding of flowers or buds is normal. This is how a plant reacts to stress.
But don’t worry too much, manufacturers stuff their products with various substances and stimulants that temporarily enhance plant immunity. Usually their action is enough for the orchid to bloom safely and recover calmly.
Necessity
Replanting after purchase is necessary and justified only if the orchid is in poor condition and dies. At the same time, a full inspection is carried out, pruning of flower stalks, dead parts of the plant and other activities. Otherwise, there is no need to replant orchids after purchase.
When is it possible?
The plant is replanted only when it begins to literally crawl out of the old pot or the substrate becomes unusable.
It should be understood that orchids are replanted only after flowering. And, accordingly, since most orchids bloom in winter, the best period for replanting is in the spring.
It is also the best for the reason that with the onset of spring in the middle zone, daylight hours increase and all plants begin to grow. Accordingly, your pet will survive the transplant with minimal losses.
In principle, if you have equipment for artificial lighting and appropriate conditions, orchids can be replanted all year round.
Effect of delay on plant development
If you miss the moment when you need to replant the orchid, then in a pot that is too small and in a deteriorated substrate, the plant’s root system begins to function ineffectively. Naturally, under such conditions there is no point in hoping for the normal development of the orchid and, even more so, for its flowering.
Advice! Take care of your plants. They are also living beings.
Causes
There are several reasons for transplants:
- disease. The orchid is removed from the pot, rotten roots are cut off, procedures are carried out and placed in a fresh substrate;
- the plant has grown. When an orchid outgrows its pot and crawls out of it, this indicates that it is time to increase its “living space”;
An overgrown orchid must be replanted.
- the substrate has collapsed. Most orchids are grown in a pine bark-based substrate. When the bark decomposes and can no longer perform its functions, it is replaced with fresh one;
- planned transplant. Once every 3-4 years, gardeners replant their orchids, regardless of the reasons described above.
What to remember?
the main thing you need to know is that orchids have a succulent and very fragile root system
Accordingly, it is important to be extremely careful and careful when manipulating the orchid during transplantation, so as not to damage its roots;
use appropriate substrate. For example, phalaenopsis prefer a substrate made from bark alone, and of a large fraction, while cymbidiums, on the contrary, grow better in a heavier substrate, etc. You need to pay attention to such moments and not pour everything that comes to hand into pots with plants;
For different types of orchids, the composition of the soil is slightly different.
watering after transplantation is carried out no earlier than 5 days later. Nothing bad will happen to the plant if it dries out a little, and during this time the root plant has time to safely restore the damage.
Preparing for the procedure. Required tools and materials
The quality of the transplant will be directly proportional to how seriously you prepare for it. To do this, you need to allocate time (so that all actions are carried out calmly, without fuss and haste), a place, and also some things.
Inventory:
- fresh substrate;
- pots of the required sizes;
- cutting tool (secateurs, sharp knife, scissors or scalpel);
- ground charcoal or cinnamon for filling fresh cuts;
- chemistry (stimulants, fungicides, etc.);
- scoop;
- basin, gloves and oilcloth for convenience;
- good mood - try to have fun.
It’s not a fact that all the things described above will be useful to you, but their presence greatly simplifies the work, especially if there are a lot of orchids.
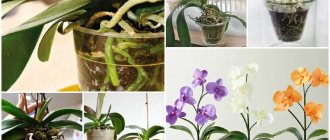
Photo
Next in the photo you can see the transplanted flower and the babies.
Rooting cuttings
- The cuttings are pre-treated with charcoal.
- Then 2 cuttings are placed in a plastic bag with moistened sphagnum moss.
- The resulting greenhouse is ventilated every day, moistening the moss if necessary.
- After 2 weeks, fresh roots should appear. Then it’s time to plant the cuttings in pots.
Reference . Relocating a flower to a larger pot if the soil is still suitable should be done by transshipment. In this case, the earthen lump is soaked and not completely removed; in a larger pot, the voids are filled with fresh soil. The substrate remaining on the roots allows the orchid to more easily tolerate replanting.
Watering
You cannot water the plant right away . It is necessary that the cut roots dry well. If before planting in the ground the roots of the plant were dried in the open air for up to 2 hours, then watering should be done no earlier than 2-3 days after transplantation.
In case of extreme heat, the orchid should be watered within 24 hours. If the roots were air-dried for 8-10 hours, then the transplanted flower should be watered immediately after being placed in the substrate. This will allow the roots to take root faster.
What should not be done during the procedure?
Some actions of inexperienced gardeners can greatly harm the plant:
- Strong deepening of the orchid during planting. It is necessary that after transplantation all pseudobulbs and buds remain on the surface.
- It is necessary to distribute the roots evenly in the pot, otherwise the plant may never recover from a difficult transplant.
- You cannot cut off pseudobulbs and peduncles; you must wait until they die naturally.
- You should not use untreated pots and soil from infected plants.
Possible problems
- It is important not to look for the presence of diseases and pests during transplantation. A plant that is stressed during transplantation and weakened by infections can take a very long time to adapt to new conditions.
- Dendrobium roots are fragile and brittle; be sure to soak the soil before removing the plant from the pot. It is also better to get rid of the old substrate in water, so as not to harm the roots. Otherwise, recovery may take a long time.
- Stagnation of water in a pot or tray contributes to the death of the flower.
Remember that in nature, orchids grow attached to tree trunks or steep surfaces of rocky soils, where there is no excess moisture. - Do not overuse fertilizing or apply it in excess of the norm.
- Treating the pot and substrate before planting will help avoid infection of a plant weakened by transplantation.
Features of flowering
Care rules during flowering
Each type of dendrobium orchid blooms at its own time, and the duration of flowering can vary from 2 to 3 months. In order for the plant to bloom in a timely manner, a temperature difference between night and daytime of 5–7 degrees is recommended. This is easiest to achieve in the summer, but in winter the matter is complicated by round-the-clock heating of the room.
When growing dendrobium nobile in winter in order to make it bloom, some gardeners resort to an unusual method. They do not water the bush until new growth appears. When this growth reaches 20–30 mm in height, and its own roots grow, watering the flower is resumed. After the growth is equal to the old bulbs, a gradual reduction in watering is carried out until it stops completely, while the temperature is reduced to 12 degrees. Watering is resumed only when the formed buds begin to bloom, otherwise babies will develop instead of flowers.
DENDROBIUM orchid after flowering and HOW TO MAKE Dendrobium nobile BLOW
Watch this video on YouTube
Care after flowering
After flowering ends, they begin to gradually reduce watering until it stops completely, the peduncle is cut off, and the bush itself is transferred to a place where it is always cool. In this case, he will be able to have a good rest and gain strength before another flowering. Dendrobium growing in nature does not stop growing even in winter, however, in mid-latitudes during the cold season, due to poor lighting, it goes into hibernation, at which time its growth stops. Of course, he won’t die from this, but experts do not recommend allowing this to happen. In winter, when daylight hours are very short, the bush must be illuminated, and it is best to use a phytolamp for this. The fact is that an orchid growing in nature does not have a rest period; it is constantly busy with something; as a rule, the flower grows either foliage, roots, or peduncles. If your flower goes into hibernation in the autumn, then you should not disturb it. In this case, stop watering for a while and move the bush to a cool place.
Further care
- After transplantation, the orchid should be protected from direct sunlight to avoid burns. For the period of adaptation from stress, shaded areas with windows facing south or north and east windows are suitable.
- It is advisable to place the flower in a place with high humidity.
- After transplantation, the introduction of fertilizing should be systematized. It is worth adding them every second watering with a concentration of 25% of the norm recommended for orchids. The last feeding is carried out towards the end of August.
- Once a month you can treat the Dendrobium with a warm shower (avoid during the dormant and flowering periods). After the procedure, the leaves are dried with a napkin.
The Dendrobium orchid is loved by both experienced gardeners and beginners. It requires special attention and knowledge at certain stages of life. If you do everything correctly at such moments, she will definitely thank you with delicate flowers that will delight their owners for a long time with their fragrance and pleasant aroma.
Read more about caring for dendrobium at home in this material.
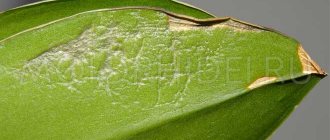
Diseases and pests
Dendrobium orchid often becomes a victim of various diseases. For example, the leaves turn yellow or become spotted, the shape of the flowers themselves changes, and sometimes the buds do not open at all. In the latter case, the plant cannot be treated and can only be thrown away. Such symptoms are most often characteristic of viral diseases. In the case of bacterial diseases, individual parts of the orchid are affected by spots and rot, and sometimes by fungi.
In this case, the orchid is separated from other plants in the room and freed from the affected parts by simply cutting them off. The cut areas are treated with ordinary brilliant green or a disinfectant
It is important to carry out a similar procedure as soon as symptoms of the disease are noticed. After treating the dendrobium, it must be quarantined and monitored to see if spots or other manifestations return
If everything is in order, then you can return it to its “neighbors”.
Yellowing leaves can be both a symbol of a bacterial disease and a natural transition from one period of the cycle to another. For example, after flowering has finished, an orchid needs time for further preparation - that’s when the leaves turn yellow. Afterwards, the growth of new shoots and root system begins. However, most often the yellow color appears due to improper irrigation or lack of nutrients in the soil mixture. When the yellow color appears in the form of spots and does not completely cover the leaf, it is probably a burn caused by direct sunlight.
Of the pests, the orchid is most often attacked by thrips, aphids and spider mites. Sometimes this occurs due to excessively dry air, which means it can be eliminated by introducing regular spraying and other measures to increase humidity. For preventative purposes, it is better to treat dendrobium once every two weeks with a regular soap solution. A small number of insects can be eliminated by simply removing them from the leaves with a soaked piece of cotton wool.
To learn how to care for a dendrobium orchid at home, watch the following video.