Many novice flower growers wonder what to plant an orchid in? I’ll say right away that a pot is not the best container for growing many orchid species. Why?
Firstly, plastic glass-shaped pots are intended for indoor plants with a different root system that grows deep into the soil.
Even if the pot is transparent, supposedly “special for an orchid,” it will not feel comfortable in it, since this position of the roots is unnatural for it.
It will simply be more convenient for you to water with transparent walls, but epiphytic roots are not designed for deep penetration into the substrate.
Remember how most orchids grow in nature - their roots tend to the sides, clinging to the bark of trees.
Secondly, it is important for them that the roots dry quickly and evenly along their entire length.
And such glass-shaped solid pots significantly impede this uniform and rapid drying, as well as good air exchange.
It is better to plant an orchid on a block or in a basket (see the article “How to make a basket for orchids”) if you want to create conditions that are closest to natural.
But if this is not possible, and you still have to plant in a pot, then plant correctly! So that later there will be no excruciating pain for either her or you. You will find everything about how to properly plant an orchid in a pot in this article.
What should the pot be like?
If it is transparent, this is good and convenient for you, but transparency alone is not enough. The container should have many holes not only in the bottom, but also in the side walls. If they are not there, then you need to do it yourself, for example, using a sharpened soldering iron or burner.
Without holes, and therefore without air exchange, uniform drying of roots in a plastic container is practically unattainable. In addition, good air exchange reduces the risk of fungal and bacterial infections.
For moisture-loving orchids, it is enough to make holes in the bottom 1/3 of the pot. But for most, you still have to make holes almost along the entire perimeter.
It is very good if the flowerpot has legs, then there will always be an air gap between the bottom and the surface on which it stands, and this is an additional plus.
The size of the container should be appropriate to the root system, neither too large nor too small.
How often to repot?
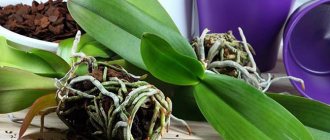
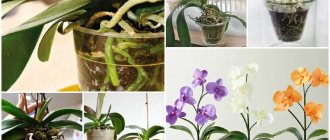
Flower growers agree that Phalaenopsis needs to be replanted at least every 2-3 years. During this time the following happens:
- The substrate partially decomposes , loses its breathability, becomes overgrown with moss and becomes saturated with salts.
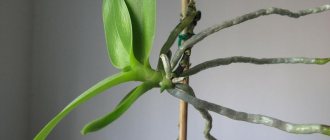
- The central part of the root system dies from waterlogging, poor aeration, and excess salts. The roots braid the walls of the pot and sprout from the drainage holes.
- The stem grows from above , becomes bare, and often hangs sideways from the pot - this is a biological feature of growth. The green mass outweighs, the pot may tip over.
- Young roots growing from the stem suffer from drying out, especially in winter.
All these signs mean that the time has come for a transplant. Prepare a pot for the orchid. Phalaenopsis is buried in it to the level of the lower leaves. The part of the stem that has died from below can be broken off.
What should the substrate be?
For plastic dishes, it should be as little moisture-intensive as possible: tree bark of medium or large fraction, polystyrene foam.
Flower shops sell a special substrate for orchids. Sadly, for the most part this substrate is as “special” as “special pots”.
Where do the names of orchids come from?
It is better to prepare the substrate yourself. But if you don’t have such an opportunity, and you have to use a store-bought one, select the largest elements from it and use only those. There should be no peat or sawdust. Leave all the change for other plants.
Soil preparation
For the normal development of orchids, the substrate with which the pot is filled must be close to natural conditions. As you know, these plants do not grow in the ground, but on branches and on the bark of trees. Therefore, the composition of the soil must include bark and most often pine bark.
In specialized flower shops you can purchase a ready-made substrate, which includes bark, chopped into pieces, chopped sphagnum moss, fern roots, and charcoal.
You can prepare this mixture yourself. To do this, mix pine bark, sphagnum moss or peat and expanded clay in a 3:1:1 ratio. The bark is cut with a knife from dry fallen trees, and before use it is disinfected, for which the bark, previously crushed to a size of 2 cm, is boiled for 30 minutes and dried well.
Sphagnum moss is cut into 5 cm pieces, dry moss is immersed in boiling water for 5 minutes, squeezed out and dried. Moss makes the substrate loose, helps retain moisture and provides the orchid with minerals for six months.
Peat should be chosen with a coarse-fiber structure, since finely crushed peat compacts the soil, making it less breathable.
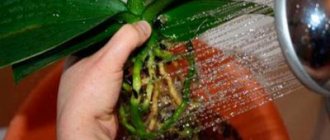
Treatment of orchids before planting
It is recommended to plant orchids “dry”, that is, in the period between waterings, when the roots have already dried well.
Carefully inspect the plant, if necessary, remove all rotten parts so that they do not become a source of infection. Be sure to disinfect tools for processing, as well as sections after processing.
Check the roots especially carefully. They may look good on the outside but actually be rotten on the inside. Press your fingernail onto the shell and check each area along its entire length, especially at the base.
If the shell is pressed through, it means that the root inside is empty and therefore dead, it needs to be removed. Healthy roots are solid roots!
Transplant instructions: step by step with photos
Prepare materials and tools. You will need:
- Orchid pot.
- Suitable basin for the job.
- Pine bark substrate.
- Drainage - expanded clay, ceramic shards, pieces of red brick.
- Alcohol-disinfected pruning shears or sharp scissors.
- Antiseptic - crushed charcoal powder, you can take activated one.
- Sphagnum moss (if you can’t find it, you can do without it)
- A stick for pushing the substrate between the roots
- Peduncle holder
- The drug Fitosporin for the prevention of rot.
- If necessary, insecticides (Fitoverm is allowed in indoor conditions)
Prepare a solution of Fitosporin for soaking the orchid. Dilute 1/5 teaspoon of the drug in a small amount of warm water, then dilute to two liters. You can add a drop of Epin to the solution, which stimulates the immune system.
Carefully lift the plant out of the container by the base of the stem. If the roots are tightly entwined in the pot, it is better to cut it with scissors.
Shake off the old substrate from the roots. If it is difficult to remove, rinse it off the roots under running warm water.
Mix a little good substrate from the old pot with the new one - it contains the microflora familiar to the plant.
If pests are noticed, the soil should be washed with an insecticidal solution. Carefully! Phalaenopsis roots are very fragile and easy to break.
Carefully inspect the roots, leaves and stem. We remove all blackened, rotten, shriveled roots to the healthy green part.
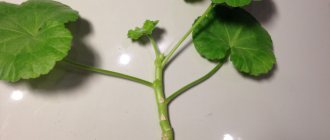
Remove diseased and wilting leaves. To do this, cut the leaf along the central vein and remove the halves from the stem. Cut off dried remains of leaves and flower stalks.
Immerse Phalaenopsis roots in the prepared Fitosporin solution for 30-40 minutes.
Lightly dry the plant and sprinkle all cuts with charcoal powder.
Place drainage in a layer of 3-5 centimeters at the bottom of the pot. It protects the roots from getting wet and prevents the pot from tipping over, making the bottom heavier.
Add a small layer of substrate. Set the plant by placing the stem in the center of the pot. Place a support for flower stalks nearby.
Gradually fill the pot with substrate. Place large pieces of bark on the bottom and smaller pieces on top. Gently push the bark between the roots, filling in the gaps. Do not compact the soil, you may damage the roots!
When the pot is filled with bark, place a layer of damp sphagnum moss on top. Moss will protect the bark and young roots from drying out quickly.
Basic principle of landing
I hope you have already understood that epiphytes cannot be planted in the same way as plants with a tap root system.
In a pot with an ordinary indoor plant, the soil begins to dry out at the top, but in the depths it remains moist for some time. And while this is normal for most plants, it is completely unacceptable for epiphytes.
Therefore, such dishes should be considered just as a stand, but nothing more.
The main principle of proper planting of orchids is that the substrate in the center should dry out just as quickly as the one on top.
Let's look at a few options:
First option
The first option will be based on the example of phalaenopsis. This planting method is suitable for all orchids whose maintenance conditions are similar to those of phalaenopsis and the entire Vandaceae tribe.
On the left is an incorrect landing:
- The container is solid, without holes;
- There is no drainage;
- The substrate is shallow and occupies the entire space, there is no air exchange;
- The base of the plant is located in the thickness of the substrate.
An orchid planted in this way will sooner or later begin to hurt.
The one on the right is correct:
- Container with holes;
- Large drainage made of granite crushed stone;
- A fairly large substrate in which voids are visible, which means air exchange is ensured;
- The base of the plant is slightly raised above the surface of the substrate;
- The most dangerous zone in terms of waterlogging has been eliminated - the center of the pot, where a large piece of foam plastic is placed, directly under the base.
Second option
The second method (using the example of masdevallia) is suitable for relatively moisture-loving orchids that like to be watered more often, but, nevertheless, they also do not tolerate stagnant water and their roots also need good aeration. These are bulbophyllums, draculas, miltonias, masdevallias, oncidium group and other orchids similar to them in terms of keeping conditions.
In the picture on the left, the same mistakes were made as in the first version. In addition, the substrate contains a large amount of moss - this is a very moisture-intensive material that retains moisture for a long time.
On the right is the correct landing:
- Powerful drainage, occupying half the pot, again with a piece of foam in the center;
- For such plants, the substrate layer should not exceed 10 cm. And for bulbophyllums, in general, the substrate layer is 2-3 cm;
- The moss is laid in a thin layer only on the surface and only along the edge of the pot.
Third option
Using Cattleya as an example. Suitable for all sympodial orchids.
The mistakes of improper planting are the same: shallow substrate filling the entire container; the rhizome is buried. In addition, the cattleya is planted in the middle of the pot, and this arrangement is only suitable for monopodial orchids.
On right:
- Large waterproof drainage, and in the center too;
- The rhizome is located on the surface of the substrate; you can make it rise slightly above it;
- And most importantly, due to the fact that the old bulbs are planted closer to the edge, free space is left for new growths.
Feng Shui
What is Feng Shui? A well-known Taoist practice of symbolic exploration of space. Its proper organization. It allows you to take into account the favorable flows of Qi energy. For the benefit of humans.
Many scientists still consider this practice mystical and even pseudoscientific . In the East, Feng Shui is still respected.
Feng Shui is the science of organizing space.
What if we are not Chinese? Or not really:
- Someone smiles maliciously. Try to observe all this in practice;
- And someone follows them. Or pretends to comply.
But still. Why not use such centuries-old advice and conclusions. If they have a positive impact on your thoughts and actions. Even if you're not Chinese! After all, it is very difficult to judge how it really works:
- Successful, happy and prosperous people will definitely note that they honor Feng Shui;
- Losers who have numerous problems and unhappy people can also count Feng Shui as a reason.
So. Feng Shui. According to him, all fresh flowers were considered a source of positive emotions. According to Feng Shui, an orchid in an apartment is capable of many things:
- Helps develop willpower red and purple colors:
Extinguish and overcome laziness; - Set up to achieve your goals. Even follow a diet;
- Resolve pending matters. Quit smoking and exercise;
- Harmony in family relationships will be helped by placing them in the southwestern part of the apartment.
Red orchids help in developing willpower.
- There will be additional energy and productivity will increase;
- They have a beneficial effect on calming the nervous system and health. There will be no place for melancholy, apathy and depression. And inner harmony will appear;
Are we doing everything according to the laws and recommendations? Often the results are better. Contrary to recommendations. But as advised, it turned out far from the same. As expected. And they promised.
Orchids have been growing successfully in China for thousands of years. And they are deified. And they know how to handle and where to place an orchid according to Feng Shui.
Advice! Remember mutuality and symbiosis. Flowers feel care and attention. Some housewives like to talk with them. And they reciprocate. With its flowering and positive impact.
Securing the orchid
Now the most important rule is that after planting the plant must be firmly secured. Because even the slightest wobble can negatively affect rooting. The root tips are extremely sensitive to mechanical damage and can stop growing even with a slight injury.
Each orchid grower fixes in his own way, who is good at what. Some tie the stems of the plant to sticks stuck into the substrate. Others are wrapped several times over the edge with cut nylon tights. It may not look very decorative or aesthetically pleasing, but it is reliable. Moreover, after rooting, all fastenings can be removed.
There are also special fasteners for plants; if you find them in flower shops or online stores, that will be great!
Possible mistakes
Common mistakes when transplanting Phalaenopsis:
- Wrong choice of soil.
- The pot does not provide aeration and lighting to the roots.
- The pot size is incorrect.
- Transferring to a new pot without examining the root ball.
- Cauterizing the roots with brilliant green, iodine and other substances.
- Soaking watering immediately after transplanting or over-watering an unrooted plant.
So, the Phalaenopsis orchid needs a planned transplant every 2-3 years or for “medical” indications. Don't be afraid to repot your plant. After some time, you will understand its needs and requirements, gain valuable experience, and your favorite orchid will delight you for many years.
Watering after planting. When?
After planting, the orchid is not watered for as long as possible - 5-10 days, sometimes 2 weeks, depending on the condition. At the same time, it should be in a shady, cool place.
Basic mistakes in caring for orchids photo
At this time, instead of watering, it is recommended to spray the leaves and the air around them (not the substrate), but only in clear, warm weather. And when watering for the first time, it is recommended to add phytosporin to the water.
These tips will help you plant an orchid in a pot correctly and avoid common mistakes made by beginners. If you have anything to add to them, share your experience in the comments.
Author: Irina Baltaga Updated: March 31, 2020
- All about orchids
Comments
Krasnova Irina 03/13/2016 13:55 I really like your site.
I find a lot of information here that is useful to me. Thank you. Answer
Update list of comments
Where to place the plant in winter?
We must remember that orchids are not enthusiastic about any movement from room to room. Even painful. It’s better not to ask where to put the orchid in winter, but to immediately determine a permanent place for it.
Experienced flower growers are trying to determine a suitable location for them. So that the conditions are acceptable both in winter and summer. But not many people practice taking it out onto the balcony or into the garden for the summer.
But the defining ones are the types of orchids:
- Orchids in which the state of dormancy is not very pronounced . And caring for them is almost the same. It is necessary to highlight and maintain the temperature: Phalaenopsis;
- Paphiopedilum;
- Miltonia;
- Wanda.
- Dendrobium (some species);
- Tunia;
But for everyone:
- Be sure to maintain a good light regime - about 12 hours;
- And don't freeze it. The temperature should not fall below 14-16 degrees;
- But spraying must be stopped.
Be sure to add light to your orchids in winter.
Important! Consider the influence of heating systems and appliances. Humidification may be required. Be careful with ventilation. So as not to frostbite the Tropicans. The same window sills are quite suitable for wintering.