If there are more and more flowers in the house, and less and less free space, group planting in one pot is an excellent way out of this situation. Especially if these flowers are beautiful orchids. Each of them individually is capable of delivering aesthetic pleasure. But the man-made composition of several orchids in one voluminous flowerpot causes genuine delight. Group flowering looks especially impressive. Being in equal conditions, they also develop simultaneously. Already in a paired planting, at least two peduncles are formed at once.
In 90% of cases, plants sitting together grow leaves and shoot arrows at the same time. Group flowering, for example, of large-flowered snow-white phalaenopsis is a simply mesmerizing sight.
Another equally important reason for paired (and not only) planting of orchids is the banal saving of usable space. One, even medium-sized pot takes up much less space than two small ones. There will be more indoor plants and less dishes. Therefore, several orchids in a container make the owner’s life much easier.
By the way, specimens with a healthy root system quickly adapt to a new environment. And when optimal conditions of light, temperature and humidity are created for them, they coexist perfectly with their “neighbors.” You can help them develop by adding fertilizers and biologically active additives to the substrate.
Landing in a classic closed system
For planting, for example, in pairs, it is desirable that both plants are in the growth phase, with healthy roots. Then they will not require special conditions - they will not need to be watered or sprayed more often. Pairs are selected randomly. Based more on personal preference. Either one variety or two flowers of different types will do. Different varieties are sometimes combined on the principle of similarity in the color of leaves or buds, paying attention to the uniformity of color, the presence of speckled spots, etc. Successful acclimatization and the presence of a certain number of healthy roots are mandatory.
Important! If the root system is initially diseased, resuscitation measures and observation are first needed.
Store-bought flowers with relatively healthy roots can be treated with Fitosporin within half an hour. After drying for 20 minutes, they can be planted together in new soil, in a closed system.
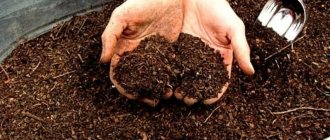
The classic substrate is made up of Seramis, bark, coal, expanded clay, and sphagnum moss. The flowerpot is selected depending on the size of the roots. Small if the roots are small. If the roots are large, then it is better to choose a pot or vase of significant size if the volume of the roots is impressive.
Expanded clay and sphagnum are laid in layers on the bottom, and large pieces of bark, pieces of charcoal, and Seramis are placed on top. The orchid is placed in a vase and covered with large bark. For convenience, it can be secured with a holder using fasteners.
Note! In some cases, adding polystyrene foam to the soil has a beneficial effect. This planting material is “warmer” compared to others. Some species grow roots well in it.
The voids are filled with bark as much as possible. A small amount of charcoal and Seramis are added. The surface of the substrate around the flower is framed with moss. Watering should be done no earlier than every 3-4 days.
Useful video
Find out in the video how to transplant several orchids into one pot: Watch the video to see how orchids look in one pot: Interesting facts in the video about how two orchids develop in one pot: Find out in the video how to care for orchids in one container:
Planting several orchids in a pot is quite normal.
, which has every chance of life and existence, just like traditional planting. This method will require new and different efforts from the grower, which will more than pay off during the flowering period. Experiment the right way and enjoy your orchids.
- Glass pots
Experienced florists recommend replanting orchids in glass pots only if there are holes in the container. And the more such holes, the better. In this case, you can safely grow orchids in the same way as in plastic. A glass pot without slits or with a single hole at the bottom will only be suitable for growing Vanda, Ascocenda or Phalaenopsis orchids. In this case, substrate-free plant transplantation is performed. - Wooden blocks
Those who want to transplant a beautiful orchid from a plastic pot to a block should know that this can only be done in the spring. After all, at this time, the root system of the flower grows very quickly. It is important for owners of epiphytic plants planted on blocks to understand that in this form the roots of the flower will dry out very quickly, so it is important to moisten them daily. It is best to grow orchids on blocks in small greenhouses. - Transplanting several plants into one pot
Such compositions look simply amazing. But for those who decide to transplant several orchids into one container, it is important to know a few points. In a single pot, the roots of different plants are tightly intertwined, and diseases are also quickly transmitted from one flower to all neighboring ones. If only one orchid blooms, the appearance of the composition is no longer so elegant. Therefore, the best solution for those who want to combine their plants into one flowerpot is Here’s an idea: you need to place several orchids in separate pots in one basket, flowerpot or vase. - Bamboo planters
This option for growing orchids also requires frequent spraying of the plants, since the substrate and moss in such a planter tend to dry out very quickly. By the way, for those who love handicrafts, it will not be difficult to make such a flower pot yourself. - Ladder for plants
Placing indoor plants on the windowsill has long become trivial. The boring window decoration is being replaced by a variety of stands and supports for plants. It's worth getting at least one of these things. - Mesh pots
The lack of substrate for orchids is a risky, but very interesting idea. And all because the plant needs to be sprayed more often not only with water, but also with a variety of fertilizers. After all, the epiphyte needs to get nutrients from somewhere. - Decorative branches
With the help of such simple branches and orchid flowers you can create a simply fabulous composition. In this case, it is necessary to take into account several important points: the roots of the orchid should be carefully wrapped in moss and sprayed at least twice a day.
Anyone who loves to grow flowers and especially loves orchids knows that they will have to deal with replanting or initial planting of such exotic plants. Therefore, there is a need to know how to properly transplant orchids into a pot. You can keep a variety of types of these flowers at home, but everyone needs to be able to create suitable conditions. And a lot depends on the correct landing.
This article will explain in detail exactly how to plant orchids so that the flower is comfortable.
Planting in wicker flowerpots
The composition looks very beautiful in wicker baskets-pots suspended above the window. A drainage layer of coarse expanded clay is placed on the bottom of the basket, on top of which is sphagnum moss and a “nest” made of a layer of coconut fiber. You can add a large fraction of pine bark. The plant must first be treated with a fungicide solution. The systemic drug Previkur is suitable for this purpose. To increase stress resistance, accelerate development and reduce rooting time, “grafting” with mycorrhiza is sometimes practiced.
Old bark can be boiled and used for other plantings.
Wash orchids with warm water from the shower using baby or laundry soap. Place under the phytolamp. During this time, all cuts and wounds that will inevitably form will dry out. After drying, you can plant it in a flowerpot. Place wine corks or polystyrene foam between the roots.
Humidity, maintenance conditions - this is what determines what soil is suitable for planting. Thus, coconut fiber is a moisture-intensive material. It is good to use if the apartment is warm - 27 C; in cooler conditions it will not serve very well.
In case of mass flowering in lush clusters for at least 9 months, it is advisable to give it a rest once a year. Trim flower stalks, preferably in late autumn, and ensure a dormant period of 2-3 months. Rested plants will begin to grow flower stalks, leaves, and roots with renewed vigor.
Root treatment
Before planting in a pot, the roots are carefully inspected. Even if they look healthy on the outside, they may be empty inside. Based on this, each root is felt and examined. If it is defective, then it is cut off, grabbing about 5 mm of the healthy part, and then the cut is treated with charcoal powder to prevent the spread of the disease.
You need to be able to distinguish a healthy root from a diseased one. Healthy ones will feel flexible and quite hard to the touch, while sick ones will be soft, flaccid, often emitting an unpleasant odor.
Reasons for failure of group plantings
- Parasites can cause death.
1) Mealybug. The pest settles in the center of growths and feeds on young growth. As a result, a leaf of a non-standard, twisted shape grows. A microscopic parasite is difficult to detect until a certain moment, until it multiplies in huge numbers. Processing each “patient” in a group planting is a labor-intensive process. In severe cases, the orchid becomes densely covered with cobwebs and quickly fades. Leaf rollers have the same effect .
2) Leaf juice is a favorite treat for fungus gnat . In nature, they colonize various types of fungi with their offspring. They can be brought from the forest along with planting material. The larvae gnaw through the roots and eat the nutritious shell - velamen - from the inside. Although the strands remain intact, the roots, and after them the leaves, begin to rot. In advanced forms, it is no longer possible to save the patient.
Getting rid of adult mosquitoes is quite difficult; treatment must be carried out repeatedly. They are destroyed by fumigators and dichlorvos. You can plug in the electric fumigator and place the contaminated pots very close to it. If you have pets, it is better to use special animal-safe products.
- Excessive planting density.
In order for the planting to grow and develop well, it is advisable to allocate 10-12 cm of soil area for each inhabitant. This will be more than enough for any type. The statement that the more plants and, accordingly, flower stalks, the more magnificent the flowering will be, is erroneous. Large specimens need space for free growth of leaf mass. In forced close quarters, orchids will inhibit each other’s development. Sooner or later, the “extra” specimens will have to be replanted. With rooted orchids this manipulation will be more problematic.
- Content shortcomings.
If many plants grow in a massive flask, difficulties with watering will inevitably arise. Even if drainage tubes are pre-installed, pouring and draining the solution always requires some skill. As well as for washing them if necessary. Experienced orchid growers do not recommend combining more than 3-4 plants into one group.
The first trump card is versatility
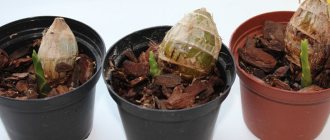
White is a spontaneous acquisition this year. Lilac - an old-timer who happened to become my trainer in growing phalaenopsis
The advantage of a double pot is that it is suitable for two ways of growing orchids:
- Open system
, when holes are made in the dishes for ventilation. A proven option that is chosen by most orchid owners. - Closed system
, when the pot is a solid vessel without holes for draining water. The wet method has many opponents. They believe that due to high humidity the roots will certainly rot. But I am a devoted adherent of a closed system. And it is the design of the double pot that helps my phalaenopsis keep their roots intact.
A double pot is also an opportunity to combine both options WITHOUT replanting.
Features of growing in large vases
The main disadvantage of a closed system is the potential for waterlogging of the soil and the development of putrefactive processes. In the case of group planting and against the backdrop of difficulties in maintenance, the risk of rotting increases. ZeoFlora soil for orchids will help improve the situation even in flooded conditions . Keeping several flowers together makes it possible to experiment and find new care options. And you can start by modifying the composition of the components of a classical closed system.
Due to the fairly large granule sizes - from 5 to 9 mm - Ceoflora can be used both as drainage and as a monosubstrate. The main substance - zeolite - absorbs water well and releases it into the soil gradually. Which is a huge plus. There is no accumulation of excess water, as in expanded clay.
Ceoflora is a sorbent that replaces charcoal and performs such important functions as:
- protection against all types of rot;
- resistance to fermentation processes;
- maintaining the purity of the substrate.
During the watering process, the drainage layer is saturated with water, allowing a small excess to pass down. It dries out about 1 cm on top, the crust retains moisture, which remains below. A mulch layer is formed that does not release moisture from the inside. By preventing the soil from becoming too acidic, it at the same time prevents it from drying out. The timing of the next watering depends on the degree of drying of the sorbent.
Ceoflora is the optimal soil for planting orchids that require resuscitation. In addition, it relieves stress in the weak, will help them adapt to a new method of planting, will retain all the necessary nutrients, and will not allow them to be washed out. Before use, you need to soak it for an hour, then drain the unabsorbed water.
Fact! The soil contains silicon, nitrogen and potassium, which are necessary for the nutrition and development of roots, especially in the flowering phase.
The bark is used in sizes from 2 to 4 cm. Thermally untreated is acceptable - it will last longer and retain its properties. It is good if the bark has a soft, sponge-like structure, reminiscent of cork material. It makes no sense to add moss with this type of planting. Sphagnum is added to prevent the soil from rotting. It also separates the drainage layer from the soil, consumes moisture, and then releases it. All these functions are performed by zeolite.
During the next watering activities, you can add a little specialized fertilizer. Or use any growth stimulator - vitalizer NV-101, Epin, Fitosporin-reanimator, etc.
Planting process
You should first lay a drainage layer of soaked Ceoflora on the bottom and secure a polypropylene tube. For better water passage, the lower part of the tube can be cut at an angle. Sprinkle evenly with some of the bark.
Important! After planting, a small amount of moisture remains at the bottom. You should not be afraid of this, since the water remains within the drainage layer and does not cause any harm.
It is important to carefully prepare transplant applicants:
- to avoid rotting, remove questionable roots, including filamentous ones;
- remove old leaves and dry flower stalks;
- apply green paint to the cut areas of the roots, creases on the leaves and the base of the stem.
The flowers are distributed in a wide pot so that the roots are located horizontally and are immersed in the substrate right up to the foliage. The planting depth should be the same for everyone. When adding bark, you need to carefully compact it. You can fix the position using peduncle holders.
At the next stage, the substrate is distributed between the flowers - wherever voids have formed. In fact, zeolite will take up about 30% of the total soil volume. It will compact the base and increase the overall moisture capacity. In the future, you may have to add some more if they lack water. It is better to cut off flower stalks with flowering buds to ensure a dormant period and give time for adaptation.
Advice! Before cutting flower stalks, it is advisable to mark the stems, if this has not been done previously. This way it will be easier to “recognize” the origin in the general planting.
The finished product produces a very beautiful composition in eco-style: a combination of wood, lush greenery and glass.
Substrate preparation
Despite growing a flower at home, the soil should still be close in composition to natural conditions. As a rule, orchids live in the tropics, where they cling to trees using aerial roots. This means that the home soil must contain moss and bark.
Experienced gardeners believe that it is not worth using store-bought mixtures, as they are too crushed. In general, the composition of the substrate can be the same for all types of orchids, but must differ proportionally and in the size of the components. Epiphytes love large and medium-sized fractions, while moisture-loving ones love smaller ones.
When working with a plant, you need to take into account the acidity of the soil, moisture permeability and air circulation.
You can make the soil yourself, knowing its composition.
- Bark
. Chopped pieces of coniferous and deciduous trees (in a ratio of 70 to 30, while deciduous trees should be only one type), you can add a couple of pieces of willow, which has an antiseptic property. - Charcoal or ordinary charcoal
- pharmaceutical grade. - If possible, coconut fiber
. - Swamp moss
, which can be obtained at any flower shop. - Humus, expanded clay, fir cones
, and other similar materials, if available.
The quantity and size of the soil kit will depend on the moisture holding capacity needed. For strong use a mixture of peat and bark in a ratio of 1: 1. Medium - increase the amount of bark in proportion to the peat and add coal. For drainage, crushed stone, as well as foam or expanded clay, are used.
Post-landing care regimen
After planting, if wet zeolite was used, no watering is required for at least a week. There is already a sufficient amount of moisture in the pot, which was obtained when processing and soaking in various preparations were carried out. Overmoistening in this case will only increase the acidity of the substrate. Sometimes, after a day or two, it is possible to drip moisten the soil using a medical bulb. As well as lightly spraying the leaves from a spray bottle, to which you can add a few drops of Epin, succinic acid.
Note! Pre-soaking future neighbors for 30 minutes in Fufanon with the addition of Fitosporin will minimize the appearance of pests on them in the future - mealybugs, etc.
When Ceoflora dries out, it is time for the first and subsequent waterings. It is important not to miss the moment when it begins to take moisture from the roots.
How best to water
Follow several methods of moisturizing.
- First time after landing.
You need to dilute thiamine chloride - vitamin B1 - in warm water. It stimulates the growth of leaves and root systems, and generally has a beneficial effect on the life cycle. It is suitable for adaptation measures. You can add succinic acid, a few drops of echinacea, Heteroauxin or any other growth stimulant.
A small amount of solution is enough, since the zeolite layer is still wet. It is necessary to replenish the water in the drainage layer. To do this, take the solution into a bulb or spray bottle and pour it onto the surface, including under the leaves if they are tightly adjacent to the substrate. In this way, excessive flooding is avoided, as, for example, when using a watering can. The roots and substrate have time to become saturated. With the remaining liquid you can wipe the leaves from above and especially from below. Finally, the growth point should be blotted from water with a dry cotton swab.
Advice! Leaves that have lost turgor can be covered underneath with cotton pads soaked in a solution with vitamin B1.
- Fill a watering can with warm, settled water and add liquid Fitosporin or Epin. Pour the containers with flowers with this mixture for at least 1-1.5-2 hours so that the zeolite has time to be saturated. Water the soil with caution, trying not to get it on the leaves or at the growing point.
Advice! It is better to use Fitosporin at half the recommended dosage. For example, 20-30 drops per two-liter watering can. This amount will be safe for roots and leaves and is suitable for frequent feeding.
To drain the water, you will need a silicone hose and an aquarium pump (or the same medical bulb). This method greatly facilitates the care of a group placed in one large flask. You need to place the hose in the polypropylene tube all the way to the bottom. With a few presses, pump out all the water into a bucket or basin. A small amount of water remaining in the drainage layer is acceptable.
Advice! It is convenient to close the tubes during periods between waterings using plugs, which are sold in hardware stores.
It is recommended to carry out this procedure no more than once a month (during the warm season).
- Showering at weekly intervals . Wash the leaves of the plants and fill the pots completely for several hours or overnight. Drain in the morning. In this case, the bark becomes more structured and hygroscopic - it absorbs as much water as the plants require. Orchids are saturated with the moisture they need to grow root and leaf mass. As a rule, they tolerate showering well and no rot occurs.
Note! An overdried orchid should not be suddenly given water. Otherwise, its leaves may crack.
By watering, you can add nutritious fertilizer. Use weak solutions if there were problems before and the active growth phase has now begun. A strong solution can leave burn marks on the roots. If there are not many roots, care for preservation will not be superfluous. Nutrition in this case is simply necessary.
- Add water little by little so that the drainage layer does not dry out. Or pour in for 10-15 minutes and drain.
If the bark does “bloom”, it is recommended to pour a solution of Fitosporin with a few drops of Fitoverm under the neck. Wait 30 minutes. During this time, the drugs will have an effect on pathogenic fungi, microorganisms and rid the bark of pests.
Group planting is suitable for aesthetes and those lovers who are not afraid of any maintenance problems to obtain a beautiful result. Compensation for overcoming all difficulties will certainly be the lush and abundant flowering of these amazing plants.
Selection of capacity
An orchid is considered a houseplant, so replanting it at home is not that difficult. But here a lot depends on the type of plant itself. For example, phalaenopsis (a subspecies of orchids) has aerial roots and does much better in a plastic pot with many holes. It allows sunlight to pass through, provides ideal air circulation and makes it easy to monitor the condition of the root.
Quite often in gardening stores you can find transparent pots shaped like a glass. They are absolutely not suitable for any type of orchid. Their roots grow not deep, but wide, so the best option would be a wide pot, but with low walls.
A common mistake is planting a plant in a glass vase, which looks beautiful and fits into the interior, but is absolutely not suitable for a plant with aerial roots, since the glass will refract the sun's rays, which will burn the roots. In addition, glass will not allow oxygen, which is so necessary for the plant, to pass through.
If you keep a sympodial orchid at home, then a pot that looks like an oval bowl is ideal for it.
. The plant needs to be planted on the edge to leave enough room for roots. You can plant two orchids in one pot, but only if the size of the container allows it and proper care is provided. It is important to ensure that plants do not get sick in such conditions.
Avoid overheating and burns
The same applies to those cases when it is not shaded. Of course, as already mentioned, a flower can stand on a windowsill facing any side of the world, but in this case it is necessary to adhere to certain rules. They are to ensure that with enough light the plant does not burn.
If the flower is on a window that faces south, then during the daytime you should lower the blinds or close the curtains. Penetration of individual rays is allowed, but not the scorching sun. Around 6-7 o'clock in the evening it will be possible to “let” the sun into the room so that the plant can enjoy the sunset rays of the heavenly body.
Sometimes gardeners notice that pigment spots have appeared on the leaves of the flower. Young roots, which change their color to purple, pink or cherry shades, are not protected from this. All this indicates the pigment “tan” that the flower received. As for the root system, after a while everything will be restored, but the leaves will remain yellowish or brownish. Despite the fact that this will not particularly affect the condition of the plant, you should pay attention to this and remove the flower from the sun before the leaves and roots are completely burnt.
In this case, you can install the pot on a western or eastern window.
Flower propagation and transplantation
Orchids reproduce in three ways:
- Seeds. It is very difficult to achieve, because flowers are not pollinated at home. It is much easier to buy ready-made seeds collected in the natural environment. However, their price may be significantly higher than if you purchase a ready-made plant in a specialized store.
- By cuttings. In this case, the probability of a favorable outcome is about 65%. It is necessary to cut off the peduncle at the base and divide it into several parts of about 10 cm each. After this, the material is placed in a container with water and placed in a greenhouse. After about three months, some of the cuttings will have roots.
- Dividing the bush. To do this, you need to have a sharp knife, antiseptics for processing it and activated carbon to treat the cut area.
Important! Only some varieties of orchids reproduce by children that grow directly from the stem. In this case, everything is much simpler: they need to be trimmed and planted.
Orchid transplantation does not occur during flowering. Performed in a standard manner.
To do this you need:
- Get a new pot.
- Lay out a drainage layer. It is better to use expanded clay.
- Fill up the soil.
- Carefully remove the orchid from the pot and inspect its roots for rot. If there is one, then it is cut off, and the plant itself is left for about a day to dry out.
- Then you need to plant the flower and put it in a dark room for a couple of days to acclimatize.
- After two days, the orchid can be placed where it will live.
Important. Replantation is required every 2-3 years. In this case, the new pot should be only a couple of centimeters larger in diameter than the previous one.
How to grow a lot of orchids at home?
In fact, there are no problems. If the flowers are of the same species, but of different varieties, then you only need to properly care for them, namely:
- water;
- observe the temperature regime;
- provide lighting;
- maintain air humidity;
- apply fertilizing.
Reference. If there are a lot of orchids in the room, and insects periodically fly into the window, pollination can occur. Then the flowers will give seeds. And this is an excellent opportunity to start a business selling representatives of this family. On the market, the average price of an orchid is 2,500 rubles. Hobbyists are ready to buy some species for $5,000!