Reproduction of orchids in nature
Before talking about methods for propagating orchids at home, it is important to understand what a plant needs for propagation. In nature, there are over 20 thousand species of orchids and each of them has its own characteristics and conditions in which procreation occurs.
When talking about orchids, we usually mean the plants that are most adapted to home conditions:
- phalaenopsis;
- dendrobiums;
- Cumbria;
- cymbidiums;
- oncidium;
- vandas;
- miltonia;
- Cattleyas.
How do orchids of these species reproduce in nature? Some of them belong to sympodial species, which have many growth points and easily reproduce by division, and some are monopodial species, which reproduce mainly with the help of children. A common factor in procreation in all flowering plants, including orchids, is propagation by seeds. Once in the soil, the seeds are completely dependent on the beneficial fungal flora, which provides them with a nutrient medium and the opportunity to germinate.
In a similar way, procreation occurs in domestic plants. Sympodial species - dendrobiums, cambrians, cymbidiums, cattleyas, oncidiums, easily reproduce by division. Every year they produce new and new growths, as a result of which the owner has to plant them one way or another. In monopodial orchids, this process is more complex and in order for the orchid to give birth to a baby, it is necessary to create optimal conditions.
Read on to find out how to do this.
Soil and container
The substrate should consist of tree bark, preferably pine, since in natural conditions phalaenopsis lives on trees. You can add pieces of polystyrene foam or sphagnum moss to retain moisture. Before planting the children, the bark must be boiled for 20 minutes.
Small cups made of transparent plastic with holes at the bottom and sides are used to seat the children. Read more about choosing a container for phalaenopsis here.
Conditions necessary for reproduction
Growing orchids requires a number of skills and can be challenging for beginners unfamiliar with plant cycles. It is recommended to provoke the appearance of children with various stimulants only in healthy flowers, since a plant with weak or diseased roots may not withstand the load and die.
The time of year is also of great importance, since lighting, temperature and humidity create good conditions for both flowering and the formation of new shoots. Most often, orchids at home begin to reproduce in the spring: after a short daylight hours in the winter season, the increase in light gives a signal to the plant that a favorable period is approaching. If the remaining conditions are suitable for the plant - temperature and watering regime, then the plant will begin to produce new shoots.
Next, we’ll talk about what methods of propagating orchids are acceptable for home use, and how the owner of these beautiful flowers can influence the continuation of their species.
Basic mistakes
The main mistakes that can be made when breeding orchids:
- the use of unsterile instruments, respectively, infection;
- poor-quality and insufficient care for both young shoots and adult plants;
- damage to an adult orchid due to improper separation of shoots.
To get the desired result, treat the reproduction process responsibly.
- Choose the method that you think is appropriate for you.
- Follow the instructions clearly and without deviation.
- Be sure to sterilize your instruments.
- Use only high-quality soil.
Don’t forget, orchids love light; poor lighting is the cause of plant death.
Propagation of orchids by division at home
As already mentioned, the division method is in most cases suitable for sympodial species. Since all pseudobulbs are united by a rhizome, or, as it is also called, a rhizome, new growth is just a matter of time. But it is equally important to know that you need to divide plants only in cases where there are too many pseudobulbs and the entire root system no longer fits in the pot.
In addition to dividing, there is another option: transplant the overgrown plant into a larger pot. As practice shows, sympodial orchids with a large number bloom more luxuriantly and have better immunity to diseases and pests. Therefore, here you need to be guided by the principle “Measure seven times.”
If you decide to divide your orchid, the question will probably arise as to how to divide it without harming the flower. To do this, it is important to determine where the rhizome is located and divide according to it. It is extremely important that each division has at least 3 pseudobulbs; the more there are, the faster the orchid adapts after division.
Another important feature of sympodial orchids is that the faded pseudobulb will no longer bloom, therefore, when dividing the plant, you need to leave the old ones with the new growths; they will initially nourish and support the young plant, and then dry out over time.
The separation action plan should be as follows:
- We take the plant out of the pot and use a sterile instrument to separate the pseudobulbs.
- The rhizome cut should be processed. A garden pitch is suitable for this, or you can simply drip it with wax or paraffin.
For many adherents of phalaenopsis who have not encountered other species before, the question of how to plant a dendrobium orchid becomes very relevant. It is worth noting that, although dendrobium is a sympodial species, division is not the only type of its reproduction. Sometimes babies begin to grow on pseudobulbs, which eventually grow roots.
Once the baby has produced new growth, followed by a new pseudobulb, and grown sufficient roots to support its own life, it can be removed by careful cutting with a sterile, sharp instrument.
Important tip! Do not remove from the dendrobium children with one growth or pseudobulb, as well as new shoots without aerial roots. It is impossible to propagate an orchid of this type without roots, since they provide the basis for growth, and not vice versa.
Possible problems
Some difficulties may arise during the transplant.
- To avoid infecting the plant, use only sterile scissors for work.
- You cannot use a baby if its roots have not yet formed. She will simply die.
- It is forbidden to cut all the keiki at once: the mother plant will not cope with such a load.
- Fertilizing can be done when the flowering period ends.
Reproduction of orchids by root children
Propagation of orchids by root children at home is practiced quite often, but it is important to understand in what cases this should be done. Monopodial species of orchids reproduce by basal children, such as:
- phalaenopsis;
- Wanda;
- vanilla;
- brassavola.
One of the most frequently asked questions among novice gardeners is how to grow an orchid from roots. To answer it, you need to define the concepts.
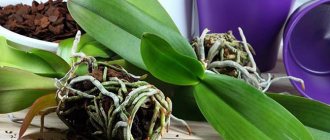
It is almost impossible to grow an orchid from a root naturally: this happens either in the event of the death of the mother plant or in the case of rejuvenation of the old orchid. Moreover, a prerequisite is that the roots must be strong enough and located on the remainder of the trunk, which orchid growers often call the “stem.”
In other cases, having cut off a piece of root, it is completely pointless to wait for a new growth point to appear from it.
So, how to plant an orchid to get basal children? To do this, flower growers use horizontal division of the bush. However, it should be noted that this method is quite extreme and requires the following conditions:
- the plant must have a healthy root mass;
- The orchid trunk must have at least three aerial roots, 5-8 cm long.
The action plan will be as follows:
- We take the plant out of the pot and carefully examine the roots again.
- We mark the place of pruning: usually, when dividing with the roots, the two lower leaves are left, and the upper part, together with the aerial roots, is separated with a sterile instrument.
- We treat the sections with antiseptics: phytosporin or crushed activated carbon.
- We plant the roots together with the remaining leaves in an old pot with an old substrate and reduce watering by 2 times.
- We plant the top in a new pot according to the size of the aerial roots, using a new substrate.
- Water the tops after 4 days, apply fertilizers no earlier than 30 days.
- To support a divided plant, you can use succinic acid by wiping the leaves or spraying with a fine dispersion spray bottle.
Further, caring for the divisions is no different from ordinary plant care. After a while, green shoots may appear on the “stalk” - this is the root baby. After its appearance, fertilizers should be applied 2 times a month using the root method.
In addition to propagating orchids by roots, there are a number of other ways to make several from one plant. How to do this - read on.
What kind of method is this?
Definition
Cuttings are a fairly simple method of artificial vegetative propagation using a cutting separated from the mother specimen.
By choosing this method of propagation, gardeners preserve all the varietal biological properties of the plant.
What parts can be used?
Orchids are propagated by dividing the bush, by children or by cuttings.
Is it possible to propagate an orchid from leaves? It is impossible, because the leaves of this plant do not have growing points. The cuttings of an orchid can be its tip or peduncle , which is cut into pieces for propagation.
The shoots must be divided into parts. Each part should be approximately 10 -15 cm in size. It is imperative that each part has 2-3 buds. Each part should have its bud as low as possible.
Propagation of orchids by cuttings
In order to propagate an orchid by cuttings, you need to know for which species this method is suitable. Oddly enough, both sympodial and monopodial species can be propagated by cuttings. In the first case, cuttings will be carried out with a pseudobulb, and in the second - with peduncles.
The best results of this type of propagation are produced by dendrobiums and phalaenopsis. However, there are also negative experiences, since the result depends on many factors: environment, lighting, and most importantly, the genetic characteristics of the orchid. Experienced gardeners also do not recommend using cymbidiums, cattleyas and other more expensive species for this.
So what should you do to propagate from cuttings?
- We will need a peduncle or pseudobulb. The peduncle can be cut off after it begins to dry out, and the pseudobulb can be taken from any faded dendrobium.
- We will need a mixture of fine bark and sphagnum moss.
- Sections of peduncles can be dried, sections of pseudobulbs can be treated with phytosporin or filled with paraffin.
- We place the prepared substrate in a greenhouse and place the cuttings there.
- As the substrate dries, it should be moistened with a spray bottle. The temperature should be maintained at 23-25 degrees, there should also be diffused light and regular ventilation.
The first results can be seen within 1-2 weeks. Dormant buds may awaken on the peduncles of phalaenopsis, and new shoots may appear on the pseudobulbs of dendrobium, which will eventually become babies.
How to sow: step-by-step instructions
- The prepared nutrient medium is poured into pre-sterilized glass containers - jars or flasks, being careful not to splash it on the walls of the vessels - 30-40 g per 100 ml of volume.
- Then the containers are sterilized again, together with the poured mixture, for the same amount of time as the empty ones, and a day later the procedure is repeated.
- Leave for about 4-5 days for observation - if no mold appears on top of the mixture or on the walls of the vessel, then you can sow.
- Just before sowing, everything needed for sowing is placed inside a disinfected container, plastic or glass.
- The seeds are also sterilized - they are placed in a solution of calcium hypochloride at the rate of 10 g per 100 ml of distilled water for approximately 10–15 minutes, shaking constantly.
- Using a sterile syringe or pipette, take planting material from this solution and distribute it evenly over the entire surface of the nutrient mixture, doing this as soon as possible.
- The vessels are tightly sealed and placed in a specially selected place.
Reproduction of orchids by children
This method is most relevant for the most common orchids of the phalaenopsis species. It is these plants that reproduce very readily even without additional intervention from the grower. Reproduction of orchids at home with the help of children can be provoked by hormonal pastes containing cytokinins. However, children often appear in the roots and on the trunk of the plant itself.
Important! Paste for propagating orchids is sold freely in the CIS, but in European countries it is quite difficult to purchase. It has side effects and its own characteristics of use.
This paste contains phytohormones - cytokinins, which accelerate the plant's metabolism and enhance the growth of new shoots and buds. However, it should only be used on healthy and mature plants.
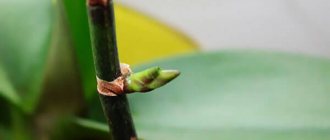
The natural appearance of babies in orchids is possible immediately after flowering. The upper or middle bud on the peduncle awakens and produces either new growth or a new shoot. Read on to learn how to propagate orchids using paste.
Baby on a peduncle
In order to get a baby on a peduncle, you can use cytokinin paste. The action plan will be as follows:
- Using a sterile instrument, it is necessary to bend back the scales covering the dormant bud.
- Use a heated needle or clean toothpick to scratch the plant tissue next to it.
- Apply the paste to the dormant bud in a volume the size of a pinhead.
- The awakening of the kidney can be observed on days 7-10.
Propagation using orchid paste can result in the formation of 2-3 new shoots from one bud. Such mutations are very harmful to the aesthetic appearance and lead to severe stress on the mother plant. This can happen both due to an overdose of hormonal paste, and due to genetic pathologies in development. It is difficult to say how strong or weak the baby will be, but, according to numerous reviews from flower growers, the offspring after cytokinin paste are an order of magnitude weaker, and the flowering is not as lush as that of the mother.
Another important point when propagating orchids by children is the need for proper rooting of the child. Quite often, young growths are in no hurry to build up the root system, but they push out new leaves one after another and may even bloom. This situation has a negative impact on the mother; she may not have enough strength to feed the baby.
A good way to quickly grow roots in young plants is to create a cushion of moss or so-called planting in a pot directly on the mother’s peduncle. For this we need:
- A small pot with a diameter of 2.5 cm or a cut plastic bottle of 0.5 liters.
- Scissors.
- Scotch.
- Sphagnum moss.
- Pin.
At the bottom of the pot we make a hole for the diameter of the peduncle. Using scissors, we cut the pot vertically down to the hole and wrap the pot around the peduncle so that the baby is ¾ of the way up to the pot. Secure the container from below with a clothespin. We glue the walls of the pot together with tape and put sphagnum moss inside, after moistening it with water and a rooting agent. A good drug for this is Kornevin - it is accessible and inexpensive.
This method adapts young plants well to independent life, and the undoubted advantage is that the orchid immediately learns to feed on roots, which reduces stress during transplantation. Among other things, flower growers note a positive point in the fact that the roots immediately grow inside the pot and the transplant will be less traumatic.
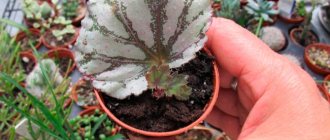
Root baby
Basal children, or as they are also called, basal, can appear in monopodial orchid species. Most often they begin to grow in phalaenopsis, but it is impossible to induce an orchid to this type of reproduction. As a rule, a basal baby appears when the mother plant is in danger and the plant does not want to interrupt its life cycle.
Experienced gardeners categorically do not recommend smearing the trunk of healthy phalaenopsis with cytokinin paste - this method can be detrimental to the plant.
Growing the Essential Roots
Some keiki orchids do not produce roots.
To correct the problem you will need sphagnum moss, strong thread and cling film.
- The moss is soaked for half an hour: it should swell.
- A nest is formed from moss and secured to the peduncle with the baby using a thread.
- For additional protection, the socket is secured with a stick with a clamp.
- Moss is wrapped in film to create a greenhouse effect.
- In the future, the plant will need to be ventilated and sprayed with water every day.
The video shows how to do it correctly:
With the artificial augmentation method, the baby is already separated from the mother. Further growth of the root system occurs independently, without a peduncle. For these purposes, gardeners often use polystyrene foam.
- Make a small hole in a piece of foam and insert the cake there. You can strengthen it in any available way.
- The foam with the appendage is lowered into a container with warm water. The base of the baby should be above its level.
- If this method does not work, you can try releasing the shoot into water. So that the base touches the surface only lightly.
To accelerate the growth of the root system, you can use special preparations, for example, “Kornevin” or succinic acid.
The base of the plant is soaked for several hours in an aqueous solution, according to the instructions.
Orchids from bulbs
Quite often they write on forums about how to grow an orchid from a bulb. Many people don't know what they are. Bulbs or “carrots” are the pseudobulbs of Cycnades orchids grown and sold in Vietnam. Propagation is a process identical to cuttings, but caring for the sprout is slightly different.
The bulb has a round shape, about 15 cm long, and in appearance is very similar to dendrobium pseudobulbs. Growing it is quite simple: the bulb is planted with its roots in dry bark, slightly deepening its body so that the root collar is open. To strengthen, the cycnades sprout can be secured with a wooden stick.
There is no need to water the bulb until new roots form. However, a developing plant will need warmth and good lighting.
Propagation of orchids by seeds at home
In the wild, epiphytes reproduce in different ways, but the easiest way is sexually. Not only the plants themselves play a great role here, but also insects, thanks to which orchids are pollinated.
After pollination, the plant develops a seed capsule containing from 3 to 5 million seeds and ripens within 6-8 months. At the end of the process, it bursts, and small, dust-like seeds are carried away by air currents. For development, they require a nutrient medium, which is rich in soil and tree bark.
As for the sexual method of reproduction at home, it is quite difficult to withstand all the conditions. A successful result can only be achieved in completely sterile conditions, and also if an ideal environment for development is provided. However, some gardeners have successful experience in such breeding.
In order to grow an orchid from seeds, it is necessary to create a nutrient medium in which the seeds are sown. Out of 3-5 million, very few will be able to germinate, since due to the small size of the seeds they contain very few nutrients. After 6-8 months, the sprouted seeds will acquire a tuberous appearance and will develop for another 2 years.
However, even here the orchid requires certain conditions. In order for a plant to receive nutrients from the environment, it needs to exist in symbiosis with a certain fungal microflora. The plant's immunity must be sufficient to form a symbiosis with microorganisms, otherwise either the plant will destroy it or the fungus itself will turn into a pathogen and destroy the plant.
It is almost impossible to do all the manipulations for propagating an orchid by seeds at home. To grow orchids from seeds, laboratory conditions or professional home selection are required.
Folk recipes for nutrient medium
Many orchid growers, due to the unavailability of ready-made commercial media, prepare a nutrient mixture on their own, using natural products per 1 liter of distilled water:
Option 1
- freshly prepared potato juice – 450 ml;
- lemon juice – 1 teaspoon;
- powdered sugar – 40 g;
- agar-agar – 15–20 g;
- fertilizers for orchids - 7 ml.
Option 2
- agar-agar – 5 g;
- honey and brown sugar - 10 g each;
- fertilizers for orchids - 1 ml.
Option 3
- potato starch – 200 g;
- freshly squeezed tomato puree from half a kilogram of tomatoes;
- coconut water - half a liter;
- agar-agar – 20 g;
- liquid fertilizer for orchids - 1–2 ml.
Option 4
- banana puree – 70 g;
- honey and sugar - 10 g each;
- starch – 200 g;
- activated carbon powder - from 3 tablets;
- fertilizers for orchids - 2–3 ml.
Option 5
for 460 ml distilled water:
- sugar and honey - 5 g each;
- pineapple juice – 40 ml;
- activated carbon – 1 tablet, ground into powder;
- starch – 100 g;
- fertilizers for orchids – 2-3 ml.
Half the volume of water is used to prepare agar-agar jelly; in the second half, heated to 95 degrees, all other components are dissolved, stirred for 3-5 minutes and poured into the jelly.
Bottom line
Breeding orchids is an exciting process, because their beauty is difficult to overestimate. To summarize, we can conclude the following:
- There are a large number of propagation methods: cuttings, division, babies, seeds.
- For sympodial and monopodial orchids, different propagation methods are used at home.
- Any method requires a lot of time and special care for young plants.
- Propagation by seeds is in most cases available either to professional orchid breeders or only in laboratory conditions.
How do you propagate your orchids?
Preparation
Any method of propagating phalaenopsis requires care and a clear sequence of actions by the home grower:
- carry out work with gloves:
- the knife must be well sharpened;
- pre-disinfect the tools - boil or wipe the blade with an antiseptic;
- Have charcoal on hand to sprinkle on the “wounds” to protect against bacteria and dry the cut.