General information about Phalaenopsis
The first plants were discovered on the Moluccas in the middle of the 18th century. In the first half of the 18th century, similar flowers were found on the Malay Islands, and it was then that the orchid was given the name phalaenopsis, which means “butterfly-like.”
In nature, there are more than twenty thousand species of these plants, in addition, many hybrids have been bred, and it is no coincidence that phalaenopsis is so common in home floriculture. Externally, the plants are small bushes with a rosette of leathery leaves from which flower stalks emerge. The length and shape of the peduncles are different and depend on the characteristics of the particular type of orchid: tall, hanging, curved.
Phalaenopsis has a very short stem (monopodial appearance), aerial roots, the surface of which is covered with velamen. The color of the roots is greenish, as they participate in the synthesis of chlorophyll.
These plants are epiphytes, although lithophytic species are also found. In nature they grow on tree trunks and branches, but are not parasites. Food is obtained from plant residues accumulating in the bark, moisture is obtained from air and precipitation.
The flowers are shaped like moths, sizes vary from 3 to 14-15 cm. The number also varies, some phalaenopsis produce 5-10 flowers, others - up to 50-60 flowers.
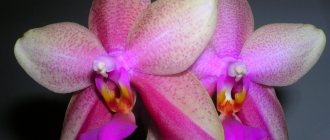
On a note! The natural color of flowers of this genus of Orchids is white.
The hybrids bred by breeders have petals of various shades, including those with the famous “French specks” - dark dots on a light background. Hybrids of mini and macro orchids have been created, with and without odors. The stores offer various varieties of phalaenopsis, which are eagerly snapped up by customers. But you need to know the characteristics of this type of exotic plant and follow simple growing recommendations.
Mini orchids - variety of varieties
Among the huge variety of orchids grown in indoor floriculture, there is a separate group that combines plants with a large number of small, small flowers. Sometimes large clusters hang up to half a meter long. Often there are so many buds that it seems as if they are crowded on one peduncle.
The “Mini” group is filled with varieties and hybrids bred on the basis of species and interspecific crossings. The most common species are representatives of the Phalaenopsis genus.
Their greatest advantage is the peculiarity of flowering, which is divided according to the type of flowering:
| Name of flowering type | Characteristics of flowering |
| Standard | The flower arrow, on average, grows to 9-12 cm. At the end of flowering, the apical bud dies off. The most common species involved in the selection of mini varieties are Phalaenopsis stuartiana, Phalaenopsis amabilis, Phalaenopsis schilleriana. |
| Novelty | The growth of the peduncle occurs gradually during the period of active growth of the ground mass. As a result, very small buds are formed, 4-8 cm in size. Despite their miniature size, the flowers completely retain the shape and color of one of the original parent species. Developed from the natural botanical subgenus Polychilos. |
| Multiflora | This type of flowering has the following features: · The arrow grows throughout flowering. · The size of the buds is 3-6 cm. · The miniature size is compensated by a large number of flowers, which are located on the stem, tightly pressed against each other. The main participants in the selection process are Phalaenopsis equestris, Phalaenopsis stuartiana, Phalaenopsis schilleriana. |
Based on the characteristics of flowering, it should be noted that mini phalaenopsis can belong to each of three types - standard, novelty and multiflora. But most often, these are representatives of multiflora.
The varieties of this group are by no means distinguished by their miniature plant size. In some, the total size exceeds the original species. For example,
Phalaenopsis Be Tris is much larger than the standard mother variety.
The mini orchid Phalaenopsis Be Tris is much larger in size than the mother varieties taking part in the selection. The name "mini" refers to the size of the flowers.
Mini phalaenopsis are distinguished by long-lasting, spectacular flowering. Popular:
- Phalaenopsis Luddeman
- Phalaenopsis pink,
- Phalaenopsis "Mini Mark".
Mini orchid - phalaenopsis "Mini Mark" is characterized by long flowering. With good care it can last almost a whole year.
In addition to phalaenopsis varieties, other mini-group hybrids, bred on the basis of other botanical genera of orchids, are popular. Among them are such popular examples:
| Orchid genus | Mini group variety |
| Oncidium | Oncidium is sinuous with flowers 3 cm in diameter, collected in dense panicles. |
| Ascocendes | Product of hybridization of orchids of the genera “Asko. Flowers can be single-colored, two-colored, or speckled. Their size is, on average, 4-8 cm. The length of the leaves is up to 15 cm. |
| Dendrobium | The most popular mini variety is “Moniliforme”, 15 cm high. The color of small flowers is white and pink. It is unpretentious to growing conditions. |
| Cymbidium | Mini varieties of this genus of orchids differ in flower size of no more than five centimeters. Common colors are white, yellow, pink. |
Many indoor mini orchids are easy to grow if you follow the necessary care requirements.
How to choose Phalaenopsis?
If you want to purchase a luxurious flower, you need to carefully choose the plant you like:
- Phalaenopsis should be healthy, with a large number of unopened buds, with elastic leaves.
- It is advisable to choose orchids growing in transparent pots. This makes it easier to inspect the root system of plants and see possible damage. The roots should be grayish, in those places where light reaches them - green. Brown or dark roots indicate that the plant is not entirely healthy and it is better not to purchase it.
- You should not buy phalaenopsis with wrinkled, dry leaves.
- You should also refrain from buying a plant that does not “sit” tightly in the substrate and pot, and its roots are obviously damaged.
Those who have experience growing a marvelous flower can purchase a plant with minor damage. Their price is lower, and if you have the desire and time, then it is quite possible to revive phalaenopsis.
Diseases
Fungal diseases. The leaves turn yellow in spots, and bumps also form. Treated with antifungal solutions. The reason is improper care.
- Bacterial stains. Old leaves of mini orchids are affected, which acquire a dark yellow tint. It is treated by removing the diseased leaf. The sections are treated with bactericidal preparations and charcoal.
- Root atrophy. Leads to the inability of the root system to nourish the plant. The reason is improper soil and care of the mini. It is treated by dividing the bush and fertilizers.
- Putrid disease. The reason is improper watering, poor-quality soil for the mini, incorrectly chosen humidity regime. It is treated with a complex of transplantation, cutting off the affected sections and changing the humidity regime.
In this article we talked about what a mini Phalaenopsis orchid is and how to care for these orchids.
Differences in flower maintenance at home and in the store
Despite its unpretentiousness, phalaenopsis requires the creation of special conditions indoors. The flower's homeland is tropical forests, where there is enough light, heat and moisture, so it is necessary to create similar conditions for the orchid.
After purchasing the orchid, they select a place in the house that is light and warm enough, install a pot and leave the plant alone for a while. It is necessary to observe the flower and its condition for about 1.5-2 weeks.
Description of the flower
Phalaenopsis is an exotic flowering plant of the Orchidaceae family, an epiphyte. Its homeland is the tropical rainforests of Indonesia, Australia, and Southeast Asia. Phalaenopsis has only one growth point - its basal rosette of leaves. The average orchid grows up to one meter. Breeders have developed hybrid varieties to suit every taste - from miniature bushes to giants. The color palette is also amazing: from pure white to almost black colors, as well as pink, yellow, purple, lilac and violet of all shades. In addition to pure tones, there are flowers with speckled petals, with spots, with streaks, and even with hieroglyphs.
Not so long ago, only the most advanced gardeners were engaged in breeding and growing Phalaenopsis, but now these orchids are increasingly found not only in flower greenhouses, where it is easiest to create suitable tropical conditions for them, but also in ordinary apartments of exotic lovers. In this article we will tell you what conditions will be comfortable for a flower if it lives in the same apartment with you.
More detailed information about the plant, as well as a description of Phalaenopsis species and varieties, can be found here.
Is a transplant necessary after purchase?
Experienced flower growers always replant an orchid after purchase, thereby saving the flower from death. In stores (especially on sales in supermarkets), phalaenopsis is often sold in pots with peat tablets or baskets, moss plugs, foam rubber, lightly covered with bark or special coconut chips. This is done for the convenience of transporting plants and preserving moisture for the roots.
After purchasing without replanting, the orchid is watered in the usual manner for this plant, so the roots do not have time to dry out, the humidity rises, and rotting processes begin. First, the roots rot, then the process moves to the neck, the plant turns yellow, stops growing and dies without surgical treatment.
Conclusion: after purchase, the exotic Phalaenopsis is replanted, moss, peat baskets, and other moisture-intensive materials are removed and a substrate is added to the pot.
Step by step instructions
We will describe in detail all the steps for choosing and creating optimal conditions for growing phalaenopsis.
Selecting a location
The usual placement of flowers in an apartment is window sills or special stands. For tropical beauties, an eastern window is suitable, where there is enough light, but at the same time there is no direct sunlight.
Phalaenopsis loves diffused light and blooms profusely in the back of rooms, provided that there is at least 12 hours of daylight. When placing the pot on the south side, in the summer you need to make a little shading for the orchid. If there are not enough hours of daylight, fluorescent lamps are used for additional illumination.
On a note!
During the formation of flower buds, the plant is not recommended to be moved or transferred from place to place.
The flower reaches for the light and, in order to avoid getting a one-sided plant or one that falls to one side, carefully turn the pot.
Humidity and temperature
Residents of the tropics, phalaenopsis are demanding of air humidity and a certain temperature. In city apartments, the air, especially in winter when the heating is on, is too dry, so humidifiers must be used.
A good option is pallets with pebbles, expanded clay, into which water is poured. The pot with the orchid is placed on pebbles (not in water) so that the plant is in comfortable conditions.
Spraying phalaenopsis is allowed, but moderately and only in the first half of the day. During the procedure, it is important that water does not linger in the axils of the leaves, at the point of growth, otherwise the plants will rot. In the summer, containers with water are placed near the orchid pot.
The premises are regularly ventilated, preventing drafts from entering the plants.
The best temperature for Phalaenopsis is from +24ºC...+29ºC in summer and +17ºC...+25ºC in winter. Plants do not have a pronounced dormant period; to stimulate the formation of flower buds, the temperature will need to be slightly reduced to +17ºC. The phalaenopsis is kept in this mode for 2-2.5 weeks, until the formation of buds begins.
It happens that the temperature in the room has dropped. A short-term change in indicators for phalaenopsis (for 1-3 days) to +11ºC...+15ºC is not so critical, but you must still try to prevent this. When the temperature drops for a long time, diseases occur and the plant may die. One of the common mistakes of novice gardeners is intensive watering of an orchid that has withered from the cold. When the temperature drops, the root system of the plant loses its ability to absorb nutrients and moisture, the leaves lose turgor and wrinkle. Increased watering leads to a worsening of the situation, the roots rot and the orchid becomes difficult to revive. Therefore, you always first need to find out the reason for the deterioration of the flower’s condition, and only then take some measures.
First watering
When growing Phalaenopsis, follow the watering regime. The first time after purchase, plants are not watered immediately, but after adaptation. In this case, it is necessary to inspect the roots of the plants and the substrate, removing all moisture-intensive materials from it.
Orchids of this species love moderate watering, tolerate short droughts, but suffer from irregular moisture supply. The optimal watering regime is selected taking into account the room conditions, temperature, humidity, time of year, as well as the condition of the plants themselves.
Schedule (approximate):
- in summer - once every 3-4 days;
- in winter - once every 10-14 days;
- in autumn and spring - once every 6-8 days.
Use clean, filtered, slightly warm water. Orchids are watered in the first half of the day so that by evening the plant dries out slightly. It is best to water an orchid by placing the flower pot in a bowl of water. Time – 2-3 hours. During this period, the bark of the substrate will be saturated with water, the roots will “take” the required amount of moisture.
Another option is to place the pot in a sink or basin and gently water the substrate for 12-15 minutes. The excess drains into the pan, then the pot is returned to its usual place. In order to accurately determine that phalaenopsis needs watering, inspect the roots of the plant and the substrate. The pot has become light, which means it’s time to water the orchid, but strictly observing the norm. Also, the need for watering is indicated by a change in the color of the flower roots; they become light gray or silver.
Important!
The orchid should not dry out completely! A slightly moistened substrate is a guarantee that the plant will not experience discomfort or lack of moisture.
Excessive moisture leads to rot and plant diseases. Therefore, compliance with the norms and watering schedule is a prerequisite for the normal growth of phalaenopsis.
Place for a flower. Lighting and temperature
After purchase, you need to inspect the pot for drainage holes, and repair them if there are none.
If the flower is healthy with lush green leaves, you should not disturb it by replanting it. Let him first adapt to new conditions.
The quality and life expectancy of phalaenopsis depends on the location and lighting. Due to the entry of light into the plant, the necessary reactions occur that ensure growth, an increase in leaf density and the quality of the peduncle.
It is ideal to place the flower next to a window facing east. A window facing west or south will have to be curtained in spring and summer. If the window faces north, place the pot directly on the windowsill. In cold weather, it is a good idea to provide the plant with additional lighting.
In order for phalaenopsis to actively develop, the lighting duration must be at least 12 hours. The color of the leaves will tell you about successful lighting. Dark green means there is not enough light. The reddish tint of the leaf will indicate excess lighting. When the phalaenopsis finishes blooming, it can be moved to another place, avoiding direct sunlight. If the orchid does not bloom again for a long time, you should increase exposure to light.
From time to time the pot needs to be turned on the other side. Otherwise, the orchid will bend, because it reaches for the light. The main thing is not to touch it when buds are developing on it. After all the buds have bloomed, the tropical guest can choose a new place.
As for the temperature regime, the exotic beauty grows calmly at our usual home temperature. The exception is cold places - window sills and verandas. When the temperature drops below 15 degrees, flowers and buds will fall off, and the leaves will begin to wither. You should carefully monitor the temperature of the flower to prevent death of the root system.
How to replant phalaenopsis correctly?
After purchasing a flower in a store, it must be replanted. By acting carefully and following simple recommendations, the transplantation process will not take much time, and even a blooming orchid will not feel any stress.
Basic Rules:
- The pot in which the phalaenopsis grew in the store must be changed.
- The old soil is inspected; if it is suitable for cultivation, it is used again, mixed halfway with the new substrate. Be sure to remove plugs, tablets of moss, peat or foam rubber.
- The best substrate for growing orchids is bark and peat, bark and peat moss. Specialized stores sell ready-made soils for orchids:
- Take a new pot of the same size or slightly larger in volume. It is advisable to use transparent plastic containers, as the roots of the plants are visible in them.
- The flower container is disinfected: washed with soap and water and dried. It is advisable to calcinate the substrate in the oven.
- Before transplanting, carefully examine the roots of the phalaenopsis. Armed with a sharp knife, remove all deformed, black, weak roots. The sections are disinfected with an alcohol-free antiseptic.
- Dried and withered leaves are removed by carefully cutting them and removing them from the stem.
- Place the orchid in a new pot, choose the best position (take into account the growth point), sprinkle with substrate.
Attention!
If the plant stem is slightly bent, do not straighten it. This is the specificity and peculiarity of the growth of a particular specimen, so let it continue to grow like this.
- After proper transplantation, the phalaenopsis stands firmly and firmly in the pot and does not lean to the sides.
- The plant is placed in moderate shade so that it takes root in its new location within 7-10 days. Water no earlier than every 4-5 days.
- Fertilizing with fertilizers is done after 10-12 days.
You may be interested in: How to care for orchids in a pot after purchase Why the leaves of an orchid wither and how to save it Features of the care and propagation of the Dendrobium Nobile orchid
The detailed recommendations for replanting Phalaenopsis after purchase are also suitable for regular planned plant replanting. It is carried out once every 2-3 years, choosing the most optimal time. This is usually spring, when the flower grows roots and new leaves, so transferring it to a new substrate will be less painful.
When to replant an orchid:
- after the purchase;
- when the roots of the plant are damaged (usually occurs due to excessive moisture);
- when the pot becomes too small for the root system of the flower;
- to replace the substrate.
The substrate for orchids must be loose, with a certain level of acidity, balanced in salt content. A change in the structure of the soil leads to a loss of its beneficial properties, the roots of phalaenopsis do not receive the required amount of moisture, the water stagnates, which leads to infections.
For substrates use:
- crushed bark (sizes 1-2 cm);
- coconut chips;
- sphagnum (no more than 18-20% of the composition);
- dried fern roots (no more than 18-20%).
From ready-made soils, “Durpeta”, “Compo Sana”.
When transplanted, the roots of the plant are very intertwined. To better clean them from the old substrate, the plant roots are immersed in warm water to soak. Then, after examining and removing dry and old roots, the orchid is dried for several hours and only then transplanted into a new container.
Proper care
Dwarf orchids, being much smaller in size, have some special features in caring for them and creating comfortable growing conditions for them.
Soil and container
Unlike other members of the orchid family, this plant requires different soil components. For large varieties, bulk substrates containing a large number of components are collected. For small flowers, different soils are selected in proportion to their capacity.
Soil composition:
- Sphagnum moss;
- Fine pine bark;
- Fine charcoal.
It is not difficult to choose a container for this variety. You can do it yourself. A small plastic bowl would be a great solution.
It is important to create good aeration conditions for the substrate by making holes in the walls and bottom
Temperature and lighting
For these varieties, a bright place is selected where direct sunlight does not constantly fall, as this harms the flowers and leaves. Burns appear very quickly and the foliage turns yellow.
The east and west sides of conservatories and rooms are best for placing these little beauties. If the dwarf orchid is located differently, then shading or diffused lighting is created.
Temperature conditions are very important for dwarf Phalaenopsis orchids. The temperature all year round should be maintained in the range from 17 to 29 degrees. Higher and lower temperatures harm the flower and lead to serious diseases, such as rotting and atrophy of the roots, and loss of the leaves' ability to photosynthesize.
Popular articles How quickly porcini mushrooms grow after rain
Watering and humidity
Phalaenopsis mini does not tolerate low or high humidity levels, as they lead to death, therefore, constant humidity should be approximately 60%.
Watering this variety of orchids depends on how quickly the substrate dries out, which must have good drainage properties. Also, it depends on how large its volume is. Typically, watering once every 5-7 days will be sufficient.
There are several additional watering options:
Bathing in the shower. Many gardeners claim that this is the best way to care for mini orchids. The water temperature should not be higher than 40 degrees, and the water should not be hard. Bathing lasts 10-15 minutes. After completing the procedure, excess water is allowed to drain and the remaining water in the axils of the leaves is wiped off to avoid rotting.
Mini Phalaenopsis cannot tolerate stagnant air, so the place where the orchid is placed should be well ventilated.
Transfer
Replanting mini orchids is carried out once every 2 years when there is no more space in the old bowl and aerial roots have begun to appear.
The flower is carefully pulled out of the pot, the roots are cleaned of the old substrate, and the dried ones are cut off. Watering after transplantation is carried out a week later. It is also worth changing the temperature and lighting mode downwards.
Conditions under which an orchid will bloom
Seeing a blooming phalaenopsis in a store, many, without hesitation, buy this luxurious flower. But after a while, when the plant fades, after a period of dormancy, it can be difficult to achieve repeated flowering.
Even for the fairly unpretentious Phalaenopsis, certain conditions for flowering must be created.
- Moderate regular watering. The substrate is watered only when it dries out, avoiding excess soil moisture. After the orchid has completely bloomed, stop watering for 30-35 days.
- Choosing the right place for the plant. It should be taken into account that orchids do not like “moving”, so starting from the moment of flowering, do not touch or rearrange the pot.
- Phalaenopsis will bloom only with sufficient light. The flower requires about 11-12 hours of light, so orchids blooming in winter must be illuminated with phytolamps.
- Growing phalaenopsis in ceramic pots is not allowed. The roots of the plant participate in the process of photosynthesis; they need light. Select special transparent plastic containers through the walls of which light enters the root system. In addition, roots do not grow to plastic surfaces, which avoids deformation.
- Consider the age of the phalaenopsis. The plant “throws out” the peduncle only after reaching 2-3 years of age. The number of leaves will allow you to determine how old an orchid is; if there are from 5 to 8-9, then you should expect a flowering arrow very soon.
- It is important to maintain a temperature that is comfortable for the epiphyte. But to stimulate flowering, it is useful to lower the indicators slightly (by 5-6 degrees) so that the plant is “scared”.
- A short cessation of watering has the same effect on phalaenopsis. A kind of stress will “force” the plant to throw out the peduncle.
- Like many other plants, orchids need feeding. It is advisable to purchase special fortified formulations for orchids, which contain all the elements necessary for normal growth and flowering.
And don’t forget to talk to your indoor flowers, create the most comfortable conditions for them, and take care of them. Then the phalaenopsis will definitely show all its beauty and splendor!
Planting and care
A florist who has decided to decorate his home with orchids must understand that this is a very delicate plant that requires special care rules.
- The orchid loves the sun, so it should be placed on the south side. The sun's rays have a beneficial effect on the flowering and beauty of the emerging buds.
- Ensuring sufficient watering, do not be too zealous. Twice a week is sufficient for the summer months; in winter, watering should be reduced to once a week.
- The flower also needs moisture, so regular spraying in summer will benefit it, but in winter the orchid does not need it.
- The orchid will be more comfortable in a transparent plastic pot; such conditions are most favorable for the roots. They need sunlight for the plant to develop properly.
- The preferred temperature during the day is from 22 to 25 degrees, at night - from 18 to 20 degrees. To create a cooler atmosphere at night, you can ventilate the room or turn on the air conditioner. In this case, a strong increase or decrease in temperature can have a detrimental effect on the flower. Thirty-degree heat is contraindicated for the plant, as is cold air (at 15 degrees Celsius and below).
- You need to be especially careful when choosing soil. There are two options - purchase a special substrate in the store or prepare it yourself by collecting all the components. For this you need moss, pine bark, fern roots, peat, sand, walnut shells, charcoal. This composition will be ideal for growing orchids. Moss and pine bark can be collected in spring. Both are easy to find at the base of the trees. Ordinary nutrient soil will not work in any case. It's too heavy for an orchid. Oxygen will not penetrate in sufficient quantities to the roots, so the death of the plant is inevitable.
- When everything is ready, you can plant the sprout using the right pot and soil. To do this, you need to make drainage holes, put a layer of drainage in the form of small pebbles, then pour in a little soil, carefully place the roots, pour soil on top again, and then water.
- To prolong flowering, you need to fertilize the orchid with potassium and phosphorus fertilizers, but this must be done on time. For example, a transplanted orchid cannot be touched for a whole month. No amount of fertilizer will do her any good. In addition, if the plant is weakened by disease or infested with pests, the problem must first be dealt with. At this time, feeding is also useless. The peak of active flowering is also not intended for manipulation with fertilizing. At other times, the plant needs to be fertilized. In this case, you should first water it well, and only then add useful elements.
- Another feature of the orchid is that it does not like moving in space. Therefore, you should not unnecessarily change its location or even simply move it, for example, during cleaning. If you still had to move the pot, you must then return it to its original place so that the plant is turned to the sun with the same side as before.
- If you do not pay due attention to the orchid and do not observe the correct conditions for its maintenance, the appearance of diseases and pests is possible, due to which the plant may be in danger of death. The pests that most often threaten orchids are scale insects. Their appearance usually occurs due to excessively dry air. In order to get rid of them, you need to buy special chemicals that are sold in garden stores. You can treat the leaves with a soap solution with added alkali if the lesions are not too severe. Aphids are also dangerous. It promotes the growth of fungi. There are also special preparations for such cases. At home, you can spray the flower with water and milk mixed in equal proportions.
How to propagate domestic Phalaenopsis?
If you want to get several plants of your favorite species, you will need to propagate phalaenopsis. Several methods are available:
- children;
- cuttings;
- division.
Each gardener chooses the most suitable option for him, taking into account the age and condition of the plant.
Propagation by cuttings
Propagation by cuttings is one of the simplest methods, for which orchid peduncles are used. After flowering ends, they wait time, and if a new branch with buds does not appear on the peduncle and it does not dry out, it is cut into cuttings (length - 4-6 cm). Each cutting should have a bud.
A special substrate is placed in the container (chopped sphagnum is suitable), moistened, then the cuttings are placed and covered with film. Place the container in a warm, well-lit place, periodically open the film, moisten the substrate, and ventilate the cuttings.
On a note!
For better survival, it is recommended to spray the cuttings in the greenhouse with special stimulants for the root system.
The cuttings will wither, and the buds will produce roots and leaves. As soon as the roots are about 4-6 cm long and two leaves are formed, the orchids are transferred to separate containers and a regular bark substrate.
Reproduction by division
It is not used as often as propagation by cuttings, since the plant experiences quite serious stress. Only healthy phalaenopsis, with a well-developed root system, at the age of 4-5 years are suitable for this method.
The orchid must have more than 6 leaves and aerial roots. The phalaenopsis is taken out of the pot, and the stem is carefully cut into two halves with a knife. All sections are disinfected using charcoal. Then each part is planted in separate plastic containers with finely chopped bark and sphagnum. Plants are not watered until the roots are completely dry. As soon as the roots of the orchid acquire a silver color, the substrate is moistened with settled water. Growth stimulants are added to the water.
When two leaves appear, the plants are transplanted into a regular substrate for adult orchids. With this method, the most important thing is to avoid excessive moisture in the roots of the plant, otherwise young phalaenopsis will rot.
Reproduction by children
Another simple way is to propagate phalaenopsis with the help of children. But this option will also require a plant over 3 years old, with well-developed leaves. In such flowers, babies appear in the axils of the leaves or on the arrows.
A slight drought (stopping watering for 8-12 days), as well as lowering the temperature by 8-10 degrees, helps stimulate the appearance of children in adult plants.
Important!
Plants at this time should receive good lighting (at least 12-14 hours).
The best time for reproduction by children is from early February to July. When you stop watering, wait until the roots turn white; this is an indication that the plant is lacking moisture. The bud is opened, removing its scales, coated with a special cytokinin paste, and covered with polyethylene to create a “greenhouse” effect. Then the baby is separated and planted first in a substrate for growing roots, and then in soil for adult plants.
It is advisable not to leave the baby on an adult orchid until roots appear, as the mother plant loses too much strength.
How to water a flower
Varieties of phlox with photos and descriptions
Phalaenopsis mix, like other epiphytic orchids, is watered mainly by immersion. The first watering, as we have already written, can be organized 2 weeks after purchase.
How to do it? You need to pour warm, clean water into some container, such as a basin. It is not recommended to use unsettled tap water. It is better to take filtered or even boiled. The water should be warm, but not hot. Place the pot with phalaenopsis in water, immersing it completely. You need to leave it there for 20 minutes, no more. This time is enough for the substrate to become saturated with moisture, but not to become too waterlogged.
Since the plant usually still blooms during this period, you need to do everything carefully so as not to damage or break the peduncle.
After some time, you can use another method of watering, called a hot shower. Phalaenopsis are very fond of this event, and it has a good effect on their well-being. To do this, hold the pot with phalaenopsis over the bathtub, and pour a hot shower on the leaves and roots from the side. The water temperature for this procedure should be sufficient. Hot, but do not burn your hands or cause discomfort. On average it is about 40-50 degrees. The time of such watering is no more than 5 minutes. Can only be used if the room temperature is sufficient, not lower than 22 degrees.
After each watering, regardless of the method, you need to check that there is no water left in the axils of the leaves. If it is there, then remove it carefully with a cotton swab.
Choosing fertilizers
Like any other indoor flowers, Phalaenopsis needs additional nutrition. Fertilizers are used for:
- formation and development of roots;
- formation of peduncles;
- lush and abundant flowering;
- increasing plant immunity.
The timing of fertilization depends on the condition of the orchid, as well as the conditions in which it grows. Approximate fertilizer application scheme:
- at the moment of bud formation (phosphorus-potassium compounds are added);
- a week after flowering ends.
In winter, as well as at rest, phalaenopsis is not fertilized. The usual feeding regime in summer is twice a month. After purchasing the plants in the store, they undergo a period of adaptation and quarantine, then the first fertilizing is applied with a decrease in the concentration of nutrients by 2-3 times.
There are a huge number of different types of orchid food on sale:
- liquid;
- in sticks;
- in tablets;
- in powders.
Experienced gardeners often use liquid preparations, strictly observing the dosage and reducing it several times so as not to burn the roots and leaves of the plants.
For phalaenopsis, leaf feeding (spraying) and root feeding are used. In the first case, the procedure is carried out in the first half of the day, spraying the leaves on both sides, as well as the aerial roots. Such fertilizers are effective for plants with damaged root systems and for orchids with chlorosis.
Root feeding is carried out only after watering; the orchid in the pot is immersed in a fertilizer solution, left for about 20 minutes, then removed and placed in a warm place for complete absorption of nutrients.
On a note!
It is not advisable to feed weak and diseased plants. The orchid is first cured, and only then fertilizer is applied.
Popular and proven fertilizer complexes for Phalaenopsis:
- Agricola is a well-known drug used for root feeding. The composition does not contain magnesium (this is a “minus”).
- BONA FORTE - promotes plant growth, strengthens immunity, lush flowering and bright colors of flowers.
- DOCTOR FOLEY is a preparation containing a full range of nutrients for orchids. Used in the budding phase.
- Greenworld (Germany) – a preparation for abundant flowering.
- Mister-flower-Orchid is a composition for flowering plants, used in the phase of laying flower stalks.
Nitrogen fertilizers should be used very carefully, as they promote the growth of orchid leaves, but do not produce flower stalks.
Possible problems and difficulties
Mini orchid is a plant that is sensitive to various diseases. She is attacked by pests, and if you do not notice their presence in time, she will die. More often she suffers due to improper care and viral diseases. To prevent it from withering away, they carefully monitor the conditions of detention, the color and color of the leaves, and the condition of the buds.
If the leaves turn yellow, pay attention to lighting and watering. They turn yellow due to excessive lighting and excess moisture in the pot.
Flowers fall off due to problems with air humidity, and leaves shrink because the roots do not receive enough moisture.
The dwarf orchid is a tasty prey for pests (ants, thrips, whiteflies, mites, cockroaches, nematodes, etc.). The main thing is to take action in time. They are dealt with manually, i.e. eliminate each individual pest by crushing or using special chemical solutions.
Flower growers are advised to check the presence/absence of pests daily. It is easy to prevent their appearance if you wipe the leaves once a week and water the soil thoroughly using the submersible method at least once a month.
The main problems when growing a plant
Phalaenopsis is adapted for growing at home; if all care rules are followed, it blooms long and profusely. But even experienced gardeners have problems cultivating this plant, and you need to know how to correct the situation.
You need to observe the plant, notice the slightest changes in the color of the leaves and roots. Improper watering, low temperature, and insufficient lighting of the orchid can be destructive. Its leaves and roots will tell you how phalaenopsis feels.
Specialized stores sell varietal phalaenopsis and hybrids. The latter are better adapted to the conditions of city apartments, have increased immunity, and are less likely to get sick.
Some problems of phalaenopsis and ways to eliminate them:
- Yellow leaves of an orchid. Reasons: overmoistening of the substrate, low air temperature, sunburn. It is necessary to create a temperature regime of +24ºC...+29ºC in summer and +17ºC...+25ºC in winter, adjust the watering schedule, and remove the plant to a slightly shaded place.
- Black spots on the roots. Reason: waterlogging. It is necessary to cut off all diseased parts of the roots with scissors, slightly dry the plant and replant it in a new substrate. Water the orchid only when the substrate dries out and the roots turn gray.
- Soft leaves of the plant, turgor disturbance. Reason: room temperature is too high, lack of fresh air. It is necessary to slightly lower the temperature, regularly ventilate the room, and use humidifiers or water trays in winter.
List of basic prohibitions when caring for orchids (what not to do):
- water the plants with tap water;
- water in the evening;
- constantly (several times a day) spray the plants to increase humidity;
- place new, just purchased plants next to already adapted house flowers (quarantine is required.
Among the diseases of phalaenopsis, we note various types of rot, anthracnose, and bacterial leaf spot. Most often, infections are caused by irregularities in care, non-compliance with the rules of watering and lighting the plant.
The biggest problem is the appearance of pests. And here we must immediately begin to take operational control measures so as not to lose the flower.
Types and varieties
Thanks to the efforts of specialists, many varieties of this plant have appeared. New varieties appear almost every year. They most often differ in the duration of flowering, as well as in the variety of colors. The most popular among them are “Mini-Mark”, “Hummingbird”, and also “Little Lady”. To have a better idea about these beauties, you need to get to know them better.
"Mini Mark"
This hybrid was the result of crossing a phalaenopsis with a Micro Nova mini orchid. The leaves of this beauty have a rather rich color; they are no more than 15 centimeters in length. On a small stem there are small flowers, up to 3 centimeters in circumference. Their color is white, with yellow or pink specks. In addition, the flower is complemented by a brown “lip”.
"Pink"
It is called so because of its color. This is one of the smallest varieties of orchids, which has leaves up to 8 centimeters in size. But the peduncle can be up to 18–20 centimeters. It contains approximately 12–14 flowers, which are very small in diameter, up to 3 centimeters.
"Luddeman"
This variety got its name in honor of the famous Parisian breeder Luddeman and it also belongs to mini-orchids. Its stem can grow up to 20 centimeters. It can simultaneously accommodate 7 striped flowers with a bright purple color. But their tips are colored brown.
"Multiflora"
These plants are distinguished by a large number of small flowers, the diameter of which is up to 6 centimeters. The size of the peduncle can be up to 20 centimeters. In addition, they can be branched, which allows you to admire a huge number of buds. The growth of peduncles does not stop even during flowering. When this plant reaches its peak, it is impossible not to admire its beauty, especially if it is not alone on the windowsill.
"Philadelphia"
This hybrid was obtained by crossing two varieties of phalaenopsis - “Shilera” and “Stuart”. It has green leaves with a silvery tint. From a distance they look like marble. Their flowers are placed on a peduncle that grows up to 18 centimeters in height. Most often they are purple in color, but they can also come in other colors.
"Hummingbird"
A distinctive feature of this mini-orchid is its unusual flowers, slightly reminiscent of an asterisk or a small hummingbird. Its peduncle is very small, up to 12 centimeters. However, this small stem perfectly accommodates several flowers, which can delight their owners for quite a long time, up to 35–45 days.
"Cattleya"
This small mini-orchid, which is quite popular among many gardeners, is perfect for growing at home. However, among this group stands Fr. It is distinguished by small dark green leaves, the length of which is up to 10 centimeters. But her flowers are quite large, up to 8 centimeters in diameter.
"Cymbidium"
This bright plant is the most unpretentious to care for. In addition, it has a very delicate and unobtrusive aroma. When an orchid blooms, it is impossible to pass by it and remain indifferent. The plant itself looks fragile. The peduncle grows surrounded by long and narrow leaves and is no more than 15 centimeters. But the flowers, whose diameter is no more than 5 centimeters, are quite diverse: both white and pink.
Orchid pests and methods of controlling them
A slowdown in orchid growth and deterioration in appearance are often associated with the appearance of pests. Plants at home are attacked by a variety of insects, and in order to quickly detect them and then start fighting, you need to constantly inspect the flowers, noticing all the slightest changes.
Among the most common pests of phalaenopsis, we note the following:
- aphid;
- whitefly;
- thrips;
- fungus gnats;
- root mealybug;
- mealybug;
- spider mite
In order to identify possible insects in a purchased orchid, the plant and pot are immersed in water. Leave for 4-6 minutes, carrying out a unique procedure for catching pests. Also, the flower should be kept for two weeks at some distance from other plants in the house (quarantine).
Aphid
Usually these insects are located in settlements on the underside of leaves. They feed on plant juices, causing the leaves and shoots to wither and lose their elasticity. Honeydew appears on the orchid, then a sooty coating.
Control measures:
- isolation of the affected plant from other flowers;
- washing leaves and shoots with soap;
- spraying the orchid with an infusion of orange peels (3-4 days);
- treatment of the plant with Fitoverm, Aktara (strictly according to the instructions).
Aphids spread quickly; if no action is taken, the pests will also “invade” other house plants.
Thrips
Very small insects with wings, the larvae of which feed on orchid juices. Californian thrips most often appear on house flowers, but there may also be other species (black, tobacco).
On a note!
Thrips are carriers of viruses.
Control measures:
- mandatory isolation of phalaenopsis;
- treating leaves with soap solution (especially in the axils of the leaves);
- treatment of plants with Vertimek.
Ticks (spider and armored)
Phalaenopsis is damaged by two types of such parasites living in the substrate. To avoid the appearance of ticks, it is necessary to use high-quality soil for planting, which must be calcined in the oven.
To destroy mites, orchid roots are immersed in water for 15-20 minutes so that all pests float to the surface.
Mealybug
One of the most dangerous pests of phalaenopsis, feeding on plant juices. It lives under the covering leaves, in the roots, and also under the scales of the flower. A characteristic sign of the presence of a pest is whitish powdery dust.
Control measures:
- spraying with Fitoverm;
- inspection of the plant and removal of clutches of pest eggs and larvae;
- wiping the leaves, removing all plant debris from the surface of the substrate.
Among the drugs suitable for treatment are Aktara, Vertimek, Calypso.
Whitefly
Yellowing and drying out of the green shiny leaves of an orchid is often caused by the appearance of dangerous whiteflies. A microscopic butterfly lays eggs on the plant, from which larvae emerge that feed on the orchid sap.
Control measures:
- treating the flower with soapy water;
- spraying for prevention with Aktara or Vertimek.
Most often, insects appear when the orchid growing conditions are violated: too high a temperature and high humidity. Adjusting watering and stabilizing temperature indicators will prevent pests from appearing on flowers.
Shchitovka
A rapidly reproducing insect that harms adult orchids. Colonies of pest larvae number up to 1500-2000 pieces, so quick and effective treatment is required.
Control measures:
- isolating the plant (placing it in a special greenhouse);
- treating plants with compounds containing garlic and soap, infusion of onion peels;
- spraying with Permethrin, Actellik, Aktara.
Reproduction
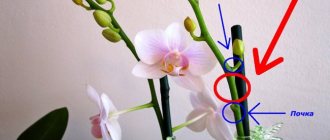
How often do they give babies?
- Babies appear on flower stalks. Healthy plants also produce good children;
- A leaf grows from a bud. And a little later, aerial roots;
- Only with their presence children are sent away.
The best varieties of miniature roses with photos and descriptions
Important! They do not appear so willingly or often. You can stimulate their appearance by cutting off the peduncle
And apply cytokine paste to the scaled kidney.
Baby phalaenopsis on a peduncle.
Methods
It is known that the vegetative method: seeds, division, apical cuttings.
You can propagate phalaenopsis yourself:
- And they do this by separating new side shoots. If they have grown to 5-6 centimeters. They are called children;
- Can be transplanted directly into prepared containers (pots). Cut plastic bottles are often used. With numerous holes;
- You can place them in special greenhouses with wet sphagnum moss. If they exist.
Remember! It is necessary to cut with a disinfected instrument (knife, scalpel, scissors).
Transplant from moss - carry out for phalaenopsis purchased in stores:
- You can implement it immediately;
- Or you can wait. Until it blooms;
- At the same time, ensure proper care.