The most popular species among orchids is dendrobium. If you provide it with proper care, it will decorate your home. But in addition to caring for the plant, you need to know the nuances regarding the propagation of this type of flower. If this is not done in time, the plant may die. The same applies to the phalaenopsis variety.
To propagate a flower, you need to know exactly when to carry out the separation procedure, what propagation methods are inherent in the plant, and how to plant a baby orchid. Additionally, it is worth inquiring about the rules for caring for the “sprout” during the process of development and rooting.
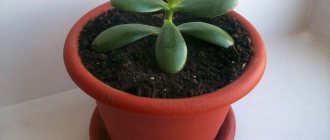
Beautiful view of a blooming orchid
Is it worth separating the root children of an orchid (video)
At first, it is better to place the separated baby in conditions of high humidity and heat.
It can be a greenhouse, a bag, an arboretum, a terrarium or an aquarium, but without inhabitants. So a young individual should grow throughout the year. Then it is transplanted into an adult substrate. In the future, it is necessary to care for a young plant in the same way as for an adult - to ensure high temperature, sufficient humidity, timely watering, and good lighting. If the plant has been planted correctly and will continue to receive the necessary quality care, then it will certainly take root and even, perhaps, bloom soon.
At first, it is better to place the separated baby in conditions of high humidity and heat.
If you do not touch the young plants at all and do not try to separate them, then the growth of foliage will stop, and the rapid development of the root system will begin. As a result, the children can produce flower stalks that will bloom with a couple of regular buds. In this case, you should wait until the young plant has flowered and gained strength, only then can it be separated from the parent individual
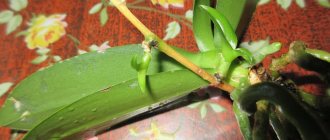
To understand that the baby is rested and ready for transplanting, you need to pay attention to the rhizome. It will begin to grow rapidly again
Symptoms and causes of the disease
Accurate knowledge of the causes of flower disease will help you understand how to save the orchid and provide it with proper care.
Orchid diseases:
- Problems with flowering. There are three main ones:
- doesn't bloom
- buds may wither or rot,
- Dark spots appear on the flowers.
- Various rots:
- Brown bacterial. In this case, the leaves begin to rot.
- Rotten roots. In most cases a transplant will be required.
- The leaves may rot and become covered with a gray or black coating - this indicates the presence of fungi.
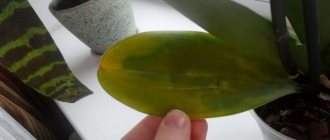
- Fusarium rot - leaves begin to turn yellow.
- Leaf diseases:
- Anthracnose. The leaves are infected by a fungus and become covered with small black spots. This happens due to stagnation of water in the leaf axils.
- Bacterial spotting. First, the leaves turn yellow, then they can rot, then they soften, crack, and can dry out and fall off.
- Leaf deformation, lost turgor.
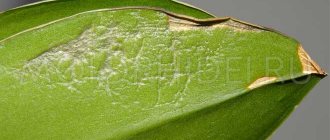
- Leaf burn. Often occurs in the summer. If you do not put the orchid in the shade in time, the leaves will die very quickly, forming holes at the burn sites.
- Powdery mildew. The plant becomes covered with a white coating and will soon die if no action is taken.
- Viral diseases. They do not manifest themselves for a long time, cannot be treated, and the flower will have to be destroyed.
Important! As soon as a virus is detected in an orchid, it should be immediately removed from other plants and destroyed. If watering is common in one container, then other flowers are probably infected.
In this case, they must be treated with antibiotics.
The causes of diseases can be:
- A virus or fungus can be introduced using tools.
- Overheat.
- Over or under watering.
- Incorrect amount of feeding.
- Parasites, insects in the soil.
- The substrate has not changed for a long time.
- Bad light.
How to get a baby orchid at home?
Let's find out how to make an orchid give birth to babies. The appearance of a young baby is always considered good luck for the gardener, as it indicates that there will be more orchid plants.
Flower growers sometimes sell the newly born orchids.
And that means you can have an extra child:
- Exchange for another variety;
- Or, after selling, buy yourself a new attractive copy.
IMPORTANT! 2-3 bushes of the same variety, planted in one container, when flowering, look like a beautiful tropical bouquet.
The necessary conditions
Many beginners ask the question: how to force a flower to produce a baby? The plant needs certain conditions in order for it to begin growing babies.
Also, two factors can influence the appearance of a young rosette:
- Ideal conditions for baby growth;
- Extreme conditions: before death, an orchid can also give birth to babies.
It is better not to simulate the second situation; this is an extreme case, which is necessary when resuscitating the plant. Let's consider the normal conditions under which a baby appears.
Temperature
The ideal temperature is considered to be in the range of 20-28 degrees Celsius. Deviation in any direction can provoke not the appearance of a young baby, but the death of the plant.
Indoor air humidity
Humidity should be high and reach 85%. If it is very hot outside and there is no precipitation for a long time, then you need to place containers with water between the flowers, and the water, evaporating, will increase the humidity around the plants.
Air humidity for orchids should be at least 70%.
It is important at this moment to monitor the amount of water in the containers and add it as it evaporates
Lighting
But if the temperature and humidity are ok, then how can you make the orchid give birth to a baby? The plant should receive a lot of diffused sunlight for 12-13 hours throughout the day.
Do not forget that direct sunlight can destroy the plant. And the lack of sunlight will delay the development of children. Therefore, it is necessary to choose the right lighting for the flower.
Watering
Watering the plant must be organized in such a way that the root system is dry for a couple of days between waterings. The orchid needs this for the process of photosynthesis, which involves not only the leaves, but also the root system.
IMPORTANT! In order for a plant to produce a baby, all these parameters must be observed, and then after flowering there is a possibility of a baby appearing.
Preparation - tools, soil, pot
To carry out the operation of separating a young plant, you should prepare:
- scissors, knife or pruning shears - they should be disinfected with alcohol, boiling water, or a strong solution of potassium permanganate;
- a small plastic pot in which the roots of the young plant can rest freely;
- soil filled with pine bark substrate with particles from 0.5 to 1.5 cm with the addition of sphagnum.
- Pour boiling water over the substrate to soak the bark and disinfect it.
- After cooling, the water can be drained.
- Place a 2 cm thick drainage at the bottom of the pot, pour soil on top so that the roots are placed on it, and the base of the leaves is 1 cm below the edge of the pot.
Video on how to properly immerse a baby orchid in the substrate:
Possible difficulties
If you are planning to separate and transplant a baby orchid for its further growth, then you should familiarize yourself with the list of the most common possible difficulties that you may encounter during such procedures.
During transplantation, the plant may contract an infection. This not only ultimately leads to the appearance of serious diseases, but even to the death of the flower. To avoid such a problem, you should use only sterile scissors, a knife and pruning shears when working with young sprouts. Many gardeners are faced with the rotting of this capricious plant. To avoid these problems, you need to let the baby lie in the air for a while (about 30 minutes). After this, the sections will need to be treated with ground cinnamon or wood ash. Please note that if you cut a sprout too early, it will simply die
It is easy to distinguish a baby that is not yet ready for separation; the main thing is to pay attention to the condition of its roots. If several children appear on an orchid at once, then cutting them all at once is prohibited. This is due to the fact that the mother plant may die from the damage received.
First you will need to separate only one baby. It will be permissible to plant the second one after the cut area from the first part is completely overgrown.
Possible problems and ways to solve them
- Long absence of children. If a healthy plant does not produce children for a long period, you should reconsider the environmental conditions and provide proper care, or, on the contrary, try to create a stressful situation.
- The young shoot does not send out roots for a long time. The shoot does not always produce roots. For their appearance, the following activities are carried out:
- take sphagnum moss, strong thread and cling film;
- moss is soaked in water for 30 minutes to swell;
- a nest is formed from moss, which is attached to the peduncle with the baby using a thread;
- wrap the nest with cling film to achieve a greenhouse effect.
Babies appear on a sick orchid. In case of such a problem, first of all, cut off the peduncle and place it in water with activated carbon. After the flower stalks wither, the young plants are transplanted onto moss.
Some experienced gardeners do not recommend growing roots using special methods, but advise waiting for them to appear naturally.
How to raise orchid babies?
Sometimes on mature, well-fed specimens, or rather on their peduncles, some time after flowering, a small baby forms from a dormant bud. This is explained by the fact that an unpollinated plant really wants to reproduce. And during the rainy season, which follows a period of drought in nature, where orchids grow, it produces shoots.
Accordingly, it is necessary to recreate natural conditions, that is, to stimulate the plant with frequent spraying and the correct (summer) temperature regime. It is mandatory to provide the plant with sufficient light, nitrogen fertilizers and moisture.
On a peduncle. Application of cytokinin paste
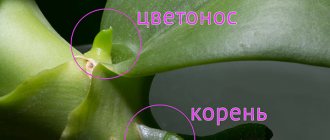
Babies usually appear on peduncles after flowering. It is quite simple to distinguish a baby from a flower arrow:
- the baby has a pointed tip, similar to a cone;
- The peduncle has a rounded, flattened shape.
If for some reason the plant refuses to reproduce on its own, and you, in turn, have done everything possible on your part, then you can push it a little. Cytokinin paste has proven itself to be a very effective remedy in this matter. This is a hormonal agent, a small amount of which is placed on the upper and lower dormant kidney.
Stimulation of a dormant kidney with cytokinin paste.
Important! You need to process no more than 3 buds on one flower. After the sprouts appear, the strongest one is selected, the rest are removed
If the plant is large, you can leave the two strongest growths.
Cytokinin paste can only be used on an adult plant over 3 years old with a developed root system and at least five leaves. Using the paste on young, sick or weakened orchids can lead to depletion and death of the plant.
On the stalk of a peduncle
If the plant is sick, young or weakened, but it’s a shame to just cut off the peduncle, then you can try to raise children from it:
- The peduncle is separated from the plant and cut into fragments so that each has a dormant bud;
- Pieces of peduncles are placed in water with the addition of activated carbon. You don’t need a lot of water; it is enough that the level is 1-2 cm above the cut of the peduncle. Change the water every 3-4 days;
- If the peduncle is small, then it can not be divided, leaving it whole;
- When the babies appear, spray them once a week with nitrogen fertilizers at half the concentration indicated on the package.
On the stump of a cut plant
Dividing the mother plant into two parts so that both have roots is also one of the options for producing a baby on the roots. It should be understood that only a fairly large, elongated plant with a large number of leaves and roots is suitable for this procedure.
The cut is made carefully, with a sharp, disinfected instrument - a knife or scalpel, being careful not to damage the roots. The sections are dried for 24 hours, treated with antiseptics, charcoal, fungicides or ordinary brilliant green.
The top of a strong mature plant can be cut off.
The upper half is planted in the substrate so that the cut does not touch it. The peduncle, if present, does not need to be removed. Place a piece of foam under the stump - this will prevent rotting. The lower half continues to be looked after as before. Of course, you need to water less, because the plant, consider it, has halved in size.
After some time, 1-3 or more babies should appear from the hemp. They do not need to be separated from the mother plant in order to obtain a lush bush in the future.
Advice! You can support the plants by spraying them with epin and/or zircon.
When to replant
Houseplants should be replanted in accordance with the natural cycle. With the arrival of spring, their dormant period ends. Orchids gradually enter a phase of active growth - the growing season. This process makes it possible to painlessly relocate indoor flowers, without fear of losing or delaying luxurious flowering.
The need for phalaenopsis and arboretum orchids to replace soil averages once every 2–3 years. The period depends on the quality of the soil mixture. The substrate, which consists mainly of moss, is depleted faster. In this case, the orchid is replanted after 1.5–2 years. The bark contains significantly more nutrients, so the shelf life of such soil can be extended to 3 years.
The signal for a change of “place of residence” is provided by aerial roots that seek support, rising above the container. The roots of an orchid huddled in a cramped container do not receive the required amount of nutrients.
Note! Such a plant looks depressed: the leaves become flabby and dark spots appear on them. Such a plant is unlikely to bloom
Transplantation in winter
As daylight hours shorten, metabolic processes in any plants gradually slow down. The flower enters the resting phase. It is not advisable to disturb the plant during this period. It should be replanted between November and March only in emergency cases.
The color of the roots of a healthy orchid is light green. If the color has changed, turned gray or brown, or some of the roots have noticeably dried out, this means that the plant needs to have its roots examined and possibly treated.
There are often cases when pests of indoor plants settle in a pot or spores of a fungal disease develop. Treating only the above-ground part of the plant with medicine is not enough. To get rid of pests, you need to do this:
- The flower is removed from the planting container.
- Inspect the roots, cut off the rotten, diseased and dried roots.
- The plant is treated with a fungicide or insecticide, depending on the lesion.
- The sections are disinfected (phytosporin, foundationol), the sections are powdered with crushed charcoal.
- The flower pot is disinfected and the drainage is changed if necessary.
- The soil for planting is replaced with a new one.
Dendrobium orchid
Replanting after purchase
For the first time, a flower is replanted after purchase. Transport containers for plants are too compact and are designed for short-term storage. Roots in containers quickly displace soil and grow through drainage holes.
For adult large plants, disposable containers are dangerous due to their instability. They can easily turn over, break the peduncle or damage the rosette with leaves.
Note! If you buy an orchid, you should also purchase a container that fits the size of the root system. Transplantation, if possible, is carried out in the spring or in the first half of summer.
Transplanting a blooming orchid
You should not replant a blooming beauty without good reason.
At the moment of flowering, all the plant’s energy goes into feeding the flowers, so careless injury to the root system can result in a long-term illness and even death of the flower.
Replanting a flowering plant is justified only in the following cases:
- disease damage (phyllosticosis, leaf deformation);
- spread of pests (mites, thrips, scale insects, nematodes, bedbugs)
- Root rotting due to stagnation of moisture.
In case of emergency transfer:
- Peduncles are shortened by 2–3 cm.
- To reduce the risk of damaging the roots, the plant and pot are soaked in warm water for half an hour. You can use a bucket or a tall basin; the water should cover the container with the roots by 2/3 of its height.
- If the roots fill the plastic pot, carefully break it and remove it, being careful not to damage the roots.
- The roots are inspected, pruned if necessary, and the sections are disinfected.
- If the reason for the transplant is a disease or pests, the rhizome can be kept in a bath with a solution of the necessary drug, and the leaves and peduncles can be treated with a spray bottle.
The plant must be planted in clean soil, having previously treated the planting container.
Sanitary pruning
How to grow at home: step-by-step instructions
Getting an orchid to produce a shoot and then taking it for planting is quite simple, but how exactly should this be done so as not to ruin both flowers? There are a number of conditions that must be met for a guaranteed result.
Preparation
To get a baby orchid after it blooms, you need to shorten the peduncle to the upper dormant bud a couple of centimeters above it.
Watering
Orchid is a tropical plant. For its normal functioning, you need to monitor the moisture content of the substrate and water it as needed. In winter and autumn, it is enough to water the flower once a week. In summer and spring, the frequency of watering is increased to 2 - 3 times a week.
For irrigation use settled water at room temperature.
During the hot season, it is important to organize a warm shower. To do this, place the pot with the plant in the bathroom and water it with warm water from the shower for 5-7 minutes.
This simple procedure promotes the birth of children.
Sometimes, to stimulate the appearance of young shoots, it is beneficial to arrange a “drought” - do not water the flower for 1.5 - 2 weeks.
Fertilizer
Dissolved mineral fertilizers are used as fertilizers. In such complexes all vitamins and microelements are maximally balanced.
Use fertilizers strictly according to the recommendations and scheme prescribed in the instructions. After most of the buds have bloomed, you should start feeding the orchid once a week. After flowering stops, feed the flower for another week. Then do not disturb or feed the plant for two weeks.
Prerequisites
The process of formation and growth of orchid babies is actively carried out when the following conditions are provided.
Air and water temperature
The ideal temperature for growing is + 27 – 30°C. But often, under ideal conditions, the orchid does not bloom and does not bear children. In this case, you need to ensure a temperature difference: +15°C at night, +30°C during the day.
The water temperature for irrigation should be higher than the air temperature. Under such conditions, there is the greatest likelihood of awakening the dormant flower buds.
Humidity
Sufficient humidity is a necessary condition for the birth of babies. The best results can be obtained by increasing the humidity to 70 - 80%.
You can create such humidity in a specially equipped greenhouse with lighting.
At the same time, it is important to regularly ventilate the greenhouse, since humid air increases the risk of bacterial and fungal infections.
Pot
The container for the orchid should be transparent, of optimal size and with a drainage system.
When can I expect results?
The formation of children is influenced by many limiting factors:
- ambient temperature;
- proper care;
- individual characteristics of the plant.
But usually, if all conditions are met and the necessary stimulating measures are taken, babies appear in 3 to 4 weeks.
When to plant?
The growth and development time of a baby on its mother is six months. During this period, a shoot is formed, leaves and roots grow, and it gains strength for independent life.
The baby can be transplanted into the ground after its roots reach 5-6 cm.
You can learn more about how to separate a baby orchid here.
Caring for a transplanted plant
In order for a small plant to take root, it must not only be planted, but also properly cared for.
Rooting baby
fully formed baby is separated and transplanted into a suitable substrate:
- from pre-boiled pine bark and cut into 1 cm pieces;
- sphagnum moss;
- charcoal.
All components are taken in equal proportions.
A layer of expanded clay is placed at the bottom of the cup. The roots of the plant are placed in a container and covered with substrate, shaking occasionally so that there are no empty spaces left.
Attention! Do not compact the soil mixture, as this can lead to breakage of the roots.
The grown orchid is transplanted into a larger container.
Features of watering
The transplanted children are watered on the second or third day , when the cutting has already been completed.
In the future, watering is carried out as the soil dries, but at least once every five days.
After planting the cuttings in moss, the plant is watered much less frequently, since this substrate has a high moisture capacity.
Top dressing
Feeding is an important point in how to care for a baby after transplantation. After the baby has started to grow, you can begin to feed it with a half dose of standard orchid fertilizer. A grown plant requires the same care as an adult orchid.
What is it baby?
How does she look?
If you do not remove the peduncle after flowering, then after some time (3-4 weeks) you can find 2-3 buds on it. This can either be a new peduncle sprouting, or a baby phalaenopsis, or keika.
By the appearance of a developing bud, it is possible to determine what will grow:
- if the sprout is pointed, this is a sign of the appearance of a peduncle;
- a round bud indicates the appearance of a baby, which over time forms a rosette very similar to the mother plant.
Where does it grow?
An orchid shoot can grow:
- on a faded peduncle, if it is not cut off after flowering;
- on the stem between the axils of the leaves of the plant;
- on the root collar.
When is it formed and how to get it?
At home, an orchid usually begins to reproduce in the spring: an increase in daylight hours gives a signal to the plant about the onset of a favorable period. At the same time, other conditions should also contribute to the formation of a healthy flower that can produce offspring.
- Warm and humid air with a temperature of 23-25C and a humidity of 60-80%.
- Good nutrition - regular feeding with special fertilizers for orchids. However, overfeeding the plant can lead to absence of flowering for a long time.
- Watering is plentiful, but rare. No more than once a week, a pot of phalaenopsis should be placed in a container of water and left for 20-30 minutes to saturate the flower tissues. It is also advisable to water the leaves from a watering can or shower. After this procedure, make sure that there is no water left in the sinuses.
- Good lighting, but in the absence of direct sunlight.
The orchid should bloom and have a peduncle, which should be cut to the top bud. The age of the plant is at least 2 - 3 years. If favorable conditions are met, sprouts can be expected to appear.
If the orchid does not produce children on the stem or other parts, stimulating measures should be taken to grow them; Here's how to do it:
- Light stimulation. In February-March, the plant is positioned so that the sun hits the peduncle for 5-6 hours a day. The plant itself should be protected from direct sunlight to prevent the leaves from burning.
- Provide a temperature difference: during the daytime – 23-25 C, at night – 15-17 C. Such conditions will be created if the plant is placed on a window on the east or west side of the house.
- Reduce watering by 2 times compared to usual. Stick to this regimen for a month.
- Do not apply fertilizer during this period.
Ideally, the plant has bloomed in the fall, rested and gained strength over the winter.
So, everything is done correctly, shoots begin to develop from dormant buds on the peduncles. The appearance of sprouts can be stimulated by:
- treating the plant with succinic acid;
- applying cytokinin paste containing growth hormones to the kidneys.
Radical, or basal, children are formed when the plant is in danger; it is impossible to influence their occurrence.
Possible problems with shoots
If these recommendations and rules are not followed, some problems may arise with the birth and raising of children, including:
- an adult orchid does not produce shoots;
- the shoots dry out directly on the mother plant;
- shoots refuse to grow roots.
Next we will look at these problems in more detail.
Do not form on an adult orchid
Under normal growing conditions, orchids tend to bloom and produce offspring regularly. If this does not happen, you need to reconsider the method of caring for the plant and make sure that all norms and growing conditions are met.
With proper care, orchids bloom profusely and regularly.
If there are no errors in care, then only then can a well-fed plant be stimulated by stress, for example, by sharply reducing watering for 2-3 weeks, or by using hormonal agents (cytokinin paste) for stimulation.
Dries directly on the mother plant
Drying of the baby by the mother plant is possible if it takes too much energy. For example, in hot conditions, at air temperatures above 28 ° C, orchids experience shock and begin to actively evaporate moisture in an attempt to cool down. At the same time, the mother plant may not be able to cope with the supply of moisture to the baby, and the latter dries out after the plastic substances are exhausted.
This is also possible if the baby is grown on a weak or diseased plant - it tries to survive by getting rid of everything unnecessary.
Refuse to grow roots
If the baby has formed and does not grow roots, pay attention to the air humidity around the plant. It should be as high as possible, preferably more than 70%
If it is not possible to maintain an optimal level of humidity, then the baby can be wrapped in damp sphagnum. Secure the sphagnum moss with thread or wire.
Step-by-step instructions for growing at home
In addition to growing babies on a peduncle, there are several other methods, and we will describe each of them in detail.
How are they formed naturally?
After the orchid finishes blooming, in order to grow a baby on the peduncle, it is necessary to recreate special natural conditions for the plant and create a little peculiar stress.
- The best time of year for growing babies on a peduncle is spring. Stimulation of the kidneys can begin as early as February, when daylight hours begin to gradually increase to 10 hours.
- By the beginning of spring, move the pot to a window on the west side. Thus, the plant will be exposed to sunlight for about 5-6 hours a day.
- It is also necessary to ensure sudden temperature changes. During the daytime, the temperature should remain at a level of +25 to +27 degrees, and at night drop to +15-17 degrees.
- Watering should be no more than once every 7-10 days.
- Until the bud wakes up, you should not fertilize or feed the orchid.
Can the culture produce keiki after stimulation?
If for some reason the orchid does not reproduce on its own, this process can be stimulated with a special means. Cytokinin paste has proven itself best in this matter.
The process of stimulation with cytokinin paste is as follows:
- First of all, you need to warm the paste to room temperature.
- Decide on the peduncle on which you want to raise the baby and choose the healthiest bud available.
- Disinfect the knife and use its tip to carefully separate the scaly skin on the kidney.
- Moisten the exposed area with water, and then, using a thin needle, evenly apply a small amount of cytokinin paste.
- The result should appear within two months.
You cannot process more than 3 buds on one orchid. If several babies appear at once, you need to choose the strongest one and remove the rest.
How to grow in water on a peduncle cutting?
This method is suitable for growing babies on sick, young or weakened plants. In this state, the orchid is simply not able to form a baby on its own, but this does not mean that you cannot stimulate this process. To do this you need:
- Separate the peduncle from the plant and cut it into separate parts so that each has a while.
- Fragments of the peduncle must be placed in water with activated carbon. The water level should be a few cm above the cut. It is necessary to change the water every 3-4 days.
- As soon as the babies form on the fragments of the peduncle, you need to start spraying them with nitrogen fertilizers. This must be done once a week.
How to get it from a part of a plant?
Another way to grow babies is to divide the mother plant into parts. The division occurs as follows:
The plant must be removed from the pot and properly shaken off the substrate. Then the root system must be soaked for half an hour in warm water. Next, the bush must be carefully laid out on a newspaper and, with a sharp, disinfected knife, cut off the upper part of the plant, capturing several aerial roots.
Please note that the cut part must have at least 5 leaves. All cut areas should be thoroughly dried and treated with activated carbon or regular brilliant green. The plant will dry out within 24 hours, after which the upper part should be planted in the substrate and a small piece of foam should be placed under the stump - this will help avoid rotting. The lower part is also carefully planted back into the pot and they continue to care for it as before, but by reducing watering the plant by half. After some time, babies should appear on the lower part of the plant. If there are about 3 of them, don’t hesitate to remove them and then in the future you will get a beautiful and fluffy bush.
Planting in an air greenhouse
Much more difficult than a regular landing. The greenhouse is created from a pencil and a plastic glass or bottle. Holes are made not only in the bottom, but also in the sides. The first are drainage, and the second are for pencils. Moistened soil from bark and moss is poured into the container, but a small amount of peat is added. A little space is left in the greenhouse.
The process is placed on a pencil. The root system should be in the air and only touch the substrate with its tips. The container is placed on a warm and well-lit windowsill. The shoot remains in the greenhouse until the roots grow to seven centimeters, and then it is transplanted into a regular pot.
If everything is done correctly, the baby will not only quickly take root and settle in, but will also quickly grow.