Orchids are sophisticated, delicate, exquisite and impeccably beautiful flowers that you can admire for hours. Given the variety of species, you want to have as many varieties of plants as possible at home to create your own mini-garden.
Of course, some gardeners in this case try to acquire more and more specimens, while others do everything possible to find out how to grow an orchid from a root, having the opportunity to grow flowers themselves.
This is a wise decision, because gardeners who have been growing plants for years must know not only how to care for them, but also how to propagate them at home. It must be said that manipulation is carried out not only by dividing the root, but also by cuttings and seeds. True, in the first case, you can wait for years for escapes, but you won’t get it. As for seed propagation, this is a very complex and labor-intensive process that even experienced breeders and biologists do not deal with.
The most realistic way to grow a flower is from the roots. You can, of course, try other methods, but they will not be touched upon in this article, because it is most realistic to propagate an orchid in exactly the manner presented.
Most often, gardeners breed the following types of orchids:
- Paphiopedilum;
- Cymbidium;
- Cattleya.
They are considered to be the best breeding breeds. True, if you wish, you can try to propagate other subspecies of orchids.
What is cutting?
Cuttings mean the division of a peduncle into several component parts, any of which, under specific conditions, can form a baby.
It is necessary to reduce the flower arrow at a time when it has completely faded. The length of the cuttings may vary. It is important to create the right environment for the cuttings. Initially, the scale that covers the dormant bud is removed from the section of the peduncle.
Then the shoot share is placed in a mini-greenhouse filled with wet sphagnum. The top of the greenhouse should be covered with a lid or colorless film. Rooting petioles is allowed in:
- cut plastic bottles;
- containers;
- zip bags;
- cake boxes.
Important! Rooting must be carried out at a temperature of at least +25° C during the daytime and +18° C at night, otherwise the dormant bud will not come to life. Suitable humidity in the greenhouse is 70%. The greenhouse must be ventilated every day and the plant must be irrigated to maintain moisture.
The required daylight hours at the moment are 14 hours. If there is little natural light, you should create a backlight. With proper care, after 2-3 weeks, new orchid plants will begin to rise from dormant buds
The greenhouse must be ventilated and irrigated every day to maintain moisture. The required daylight hours at the moment are 14 hours. If there is little natural light, you should create a backlight. With proper care, after 2-3 weeks, new orchid plants will begin to rise from dormant buds.
Possible mistakes when caring for an orchid
When caring for orchids, beginners may make some mistakes that lead to disease or death of the plant:
- replanting immediately after purchasing the plant: it is necessary to allow the plant to adapt to its new habitat, and only after about six months can the plant be transplanted into a new pot;
- incorrect pot and soil: you need a transparent pot with many holes and a special substrate consisting of tree bark;
- rearranging the orchid during flowering: it can drop its buds and stop blooming. The plant spends a huge amount of energy on the formation of peduncles, and adaptation to new conditions can interfere with the process of color gain;
- Wrong place for an orchid: the north and south sides are not suitable for the flower to grow properly. The best option is the eastern and western sides;
- non-compliance with the watering regime: frequent watering will lead to rotting of the roots, rare watering will lead to drying out. Good drainage is also necessary to prevent moisture stagnation;
- indifferent attitude towards pests. If the plant looks sick, which is manifested by changes in foliage color, rare flowering, and a general tired appearance of the flower, treatment of the orchid is necessary. There are special preparations against pests and diseases that can be purchased at any flower shop.
Further care
So, to the question “Is it possible to grow an orchid from a root?” we responded positively. Now we need to consider how to care for this plant in the future.
In fact, when you have already made sure that the flower has taken root and taken root, there is no point in additional manipulations. The care required is the same as for full-fledged adult specimens.
You must provide the flower with a light regime (daylight hours last about 8 hours), a temperature regime (the optimal temperature is 16–24 degrees), and a watering regime
The latter is extremely important, since these flowers do not like to be over-watered (the roots begin to rot), but when the substrate dries out this can lead to negative consequences
So you need to carefully monitor the condition of the soil, and it is better to pour water into a tray so that the flower itself takes as much moisture as it needs. And do not forget about the fertilizing that the flower needs for optimal growth and abundant flowering.
Is it possible to propagate an orchid using the air method?
Yes, definitely. But not all crop varieties can reproduce through aerial roots. Mostly sympodial species (in particular, the Dendrobium orchid) are capable of this.
The air outlets have pseudobulbs. This is a special thickening located inside the stems. Inside these formations there are buds that are at rest. To awaken a bud, you need to carefully bend the thickened stem, remove the required shoot (bud) and place it on a previously prepared moist layer of sphagnum in a planting container.
But for the normal growth and development of such a process, several conditions must be met:
- Be sure to build a greenhouse for the flower. You can simply cover the seedlings with a plastic cup.
- It is also necessary to find an additional light source, since the developing plant does not have enough daylight.
How to activate a dormant kidney
To provoke the appearance of roots on a leaf with a meristem, gardeners advise using one of several methods:
Using activated carbon and root former. After cutting, the leaf is dried for 8-10 hours. In the place where future roots appear, the leaf is smeared with “Kornevin”. After this, place the shoot in a glass with 1 crushed tablet of activated carbon. The neck of the sprout should be in water at a depth of 1 cm.
Using a substrate and a mini-greenhouse. A drainage layer (5-10 cm) is placed in a plastic container. Wet sphagnum moss is placed on top of the expanded clay. The drainage is filled with hot water. The sheet is laid on moss (no deepening is required). The mini-greenhouse is covered with film and ventilated daily.
With succinic acid. In 1 tbsp. Dissolve 1 tablet of succinic acid in warm water. You need to wipe the orchid leaf with this composition every day. The solution should be changed to a new one every day. When the first roots appear, the leaf is slightly deepened into water with the addition of succinic acid (1 tablet per 1 liter of liquid).
During the period of preparation for planting, you need to carefully ensure that no traces of rot or mold appear on the sprout.
The nuances of planting different types of orchids in the substrate
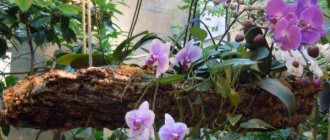
Most orchids are epiphytic plants that grow in nature without rooting in the ground. Some of the roots are attached to the tree trunk. The remaining roots hang freely in the air.
This is why ordinary soil mixture is not suitable for planting orchids. If you plant a flower in the traditional way, its roots will quickly rot. As a result, the plant will die. The composition of the substrate is selected individually for each variety.
Phalaenopsis, Cattleya
Typically, phalaenopsis and cattleya are planted in a pine bark substrate. For adult plants, a large fraction of the material is suitable. For young orchids, the bark is additionally crushed so that the size of the pieces does not exceed 1 cm in length. Today, flower growers have adapted to growing orchids in different ways, including using closed planting, when the container does not have drainage holes.
In this case, a large transparent glass flask is most often used. For a closed planting system, a slightly different substrate is used. In addition to pine bark, the following is added to the flask:
- perlite,
- pieces of sphagnum;
- charcoal.
Moss allows you to create air pockets inside, and charcoal prevents the orchid roots from rotting due to possible excess moisture. It is better for beginners to move on to using a closed system gradually as they gain experience.
Miltonia
Miltonia, according to experienced orchid breeders, loves denser soil, although it is also an epiphyte. The substrate for it consists of the following components:
- chopped sphagnum;
- crushed fern roots;
- loose turf;
- leaf humus.
All materials are taken in equal parts. As an alternative, you can use a substrate made from a mixture of equal amounts of peat and pine bark.
Cymbidium
An acidic substrate is suitable for cymbidiums. To prepare the mixture use:
- conifer bark (3 hours);
- sphagnum moss (2 hours);
- leaf humus (1 tsp);
- charcoal (1 tsp);
- perlite (1 tsp).
In nature, this plant lives in tree hollows or rock crevices, so for planting it is not necessary to use a transparent pot, as for epiphytic species, whose roots participate in photosynthesis.
Dendrobium
Dendrobiums like a loose substrate with an acidity of 5.5-6.5 pH. All materials must be sterile, this can be achieved by steam treatment. Substrate composition:
- pine bark of the middle fraction;
- sphagnum moss;
- charcoal;
- peat.
The components are taken in equal parts. At the bottom of the pot, drainage from expanded clay, vermiculite, large bark or pieces of foam is required.
Paphiopedilum (Lady's slipper)
Lady's slipper responds well to planting in a standard orchid mixture based on:
- pine bark;
- crushed sphagnum;
- charcoal;
- vermiculite.
Vermiculite can be replaced with perlite or coarse sand. Coarse pine bark is placed at the bottom of the pot. Some species require an additive to the substrate in the form of crushed shells. Replanting should be carried out annually, as the substrate quickly becomes salty and the plant begins to feel worse.
What kind of sprouts does Phalaenopsis have?
The orchid forms young shoots on peduncles, stems and roots. The reasons for their formation and developmental features are different.
Basal
On the root system, shoots are formed from dormant buds. A new shoot appears from the root, which eventually turns into a pseudobulb. A leaf mass subsequently appears on it, and the shoot becomes an exact “copy of the mother.”
On stems and trunk
A peculiarity of children grown on a trunk is the absence of roots. The shoot feeds from the mother plant; after separation from it, it is not always able to exist independently. If the grower does not take any action, over time there will be two plants in the pot. Gradually, the old part dies off, the shoot continues to develop and turns into an adult specimen.
For your information! Some experts argue that the appearance of such sprouts is a consequence of improper care of the plant. In this case, the flower, dying, tries to continue the race. However, practice shows that the offspring on the trunk and stem form a completely healthy plant. Most often this happens when the stem is injured or the growing point is damaged.
On the peduncle
The baby on the peduncles is formed from a waiting bud. As a rule, there are 2-3 buds on each arrow. But directly on the flower arrow, the baby develops from only one. The next ones can wait their turn; they begin to grow after the separation of the first one.
Growing an orchid from a root
Is it possible?
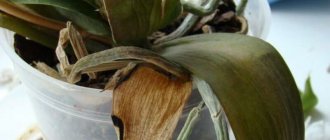
It often happens to gardeners that an orchid suddenly begins to shed its leaves and fade. Inexperienced people think that the flower is dead and rush to throw it in the trash. This should not be done; the healthy roots of this plant can be used as planting material.
It is only important that the orchid is not young, has grown and has a powerful root system. This way it is easy to grow a new flower to replace a wilted one.
You can easily get a new flower from an old overgrown orchid.
For reproduction
This type of propagation is applicable for orchids in which the root system has several pseudobulbs . It is excellent for varieties of orchids such as cymbidium, cattleya, and paphiopedilum.
Aftercare
After transplanting parts of the orchid into separate pots, you need to take care of proper care.
- Soil for replanting, as mentioned above, must be purchased at a specialized store. In this case, the gardener will not have to worry about choosing the right soil.
- At first, you will not need to feed the flower. In addition, it may even be contraindicated.
- For weakened roots that are just gaining strength, care should be the most thorough. The light on the orchid pot should fall diffusely.
- The room should be warm, the optimal temperature is +22 - 25 degrees.
- After planting in a pot, the young plant is kept under film for 30 days.
There are several ways to propagate orchids, including cuttings and babies. However, the simplest and safest of them is propagation through a peduncle.
Despite the fact that there are several types of orchid propagation, the vegetative method is used most often. It is also called asexual reproduction. The peculiarity of root division is that the flowers are genetically equal to the mother plant. If you strictly follow all the rules of care, then you can eventually get your own indoor garden consisting of orchids using this method of propagation.
When is a plant ready to reproduce?
The easiest way to plant an orchid outside natural conditions is with the help of a baby, a small peduncle that can grow on any part of the plant.
To see that an orchid is ready to reproduce, you need to know the structure of the tropical beauty and the young shoot.
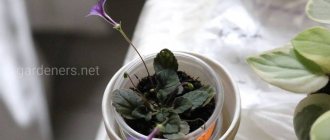
On the root
To understand that a new shoot has appeared on the root, you need to carefully remove the top layer of soil. It will immediately become clear that a baby has appeared on the main root, which must be separated from the main plant and sent to a separate pot.
On the trunk
The appearance of new life on the trunk (basal shoot) can occur for two reasons:
- with improper care, when a plant, dying, tries with all its might to leave behind offspring and produces a new shoot;
- If the stem is damaged or the growing point is destroyed.
It is not recommended to separate the young plant from the stem. Otherwise it will die. Therefore, two bushes of beautiful orchids will grow in a common pot. The main plant dies as a result, leaving room for new growth.
For information! The basal sprout does not have its own roots. It lives and feeds off the mother plant.
At the base of the root collar
Sometimes an orchid produces babies at the base of the root neck. They are separated and transplanted into separate containers. There is a certain procedure for separating them, which must be strictly followed so as not to damage either the mother plant or the young shoots.
What to do if they don't grow?
If the grower needs a baby, but Phalaenopsis is in no hurry to grow it, stimulation will be required. The flower needs to create certain conditions.
The appearance of a shoot can be influenced by two factors:
- Ideal conditions of maintenance and care.
- An extreme situation in which a culture “falls into panic” and seeks to grow its continuation.
Carefully! Modeling extreme conditions is a risky method. Events may develop in such a way that an adult plant dies, but does not sprout
Experienced flower growers advise using this method when the crop already needs resuscitation.
To stimulate the development of the process, the following conditions must be provided:
- stable temperature in the range of 20-28 degrees;
- air humidity - 80-85%;
- intense lighting (12-13 hours);
- watering and drying the substrate for 2 days.
Features of formation
When ideal conditions are created, additional buds are formed, which are dormant at an early stage. If, when ideal conditions are created, they are in no hurry to wake up, additional efforts are made to form:
- Using tweezers or a toothpick, remove the covering scale from the bud.
- Lubricate the green bump that appears with cytokinin paste. Every day, lightly spray the treated areas with water from a spray bottle.
- After 7-10 days, a shoot begins to develop in place of the bud. For the entire period of its formation, the temperature in the room is maintained at 27-28 degrees, humidity - 85-90%.
- As soon as the first roots appear, they are covered with damp sphagnum moss and wrapped in film.
Important! One of the main conditions for the rapid growth of babies from a dormant bud is regular feeding. The predominant substance in fertilizers is nitrogen
How to choose a suitable plant specimen?
First of all, the orchid must be completely healthy and at least 5 years old. This time is necessary for it to become overgrown with young shoots of young pseudobulbs, with the help of which reproduction will occur.
The more shoots, the more successful the propagation of the flower will be. The plant must not be affected by harmful insects or be in the post-resuscitation stage of recovery.
Pseudobulbs in an orchid.
The leaf mass must be healthy and not damaged by fungal or infectious diseases . The healthier the flower, the more successful its reproduction will be.
It is best to start propagation 2 weeks after flowering ends. And it’s better if it’s spring, when all the buds are awakening and reproduction will be easier.
IMPORTANT ! All flower stalks after flowering are removed with disinfected pruning shears.
Aerial roots
Main role
In orchid plants, this section of its structure performs the main functions:
- They supply the flower with nutrients obtained from the surrounding air;
- With their help, the flower is attached in its natural environment to tree trunks or stones;
- Fully participate in photosynthesis.
When they die, the flower begins to devour its leaves to grow new roots.
Aerial roots are very important for the existence of orchids.
When do they appear?
Aerial roots appear in a plant due to improper care for the following reasons:
- in summer, at high temperatures and high humidity, they begin to grow and crawl out of the container where the flower is planted;
- with excessive watering, the lower part of the plant experiences difficulties, and in order not to die, the flower grows aerial;
- when there is a lack of water, the flower looks for it on the surface, trying to survive;
- if the substrate is too dense, the root mass is starved from lack of oxygen and aerial roots grow from the stem.
IMPORTANT! There is no need to fight with aerial roots, you just need to find the mistake in care and correct it.
Further difficulties and problems
Difficulties and problems with division can arise due to incorrect actions of the grower. Therefore, it is worth considering the most common mistakes when transplanting orchids and how to eliminate them:
Incorrect landing time. It is worth propagating the flower using roots in spring.- Incorrectly chosen method of reproduction. In this case, you need to focus on the flower. If the plant is strong, strong and overgrown, then division by roots is the most suitable method of propagation.
- During the period of active flowering of orchids, reproduction is not carried out. The same prohibition applies if leaves form on the plant.
- If rotten roots are noticed, they are removed.
- If you do not treat the cut areas with charcoal, the plant will get sick and soon die.
Which orchid variety is suitable for growing at home?
There are about 20,000 varieties of orchids in the world. This beauty cannot be called an unpretentious houseplant, since in our climate you can try to breed about a dozen species, and all the rest can only survive in greenhouses.
Phalaenopsis is an optimal variety for home growing, as the flower comes in the most incredible colors and remains in bloom for a long time.
If you decide to try other varieties of orchids, pay attention to the following options:
- Dendrobium blooms for about a month and requires relative coolness.
- Cattleya prefers warmth, but not heat. Its flowers can reach about 20 cm in diameter.
- Zygopetalum is a flower with fragrant beautiful inflorescences of 2-3 shades. He cannot stand the scorching rays of the sun.
- Vanda has a strengthened root system and loves shade. The inflorescences are large, and as they increase in size, they become brighter.
All these types of orchids are a little more “complicated” than phalaenopsis, so it is better for beginners to practice with them
General rules for growing plants
Regardless of how it was decided to breed an orchid at home, it is necessary to adhere to rules that will help in the process not to ruin the source material and young growth.
These rules are as follows:
- The roots are cut only with a sharp and disinfected instrument (hydrogen peroxide, manganese or alcohol are suitable for these purposes).
- The roots must be handled extremely carefully, otherwise the orchid will be left without a root system.
- All sections are treated with charcoal powder.
- The planting substrate must be moistened with clean and filtered water.
- Maintain temperature and light (should be warm, humid and light).
- Watering is replaced by spraying.
- Reproduction is carried out only in early spring.
If you decide to start growing an orchid from the root, you will have to work hard.
Features for some species
Cymbidium
This terrestrial epiphyte is replanted every 3 or 4 years. The procedure for propagation and planting is carried out immediately after flowering. One of the important conditions for reproduction is the presence of at least 6 pseudobulbs in Cymbidium. The plant is divided into sectors of 3-4 pseudobulbs with leaves and roots, dead roots are removed and planted in a new container with prepared soil mixture.
Cumbria
Cambria, like many orchids, has a negative attitude towards transplants. Planned replanting is carried out every 2-3 years, depending on the condition of the substrate.
Reproduction is carried out by bulbs. In this case, the bulbs are carefully separated from each other, trying not to damage the roots. If the roots are damaged, they must be treated with crushed activated carbon or cinnamon.
For good stability and rooting they should:
- Attach to the support stick;
- And do not water for a week.
Cattleya
The transplantation and propagation procedure is based on the same principles as for other species when dividing a bush. It is better to carry out this procedure during the period of planned replanting once every 2-3 years, during the period when active root growth begins:
- The plant is removed from the container;
- Soaked;
- Clears;
- And processed;
- Then the rhizome is divided so that each part has at least 3 bulbs;
- And after processing and drying, it is planted in a container prepared in advance.
Wanda
If in nature Vandas can reproduce not only vegetatively, but also by seeds, then under home conditions seed propagation is impossible. Transplantation is carried out in the same way as most orchids, once every 2-4 years.
The most effective method for planting Vanda is considered to be the separation of children, or, as they also say, basal rosettes, from the mother plant. Of course, it is best to perform this procedure during a planned transplant:
- Using a sharp, disinfected instrument, the baby is separated from the “mother”;
- The cut areas are treated with crushed activated carbon or cinnamon (ground);
- The babies are placed in small containers with a substrate of bark, charcoal and sphagnum moss;
- A support is installed for the vertical position of the children in the container and a greenhouse effect is created (mini greenhouse);
- Ventilation and removal of condensate are carried out daily;
- Periodically, as necessary, the mulch layer of moss is sprayed;
- Once the roots grow and the young plants become stable, the greenhouse is removed.
Dendrobium
Reproduction of Dendrobium even in a natural environment does not cause difficulties. Therefore, there are many ways to reproduce it. Under natural conditions, it is capable of reproducing from broken small fragments if it lands in a fertile place.
At home, it is best to plant it using vegetative methods.
Children
The baby, very similar to a small copy of the adult plant, emerges from a bud formed at the very base of the stem. This serves as a signal to produce offspring. There is an opinion that after several such cycles of breeding offspring, the mother plant begins to die off. You can see the baby in the photo, we will tell you step by step when to separate her from her mother.
Baby on the dendrobium.
As soon as roots of 3-5 cm in size appear on the baby, it can be separated with a piece of the trunk and placed in the substrate, then creating a small mini-greenhouse.
Advice! Experienced gardeners recommend planting simply in sphagnum moss.
Dividing the bush
An adult, sufficiently expanded Dendrobium orchid can be divided, thereby obtaining several copies. Moreover, such specimens will be adult plants.
The division process comes down to:
- Removing the main bush;
- Cleaning and processing of the root part.
The plots are made in such a way that each has at least 2 stems and young shoots. Do not forget to treat the cut sites to avoid infection.
Cuttings
It is possible to plant this type of orchid with stem fragments that have several internodes. These fragments should be laid on damp sphagnum or sand. Having created a greenhouse effect, good lighting, temperature, wait for the babies to appear.
Then the children are seated in a permanent place of growth. Many gardeners use transplantation using the cutting method.
When to replant a young orchid
Having decided whether it is possible to grow an orchid from a root and having completed the manipulation, you should know when to transplant the flower. At home, the procedure is carried out once every 2-3 years, but this does not apply to young plants. A flower planted in a small pot can grow out of it quite quickly. Therefore, it is better to take care of the manipulation in advance. Having assessed the condition of the plant and realized that it has become sufficiently strong, you can start replanting .
It is done like this:
- The substrate is wetted to make it easier to remove the orchid from the flowerpot.
- The flower is placed in warm, settled water so that the roots become slightly wet and saturated with moisture.
- The condition of the roots is assessed. If there are rotten ones, they are cut off. The same applies to “incompetent” pseudobulbs.
- In a new larger flowerpot, drainage is poured at the bottom, and then soil. The flower is carefully placed in the pot, the roots are carefully laid out, and then they are covered with substrate.
If some of the roots remain on the surface, there is nothing wrong with that. You shouldn't force them in, they might just break.
Important! The transplanted orchid is placed in a cool place where it will undergo an adaptation period.
During this time (which is about two weeks), the flower should not be fed or watered abundantly. After this, the plant can be returned to its original place.
Orchid propagation is a labor-intensive process, but a real one. It largely depends on the original plant specimen. If the flower often gets sick or other problems arise with it, then it is better to abandon the idea. Otherwise, there is a possibility that the manipulation will be successful, and the grown orchid will delight you with its beauty and grace.
Growing a new plant from old roots
The most simplified vegetative method of propagating orchids is to grow new bushes on old roots. The essence of the method is to divide the root. This method is practiced for older plants that are quite large and overgrown.
The plant is slowly lifted above the pot, shaking a little, freeing the roots from soil particles. Using a sharpened knife, divide the rhizome into parts, leaving 2 pseudobulbs on each, or better if there are 3 of them.
To prevent disease, the sections are powdered with cinnamon or fine coal. Each part of the root is planted in a separate pot filled with a suitable substrate. The pots should be watered moderately, or better yet, sprayed twice a day until full leaves and roots appear. With their appearance, you can be sure that the plant has taken root.
Reproduction by division of roots.
Methodology
Orchids that have a sympodial growth form can be propagated by division. This is a simple method, it is practiced in relation to plants that have two or more growth points, from which sprouts and then pseudobulbs are then formed. The number of pseudobulbs directly affects the success of rhizome division. This is how they reproduce:
- lelia;
- miltonia;
- cymbidium;
- odontoglossum;
- dendrobium;
- oncidium;
- Cattleya.
Attention! There is no need to divide the rhizome into too small parts, otherwise you will have to wait a long time until a full-fledged plant grows.
How to obtain and prepare the root
The roots of the orchid are quite fragile, so you need to release them from the pot very carefully along with the soil ball. Afterwards, the rhizome should be slightly shaken so as to free the roots from the substrate.
To divide the rhizome, you need to use a sharp knife or pruning shears; the tool must be disinfected.
There should be several pseudobulbs left on each cut part, otherwise the new bush will take too long to grow. Cuts must be immediately treated with crushed charcoal or cinnamon to avoid the plant being damaged by disease or pests. After processing, parts of the rhizome are ready for planting.
Ways to save a plant that has rotted
If the rhizome is completely rotten, there are several proven ways to grow it.
Grow in a greenhouse
This option is suitable if the phalaenopsis has at least a few healthy root shoots left. You must first lay expanded clay on the bottom of the container, then moss. All this is abundantly moisturized. The orchid is placed on the finished substrate and covered with film. In this state, ideal parameters of temperature and air humidity will be created, due to which the roots will begin to actively grow.
Soaking and drying
To implement this method you will need the following items:
- transparent container (choose a size so that the orchid fits completely into it);
- water (you need to take settled or boiled water);
- "Kornevin";
- sugar (can be replaced with honey).
Rooting algorithm:
- pour a small amount of water with Kornevin and sugar into the container;
- place the phalaenopsis in the water so that the plant is no more than 1 cm deep in the aquatic environment;
- After 5–6 hours, drain the water and dry the culture completely.
Repeat the procedure daily until the roots begin to grow.
Reconstitute in water
To grow roots, the orchid is placed in water. But for this, the plant must first be prepared as follows:
- remove the crop from the flowerpot;
- clean well of soil residues;
- rinse the root system under running water;
- remove all affected parts with a sharp knife (it is treated with a disinfectant in advance);
- treat the cut areas with crushed coal or ash (if they are not available, use cinnamon);
- dry for several hours on a paper towel.
Then the phalaenopsis is placed in settled water (a root growth stimulator or sugar can also be added to it).
Above the water
An ideal option for those plants that are left completely without rhizomes.
In addition, after transplantation, phalaenopsis quickly takes root and takes root.
To build up the root system, take a transparent container with settled water. Lower the orchid with its foliage down so that the leaves are half in the water. Place a crushed activated carbon tablet into the water. Spray the upper part of the phalaenopsis with settled water every day.
Fast with fertilizers
The extension method is suitable for weak and sick phalaenopsis. The option promotes not only the growth of new roots, but also the restoration of the entire plant. Succinic acid or a vitamin cocktail are good for extensions.
The vitamin cocktail is prepared according to the following algorithm:
- vitamin B1 - 2 ml (1 ampoule);
- vitamin C (ascorbic acid) - 1 tablet;
- warm water (no more than 35 degrees, otherwise vitamin B1 will be destroyed) - 1 liter.
Spray the entire plant with the prepared solution, making sure to wipe the leaf blades. Also, phalaenopsis is dipped into the solution every day (5-7 minutes is enough).
Read about other feeding methods used for phalaenopsis roots here.
On moss
In this case, greenhouse conditions must be created for the orchid. An old aquarium, plastic container or bottle will do. Expanded clay is placed at the bottom of the container as drainage, then sphagnum moss is placed, which is moistened with the Kornevin solution. Place the plant on top and cover the container. The moss should be moist throughout the growing process, but water should not drip from it.
In the substrate
Suitable only for those phalaenopsis that have at least two roots of at least 2-3 cm each left. Place the plant in an orchid substrate and do not water it for the first three days. After this time, pour with succinic acid, and after drying with the Kornevin solution. Wipe the sheet plate with a solution of succinic acid throughout the entire time.
On a piece of bark
The purchased bark is pre-soaked for two days. Soak the base of the phalaenopsis for a few minutes in a growth stimulator, and then attach it to the bark (using thread or rubber band).
Place the bark in dry moss at an angle. Keep the bark moist at all times. If it is dry, remove the plant and soak it in water again. Thanks to this method, roots will appear after three months.
How to do it yourself?
Once again it is worth recalling that in this way you can propagate a stronger plant. The young orchid will not withstand such stress and will die.
Removing the plant and selecting the desired part of the rhizome
- The flower along with the roots is removed from the pot.
- The roots are cleared of the earthen lump.
- Now the rhizome is cut off with a well-sharpened knife.
- There should be 2-3 pseudobulbs left on each site proposed for planting.
In the case of very small division, the result may be negative; such sprouts simply will not be able to gain strength and will die.
Treatment of the cut area
It is best to treat each place where the cut was made with cinnamon, this way you can protect the orchid from various diseases and pests. Another method of processing slices is more common. This is sprinkling them with charcoal.
Planting new fragments in another container
The soil into which parts of the flower will be transplanted is no different from the one where the orchid grew in the past. Of course, ordinary soil will not work; you will need to purchase soil from a specialized store, preferably one intended for orchids.
In order for the orchid to grow actively and not be susceptible to disease, the base of the soil during replanting should be a mixture of peat, coconut fiber and small pieces of pine bark. Each pot is filled with an earthen mixture, into which the separated roots are then planted.
Planting an old flower in the same pot
The main part of the plant, on which the pseudobulbs remain, is planted in its original place. But at the same time, care for this part of the orchid should be special. Here are some tips for caring for your flower:
- The root portion should not be planted in the same way as a mature plant.
- The root part is placed in a moist earthen area.
- In this case, the plant must be sprayed regularly.
- The root can become very weak; to revive it, take a regular bag and sphagnum moss.
- It is placed in a bag, and the rhizome is placed there.
- After young shoots appear, the root can be planted in its original place.
- Don't forget about watering.
First watering
After the transplant has been carried out, watering is not necessary. The period of no watering is 10-14 days, that is, until new leaves and roots appear. Instead, parts of the orchid are sprayed and placed in a shaded area. In this case, the humidity in the room should be slightly increased. As soon as the gardener notices that the plant has adapted, the pot can be moved to its original place.
How to save an orchid that has rotted:
Roots
It is very important to start the resuscitation process as early as possible, this will increase the chances of saving the orchid. In order to choose the optimal restoration method, it is necessary to carefully examine the roots and determine the extent of their damage:
- Green color indicates a young root system; they will be elastic and dense;
- The main sign of the onset of rotting is the darkening of the roots, the appearance of mucus or moisture on them when pressed.
If there are rotten areas, they must be:
- Remove thoroughly to stop the process of spreading to healthy roots;
- Then the remains should be sprinkled with activated carbon or cinnamon;
- After the remaining roots have completely dried in the air, it is recommended to treat them with special fungicidal agents.
Important! In order to increase the chances of root restoration, it is recommended to feed them with mineral fertilizers.
There are several main ways to resuscitate an orchid:
Using a home version of a greenhouse. To do this, use a special container, which can be made from an ordinary plastic bottle. Expanded clay is placed on the bottom and the dried and disinfected substrate is filled in. Next, the orchid is placed there and the following conditions are observed: Temperature within 22-28C; Humidity not less than 70%; Lighting for 12-14 hours a day. Such criteria must be observed until new roots of about 3 cm appear. The duration of plant revival depends on the degree of damage to the root system. Most often, after 2 weeks in such conditions, you can see signs of new roots. If they grow up to 5 cm, then the orchid is transplanted into a regular pot and the usual care is continued;
If the roots of a flower are completely rotten, you can restore them by placing the orchid in a container of water
It is very important that the leaves remain completely dry. Keep the plant in water for at least 6 hours a day
To speed up the process of nucleation of new roots, you can add a little honey or sugar to the container with the liquid.
The duration of resuscitation depends on how damaged the roots were. In some cases, recovery is possible in a month, while in others it takes more than a year.
Therefore, it is very important to be patient and fulfill all the necessary conditions to save your favorite orchid.
Advice! In a flowering orchid, it is first necessary to determine the degree of damage to the root system. Then choose the resuscitation method that suits you: a mini-greenhouse or placing it in a container of water.
Above ground parts
In this case it is necessary:
- Remove all rotten areas;
- Dry the orchid well;
- Treat with antiseptic and fungicide.
If most of the roots remain unaffected, then it is recommended to simply transplant the flower into another pot.
In this case, you need to use a fresh substrate, which has previously been well dried and treated with disinfectant solutions. It is also necessary to provide the following mandatory conditions of detention:
- Temperature up to 25C;
- Humidity not less than 70%;
- And bright light for at least 12 hours a day.
It is important to remember that you need to avoid excessive nighttime changes in temperature and humidity. This will allow the orchid to recover faster and throw out new roots.
Watering is carried out when the substrate is completely dry. This is best done by immersing the pot in a container of water for a short time. After 7-30 days, you can observe the appearance of the rudiments of new roots.
Method of propagating an orchid by rhizome
First you need to remove the flower from the pot and inspect the roots. It is worth noting that only “aged orchids” are suitable for breeding . Young plants should not be taken because they may die.
Important! Each new divided root should have at least 2-3 pseudobulbs.
And then do everything in the following sequence:
- The flower is carefully lifted above the flowerpot and shaken a little so that the excess substrate that remains on the rhizome falls off.
- Use a sharp knife to separate the roots. Take only those with pseudobulbs.
- After carrying out the separation procedure, the sections must be sprinkled with charcoal or cinnamon.
- Each individual root is transplanted into a new pot with fresh soil.
Next, it is very important to monitor the spraying. Experienced gardeners recommend performing manipulations several times a day until the first strong roots and leaves begin to appear.
Their appearance will indicate that phalaenopsis not only began to grow, but also began to develop.
Some gardeners, having studied a large amount of literature where it is written how to propagate an orchid by roots, begin to actively use all methods, separating the rhizomes of all plants. This is not worth doing, especially for fun. It is best to carry out propagation manipulations with those plants that are more than 5 years old.
The reason is that such flowers are quite strong, they have a well-developed root system, they will not get sick and the likelihood of their death is minimized.
In a similar way, you can grow an orchid in the case when the flower becomes crowded and young pseudobulbs appear above the soil mixture.
By the way, an orchid that has already dropped flowers is also suitable for propagation. In this case, they divide the old pseudobulb, and then place it on top of the soil, without deepening the shoot into it.
Important! During this period, the pot with the new pseudobulb must be placed in a room with average humidity and air temperature at +20..+22°C.
After a while, you can notice that those buds that are located at the base of the pseudobulb begin to develop a root. From this point on, the seedling can be transplanted into a new pot. Gardeners say that this method of propagation is most suitable for Oncidium and Cymbidium.
Regardless of which method was chosen, it is very important to transplant into fertile soil. Moreover, if for adult specimens the soil can be prepared independently, then for “kids” it is advisable to buy a store-bought ready-made substrate.
Young plants should not be fed. Very great importance is given to the temperature regime. So, the room temperature should be +22..+25 °C. There can be no talk of any changes or temporary cooling. If the room is colder, it is better to create a greenhouse and provide the flower with diffused light. For these purposes, it is worth using fluorescent lamps.
It must be said that growing phalaenopsis in this way can take up to a year.