Calla or Zantedeschia is a very popular plant that first appeared in South Africa, and nowadays can be found among many summer residents on their property. This plant is popular not only as an open ground flower, but also as a houseplant. Externally, the plant resembles a wide clearing, since wide and large leaves fill a fairly large area, where up to 10 flower stalks grow, which are fragrant with magnificent flowers similar to water lilies. The color palette of flowers is varied, since you can find buds not only in classic white, but also in yellow, pink and dark purple shades, because it all depends on the plant variety, especially since the variety is huge. How to care for calla lilies, plant and propagate this plant correctly, so that owners and guests can enjoy the magnificent flowering for a long time. We will consider all the secrets, nuances and features step by step below.
Origin of calla lilies
Calla lilies came to Europe from the tropical regions of South Africa, where they grow wild in swampy meadows, along the banks of lakes or rivers and reach very large sizes.
Flowers can be divided into 2 groups:
- white, the origin of which is established from the Ethiopian calla lily, voluminous bushes grow up to 1.5 m in height;
- colored, of various bright colors, bred from the pink-red variety Remani and the yellow-golden calla Eliott. The height of their bush is approximately 0.5 m.
Description and characteristics of the flower
Calla is a greenhouse or wedding flower that, with careful care, will decorate any corner of the house. For home cultivation, snow-white or colored varieties are usually used. And it is called wedding because of its widespread use in making bouquets for brides.
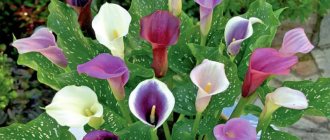
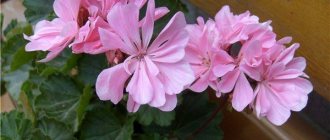
The stem is tall, rich green. Depending on the variety, the flowers are white, pink, purple, burgundy, yellow or black.
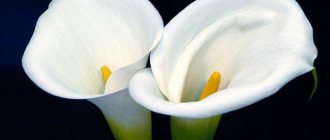
Indoor callas are a low shrub with heart-shaped dark green leaves and tall peduncles, turning into a tubular single-petal inflorescence with a bright yellow cob inside. The sail-shaped petal gently covers the cob, making the flower look elegant and beautiful.
Types and varieties
All calla flowers, regardless of the variety, look unusual in appearance: on the arrow, 50 to 80 cm long, there is a yellow peduncle, similar to a candle, it is enveloped by only one funnel-shaped petal, which is called a veil. Very small inflorescences are located on the peduncle and emit a very subtle sweet aroma (growing in open ground).
The first group is rhizomatous ; their root system has neither nodules nor bulbs. White Ethiopians are very moisture-loving; they do not shed their large glossy leaves even during the dormant period, so the plant always remains decorative. They have high lighting requirements during active growth and the dormant period.
Their most common varieties are:
- Green goddess - up to 90 cm high, giving green bedspreads of unparalleled beauty;
- Pearls - bushes up to 0.5 m high;
- Nikolai - tall, with dark leaves, the cover is green below, gradually turning into white.
Plants of the second group are bulbous .
Green goddess
Black and purple
Chameleon Indian summer
Black-eyed beauty
Vermeer
From the Remani calla series, the varieties that are most in demand are:
- Evening - with a satin bedspread of an unusually beautiful black and purple color;
- Chameleon - low bushes, peach-colored cover with golden tints;
- Indian summer - these calla lilies have a garnet red cover.
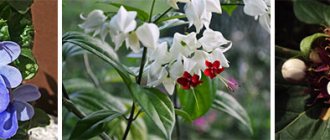
The most popular varieties from the Eliott calla series (these varieties have spotted leaves):
- Black-eyed beauty is a cream-colored flower with a slight lemon tint;
- Vermeer - has a slightly corrugated cover, white with streaks on the outside and red-lilac with a transition to dark purple inside.
Flowers of Death
You can often hear that callas are the flowers of death. The sources of this opinion are unknown. According to one version of its origin, calla lilies are often brought to funerals in some countries. Therefore, they began to be called the flowers of death.
But in real life they have nothing to do with death. In many countries, these flowers are a symbol of love. They are often used when making wedding bouquets in European countries.
Ensuring proper fit and care
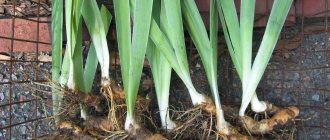
Flower growers who already have their own planting material and dig it up for the winter, take out the tubers after winter storage and carefully examine whether they are healthy. A disinfection procedure is required - soaking the tubers in a manganese solution for several hours.
Next, they are planted in containers slightly larger than the tuber size. It is not recommended to place them immediately in pots that are too large; in this case, all their growth energy will be directed to the development of the root system.
Calla lilies like soil that is sour or slightly acidic; the following composition would be best suited for them:
- sand – 1 part;
- peat – 1 part;
- leaf soil - 1 part;
- turf soil - 2 parts.
It wouldn’t hurt to add a little superphosphate and complex microfertilizers to the soil you prepare yourself.
Having placed the treated tubers in the prepared soil, place the containers in a bright place, start watering after a week, make sure that the soil is always moistened, but you should not get carried away with excessive watering. In 15–20 days the buds will wake up and begin to grow. With the appearance of leaves, you need to water abundantly (taking into account good drainage).
You should try to ensure the daytime temperature is within 20–23°C, and the night temperature is 15–18°C.
If the flowers have been stored and transplanted into new flowerpots, they should be brought into a warm, bright room in early or mid-March and started to be watered, thus interrupting the dormant period. Flowers need to be accustomed to sunlight gradually.
During the growing season, callas require a lot of diffused sunlight. It is better to protect the plant from direct rays. The ideal place for it would be a windowsill, where the sun hits only in the afternoon.
Watering for growth and flowering requires moderate but regular watering. In hot, dry summers, the volume of watering will need to be increased. The large leaves of the flower evaporate a lot of moisture, and daily spraying will only benefit them. It is important to prevent water from getting on the bedspread.
Considering the origin of white callas, they are provided with abundant watering. And yet, water stagnation should not be allowed.
If fertilizer was not added to the hole before planting, during the growing season the flower can be fertilized 1 or 2 times a week with complex fertilizers for flowers.
The fertilization period should be stopped after flowering, at which time watering is significantly reduced.
How to care for calla lilies
In order to provide callas with the necessary care, you should control the degree of lighting, temperature, humidity level and the quality of the soil in which the plant is planted.
- The soil. Of course, fertile and fertilized soil is the best option for any plant, and the presence of a large number of earthworms promotes natural loosening and oxygen circulation even at a decent depth.
- Watering. Callas are considered a moisture-loving plant, but, like most other flowers, they do not tolerate stagnation or excess water. Therefore, adhere to the rule: it is better to have little and often than a rare abundance of moisture. Control the quality of watering, as the soil should be moist, but not wet.
- Feeding. Garden callas should be fertilized twice a month. The best fertilizer option would be complex preparations for corms, as they are as balanced as possible. During the flowering period, an extraordinary fertilizing with potassium should be applied, as 20 grams of this substance will improve and prolong flowering. Remember that a high nitrogen content in fertilizers harms the plant, since the effect is aimed at leaf formation, and not at flowering, so excess nitrogen can destroy flowering.
The final stage of caring for calla lilies will be the removal of peduncles after flowering, as well as digging up tubers or rhizomes for propagation and new planting next year.
Purchased planting material
For those who have just decided to get this exquisite flower, planting material can be purchased in flower shops from the end of February.
Calla lilies tubers
When purchasing tubers, it is important to pay attention to appearance:
- The density, elasticity and freshness of the root (reminiscent of young potatoes) will indicate their healthy condition Purchased in this condition, they will throw out an arrow - a peduncle - in the year of planting. It is better not to purchase wrinkled, limp tubers;
- The larger the tuber , the more arrows it will produce. The best sizes to buy are over 7 cm in diameter.
After you bring the tubers home, they should be laid out in a cool place for a couple of weeks until the dormant period ends. In the middle - end of March, the dormant period is interrupted, the tubers are planted in pots for seedlings.
The flower must be planted correctly, the tubercle on the tuber should be located at the top.
How to achieve flowering
In a home environment, callas bloom twice a year - in spring and autumn. If flowering does not occur, or it is too sluggish, it is necessary to look for the reasons. Why doesn't calla lilies bloom? To make the plant bloom regularly, you need to follow these recommendations:
- For better flowering, the shoots formed at the base of the plant are systematically removed.
- Often the lack of flowering is caused by improper winter maintenance. In this case, it is necessary to organize a period of rest by stopping watering.
- Approximately every three years, the tuber is divided before planting. This technique is needed not only to propagate the plant, but also to obtain abundant flowering. Otherwise, many small shoots will appear that do not form inflorescences.
- Insufficient feeding and too frequent replanting can also cause a lack of flowering.
Thus, by following simple care rules, even residents of the northern regions can create a chic flower garden in their apartments. Flowerpots with stylish southern beauties will not only decorate the interior, but will also create comfort and lift your spirits.
It is believed that calla lilies are the keeper of comfort and a talisman for successful creativity. This flower brings peace and happiness into the life of its owners. Maybe that’s why calla lilies in a wedding bouquet are a symbol of mutual love and a happy marriage.
When is the right time to replant calla lilies?
The first transplant can be carried out when the seedlings are well rooted. Plants are transplanted into larger pots.
Flowers grow quickly, so after each flowering calla lilies must be replanted, separating new shoots from the rhizomes and the formed nodules from the tubers. If this is not done, very soon the plant will not have enough air and nutrition, the leaves and flowers will become smaller, the calla will become weak and susceptible to disease.
Each time you need to replant it into a larger pot, preparing a special slightly acidic, well-fertilized mixture.
A flower purchased as a seedling in a store should be immediately transplanted into a larger pot, having prepared suitable soil for it.
Favorable location
For successful flowering and excellent reproduction, any plant must be planted exactly on that piece of land where it feels most comfortable. Garden callas are no exception. This is a plant that grows well, so it needs space, but at the same time, the best option would be a slightly shaded area where the sun appears periodically, and shade is not uncommon. The problem is that if calla flowers grow exclusively in a sunny area, this increases the green mass of the plant, but the number of flower stalks decreases significantly. But the presence of not constant, but long-term shade leads to the formation of more flower stalks, so the flowering turns out to be lush and very beautiful.
How is it possible for a flower to reproduce?
At home, the reproduction process is vegetative, that is, rhizomatous species reproduce by dividing the roots of the mother bush; in tuberous plants, young nodules are separated from the main tuber.
Reproduction by dividing the bush
When replanting a root in the fall after flowering, you need to separate part of the rhizome with the offspring from it and place it in a container with a nutrient mixture for rooting.
After this, transplant it into a separate pot with soil; there is no need to water it for the first week after transplantation, then you need to provide watering that does not allow the soil to dry out, and in the spring it can already be planted as an independent plant.
Reproduction by dividing the bush
Propagation by tubers
You can determine by the tuber whether it is ready for division: first, the small nodules are tightly attached to the mother bush. As the plant develops, the children develop isthmuses.
As they mature, the isthmuses become thinner and break off easily; only at such maturity can the bush be propagated and the separated parts grown as independent ones. If children are separated forcibly, by cutting them off, rotting may begin at this place.
Choosing a pot and soil
The pot plays a fairly important role in growing indoor flowers. If you are growing Ethiopian calla lilies, then you need to select a container that is large in size. If you use a small pot, in this case the calla lilies will not bloom. If you apply fertilizer in a small container, you will only achieve growth of the green part of the plant.
To plant one flower, select a container with a diameter of more than 20 centimeters.
When choosing soil for growing indoor plants, you should give preference to porous structures. This allows you to most effectively remove excess moisture from the pot and ensure normal breathing for the plant. In order for the plant to constantly grow, it is necessary to select the correct soil mixture. For this purpose, a special mixture is most often used, which includes garden soil, rotted manure, and sand. In this case, it is necessary to ensure the acidity of the soil.
With the correct selection of container and soil for calla lilies, its full flowering is ensured. This process also greatly facilitates the work of the gardener in the process of growing calla lilies.
What diseases are calla lilies susceptible to?
When the air temperature rises, inexperienced gardeners sometimes over-water the flowers; from such care they suffer from wet rot of the rhizomes or bulbs , and the bases of the leaves also get affected. The disease can quickly spread to neighboring callas, so the affected plant should be removed without delay. In order not to breed wet rot, it is necessary to regulate the air temperature and watering.
The plant may suffer from gray rot if the planting material has been infected. Before planting, preventive disinfection must be carried out.
Brown rot affects the flower when heavy watering is carried out with enhanced nitrogen fertilizers. When the disease appears, watering must be stopped, the layer of wet soil around the bush must be removed and covered with dry soil.
Features of transplantation
If the flower is damaged or too weak, it is not replanted. To ensure the most comfortable adaptation of this plant to a new place, soil is used, which in its composition is very similar to natural soil.
Before transplanting this plant, its roots are washed.
To avoid damage to the flower, the procedure is carried out as carefully as possible, otherwise incorrect behavior with calla lilies will lead to its infection with various diseases.
A small amount of soil is poured into the new pot, on which the flower is placed. But this does not mean the end of the transplant. The roots of this plant are sprinkled with the substrate as carefully as possible. After this, the calla lilies are watered. This plant is quite demanding of abundant watering. It is also necessary to apply this procedure to sprouts. These measures should be applied without overdoing it.
Pest protection
Spider mite
If unnaturally twisted leaves are noticed on the plant, and the flower is covered with a sticky coating, aphids have begun to attack the calla lily . If they are detected, you will need to treat them with a chemical preparation against aphids, or try to fight them using one of the traditional methods: spray or thoroughly wash the leaves with a solution of laundry soap.
Calla lilies also like to be attacked by spider mites , which can only be detected after tiny yellow spots or dried areas of leaf plates are noticed on the leaves. To prevent mites from appearing on flowers, calla lilies must be doused with water during dry periods. If a mite has already appeared, treat the plant with Fitoverm or Vertimek.
Fertilizers, pests and diseases
During flowering, the plant needs feeding with solutions of organic and phosphorus fertilizers. More nitrogen fertilizer is required during growth. There is another important point that should be taken into account - the less light and heat the plant receives, the less fertilizer needs to be added to the soil.
Often tuberous callas suffer from aphids and spider mites . At the same time, the flower begins to turn yellow, the leaves curl and die. The insectoacaricide Fitoverm will help revive the plant. The drug is of the third class of danger, therefore suitable for treating indoor plants.
Bacterial rot, which sometimes affects the plant, is very difficult to treat. Measures to counteract this disease are mainly preventive - systematic treatment of tubers for the purpose of disinfection. What to do if rot has already affected the plant? It is necessary to remove damaged stems, bulbs and roots, then treat the flower with an antibacterial drug and replant it in fresh soil.
Some useful tips
- Callas begin to produce leaves only after their underground part has formed - in healthy tubers, the first foliage appears two to three weeks after planting; in weak plants, you will have to wait a month or more for the leaves to appear. You should be patient so as not to tear the hole in order to spy on the development process;
- With the appearance of young greenery, it is important to start spraying the plant, otherwise the edges of the leaves will dry out and the plant will lose its high aesthetics;
- When replanting, you need to dig up the tubers very carefully, otherwise they can be easily damaged.
Growing calla lilies in the garden
Flowerbeds with calla lilies invariably attract attention. Elegant, majestic flowers can decorate even the most sophisticated garden. These plants are no longer exotic in flower beds. Many gardeners grow them on their plots.
We recommend viewing: Zamioculcas (Dollar Tree) - home care, transplantation
Calla lilies should be planted in an open and well-ventilated area. Calla is a flower that loves light very much. It is worth remembering that direct sunlight can harm the crop. Ideal planting conditions are a shaded location in the sun, but well lit. Bushes and crowns of trees and shrubs will help cope with this task.
Callas grow well in acidic fertile soil; take care of an effective drainage system.
Landing
The area where you plan to plant callas needs to be dug up. This procedure is carried out in one of the autumn months. Ash and humus added to the soil will ensure more efficient development and growth of the plant. Repeated digging of the soil should occur in mid-spring, when you are preparing to plant the plant. After the snow melted, most of the beneficial compounds were washed out of the soil. Take care to apply mineral fertilizers.
Before planting, calla tubers are disinfected in a solution of potassium permanganate. If during inspection, pockets of rot are found, they are cut out. Injured areas can be painted over with green paint. This is one of the best remedies for fungi. It is also practiced to plant calla lilies with seedlings. In this case, flowers are planted in small pots a month before the planned planting. And when it gets warmer outside, they are planted in open ground using the transshipment method.
Holes for planting are arranged at intervals of 30-40 cm. Their depth should not exceed 10 cm. Immediately after planting, the soil is well shed. The flowerbed is not watered for at least two weeks. Before forcing the greens, the tubers consume very little water.
After disembarking, you should be patient. Calla grows and develops, but this process is hidden from human eyes until the sprouts appear.
Care
Callas require regular moderate watering. Weeding is carried out as necessary. As a rule, fertilizing is not carried out. Flowers only need the fertilizer that is applied before planting. Irrigation with acidified water is sometimes practiced to maintain pH. Most often, a weak solution of vinegar, malic or citric acid is used. Under no circumstances should you use electrolyte that has been drained from the battery. The soil will be hopelessly poisoned by heavy metals.
LiveInternetLiveInternet
Tuesday, January 23, 2022 12:13 + in quotation book 1.
Calla is one of the most elegant plants from the Araceae family that blooms indoors. Its “folk” names: whitewing, arum. It is native to the swamp forests of South Africa. In nature, there are 8 types of calla lilies, which are divided into 2 groups: tuberous and rhizomatous. In addition to the type of root system, they differ in the size and color of the spathe (varieties of tuberous callas have different colors, and rhizomatous calla lilies bloom mainly with white flowers). Of these, the following are suitable for growing at home: • Calla Ethiopian (Zantedeschia) is the largest species cultivated in indoor floriculture. The large leaves are heart-shaped. Blooms with funnel-shaped white flowers. Unlike colored callas, during the dormant period it retains its leaves and remains green. The most popular varieties: Green Goddess, Pearl, Nikolai, Childsiana; Albomaculata. • Calla Eliot reaches a height of up to 50cm. It has large variegated leaves and a yellow flower cover. Famous varieties: Black-Eyed Beauty, Yellow Corner, Vermeer, Black Beauty, Captain Chelse. • Calla Remani is a compact tuberous species (up to 70 cm in height). On its basis, varieties with red, pink, purple, and black shades of bedspreads have been bred. Popular varieties: Chameleon, Evening, Indian Summer. Anneke, Black Forest, Bolero. Callas in pots, caring for them at home, which is not as difficult as it seems at first glance, still requires a special approach. In order for them not only to grow, but also to bloom in indoor conditions, the gardener is required to create an optimal combination of conditions that are most similar to natural ones. Calla lilies: care at home - propagation, transplantation Reproduction At home, calla lilies are propagated mainly vegetatively. In Zantedeschia, the rhizome is divided into parts. Each of them must have at least one kidney. The sections are dried and dusted with charcoal powder or disinfected with brilliant green. The division of rhizomes must be carried out at least once every 4 years. Otherwise, small lateral shoots will form around the mother bush, which will not produce flowering. After this, the divisions are planted in a separate pot. In colored calla lilies, daughter nodules are separated from the mother nodule. 1.
An overgrown calla tuber is ready for division. Propagation by seeds is the most difficult method. This is due to their low germination percentage. If you manage to get ripe seeds, then before planting they must be soaked in a growth stimulant (Kornevin, Epin, Heteroauxin, Etamon, Zircon), and then left to germinate in a warm place on a damp sponge or gauze. After the seeds have hatched, they can be planted in the ground. However, another difficulty arises here: planting material often rots. To reduce losses to a minimum, it is better to moisten the sprouts not from above, but through the wick. Plantings are grown at a temperature of +22ºС. Seedlings sprout 2 months after sowing. Transplantation Calla lilies are replanted annually in the spring after the end of the dormant period. At the same time, you can divide the rhizomes or tubers. Use pots that are wide and not too deep. At the bottom, drainage up to 5 cm thick is required. Calla lilies are planted in pots no deeper than 5-10 cm. For colored calla lilies, the selected tubers should be elastic, lively, with smooth yellowish skin. Before planting, it is recommended to soak them in a weak solution of potassium permanganate or treat them with a fungicide. Sections of white calla lilies are planted at a depth equal to 3 times the diameter of their rhizomes. At first, you should not water the planting heavily - there is a high probability of rotting (it is better to spray it with a spray bottle). After the sprouts appear (approximately 14 days after transplantation), active watering and fertilizing begin. Callas in pots: care at home - soil, lighting, temperature and humidity, conditions for flowering Soil For tuberous varieties of callas, a suitable soil composition would be: leaf, turf soil, humus, coarse sand in the ratio 1:2:1:0 ,5. For rhizomatous varieties, you can use universal soil for flowering plants or replace it with the following mixture: equal parts humus, leaf soil, coarse sand, 2 parts turf soil, ¼ part clay. In both options, 1 tablespoon of superphosphate is added to 3 liters of total substrate volume. Lighting and location Callas need bright, diffused light. The duration of daylight hours should be 10-12 hours. In autumn and winter, it is necessary to provide additional lighting with an intensity of at least 700-800 Lux. A lack of light leads to a loss of decorativeness of the plant: the petioles of the leaves are elongated, there is no flowering, and the color of the bracts is observed in tuberous calla lilies. In summer, the best location for zantedeschia will be western and eastern windows. In winter, on the contrary, to receive additional sunlight, it is better to move it to the south side. Temperature and humidity For different types of callas, the temperature and humidity in the room have some differences. During the active growing season, rhizomatous plants feel good at +17-21ºС. After flowering during the dormant period, they are kept at +10-13ºС for at least 2 months. “White” callas need high air humidity (70-80%). To do this, their leaves are sprayed with soft water, the pots are placed on pallets with damp moss and expanded clay. It’s even better to use special air humidifiers. The optimal temperature for the development of “colored” callas will be +20-24ºС. During the “rest” of the plants, it is increased to +25-28ºС so that the tubers ripen and flower buds form. Tuberous callas require moderate air humidity (50-60%). Their leaves are wiped with a damp sponge every day. Conditions for flowering: why doesn’t calla lilies bloom? It often happens that store-bought calla lilies do not bloom at home. One of the reasons for this behavior is the disturbance of the “vegetation-rest” regime. Plants on sale are “pumped up” with phytohormones to maintain a presentable appearance. To send arum into hibernation, you need to reduce watering and place the pot in a cool room. Incorrect watering regime also “slows down” the beginning of flowering. Whitewing, as a tropical plant, likes to actively “quench its thirst” during the growing season. This is especially true for Ethiopian calla lilies. It is important to remember that you cannot water these “green Africans” with cold water - there is a high probability of rotting of the roots. It is better to use soft, warm (+20-25°C) settled water for this. Inappropriate pot size is another likely reason for the lack of flowering in calla lilies. This tropical plant grows quite quickly. When it becomes crowded in a pot, it stops growing and is in no hurry to delight with its elegant flowers. After a period of rest in the expanded “family,” it is necessary to separate the “babies” that weaken the mother plant and transplant them into separate pots. At the same time, the soil is replaced with fresh one. Incorrect feeding regime negatively affects the ability of calligraphy to flower. With an excess of nitrogen, the plant “fattens” - it develops leaf mass to the detriment of flowering. Therefore, it is necessary to apply phosphorus-potassium fertilizers, which are “responsible” for flowering. If the depth of planting a tuber or rhizome in the soil is insufficient, there is an active growth of lateral shoots. If they are not separated and replanted, there will be no flowering. Calla lilies: care at home - fertilizing and watering Watering Calla lilies also have different requirements for watering. Thus, “colored” callas are watered sparingly: stagnation of moisture in the soil can be fatal for them (rot forms on the tubers). Excess water is drained from the pan. The next watering is carried out when the top layer of soil dries 2-3 cm deep. “White” callas love abundant watering, especially during the period of active growth. The soil in the pot should always be moist. After flowering, in all species of this plant, watering is reduced to 1 time per week, and after 1-2 months of this regime, tuberous specimens stop watering altogether. Feeding When calla lilies emerge from the dormant period, they are fed every 2 weeks, alternating mineral and organic fertilizers. When carrying out foliar feeding, plants are sprayed so that the liquid does not get on the bracts (unsightly spots form on them and the flower loses its decorative effect). Callas in pots: care at home - why do they die? Callas in pots at home most often die due to improper care, as a result of which weakened plants are exposed to pests and diseases. The most malicious “lovers” of whitefly are spider mites, whiteflies and aphids. To destroy them, acaricides (Aktelik, Sunmite, Vertimek) and insecticides (Fitoverm, Biotlin, Aktara, Akarin) are used. With improper watering and temperature conditions, callas are often affected by various bacterial and fungal infections. Root rot can be recognized by the following signs: massive wilting of leaves and peduncles, necrotization of the root system. Its occurrence is promoted by increased humidity and air temperature, and excess nitrogen in the soil. To help the plant in this case, you need to temporarily stop watering it, partially replace the wet soil with dry soil, and treat the plant with a fungicide solution (Fundazol, Previkur, Rovral). Gray mold, caused by the pathogenic fungus Botrytis cinerea, spreads through contaminated soil, water, and wind. Its characteristic feature is a gray coating on the plant. When affected by bacterial rot, the peduncles, roots, and bases of leaves darken, and over time the plant dies. Sick callas should be destroyed. If round brown spots appear on the leaves, gradually merging, this means the plant is suffering from anthracnose. Damaged parts of calla lilies are removed, and the plant itself is treated with fungicidal preparations. Why do calla lilies' leaves turn yellow at home? The leaves of calla lilies turn yellow when kept at home for 2 reasons: preparation for the dormant period and errors in care. After the plant has flowered, it begins to prepare for a “well-deserved rest”: all the leaves of “colored” calla lilies turn yellow and the zantedeschia retain green foliage. Improper care of calla lilies affects the appearance of the plant. As a tropical plant, it needs high air humidity, which is difficult to maintain at the proper level in residential premises (especially during the heating season). Therefore, calla lilies should be frequently sprayed with settled water and moved away from heating appliances. Overmoistening or overdrying the substrate also leads to a change in the color of the leaves and their wilting. Although feces require long daylight hours (10-12 hours), too bright lighting depresses it. Therefore, if the plant is on a south window, it must be shaded or moved to another location. 1.
A burn on a calla leaf. Prolonged cultivation of calla lilies in one pot without replanting and replacing the soil leads to its depletion and, as a result, to yellowing of the leaves. Nutrient deficiency also causes increased fragility of leaf petioles. With a lack of nitrogen, the leaves lose their glossiness, their ends droop, and when potassium is consumed, they rise upward. Source: zhenskoe-mneni
Cited 10 times Liked by: 4 users
Like share
0
Like
- 4
I liked the post - Quoted
- 0
Saved
- Add to quote book
- 0
Save to links
Liked4
0
Lighting
Calla is a light-loving plant, but the lighting for its growth and flowering must be diffused.
Does not tolerate direct sunlight. The flower can be grown in partial shade , it can even tolerate shade, but such lighting negatively affects its flowering.
Poor lighting may be the reason why calla lilies do not bloom or bloom very sparingly.
On hot summer days it is especially important to protect the flower from the scorching rays of the sun. To do this, the pot can be moved to a floor stand and/or covered with a translucent curtain.
Callas need good lighting all year round. She prefers long daylight hours, so in the fall and winter it is recommended to supplement the plant with artificial fluorescent or phytolamps.
Trimming / Support / Garter
During the growth and flowering of the plant, you can sometimes remove yellowed and drying leaves. At the beginning of the dormant period, when all the leaves of the plant have dried, they should be trimmed.
As such, pruning is not applied to calla lilies. Only dried leaves are cut off. The procedure is carried out during the dormant period, when the plant does not bloom.
In most cases, the plant does not need support or garter . However, if the calla lily has reached an impressive size or has become very elongated, you can carefully tie it to a support. This will prevent the pot from tipping over and injuring the flower.