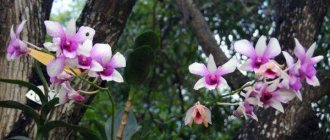
Hybrid phalaenopsis (Phalaenopsis hybridum) is the largest group of orchids, numbering more than 1000 species, with the most diverse shape, size, flowering duration and variety of colors.
The advantages of hybrid phalaenopsis are their unpretentiousness when grown at home, long flowering and easy care.
No matter how simple the care may be, without knowing the characteristics of the hybrid, you may not get full flowering from it.
Main features of proper landing
How to choose soil?
The choice of soil or, as gardeners call it, substrate, is very important for the development and growth of an orchid.
Important! The main thing is to choose the right components and their proportionality . Important! The main thing is to choose the right components and their proportionality. The main components of a good substrate are:
The main components of a good substrate are:
- Bark of coniferous and deciduous trees. Well-steamed pine bark is considered optimal. Other bark can also be used, but it has disadvantages: it decomposes quickly, contains tannins or other optional substances, etc.;
- Charcoal is a good sorbent;
- Sphagnum moss - used as mulch in case of increased dry air and as a good filtering component against soiling of the substrate;
- Inert components - perlite, expanded clay, vermiculite, polystyrene foam - are used as drainage and to increase ventilation of the root system.
The use of coconut chips, fibers and other exotic materials is acceptable, provided the intended use is known.
Capacity
You need to know that in phalaenopsis, in addition to the leaves, the root system takes an active part in photosynthesis. Therefore, it requires a sufficient amount of light.
The ideal container for light to reach the root part will be transparent pots.
Plus, there should be good air circulation in the root system, so in a transparent container, in addition to drainage holes on the bottom, there should be holes on the side walls.
A transparent plastic container is considered optimal for an orchid. The size is selected according to the size of the root part of the plant. Phalaenopsis prefer close quarters, so when replanting, the diameter of the pot should be only 2-3 cm larger than the root part.
Technology
- Drainage from inert components is poured onto the bottom of the container, a couple of centimeters thick;
- Then the root system is carefully lowered into the pot and the bark is laid;
- The bark is laid so that the orchid is stable in the flower pot;
- It is advisable to place small pieces of foam under the root collar, which will protect it from rotting during possible overflow.
The nuances of transplantation
Many questions arise after purchase - do I need to replant? Phalaenopsis do not like transplanting. Therefore, if the plant feels good, develops and grows, and also blooms luxuriantly, it is better not to replant.
Orchid transplantation step by step.
Reasons for forced transplantation:
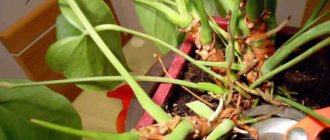
- Visual rotting of roots;
- Old and decaying substrate;
- Pests are observed in the substrate;
- The tightness of the flower pot.
Care instructions
Any indoor flower requires certain conditions for growth and flowering. The best conditions for a mini orchid are:
- room temperature without sudden changes;
- maintaining moist air;
- Avoid exposing the plant to direct sunlight;
- fertilize the flower according to the instructions
How to fertilize?
- The orchid needs to be fertilized no earlier than one and a half to two months after transplantation.
- You should not fertilize plants that have rot.
- You can fertilize the plant only after watering.
- In summer, the orchid needs to be fertilized 2 times a month, in winter - no more than once a month.
- Do not fertilize your orchid while it is blooming.
Types of fertilizers:
- Root. Used to stimulate plant growth. After watering, following the instructions on the package, you need to dilute the fertilizer in water and place it in the ground with the flower. After fertilizing, the flower should be moved to a warm room for several hours. At the same time, if the flower is located near a window or balcony, it should be moved to different points in the room so that direct light from the sun does not fall on the plant.
- Foliar. In this case, the orchid should not be watered, but sprayed. Also, following the instructions, you should dilute the fertilizer in water and apply it to the leaves of the plant using a spray bottle. And in this case, during fertilization, the leaves should not be exposed to direct sunlight. Avoid getting fertilizer on buds and flowers. It is necessary to fertilize the plant every 10-14 days during the period of active growth of mini-orchids, and no more than once a month during the dormant period. This period is characterized by the suspension of physiological processes. Visually, the plant in this state does not grow and does not show significant changes. During the dormant period, it is not recommended to fertilize the plant. For mini-orchids these are the periods of summer (hot months) and late autumn.
How to transplant?
You can use the general step-by-step instructions for replanting orchids, keeping in mind the following features of replanting miniature orchids:
- If your miniature orchid grows on a “cushion” of moss, then you need to replant such an orchid once a year. The mini-orchid should be replanted in the spring during the period of active growth and until the peduncle is completely formed.
- To separate old soil or moss from the orchid's roots, place the orchid in a container of water for a few minutes. Let the water saturate the soil (moss) and separate the orchid roots from the soil one by one.
- If you decide to transplant an orchid into soil consisting of bark, then use soil consisting of fine pieces of bark.
The pot for a mini orchid should be a little tight. Thus, it ensures good breathability of the orchid soil. You can use the transparent pot in which the orchid grew, after washing it thoroughly.
We recommend watching a video about how to properly transplant a mini-orchid:
Reproduction nuances
In the case of mini-orchid propagation, a “child” is used, which is separated from the flower (vegetative propagation method). When a new shoot appears, it is carefully removed. Then it is immersed in a greenhouse, which has previously been laid out with wet sphagnum (peat moss).
Growing the variety
The orchid belongs to the dwarf subspecies, so it will take up little space on the windowsill.
Landing
The orchid is not tall, but for good growth it requires a medium-sized container for planting. For this variety, you should choose a pot with a diameter of 8–9 cm and about 10 cm in height. Too low a capacity will not allow the plant’s root system to fully develop.
Seeds
Phalaenopsis Mukalla is grown using seeds. The correct sowing lies in observing a number of rules:
- Seeds are disinfected before planting. To do this, use a solution of lime chloride, in which it is soaked for 15 minutes.
- Using a pressure cooker will prevent microbes and fungal spores from getting on the planting material.
- Containers with seeds are kept at a temperature of 18–20 ° C until the first leaves appear.
- The substrate for planting is pre-steamed.
The process of growing seedlings is long and labor-intensive. A flowering plant is expected no earlier than 5 years after planting.
Cuttings
It is better to breed in early summer
Reproduction by dividing the peduncle is also permissible for the Mukalla phalaenopsis species. The optimal time for this is at the beginning of summer. Cuttings are carried out according to the following scheme:
- Remove the leaves from the bottom of the stem.
- Disinfect the cut areas with activated carbon.
- Use a complex of fertilizers in maximum proportion.
- Wait for young roots to appear and plant in prepared soil.
- It is worth moistening the soil 2-3 days after planting.
- Provide optimal lighting and moderate watering.
A young plant will appear in a few months with proper care.
Children
This method of propagating an orchid is carried out only when the child has more than 2 full-fledged root shoots. Cleaned pine bark or coconut chips are good for planting. You can dilute the soil by adding peat or sphagnum moss in small doses. This additive will reduce the alkalization of the substrate.
Care
Caring for such a houseplant should be comprehensive. It includes:
- Watering. During the warm season, watering should be done only once a week. During the dormant period, the plant needs extremely rare application of liquid - 1-2 times every month and a half. The best time for watering is the morning, because before sunrise the roots are saturated with moisture for the whole day. Irrigation of the soil is carried out with water heated to 25°C from above onto the container with phalaenopsis. Do not allow water to accumulate in the pot. Watering is carried out when the roots are covered with a silver-gray film. This is a clear sign of a need for moisture.
- Lighting. To stimulate plant growth, you need to organize bright but diffused light. Do not leave on an open window to prevent direct sunlight. The optimal placement is slightly away from the window opening in the southern part of the room. A bad place for these flowers is the west side.
- Feeding. For Phalaenopsis Mukkala, all fertilizers marked for orchids are allowed. They should be applied at intervals of at least a month. With frequent feeding, the plant will grow, but flowering is unlikely. In order for the orchid to delight with lush buds, wait for intervals between applying various fertilizers. If you decide to change the drug, extend the interval to one and a half months.
- Transfer. The plant must be replanted into another container only if the pot is thoroughly filled with root shoots. Transplantation is carried out similarly to propagation by sprouts indicated above.
Description of appearance
Maximum peduncle length
Peduncles, the number of which can range between 1-4, have an average adult length of about 60-80 cm. Quite often they branch well, with a large number of flowers. The structure is axillary.
Number of leaves of a healthy plant
An adult plant usually has from 4 to 8 leaves. The leaves are smooth, fleshy and about 2 mm thick. The leaf shape is elongated - oval, with a length ranging from 10 to 35 cm and a width of 8-10 cm.
Diameter, flower shape
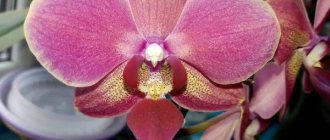
The flower shape is standard for phalaenopsis, consisting of three petals and three sepals. The sepals (sepals) form the outer circle, and the petals (petals) together with the lip form the inner circle.
The lip has a difference in color - dark purple, almost burgundy-violet.
The flower resembles a fluttering moth or butterfly. Its diameter depends on the age of the plant and growing conditions. In “Wild Cat” it can be from 6 to 9 cm.
Description of the variety
Mukalla orchids belong to the phalaenopsis species, a subspecies of dwarf.
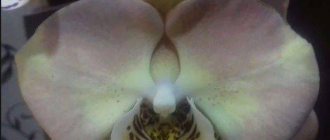
The variety is named so because of the shape of the flower, similar to the half-opened wings of a butterfly.
It is known that there are about 1000 hybrids in total. They are distinguished by high immunity, unpretentiousness to living conditions and a long flowering period.
There are no special tricks in growing, flower stalks are formed regularly, if agricultural practices are followed, the plant feels great and pleases the owners with colorful flowers.
External characteristics
Phalaenopsis Mukalla has an unusual leaf color with small spots and purple flowers. The diameter ranges from 4 to 5.5 cm.
The intensity of the color is affected by the duration and level of illumination. There are various shades of lilac, and there may be a thin white border around the edge.
The plant is small, the roots are massive (7-8 mm thick), they are branched, most often they have a gray-greenish tone.
Before flowering, the rosette produces 4-8 leaves, in adulthood they reach 30 cm, the shape is slightly elongated, the surface is smooth. Depending on the lighting, the color varies from green to very dark, almost black.
The peduncle is 35-50 cm long, less often there are 2-3 arrows emerging alternately. From 1 to 5 flowers are formed on it, they are arranged symmetrically and open gradually, starting from those closest to the base. It takes 2 to 4 days to fully open.
Features of care
The Charmer orchid grows well in a room, provided the right location is chosen, the temperature and humidity are suitable, with proper watering and fertilizing, and protection from infection and pests.
Conditions of detention
It is better to place the pot on the eastern or western windowsill. It is undesirable for the flower to be exposed to direct midday rays of the sun, otherwise a burn may form on the leaves.
If the apartment has only southern windows, the orchid is placed not on the windowsill, but on a stand near the window covered with curtains.
The optimal room temperature is 15-25°C. However, phalaenopsis easily tolerates a short decrease in temperature to 12°C and an increase to 35°C.
Humidity should be moderate - 30-40% and good ventilation.
Watering
Water the orchid after the soil dries. But the substrate should not be allowed to remain dry for a long time.
A transparent pot is convenient because it allows you to determine the need for watering: moistening is carried out when condensation disappears from the inner walls of the container and the roots turn pale.
If the container is opaque, you will have to dig up the soil to check how dry the layer inside is.
Water is poured either from above onto the ground, avoiding contact with the leaves, or bottom watering is used, lowering the pot into a basin of water so that the roots draw the required amount of moisture through the drainage holes.
Feeding
Fertilizers improve flowering
Suitable fertilizer is the key to full development and lush flowering.
Nutrients are absorbed by the roots, so fertilizing is carried out with liquid (water-soluble) preparations. The best option is Kemira-Lux. For phalaenopsis, reduce the dosage by half.
An orchid needs nitrogen to grow foliage. But you shouldn’t overdo it with this substance, otherwise the flower will actively produce leaves rather than peduncles.
If a flowering shoot does not appear for a long time, this is a signal that there is not enough potassium and phosphorus.
Landing
The future health of the plant and its ability to flower depends on how correctly the planting is carried out.
Soil selection
You can prepare the soil yourself. It should include:
- bark;
- expanded clay;
- coal;
- foam balls;
- sphagnum.
Selection of capacity
A transparent pot is suitable for a flower
Phalaenopsis is planted in a transparent pot with many drainage holes.
The size of the container must correspond to the volume of the root system.
- If it is too spacious, moisture will accumulate in excess, and the roots in contact with constantly moist soil will quickly rot.
- If it's too tight, the roots will crawl through the holes and get damaged.
Technology
Planting a Charmer orchid is not difficult. Step-by-step description of the procedure:
The plant is carefully removed from the store pot. Shake off the soil. Inspecting the roots
Remove injured ones. Powdered charcoal is applied to the cuts. Expanded clay drainage 2 cm thick is placed at the bottom of the selected pot. Place the orchid in the container and carefully straighten the roots. Cover with bark and coal. Mulch with sphagnum.
To watch online, click on the video ⤵
RARE orchid "VIOLET QUEEN": replanting + GARDEN VAR + adaptation. Phalaenopsis 'Violet Queen', peat glassRead more
The Orchid ROOTS will grow QUICKLY. Watering the village Violet Queen Violet Queen is a beauty of unrealistic color!Read more
Replanting a Violet Queen orchid.Read more
Another Orchid Resuscitation from the New Parcel | Root and Stem Rot | Phal. Violet Queen miniMore details
#ORCHIDS