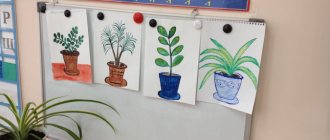
Contents of lessons on drawing a plant
Click on the desired option and you will go to it.
| 1 option | Option 2 - Video | Option 3 |
| Option 4 | Option 5 - Video | Option 6 |
| Option 7 | Option 8 - Video | Option 9 |
| Option 10 | Option 11 - Video | Option 12 |
| Option 13 | Option 14 - Video | Option 15 |
| Option 16 | Option 17 - Video | Option 18 |
| Option 19 | Option 20 - Video | 21 options |
| Option 22 | Option 23 - Video | Option 24 |
First stage
First you need to outline the edges of the flower with a pencil. To do this, a contour is drawn, depending on the shape of the flower, it can be different. It is recommended to draw an oval; you can easily draw virtually any flower from it.
Please note that the lower part of the oval should be more rounded and wider than the upper. You need to draw with a thin line so that, if necessary, you can easily erase an unsuccessful outline without leaving marks on the paper.
Next you need to start drawing the petals. You need to start with the side petals, making one on each side. Please note that the sketches are made as light as possible so that they can be easily edited. If you press hard on the pencil, it will leave noticeable indentations in the paper, which can easily ruin the drawing.
After the side petals are drawn, you need to outline those in front. Please note that you do not need to draw completely symmetrical petals. They must be unique, each with its own shape. This will make the drawing more realistic.When outlining the petals in the middle, you need to make sketches in the form of rounded triangles. Some petals need to be drawn overlapping each other.
Once the front petals are drawn, you need to add those that are located in the depths of the bud. They only need to draw the tips. When the sketches are ready, use an eraser to remove all unnecessary lines that spoil the drawing.
To have an understanding of how the petals are arranged, just look on the Internet for examples of drawn pictures of a flower, take a real photo of a specific specimen as an example.
Jasmine flower drawing
Jasmine flower is the personification of tenderness.
- Using a simple pencil, sketch out a circle and draw a line in the center.
- Next, 2 petals of different shapes are depicted.
- Next, add 2 more petals at the bottom, different in shape. Leaves are depicted on opposite edges.
- Add small elements. Add veins to the leaves, mark the deflection zones of the petals, and also sketch out the stamens.
- We erase unnecessary pencil directions.
- Paint over the image. The drawing is ready!
How to draw aloe, why I like it
We have aloe growing at home. The juice of this flower is healing. Even ancient people used this plant for medicinal purposes. When I'm sick, my grandmother always treats me with aloe juice. I like this flower because it does not just grow for beauty, but brings benefits to people. When I grow up, I want to become a biologist and study and discover new medicinal plants.
Shadow
Applying shadows is one of the most difficult stages in drawing.
The shadow must be applied as carefully as possible so as not to spoil the drawing. If you have absolutely no skills in correctly distributing shadows, you can take a real flower with a light source as a sample, see exactly how it will cast a shadow, and where it will fall. In any case, it is necessary to apply a little shadow to the inner parts of those petals that will be half-opened in the picture. The shadow is applied by lightly shading, carefully painting the selected area.
The direction of the strokes can also be different, depending on which side the light source is on. Therefore, it is necessary to determine this moment in advance.
The shadow should follow the contour of the object on which it is applied. This will help add realism to the drawing and make it more beautiful. Please note that at the edges of the petals near the base of the bud it is necessary to make bolder strokes.
Such emphasis is necessary because less light enters these places, and accordingly, there is more shadow there.
We looked at how easy it is to draw a flower, and identified the basic elements that are necessary for this. After the pencil drawing is completed, it is quite possible to add to it.For this purpose, you can use paints, pencils, felt-tip pens, colored pens, etc. Just drawing a flower is quite easy; you don’t need to have serious skills and abilities to do this.
Answering the question “How to draw a flower with a pencil,” it can be noted that the instructions are quite applicable for drawing with colored pencils. In the same way, a simple pencil will be the basis, while colored pencils will fill the drawing with the necessary colors.
How to draw Dieffenbachia, why I like it
We have Dieffenbachia growing at home. When her parents bought her, she was very young, like me. Every year it grew and grew to a height of almost 1 meter. A whole tree! My responsibilities include watering the plant and wiping the leaves once a week. It's so great to take care of a flower and see how it grows, becoming bigger and more beautiful every year.
How to draw a geranium, why I like it
On the windowsill of my house there is a bright and colorful plant growing - geranium. Its other name is also very beautiful - pelargonium. It blooms long and profusely. In the autumn, when it is gray and rainy outside, I look at the blooming geraniums, remember the bright summer and my mood lifts.
How to draw a blooming cactus in a pot
Once upon a time, the cactus was a rare plant that could be seen in the deserts of Africa or America. Now we consider the cactus to be an ordinary houseplant. In the south, some cacti are prepared as dishes. Some types contain liquid beneficial to the body. The cactus absorbs maximum moisture and then grows quietly in the desert without requiring much water.
We suggest you draw this plant. But not desert, but homemade - in a pot.
The basis
Draw a horizontally elongated oval.
Draw two slightly curved lines down and connect them with a vertical line. You will get the top of the pot.
Bottom part
Draw two lines down, tilting them at a slight angle. Connect.
Plant
We begin “planting” the cactus. Draw a large circle, part of which intersects with the pot. Draw the shape using a compass.
Extra lines
Carefully erase the circle lines that intersect with the pot.
Recesses
The cactus is not perfectly straight. It has depressions like grooves.
Draw the other side of the plant as well.
Big spines
It's time to decorate the cactus with spines.
Little thorns
Decorate the rest of the lines with small thorns.
Additional lines
The last detail is two additional vertical lines on the cactus. Now the drawing can be considered complete.
Coloring
Color the cactus any shade of green. The rest of the details can be colored as you wish.
Collage of stages of drawing a cactus
If you see an error, please select a piece of text and press Ctrl+Enter.
Add realism
To make the flower look as realistic as possible, you also need to add those petals that hang down. They are somewhat more difficult to draw because they have a more complex shape. You can take a real photograph of a flower as a basis so that you can redraw the outline.
It is also worth paying attention to the fact that the petals are not completely flat, they are curved from the middle, in the shape of a bowl. Therefore, those petals that are openly located in the drawing need to be slightly modified, the edges of the petals must be drawn in order to create the effect of voluminous leaves.
If you have absolutely no idea how to give an object volume, you can view the step-by-step instructions for beginners.
At the sketch stage, it will be enough to simply add a few additional lines, highlight them with bolder drawing, so that the sketch has clear contours and boundaries.
The next step is to draw the stem. This is the easiest part of drawing a flower. You just need to draw 2 parallel lines resting on the base of the bud. Please note that the stem will be hidden behind the hanging petals, so in the drawing there is no need to draw the stem on top of these petals.
The stem should be slightly curved, ideally have slight irregularities, in some places it should be a little thicker, and in others, on the contrary, a little thinner. It is also worth paying attention to the fact that some flowers may also have petals or thorns growing on the stem; this must be taken into account.
If petals can grow on the stem, you need to add a couple of small ones, drawing them at a slight distance from each other on both sides. Not all flowers have thorns on the stem, but they can be drawn very easily by creating small thin shoots on the stem directed towards the base of the bud.
Beautiful rose with felt-tip pens
If you have a desire to draw a beautiful card for March 8 and May 9, then the image of a rose is quite suitable for this occasion. But if you haven’t learned how to draw this beautiful plant yet, then we suggest you learn how to draw a rose flower. The lesson we will provide is ideal for beginners, so follow the instructions and then you will succeed. To organize the work, we recommend using a simple pencil, but we will draw with a marker.
Let's start the creative process:
- In the middle of the sheet, draw a vertical arcuate line. At the top of it we draw a small bow towards it towards the left. We rise a little higher and between these sketches we draw a snail. We connect the left side of the snail with a vertical line to the main sketch.
- From the top edge of the bud, step back a little to the right and draw an arc. Now, from the middle of the vertical wavy segment, we draw the second part of this sketch and connect them together.
- In a similar way, we depict an identical shape on the left side of the picture. Extend the lines of the bell-like figure. Next, we connect the upper part of the sketch with the lower part with arcs.
- On the sides, starting from the bottom of the silhouette, draw one more petal. Under the plant we draw two leaves that are directed downwards. We divide them with a line into two pieces and draw a stem between the leaves.
- Then, outline the outline of the plant with a thick line, even if you used a pencil. Paint the inside of the sketch with a pink or red pencil. We paint the leaves and stem green.
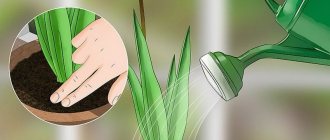
Materials and tools
Professionals use a simple pencil to create realistic paintings. The advantage of redrawing live plants is that you can carefully view the detail of the object. To draw flowers in a pot, like the masters, you will need the following equipment:
- Pencils of different hardness, ranging from light graphites to dark ones.
- Pen with black paste.
- A nag for erasing unnecessary lines.
- Material for rubbing out hatching.
- Landscape sheet with high density A4 or A5.
- Ruler.
For a beginner to draw flowers, it is better to choose a simple object to redraw.
Drawing of violet flowers
Light purple spring flowers.
- Mark the flowers and stems: sketch 2 ellipses, and from there draw 2 slightly curved lines downwards. Mark the buds, as well as the centers, by drawing an inverted figure eight in each ellipse.
- Start planning the petals.
- Mark the petals right up to the end, draw the trunk. Mark the base of the leaf.
- Draw the leaves.
- Remove unnecessary strokes and erase with an eraser.
- Color delicate violets.
How to draw an orchid, why I like it
My mother is interested in orchids. We have 12 growing at home. They are all different and bloom incredibly beautifully. Orchid flowers are delicate and striking in their beauty. First, the orchid sends out an “arrow”, it grows, buds appear and you look forward to a small miracle. And now the buds open! You can admire the bright orchid flowers endlessly!
Withdrawing money to a bank card
Withdrawing funds to a card from Yandex Money occurs as follows:
- Log in to your wallet and go to the Transfers tab. In the “Where” field, indicate “To a bank card.”
- Enter the card number and indicate the amount (the minimum possible is 500 rubles).
- Next, you need to confirm the payment using a password.
The commission will be 3 percent plus 45 rubles. and is automatically added to the payment amount. The delivery time depends on the bank that issued the card. For example, Sberbank can accept money up to 5 business days.