It happens that it is not possible to constantly care for house flowers, frequent and long business trips, vacations, etc. In this case, automatic watering for indoor plants will be the best option. It will maintain the required level of moisture and prevent the flowers from dying.
- What it is
- Operating principle
- The need for automatic watering for indoor plants
- Advantages and disadvantages
- Kinds
- Drip irrigation
- Wick watering
- Automatic watering from a medical dropper
- Granulated clay or hydrogel
- Capillary mats
- Cones and jars
- Pots with automatic watering
- Ceramic cone
- How to organize the system yourself
- What is needed for this
- Scheme
- Important Operating Instructions
- How to water flowers during vacation or business trip
- Top 5 ready-made systems (manufacturers)
Content
- 1. Micro-drip automatic irrigation devices
- 2. Ceramic cones
- 3. Enema balls
- 4. Self-irrigating pots
- 5. Organizing automatic watering with your own hands: three simple ways 5.1. 1st method
- 5.2. 2nd method
- 5.3. 3rd method
How to take care of moistening the soil for indoor plants before leaving the house for a long time? An automatic watering system will come in handy.
Additional materials.
This homemade product was assembled from all sorts of rubbish that I managed to find in my shed. So, for example, carbolite legs were used from the Idas tape recorder, the isolation transformer of the protection device was used from the VEF 202 radio receiver, the power filter was used from the 3USTST TV, etc.
Therefore, even if someone decides to build something similar, he is unlikely to need my drawings. However, I publish them because I myself am always interested in other people’s crafts and technical solutions.
July 16, 2011 (12:21) in Do it yourself
Micro-drip automatic irrigation devices
For a collection of plants in one room, on a balcony, loggia, patio or in a greenhouse, garden micro-drip automatic irrigation systems are suitable. These are the “younger brothers” of gardening systems, described in detail in the article “Which automatic watering systems are suitable for plants in the garden.” Microdrip devices are connected directly to the central water supply. Water is supplied and turned off at a specified time thanks to the built-in timer. When you go on vacation or a business trip, you don’t have to worry about the fate of your “green tenants.”
The best option for a house or apartment with an average collection of up to 30 plants is a microdrip irrigation system with a reservoir . There are many tubes coming out of the tank through which water flows to the droppers. The latter come in plastic or with a ceramic tip that is stuck directly into the ground.
IN THE PHOTO: Microdrip irrigation system with a reservoir for a collection of up to three dozen plants.
A regular dropper is manually adjusted with a special wheel. Scrolling it regulates the intensity of watering, for example, up to 20 ml. (20 drops) per hour.
Ceramic tips of advanced models play the role of soil moisture sensors. Depending on the soil moisture level, the drippers supply water or stop watering.
Emergency protection system.
To ensure fire safety, the entire electrical part of the machine is enclosed in a steel, gapless housing, which stands on carbolite instrument feet. Cooling occurs through the metal of the housing. Power is supplied through a fuse link.
In the event of an emergency spill of water, the sprinkler is equipped with a completely independent protection circuit, which disconnects the main part of the electrical circuit from the network, thus breaking the power supply circuit to the pump.
These measures may seem unnecessary, but when the apartment below you has undergone renovations, the cost of which significantly exceeds the cost of your entire apartment...
The executive element of the original protection circuit was a conventional electromagnetic relay, which in the event of an accident (water spillage) burned out the mains fuse of the entire sprinkler.
| R1, R2 = 1M R3 = 22M R4 = 1k R5 = 15k C1 = 0.47 C2 = 1.0 C3 = 47.0 C4 = 1000.0 | VD1-4 = KD510A VD2 = 15V VT1 = KT3102D DD1 = K561LE5 SA1 = MT-3 FU1 = 1A P1 = RPS20 (757) TV1 = out. from VEF-202 |
However, replacing a fuse is also a rather responsible operation that should not be trusted to women.
Therefore, I had to change the circuit and replace the conventional relay with a polarized one.
This made it possible to return the sprinkler to its original state by simply turning the power off and on.
How does the protection scheme work?
The protection circuit is powered from a separate power supply, which significantly increases its reliability.
When water gets on the spill sensor, the circuit switches capacitor C4 with one of the windings of relay P1, which breaks the circuit of the switching power supply. If you now turn off the installation with the “Power” toggle switch, then the energy stored in capacitor C4 will be directed to another winding of relay P1, which will bring the installation back to life.
The water spillage sensor is a one and a half meter strip of fabric, sewn like a ladies' belt, which is divided in half with an additional seam. Two separate bare wires are inserted into the resulting pockets and connected to the protection circuit. The protection is triggered when a few drops of water hit any part of this tape.
Return to top to menu.
Ceramic cones
are popular among gardeners . These are a kind of “carrots” from which plastic tubes extend. The “carrot” is stuck into the pot, and the end of the tube is lowered into a reservoir of water. In this case, the water supply process is not controlled manually. Moisture comes from a pressure vessel every time the soil dries out.
they unanimously speak about the high quality and reliability of the devices. However, the unsuccessful experiences of some gardeners have shown the opposite. Ceramic cones get clogged easily and sometimes do not produce the required pressure. We have to look for the right place for the water tank in order to create this pressure. But here, too, a problem arises: if you install the tank too high, there is a risk of flooding the plant; if you install it too low, the water may stop flowing altogether.
IN THE PHOTO: Ceramic cones are not very reliable, because... often clog and do not always provide the required pressure.
If there is no free space to install a vessel with water near the plant, use a ceramic bottle attachment. The advantage of this method is its ease of use. Attach the nozzle to a regular plastic bottle of water, insert it into the pot and forget about watering. The device will control the water supply itself, and the plant will receive exactly as much as it needs. This is an excellent economical option: when using large two-liter bottles, you won’t have to think about watering for a whole month.
IN THE PHOTO: A ceramic bottle nozzle is a simple and economical option for automatic watering.
There are decorative variations of ceramic cones in the form of animals, birds, butterflies, etc. They look very cute and can liven up the interior. But, unfortunately, such “toys” are not suitable for watering: due to their small volume, you will have to frequently add water.
Plant preparation
If the trip did not come as a surprise, it is better to prepare the plants in advance for the upcoming changes.
- Place in the shade to reduce evaporation. It also depends on the time of year, the presence of working heating devices and ventilation in the room.
- Remove affected leaves and inflorescences. Professionals advise partially thinning out healthy leaves, and be sure to remove not only blooming flowers, but also buds. This measure may seem cruel, but it will allow the plant to use water more economically.
- Wipe the leaves and spray them with a spray bottle.
- Place all flower pots in one place and cover the top with film, making several holes in it for air flow. An alternative to film can be a covering material - it is more porous, promotes air exchange and prevents the formation of mold.
- If you are placing flowers in groups, isolate diseased plants. In the immediate vicinity, even a banal fungus will quickly infect healthy neighbors.
- Immediately before leaving, all flowers need to be watered well. In rare cases, the plant is taken out along with the earth (a lump) and lowered into water, but not for long - so that the earth does not crumble.
Enema balls
Externally, “enemas” look like spherical flasks with watering pipettes, which are filled with water and inserted into the pot. When the soil begins to dry out, oxygen enters the stem of the flask and pushes out the amount of water the plant needs. In general, “enemas” are a good option for automatic watering, but they do not dose water well and sometimes flood the plant.
IN THE PHOTO: Enema balls provide watering to the plant and look original in the container.
Switching power supply.
| R1 = 5E R2 = 560k R3, R6 = 43E R4, R7 = 22E R5, R8 = 1E R10 = 470E VD13-16 = KD510A VT1 = 13007 VT2 = 13007 IC1 = KR142EN8B | C0, C3 = 0.47 C1, C2, C7 = 2.2n C4 = 22.0 C5 = 22n C6, C8 = 47n C9, C11 = 0.1 C10 = 10.0 C12 = 47.0 VD1-5, 7, 8 = 1007 VD6 = DB3BL VD17 = AL307V VD9-12 = KD226 |
Transformer TV2 is wound on a ring ferrite core of grade 2000NM, standard size K28x16x9.
Winding I contains 2 layers of wire Ø0.35mm, wound turn to turn.
Winding II contains 17 turns of wire Ø1.0mm.
Winding III contains 23 turns of wire Ø.23mm.
Although a printed circuit board was laid out for the power supply, the main part of the parts and electrical circuit were borrowed from the electronic ballast of a burnt-out fluorescent light bulb (CFL). How to modify the CFL electronic ballast circuit is described in detail here.
The only significant difference in the presented circuit is the presence of a real input filter on elements C0-C3, DR1, which you are unlikely to find in an economical light bulb. The filter parts were used from an old 3USTST TV. The filter can be simplified by leaving only capacitors C1 and C2, but you need to keep in mind that they must be 5 kV. These capacitors, through the electrical network, ground the housing and circuit of the device at high frequency, which ensures the operation of the humidity sensor in conditions of interference created by a switching power supply.
Return to top to menu.
Self-irrigating pots
A self-irrigating pot consists of two containers. A plant is planted in one of them, water is poured into the other. The plant gradually absorbs moisture through special wicks.
IN THE PHOTO: “Smart” containers cope with the function of automatic watering of plants. Photo by Tatura Florist.
Such a container is usually equipped with a water indicator. This allows you to accurately determine how much moisture is left in the pot and when you need to add it. The technology for independently setting up such an irrigation system is shown in the video: “LECHUZA Automatic Irrigation System.”
Small details.
- An approximate calculation of the response time of a timer assembled on a CMOS chip can be done in your head.
t = 0.7CR t – time in seconds, C – capacitance in microfarads, R – resistance in megohms. The time also depends on the amount of capacitor leakage. If you need to use large capacitors, it is better to choose tantalum rather than conventional electrolytic capacitors. If you are using a printed circuit board made of fiberglass, and you do not live in the tropics, then you can use resistors up to 100 megohms. However, the leakage resistance of some tantalum capacitors can be commensurate with this value.
The minimum resistance of the resistor must be selected based on the maximum permissible output current of the microcircuit - 1 kilo-ohm per 1 volt of supply.
- The amount of water pumped by one or another dripper depends on the number of air pockets remaining from the last cycle and may differ by 20-30%.
In addition, the amount of pumped water depends on the throughput of the liquid filter and can vary even between drippers from the same manufacturer. Droppers from different batches can be distinguished by the shades of the tubes and other plastic parts. You need to look at it in daylight. - In this design, to configure the machine, a potentiometer R11 with a logarithmic characteristic (B) is used. You can also use a potentiometer with an inverse logarithmic characteristic (B), the one used for volume controls, but then the scale will have to be reversed. That is, the sensitivity of the humidity sensor will increase when the knob is turned counterclockwise.
- The very first start of the machine in offline mode gave a leak. The tube came off the pump fitting. I had to make wire clamps.
Return to top to menu.
Organizing automatic watering with your own hands: three simple ways
Automatic watering of a plant collection can be organized independently, in a short time and without significant material costs.
1st method
You will need: several hospital droppers according to the number of plants that need watering, a 5-liter plastic bottle, an elastic band or wire to secure the ends of the tubes.
How to do:
- Remove the needle tips from the droppers.
- Check the droppers for integrity by blowing into them. If the tubes are not damaged, they will be well ventilated on both sides.
- Connect the ends of the tubes together and tie them with an elastic band or wire. This way they will lie calmly at the bottom of the bottle and not float on the surface. Try not to pinch the tubes .
- Place the tied ends of the IV tubes into a bottle of water and place the bottle as high as possible.
- Open the dripper regulator, letting water flow through the tubes, then immediately close it.
- Insert the free ends of the tubes into the pots and use the wheel to adjust the amount of incoming water.
ON VIDEO: In addition to droppers, medical syringes are suitable for creating homemade watering devices. From such a syringe, a plastic bottle and a PVC tube, a drip irrigation device is obtained.
2nd method
You will need: a plastic water bottle. The size depends on the root ball of the plant. For a tub, take several medium-sized bottles, for a compact pot - one small one.
How to do:
- Make small holes in the bottle cap.
- Place the bottle upside down in the container with the plant.
IN THE PHOTO: Automatic watering from a bottle, plastic or glass, is also good for indoor seedlings. Photo by Megan Andersen-Read.
3rd method
You will need: nylon cords or laces, woolen threads, twisted bandages or any materials from which wicks can be made; a basin or bottle filled with water; peg for fixing the wick.
How to do:
- Twist an improvised wick from scrap materials.
- Place one end of the wick into a container of water.
- Secure the other end into the plant container with a stake or other means.
This method of moistening the soil is described in detail in the article on wick watering of indoor plants.
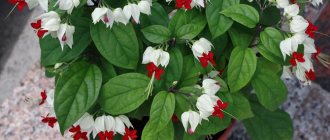
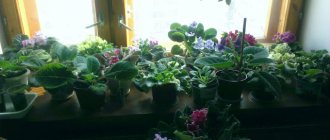
IN THE PHOTO: Wick automatic watering will keep Saintpaulias healthy and fresh. Photo by u/skysong4.
Capillary mat
The towel with the jar can be replaced with a purchased capillary mat for watering seedlings. The mat is pre-impregnated with water and pots of flowers are placed on top of it; a jar is not needed here. One square meter of capillary mat absorbs about three liters of water. The mat is covered with a film with many holes to reduce water evaporation and to prevent roots from growing from the pots into the mat.
Getting ready to leave for a few days, I made a capillary mat for seedlings with my own hands. Place a piece of terry towel on the bottom of the tray. I covered it on top with a thin film with holes. (Without film, the roots grow into the fabric.) I installed watered pots with seedlings.
- I folded thin cling film in several layers and made many holes, at least one for every square centimeter.
- Carefully unfolded and laid on top of the towel
- Now more details. The pallets were installed strictly horizontally, without tilting, so that the water did not flow to one side. Before laying, I moistened the towel from a measuring cup. (In order to know how much water it absorbs without forming a “swamp” in the pan.) I took pots with drainage holes at two levels: on the ledges and in the depressions of the bottom: the roots need not only water, but also air. A thick towel should not be folded in several layers, so as not to block air access to all holes.
- I placed a damp towel at the bottom of the tray, covered it with a film with small holes and placed pots with watered seedlings.
- I watched the plants for several days. I decided to add a layer of fabric, since the towel was thin and there was not enough water for 5 days. Before leaving, I watered the seedlings from above into the pots, poured measured amounts of water into the tray, distributing them in different places. The method works if all conditions are met.
A few final tips
- Micro-drip auto-irrigation systems connected to a central water supply are preferable for medium and large collections of plants.
- If the water supply is shut off during your absence, a micro-drip system with a reservoir is recommended.
- To water individual plants, use bottles with ceramic tips - simple, cheap and effective. One 2 liter container. Enough for about a month of watering.
- If the automatic watering system is not equipped with a soil moisture sensor, it is better to purchase it separately. The presence of such a sensor will save plants from destructive waterlogging of the soil.
How can I check that the selected option works?
It’s good if you have the opportunity to test the effectiveness of the device you created and see the plant’s reaction.
Automatic watering, although done by hand, must correspond to the type of plant. For those who love moisture, your supply may not be enough, but for cacti there will be plenty.
If the water supply comes from below, you need to make sure that the soil is moistened to the level of the roots. Plants with short roots may never receive it. Soil moisture can be checked with the same wooden toothpick or skewer.
Monitor how quickly the water is used. A larger container may be needed. Or not one system, but two.
It’s good if after a few days someone can still check the condition of the plants. Water supply systems can become pinched or otherwise malfunction. Coming and looking at the flowers is not as troublesome as watering them thoroughly. As a last resort, during their absence they can be monitored through cameras connected to the Internet.
What not to do
The only and main mistake a gardener makes when going on vacation is to flood the plants to capacity, hoping that this volume of water will be enough for them the entire time. As a result, root rot often develops. Or the soil simply dries out to the state of stone. It is very difficult, sometimes impossible, to revive such plants.
If you ask relatives and friends for a favor, be sure to leave them detailed instructions - what, when and how much to water. Those who have no experience in floriculture may decide with the best of intentions: the more water, the better for the plants.