Violet is a favorite flower of many gardeners, whose blooms can be enjoyed for quite a long time. Everything seems fine, but there comes a moment when the flower loses its appearance: flowering stops, the trunk is exposed, the leaves lose turgor and become smaller, dark spots appear on the leaf blades, and the rosette noticeably stretches and bends. This process is called natural aging of violets. Rejuvenation will help us correct this situation and extend the life of our favorite indoor plant.
How to properly carry out the violet rejuvenation procedure will be discussed in this article.
You may also like
No content available
Pollination of parent plants
The main way to develop new varieties is pollination.
To do this, select two parent varieties according to the parameters outlined above. Then the long process of elimination begins:
timing of pollination - it is extremely important to carry out the pollination process on time: the mother flower (which is pollinated) should be no older than 3-4 days, the main indicator is the stickiness of the tip of the pistil; the father's flower, on the contrary, must be well-ripened, no younger than 3-4 days, depending on the duration of flowering of the variety.
Attention! Pollen can be used from dried flowers; the storage time of such material is about six months, this simplifies the selection process by eliminating the need for simultaneous flowering of the parent bushes.
When choosing a mother bush, it is important to carefully examine it or even prepare it in advance. The rosette must be healthy and strong enough for the seed pod to ripen on it
The paternal rosette can be anything, but a healthy rosette has a higher chance of successful pollination; those flower growers who do not risk taking dried pollen must first align the flowering cycles of the parent rosettes: to do this, the flower stalks are cut off on a bush that wants to bloom much earlier than the second; Another option is to remove several flower stalks from both bushes and move them to cool conditions, and then expose them to plenty of light and warmth, after which they usually bloom together.
After all the preparations, it’s time to pollinate the flower. For this:
cut off the anther from the father's flower;
break or cut it; holding the anther tightly with tweezers or picking it up with a needle, dip the stigma of the pistil inside the crack; pollen should remain on the sticky tip (a noticeable change in its color); some gardeners simply place the anther on the pistil for a better effect.
- A successfully pollinated flower shows this after a few days. A compaction appears under the pistil, which is the future seed pod;
- seeds ripen from 1.5 to 8 months, it all depends on the conditions and the mother plant. You need to wait until the box dries. It must be remembered that seeds that have matured longer have better germination, for example, 1.5-month-old seeds often do not germinate at all;
- After receiving the seeds, they are sown, preferably as soon as possible. Sowing is carried out in moist soil, without sprinkling with soil on top, covered with film and periodically sprayed, the temperature for germination is 22°C;
- The children are raised in a greenhouse for a long time, periodically ventilated. Picking is carried out 2-3 times, depending on the density of the seedlings;
- after transplanting into separate flowerpots, the care of the young plant coincides with the care that is provided to the planted baby, obtained by the vegetative method;
- During the growth process, “unnecessary seedlings” are culled. Those rosettes that, according to the parameters set by the breeder himself, do not pass and are not interesting to him, are simply thrown away or given away;
- The last step to obtain a new variety is to check the result or consolidate it. In order to be called a full-fledged variety, a flower must transmit varietal characteristics when propagated by leaves or stepsons from three generations or more. Until then, I consider the plant to be a seedling.
To obtain specific parameters, multiple pollination is often used, thus adding more and more new rosette and flower parameters. To do this, a suitable seedling after the first pollination is dusted during the second flowering or pollen is taken from it and mixed with a suitable variety.
The process is repeated until the desired result or varieties are obtained that interest the breeder more than his original plan. This procedure is very labor-intensive and such work may take years, but the reward will be the varieties bred at the intermediate stages and, most importantly, a new, unique, final variety.
Pollination of Saintpaulias is a very complex process, especially for indoor bred species. Their anthers grow together, which virtually eliminates both cross-dusting and self-dusting.
In rare cases, the coincidence of damage to the anther in some way and the presence of an insect or other method of transferring pollen leads to dust.
Self-pollinating violets at home is almost impossible.
Typical mistakes during reproduction
When propagating violets, it is important to avoid mistakes. They will lead to the fact that the plant will not take root and will grow poorly.
The most common mistakes made by beginners:
- After planting, the young animals begin to be fed early. According to the rules, fertilizers are applied no earlier than every month.
- Winter is not the best time to separate plant parts; they grow poorly and there is not enough ultraviolet light for photosynthesis. In winter, the leaves increase daylight hours to 12 hours.
- Cuttings are cut only with a disinfected new blade or a sharp knife. When the tissues are damaged by hands, the cuttings rot.
- When propagating by part of a leaf, loose, but not too nutritious soil is needed. The sprout takes everything it needs from the mother leaf.
- Do not allow a large number of roots to form in the water. When planted, most of them die.
- The planted rosette should not have less than 3 leaves; this amount is optimal for the formation of the root system.
Knowing how to grow a violet from a leaf at home, you can assemble your own collection of violets
It is important to take into account the peculiarities of plant propagation methods, as well as purchase complete planting material from healthy violets
Rejuvenation methods
Be that as it may, if the violet is healthy, you should not throw it away immediately, because it is quite possible to return the flower to its former appearance. This can be done in two ways, depending on how much the trunk is exposed:
- Completely replant . If the violet has not stretched significantly, it should simply be replanted, but with one condition - when planting, the entire bare trunk should be deepened into the soil. Thus, new, additional roots will grow on it, which will nourish the upper part of the bush and after some time young leaves will form on it.
- Cut off and root the top . This method is used if the trunk is very bare and elongated.
Re-rooting sockets
It is known that the violet blooms safely and grows for 2-3 years, after which the stem lengthens and becomes bare, the violet loses its decorative effect, stops blooming, or simply has an unattractive appearance due to such a long stem. In this case, the plants need to be rejuvenated; this can be done by planting a cutting and waiting for the young plant to grow, or by cutting off the top part of the old plant and re-rooting.
You can germinate roots in water, but after water it is difficult for plants to take root in the soil and they need to create more favorable conditions.
The method of rooting in the ground is much more convenient. To do this, you need ordinary soil for flowering plants, lightened with cultivators and sand.
When can violet rejuvenation procedures be performed?
The optimal time for rejuvenation operations is the period of active growth of violets: spring and cool summer. At temperatures above 27 degrees and below 15 degrees, rooting processes are less efficient.
To quickly build up the root system, it is recommended to water the seedling with root formation stimulants in accordance with the instructions for the drug.
The period of budding and flowering is not the most successful for plant rejuvenation.
Remember! Each flower is a dependent, it takes away from the violet the strength that, when rejuvenated, it should direct to survival.
For a flower to take root as quickly as possible, active photosynthesis is necessary, since in the absence of roots, the plant receives energy only through the leaves. Therefore, long daylight hours are very important during the rooting period of the rosette. It can be provided with additional illumination of the plant with special phyto- or conventional fluorescent lamps.
Transplant timing
How to grow violet from a leaf at home
The most suitable time for violet rejuvenation surgery is the period when the violet is in active growth. This is spring and summer, but not the peak of the heat. If the air temperature is below +15 degrees and above +27 degrees, then rooting is slower.
To quickly grow roots, it is recommended to water seedlings with preparations that stimulate root formation. Use medications strictly according to instructions. It is not advisable to rejuvenate plants during the period of flowering and bud formation.
You can find Kornevin on sale
It is recommended to update Saintpaulia once every 2-3 years. At the same time, the soil is completely replaced. You need to choose pots that have a flat shape. In them, plants better draw moisture from the pan. We must not forget about the perforation in the bottom of the pot. When purchasing a container, you need to know the diameter of the plant’s rosette. They must match each other.
Additional Information! If the violet has grown greatly in the pot and produced many children, they need to be replanted: the shoots are dependent and take all the strength from the flower.
Plants need photosynthesis to survive best. And in the absence of roots, violets receive energy through the leaves. Therefore, during the rooting period, long daylight hours are needed. You can increase it if you install additional lighting using special phytolamps. But you can also install a regular fluorescent lamp.
general information
Before you rejuvenate an old violet, you need to familiarize yourself with the purpose of such a procedure. If the plant grows too much in the pot and feels a lack of space, it needs to be updated. Signs of aging:
- The appearance of a whitish coating on the ground.
- Soil compaction.
- Barrel exposure.
- Change in leaf color due to low acidity of the soil.
The violet develops in several stages:
- Rooting. Cuttings, fragments of leaf blades, annual shoots or roots are used as planting material.
- Bud formation and flowering period.
- Development of green parts.
- Exposure of the lower fragments of the stem with intensive growth of the rosette.
Old specimens quickly become bare, flowering deteriorates, and the leaves become covered with spots and defects.
Natural age-related changes are accompanied by varying degrees of exposure of the stem:
- 2 cm – in the early stages4
- 2.5 cm – in a neglected state.
Taking into account the appearance of Saintpaulia and the degree of damage, the gardener needs to choose a method of rejuvenation. In this case, the flower will begin to form a green mass and develop flower stalks.
To rejuvenate a plant with a long trunk, you need to dig it into the ground. In old specimens, a rosette is cut and rooted, from which a dense bush will be formed.
Preparing plants for planting and transplanting
Planting and replanting violets should be done with a complete replacement of the soil. Despite regular feeding, the soil is still depleted, and the flower does not receive from it the substances it needs in full.
Before transplanting and seating, you need to do the following:
- Tilt the pot and rotate the plant.
- Try to remove the bush along with the soil.
- Clean the roots from the old soil and carefully examine the violet, especially in the middle.
- Remove dry leaves and rotten roots.
- Rinse the new pot thoroughly and place a drainage layer in it.
- Fill the prepared soil and plant the plant in it.
- Leave the flower for a day, and then you can water it for the first time.
Caring for a young plant is no different. The flower needs to be provided with all the same conditions as all other violets.
How to update violet
There are two main ways to rejuvenate sockets; let’s look at each of them in detail.
Option one
It is suitable only for those stems that have not lost their green color and the exposed area is no more than 3-4 cm. The method consists of transferring the plant to a new pot and substrate with a recess of the exposed stem.
How to make a transplant:
- Carefully remove the violet from the ground.
- Cut the stem where the earth ball begins.
- Pinch off any wilting leaves from the rosette.
- Plant the rosette in a new pot with fresh substrate so that the stem reaches its full depth.
- Lightly water the plant in the new pot.
- Cover the flower with a plastic bag so that some air gets inside and leave it in this state for 10 days. During this time, water the flower 1-2 times.
After the time has passed, remove the greenhouse and care for the Saintpaulia as usual. Soon the stem will take root, produce new roots, and you will see how the violet actively begins to grow.
Option two
When the stem has already become significantly stale and brown, it may not take root in a new place. Here you will have to act somewhat differently.
- Remove the plant from the substrate.
- Cut off the stem at the very earthen clod.
- Remove all the lower leaves, leaving only 6-7 pieces at the very top. This is necessary so that the violet puts all its energy into growing roots.
- Using a sharp knife, remove the dried skin from the stem until the green part appears.
- Place the socket in the water so that the entire exposed area is covered.
Change the water every 3 days. After 10-12 days you will notice that new roots have appeared. When their length reaches 2 cm, the violet is ready to be transplanted into the ground.
Prepare a pot, don’t forget to provide drainage, and plant the stem in new soil.
When is the best time to rejuvenate violets?
In addition to the main points, such as the flowering period, during which the plant is not replanted or rejuvenated, there are more and less favorable days. This is due to the phases of the moon.
Violet transplant calendar for 2022
| Month | Favorable period for rooting non-varietal violets | Favorable period for rooting variegated and ampelous violets | Undesirable days for transplantation and other manipulations |
| January | 1, 2, 24, 28, 29 | 3, 30, 31 | 5, 6, 7, 8, 9, 12, 13, 14, 21, 22 |
| February | 1, 21, 25, 28 | 26, 27 | 3, 4, 5, 9, 10, 18, 19, 20 |
| March | 23, 28, 29 | 25, 26, 27 | 3, 4, 5, 6, 8, 9, 13, 17, 18, 21, 22, 30, 31 |
| April | 2, 3, 20, 24, 25, 26, 29, 30 | 22, 23 | 1, 4, 5, 6, 12, 13, 14, 15, 19, 21, 27, 28 |
| May | 1, 21, 22, 23, 27, 28, 31 | No | 2, 3, 4, 5, 11, 12, 19, 20, 24, 25, 29, 30 |
| June | 18, 24 | 30 | 2, 3, 7, 8, 17, 19, 20, 21, 22, 25, 26, 27 |
| July | 21, 25, 26, 30 | 27, 28, 29 | 2, 4, 5, 10, 16, 17, 18, 19, 23, 24 |
| August | 16, 18, 21, 22, 27 | 24, 25 | 1, 2, 14, 15, 17, 19, 20, 28, 29, 30 |
| September | 18, 19, 22, 23, 24 | 20, 21 | 7, 10, 11, 12, 14, 15, 16, 17, 25, 26, 28 |
| October | 15, 16, 21 | 17, 18, 19 | 6, 7, 8, 9, 12, 13, 14, 22, 23, 27, 28 |
| November | 16, 17, 20 | 13, 14, 15 | 4, 5, 9, 10, 12, 18, 19, 25, 26 |
| December | 13, 17, 19, 23 | No | 1, 2, 6, 7, 12, 15, 16, 25, 26, 28, 29, 30 |
Caring for violets
Caring for violets is not difficult - as already mentioned, they grow in almost any conditions, the most important thing is nutritious soil and the absence of direct sunlight. Caring for violets comes down to the following:
this plant loves moisture, so violets need to be watered little by little, but often enough; if possible, provide them with bottom watering by simply placing pots with holes in the bottom in trays with water - this way the flowers will always receive the amount of water they need; It is recommended to periodically add liquid fertilizer for violets to the water for irrigation, diluting it in the required proportions
It is especially important to feed your violets during budding and flowering; Do not under any circumstances spray water on the violets, even if it seems to you that they are hot - plants with shaggy leaves do not tolerate this procedure well, the leaves become stained and die; if you feel that the air is too dry, just place containers of water next to the violets - you can use ordinary deep bowls, this will be enough.
As you can see, caring for violets is not difficult at all, and even a novice flower lover can handle them.
General recommendations for transplantation
- The Saintpaulia pot must be exactly the right size and have a drainage hole.
- It is imperative to lay drainage material at the bottom of the pots.
- Violet loves neutral soil. It is better to buy a ready-made one, which contains everything you need.
- Water the flower with warm filtered or settled water.
- You cannot use old soil by mixing it with fresh soil. Old pots are also not used.
- A newly transplanted violet needs to be given the most favorable conditions possible.
Rejuvenation process
The plant renewal process itself does not take much time. If you do everything correctly, the flower will again regain its decorative properties and will be pleasing to the eye.
Update methods
There are several ways to rejuvenate indoor Saintpaulias at home:
- Through cuttings. A leaf is taken from the main bush, placed in water, and soon roots appear on it. The disadvantage of this method is that it is time-consuming, since it will take about 2 years to grow a new bush from a leaf.
- This method is suitable if the bare part of the stem does not exceed 3 cm and is green in color. You can rejuvenate a violet by deepening the stem. This method is simpler and painless for the plant. Professionals advise practicing this method rather than waiting until the violet grows strongly and more radical measures are required.
- For old Saintpaulias, whose trunk has already become very coarse and brown, a different method is used. You need to root the cut off stem of an old violet in water.
Step-by-step instruction
The first method is the most common. Many had to bring home leaves and sprout roots on them:
You need a glass of warm water, where crushed activated carbon is added for disinfection to eliminate diseases of violets. A leaf is placed in the container (preferably 2 or 3, since not all leaves germinate). After 1-2 weeks, roots will appear
It is important to ensure that the stems do not rot. The cutting is placed no more than 1.5 cm deep into the soil. In a month, a new sprout will appear on it.
The main stages of the step-by-step instructions for rejuvenating violets using the second method are as follows:
- First, the plant, along with the root and soil, is removed from the pot.
- Excess lower leaves are removed from the trunk.
- Using a sharp knife, cut off half of the clod of earth.
- In a new pot, drainage with a substrate is placed and the plant is placed there.
- The earthen lump around is filled with substrate and covered with it on top.
- The transplanted flower is watered with water at room temperature and covered with half a plastic bottle or a transparent plastic bag. The main thing is to create a mini-greenhouse for the flower.
After some time, the plant stem sprouts new roots that will nourish the flower.
How to renew a violet with a long stem?
This method is suitable for an old plant when the trunk is not capable of producing new roots:
- The violet is removed from the pot along with the soil.
- The lower leaves must be removed, leaving no more than 6 leaves, since the plant will be weakened and at first it will not have the strength to feed a lot of green leaves.
- Using a knife, cut off the stem 3 cm below the beginning of leaf growth and sprinkle it with activated carbon.
- The rough brown skin is carefully scraped from the violet stem to the green surface, after which it is dried.
- The cut off top of the flower is placed in water.
In a few days, the renewed old violet will take root. When they reach a length of about 2 cm, the violet is planted in an earthen mixture and a greenhouse is made using a transparent container.
Additional recommendations
A pot for replanting violets should be chosen the same size or slightly larger, with a drainage hole in the bottom. The container must be lined with drainage material; the soil must be neutral. Water the plant with warm filtered water.
When renewing violets, new soil and a new container are used; florists do not advise mixing old soil with new one.
Following these recommendations and proper care will make the transplant as beneficial as possible for the plant.
The right time for violet rejuvenation
You can rejuvenate violets at absolutely any time, but it is best to leave this procedure for spring. In this case, you do not have to add additional light to the plant and provide 12 hours of daylight.
It is also not recommended to rejuvenate the violet during flowering and active bud formation. You can deviate from this rule only if the plant is sick or has been attacked by pests.
External factors
External factors also play a role in the flowering process. Both heat and cold can destroy a flower. High temperatures above zero will cause the color to dry out. The heat will quickly dry out wet soil, harming the roots. On days like these, when the thermometer remains at high levels, you should spray or place a container of water next to the pot.
Low temperatures threaten the plant with the fact that it will not be able to survive the dormant period. The temperature should be kept above 17 °C.
Important! The most dangerous thing is sudden temperature changes. The painless difference should be no more than 3 °C
Signs of violet aging
The serious age of a violet can be determined by the following signs:
- blooms sparingly;
- small flowers;
- crooked rosette;
- bare stem;
- problems with leaves: dark spots, a border unusual for the variety on the edge of the leaf blade, curled, limp leaves even with sufficient watering;
- shrinking of central leaves.
Sometimes the same signs can be observed even in young (2-3 years) Saintpaulias. The reason for such early aging may be the soil.
Carefully examine the earthen ball in which the violet grows.
If you see that:
- there is a white coating on the surface of the substrate (precipitated salts contained in the irrigation water);
- the soil has compacted, i.e. there are no air sinuses, so necessary for the violet to breathe the root system;
- the chemical composition of the soil has changed - it has become acidic from the “wrong” water;
- the root system is cramped in the container,
then the time has come for active action to save the young but already sick violet.
The best time for rejuvenation
Home violet blooms gracefully until the age of three. The lifespan of its lower leaves is approximately 14 months. Then they begin to lose their decorative properties, turn yellow and curl. Yellowed leaves fall off on their own or can be torn off by hand.
After a couple of years, the trunk below remains without leaves. It starts out green in color but turns brown over time. Over the years, the trunk becomes covered with a crusty layer, reminiscent of oak bark. Upon reaching the age of three, the violet becomes less attractive, looking dull and sickly.
In order for the plant to always look neat and impressive, it is necessary to rejuvenate it every 3 years.
Strawberries for growing at home “Nature’s Pantry” for 149 rubles (advertising)
Where does violet selection begin?
When planning to develop a new variety and taking this issue seriously, the breeder defines a goal. To do this, he determines a set of factors that he wants to see in the new variety:
- size and shape of the outlet;
- leaf shape;
- flower size;
- flower shape;
- leaf color;
- the color scheme of the bud at different stages of growth.
Knowing the requirements for the future bush, the selection of maternal and paternal individuals begins. When propagating from seeds, it does not really matter which bush will perform which role.
Sometimes, to obtain all varietal characteristics, it is necessary to carry out more than one crossing, but several stages.
The parent bushes must have parameters that are desirable for the new variety. At home, they usually use the seed selection method; for some varieties, the leaf method is available.
It is necessary to take into account the dominance and recessivity of some of them. The first concept implies a strong gene that suppresses the second option.
For example, a standard size when crossing a mini and a standard is more likely to be obtained than a mini or semi-mini.
This parameter does not mean that all 100% of children from breeding will receive a dominant gene, but their number will significantly exceed children with a recessive parameter.
The table shows the main variants of the variety's characteristics, divided into strong and weaker ones.
| Dominant | Recessive |
| Strong peduncles | Flower stalk |
| Double flowers | Simple form |
| Simple flowers | Star shape |
| Solid color | Two-tone tone |
| White, blue, purple color | Pink, coral, yellow |
| Fantasy color | Regular color |
| Border around the edge (especially white, pencil) | No border |
| Pointed petal | Regular form |
| Fringe around the edge | Smooth edge |
| Girl leaves | Fight leaves |
| wavy leaf | Regular edge |
| Regular sheets | spoon shape |
| Narrow leaves and long petioles | Wide with short stems |
| Standard size | Mini and semi-mini |
The examples given are the result of observations by experienced breeders, but the result always depends on the specifically selected parent varieties.
In addition, among seedlings both parameters of mother plants are usually found to a greater or lesser extent, for example, there will be many more standards, but there will still be mini ones.
What does a horned violet look like?
The culture belongs to the violet family. The plant has several names: horned violet, viola, pansy.
History of appearance
Horned violet is native to the mountainous regions of Spain and France. This is a perennial plant that forms cushions of stems around itself. The viola got its name from its appendage that looks like a spur or horn.
Horned violet
Varieties
Breeders have developed many varieties of horned violet. The most effective of them are the following:
- Johnny;
- Pupa;
- Perfection;
- Gzhel patterns;
- A penny;
- Cheerful family;
- Blue Moon;
- Black magic;
- Yoke.
Important! In order for the bushes to maintain their decorative appearance, the buds must be removed after flowering.
Horned violet Black magic
Size
The height of violet bushes varies between 10-30 centimeters. The leaves are green, pointed, about 4 centimeters long. The root is creeping, thanks to which the plant grows well, forming a carpet.
Color
Violet petals can be one-color, two-color, or three-color. The buds, depending on the variety, are colored in shades of white, lilac, yellow, purple, and red.
Flowering time
The flowering period of the horned violet is long: it begins in early May and ends at the end of September. In spring the flowers are the largest; by autumn they become smaller and there are fewer of them.
Habitat
The plant lives in many parts of the Earth. It can be found in Western Europe, Central Africa, South America, and New Zealand. Violet prefers to settle in mountainous areas.
Peculiarities
After flowering, a tricuspid capsule is formed. When the fruit dries, it bursts and the seeds spill out. They can spread over a distance of 5.5 meters and germinate on their own.
Seed pod
How to slow down the aging of violets?
The inevitable aging process can be significantly slowed down if you follow the Saintpaulia transplant schedule.
How often should a violet be replanted?
It depends on the method of watering:
- if top watering or watering through a tray is used to care for violets, then it is enough to replant once a year, in the period March-April;
- if wick irrigation is used, then the frequency of replanting should be higher - every six months.
The container into which the violet is transplanted should be no larger in diameter than 1 cm wider than the diameter of the rosette of leaves.
When replanting, it is recommended to completely change the soil without using the old substrate.
This schedule can be changed if there is a noticeable deterioration in the condition of the soil: salt deposits, caking. In this case, transplantation and rejuvenation are carried out earlier than scheduled.
Why do you need to update violets?
Sooner or later, the violet begins to lose its decorative beauty. The leaves become thinner, the stem becomes bare, and buds appear less and less often. If nothing is done, the appearance of the plant will only worsen every day.
In addition, a bare stem negatively affects the well-being of the flower: the violet slows down its growth, its new leaves remain small, and it seems to “fall asleep.”
A regular transplant will not help here. Saintpaulia needs to be rejuvenated by removing everything unnecessary from it. Otherwise, the flower will die much earlier than it could survive with proper care.
Care after transplant
After about 2-4 weeks, roots appear on the transplanted cuttings. When they grow 2 cm, the shoots are transplanted into a plastic cup. When germinating cuttings in the ground, this period is shortened.
It is very important to provide favorable conditions for establishment and further growth. Violets are light-loving plants
Your pet will feel most comfortable on a window facing east.
It is not recommended to choose west and north. On northern windows you may never wait for flowering. But on the south side the plant will need shading, since too much light can cause the leaves to burn out.
It is better to place flower pots on the windowsill because violets love natural light. If such conditions cannot be created, then the place must be equipped with fluorescent lamps.
Attention! Direct sunlight is not recommended. They have a detrimental effect on Saintpaulia, as well as draft and cold
To form a rosette evenly, the container must be gradually rotated so that the foliage turns towards the light source. But it is not advisable to change the location of the room itself: plants are very sensitive to this.
Watering violets, like other indoor flowers, depends on the air humidity in the room. If the house is humid, reduce watering to once a week. In dry rooms, watering is carried out two to three times a week. Air humidity changes depending on the season. This must be taken into account when watering.
With proper care, violets bloom very beautifully.
Violet does not like excess moisture. Therefore, it is recommended to pour water into the tray. In this case, the plant will take the required amount of liquid on its own.
Water for irrigation should not contain heavy salts. It is recommended to stand, and the temperature should be at room temperature. The leaves are periodically washed with running water, but they should not be wiped to avoid damaging the hairs. The foliage dries out naturally. During this time, exposure to the sun's rays is not allowed - otherwise a burn may occur. Therefore, such water procedures should be done in the evening or at night. By morning the leaves will have time to dry completely.
As can be seen from the above, rejuvenating violets at home is a painstaking process and requires patience. But if the plant is provided with good conditions, its splendor will certainly delight everyone around it.
Saintpaulia rejuvenation methods
There are 3 ways to rejuvenate your favorite varieties of violets:
- Planting a leaf.
- Digging in the stem.
- “Blowing off the head” of a violet: re-rooting of the rosette.
Rejuvenation through leaf planting
This is the most common method of propagation and rejuvenation of violets. To do this, use a sharp knife to cut off the petiole with the leaf blade and place it in water so that the water does not touch the leaf. You need to add a crushed tablet of activated carbon to the water.
You can do without the intermediate step of soaking the leaf petiole in water. To do this, perform the following manipulations:
- dip the petiole cut into the root stimulator;
- cut the leaf by 1/3 (if the leaf blade is large)
- planted in a moist, nutritious, light substrate;
- cover the top with a cut plastic bottle or plastic bag to create a greenhouse effect. Once every 2-3 days, the greenhouse is opened slightly for ventilation.
You can get a renewed plant much faster using other methods.
Digging in a Saintpaulia stem
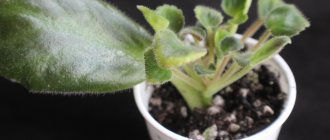
A special feature of the violet is that roots form not only at the buried leaf, but also at the stem buried in the ground. This feature of Saintpaulias is used when the plant “sticks out” from the ground by no more than 1-2 cm. That is, the violet resembles a palm tree on a short trunk. But this trunk is quite viable: green, not overgrown with dead scales and cuttings from removed leaves.
- cut off (or break off with your hands) the lowest layer of leaves;
- Sprinkle the bare stem down to the lower leaves with a layer of fertile soil or moss.
Carefully smooth the poured soil
Unfortunately, only attentive violet owners can see this phase of the plant. Most people begin to think about the reasons for the aging of Saintpaulia when its stem, protruding from the ground, grows to 5-6 cm.
Then comes the phase of radical surgery. Amateur flower growers call it “removing the head of the violet,” and professionals call it re-rooting the rosette.
Re-rooting a violet rosette
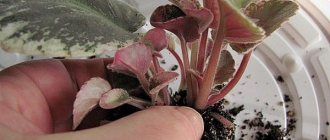
The very last phase of Saintpaulia development is when the shredded rosette leaves, curled, limp and spotted, barely grow on the tall brown stem. As a rule, lovers part with their pets without regret at this time, complaining about their capriciousness.
And even novice flower growers are quite capable of correcting this deplorable situation of the violet!
To do this you need to follow simple steps:
Trim the stem of the violet, without removing it from the pot, at ground level.
- Tear off the lower and diseased leaves as close to the trunk as possible, leaving no more than 6-8 upper, central leaves, trying to ensure symmetry.
- Using a sharp knife, clean the stem from brown dead growths - remnants of petioles - to healthy green tissue.
- Remove all buds and flowers, if any.
- Leave the top to air dry for 30-40 minutes. Some recommendations suggest sprinkling the cut areas with crushed activated carbon. I didn’t sprinkle it, but I placed the cut violet in Kornevin’s solution for 20 minutes.
- Prepare a light substrate for rooting the cut top of the violet, consisting of turf soil, sand and perlite in a ratio of 1:1:1.
- Pour the moistened substrate into the pot and lightly press it down.
- Make a depression in the center with a diameter equal to the diameter of the stem.
- Place the violet in the hole, deepening it to the lower leaves.
Lightly water the substrate, being careful not to get water on the leaves.
If the room has dry air, you can place the seedling in a mini-greenhouse made from a cut plastic bottle or plastic bag. To prevent rotting of the seedling, it is recommended to make 5-6 holes in the film or regularly open the greenhouse for ventilation.
To activate root growth, potassium and phosphorus fertilizers are used, and they need to be applied at the initial stage of rejuvenation in a proportion half that recommended by manufacturers.
Violet does not like spraying its leaves, but at a time when there is no root system, foliar feeding and spraying with antidepressants: HB-101, Epin, etc. help it a lot.
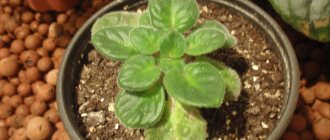
Usually after 3-4 weeks the rooting of the top occurs.
By way of repetition, here are the main points of rejuvenation:
Renewing a violet with a cut top
With the transplant, in principle, everything is clear, but what is the correct way to “blow off the violet’s head”? After all, this is a serious intervention, and if you do something wrong, you can destroy the flower.
So, first of all, you need to use a sharp knife to completely cut off the violet at ground level at one time, without taking it out of the flowerpot.
Before use, the knife must be disinfected - wiped with alcohol.
Now clean the lower part of the bare trunk from stumps and dry scales, scraping them with a knife, like the skin of a carrot, until living tissue appears.
Place expanded clay at the bottom of the pot and fill it with a light nutrient mixture. Moisten the soil, make a depression in the center and simply insert the cut “head” of the violet into it. Compact it a little so it doesn't wobble.
If the procedure is carried out in the summer, it is better to place the violet in a glass of water for rooting, since it will simply cook in the greenhouse.
The planted top should be placed in a greenhouse so that it grows roots faster. This will take about two weeks, during which it is necessary to periodically ventilate the greenhouse and moisten the soil. Once the violet has taken root, it can be placed on the windowsill.
How to properly rejuvenate a violet with a cut top - video
General information about the development periods of violets grown at home
It is easy to identify the main life cycles of Saintpaulias:
- rooting of planting material using a cutting, a fragment of a leaf grown from a shoot seed, or the germination of roots from a stepson (a shoot formed in the axil of a leaf or at a stipule);
- laying of flower buds, formation of a peduncle, flowering;
- increasing green mass;
- maturation - exposure of the lower part of the stem, critical growth of the rosette.
The old flower looks unpresentable, and the soil becomes poor, salty, and compacted
For your information! The trunk of the old Saintpaulia becomes bare over time, and flowering becomes scarce. The condition of the leaves deteriorates, spots appear on them, a border that is not typical for the species, and irregularities.
The period when a violet is considered old
Flower growers determine the stages of natural aging of a potted plant by the length of the bare stem:
- for the initial stage, length 2 cm;
- advanced stage - a trunk more than 2.5 cm long.
When young plants age, measures must be taken immediately to save the species.
Conditions for successful rooting
The rooting violet needs to be kept in a bright, warm place, so I place it on a shelf under a phytolamp. It will take about two to three weeks for the roots to grow, and since the plant is rooting in a small clear cup, I will be able to observe the process. When the violet fills the entire soil with roots, I transfer it to a larger pot.
As you can see, the procedure for rejuvenating violets is not at all complicated. It can be done even by a beginner florist who has no skills. And I wish everyone good luck, good mood and lush violet blossoms.
- Picking a Shabot clove from a paper tablet
How to rejuvenate violets at home?
can be done in several ways
- adding soil;
- replanting with deepening of the exposed trunk;
- rooting the cut top.
What you may need when replanting a plant:
- light soil for Saintpaulias containing sphagnum, perlite, peat and charcoal;
- drainage: foam;
- expanded clay;
- sphagnum moss;
- perlite
Replanting with deepening of the bare trunk
The violet is about 4 years old. It blooms, the upper leaves are large and elastic, but the picture is spoiled by the bare stem of the plant. In this case, you will need a new, larger pot and fresh soil.
What needs to be done during such a transplant:
- Disinfect a knife or scalpel and peel the Saintpaulia stem down to green tissue;
- Sprinkle the wet trunk pulp with crushed charcoal and leave to dry;
- Break off or cut off all unnecessary leaves;
- Place a drainage layer and some fresh soil in the new pot;
- Carefully remove the plant from the old pot with a lump of earth and place it in a new pot;
- Add fresh soil to the border of the lower leaves, water the plant and place it in a greenhouse for 2-3 weeks.
Transplantation with deepening.
Adding soil
The simplest and least depressing method for the plant. Suitable for violets whose lifespan is no more than one and a half years, when the lower tier of leaves has either lost its decorative effect or has already been removed by the owner. A small bare stem has formed between the soil and the crown of the flower.
The violet update occurs as follows:
- Cut off or break off the remaining lower leaves;
- The trunk at this age will be green, so there is no need to strip it;
- You can cover the stem with sphagnum moss, or you can simply fill it with fresh soil to the border of the lower leaves;
- Moisten the flower (do not overfill it!) with warm water.
Why might you need to rejuvenate a violet?
Over time, violets (another name for Saintpaulia) lose their decorative appearance, because plants, like all other living organisms, tend to age. It is important to know how to renew a violet. After all, only the first 2-3 years will delight Saintpaulia with abundant flowering.
Blooming violets decorate our lives
The leaves of the lower tier of young plants live only 1 year. Then they curl up and die. The stem may become bare and woody. The inflorescences become small and inconspicuous, the former beauty disappears.
All this suggests that the violet is far from young, it’s time to renew it. This old lady can get her second wind. And if rejuvenation is carried out, then Saintpaulia will again delight with abundant flowering.
Only young violets delight with large flowers
Beginning flower growers have a question: how to prune a violet so that it blooms more? Leaves are cut with scissors or simply removed by hand without waiting for them to dry. If the violet has grown greatly in the pot and has become lush, such pruning is very useful: it promotes abundant flowering in the future.
Another good question: should you pluck the bottom leaves of violets? If the leaves are juicy and fleshy, this will not cause harm. But if the plant is weak and the leaves are already old, then the conditions are unsuitable. Saving leaves or, conversely, cutting them off will not help. An emergency transplant or taking a healthy leaf for propagation is needed.
Attention! The older a violet gets, the more it becomes like a palm tree, with a bare stem and a flowering crown.