Often during the holidays, flower lovers leave their plants for a long time without attention or care. It’s good when there are good neighbors or relatives who will periodically visit the apartment and water the flowers.
And if there are none, what should we do? There are ways to provide flowers with life-giving moisture and organize automatic watering for indoor plants . Let's look at the simplest and most popular ones.
Plant preparation
If the trip did not come as a surprise, it is better to prepare the plants in advance for the upcoming changes.
- Place in the shade to reduce evaporation. It also depends on the time of year, the presence of working heating devices and ventilation in the room.
- Remove affected leaves and inflorescences. Professionals advise partially thinning out healthy leaves, and be sure to remove not only blooming flowers, but also buds. This measure may seem cruel, but it will allow the plant to use water more economically.
- Wipe the leaves and spray them with a spray bottle.
- Place all flower pots in one place and cover the top with film, making several holes in it for air flow. An alternative to film can be a covering material - it is more porous, promotes air exchange and prevents the formation of mold.
- If you are placing flowers in groups, isolate diseased plants. In the immediate vicinity, even a banal fungus will quickly infect healthy neighbors.
- Immediately before leaving, all flowers need to be watered well. In rare cases, the plant is taken out along with the earth (a lump) and lowered into water, but not for long - so that the earth does not crumble.
Electrical circuit of an improved automatic plant watering machine.
| R1*, R3, R4 = 22.0 R2, R7 = 100k R5 = 5.1 R6, R8 = 12k R9, R10, R15, R21, R22 = 1k R11 = 470k(B,V) R12 = 30k R13 = 47k R14 = 24k R16 = 1.0M R17* = 6.2M R18-20 = 15k SA1 = MT-3 | VD1 = FD263 VD2, VD3, VD4 = KD510A VD5 = AL307B VT1, VT2, VT3 = KT3102 VT4 = KT973B C1 = 0.22 C2, C4, C7 = 10.0 C3, C5, C6, C8 = 0.1 DD1.2 = K561LE5 (CD4001A) FU1 = 3A M1 = 12V 2.5-3A |
So that any lady could use the machine after reading a few lines of instructions, the circuit had to be significantly improved.
Now, to adjust the machine, it is enough to insert the electrodes of the soil moisture sensor into the pot, the soil of which already requires watering, and set the resistor R11 to a position at which the VD5 LED will just start blinking. At this point, the setup of the electronic part of the machine can be completed. The regulator scale allows you to record the relative soil moisture values on paper.
How it works?
When switch SA1 is switched to the “Tuning” position, the photosensor and the pump starting circuit are blocked, and an additional pulse generator is turned on.
The pulses of the measuring generator are sent through the VD4 diode into the same measuring circuit, which controls the machine in operating mode. The setting is made using the VD5 LED indicator.
To simplify the transition to the setup mode, the “protective” timer circuit was also changed by adding element DD1.3 and timing circuit R5, C3.
Return to top to menu.
Do-it-yourself capillary irrigation, watering on fabric
- An automatic watering system can be organized using a glass jar and terry cloth. Place a damp, wrung-out towel at the bottom of the tray. Place pots of flowers on it.
- Pour water into a glass jar, close it with a lid with a small hole made (10 - 15 mm). A 3-liter bottle with a nylon sealed lid is suitable. In my photo - a half-liter with a regular screw cap. Cover the hole with your finger, turn the jar over and place it upside down there, on this terry towel. You will see air bubbles rushing upward. Water will seep out little by little from the hole in the lid.
- Turn the jar of water over and place it on a towel next to the flowers.
- Once the towel is sufficiently damp, air will stop flowing into the jar and water will stop flowing out.
- Check: Wring out the towel and place the jar of water back on it. Air bubbles will appear and the process will repeat - this means the automatic watering system is working. (Without a towel, water will not flow out of the jar.)
- How much water will flow to the plants depends on the type of pots and drainage (see above - watering with a bottle), as well as the thickness of the towel. It’s worth checking 10 days before your vacation to see how this automatic watering system will work.
Alternative options
As an alternative to medical droppers for self-equipping a drip irrigation system, you can use:
- plastic bottles and ballpoint pen refills;
- PVC pipes;
- rubber hoses.
Read how to make a drip irrigation system from plastic bottles here.
Capillary mat
The towel with the jar can be replaced with a purchased capillary mat for watering seedlings. The mat is pre-impregnated with water and pots of flowers are placed on top of it; a jar is not needed here. One square meter of capillary mat absorbs about three liters of water. The mat is covered with a film with many holes to reduce water evaporation and to prevent roots from growing from the pots into the mat.
Getting ready to leave for a few days, I made a capillary mat for seedlings with my own hands. Place a piece of terry towel on the bottom of the tray. I covered it on top with a thin film with holes. (Without film, the roots grow into the fabric.) I installed watered pots with seedlings.
- I folded thin cling film in several layers and made many holes, at least one for every square centimeter.
- Carefully unfolded and laid on top of the towel
- Now more details. The pallets were installed strictly horizontally, without tilting, so that the water did not flow to one side. Before laying, I moistened the towel from a measuring cup. (In order to know how much water it absorbs without forming a “swamp” in the pan.) I took pots with drainage holes at two levels: on the ledges and in the depressions of the bottom: the roots need not only water, but also air. A thick towel should not be folded in several layers, so as not to block air access to all holes.
- I placed a damp towel at the bottom of the tray, covered it with a film with small holes and placed pots with watered seedlings.
- I watched the plants for several days. I decided to add a layer of fabric, since the towel was thin and there was not enough water for 5 days. Before leaving, I watered the seedlings from above into the pots, poured measured amounts of water into the tray, distributing them in different places. The method works if all conditions are met.
Reflections.
First we had to decide how to automate the delivery of water to the plants. In industrial irrigation installations, either electromechanical valves or pumps are used for these purposes.
The disadvantage of an electromechanical valve is that it requires some water pressure. That is, the vessels with water would have to be raised above the level of the flowerpots. Lifting 50 or even 150 liters of water is difficult and dangerous. If the valve or water supply pipes leak, then the entire supply of water will end up on the floor and possibly not only on mine.
It is impossible to connect the irrigation system to the water supply for a number of reasons.
First reason. Water for irrigation should not contain chlorine, that is, it should be settled.
The second reason and perhaps even more compelling. When leaving for not even a few days, the inlet water valves should be shut off, as this is the only way to relieve yourself of responsibility in the event of a pipe break.
As for water pumps, they can pump water from bottom to top. Moreover, any leak can manifest itself only in very short periods of time, namely when watering occurs.
In a matter of minutes, a small water leak is unlikely to cause much damage. If an accident occurs and the pump does not turn off, then it is much easier to break the power supply circuit of the pump control circuit than to turn off the water in front of a jammed electromechanical valve.
Yes, in terms of reinsurance, I am an expert. But, after all, one serious natural disaster caused by a leak can force a modest downshifter to take an uninteresting job.
Return to top to menu.
Types of automatic watering
Creating automated irrigation does not require expensive equipment. Let's consider the main ways of organizing such systems.
Here we consider systems designed exclusively for watering indoor plants; also on our website you can study the issue of organizing automatic watering systems for your dacha.
Drip
This is the simplest “automatic waterer” that can be made from an ordinary plastic bottle. The algorithm is as follows:
- you need to take a two-liter PET bottle with a stopper, cleanly washed from the inside;
- cut the bottom with a knife to make a funnel. It will be needed for the convenience of pouring water;
- Make a small hole in the removed plug. It can be made with an awl or drill of the appropriate size (3–4 mm);
- A single layer of mesh or gauze should be placed over the neck to prevent clogging. The fabric itself is also wrapped around the thread;
- Next, the plug needs to be screwed onto the thread of the neck so that the fabric/gauze is fixed.
Automatic drip watering for indoor plants, prepared for use, is turned upside down with the plug. Then you can go in two ways:
- dig the bottle into the ground;
- hang it so that it barely touches the surface;
- All that remains is to fill the system with water, and the simplest automatic watering is ready.
Important: it is advisable to choose a bottle of such a capacity that it matches that of the flower tub or pot.
Method using a wick
A rope woven from fibers is capable of carrying water along its length. This curious physical property is also useful in irrigation.
How to make automatic watering for indoor plants using a wick:
- take a piece of rope that will become a wick;
- one end is lowered into the filled container;
- the second is brought to the plant;
- the wick will absorb water and transport it to the flower.
The wick rope can be fixed directly to the ground or inserted into the drainage of the tub. The first option is well suited for plants living on a light nutrient substrate, like violets.
It is advisable to select laces made of synthetic materials - they absorb and conduct water well. It is not recommended to use ropes made from natural fabrics: in the ground they quickly begin to rot, tear and cease to perform their function.
An important advantage of the wick system is ease of adjustment. If you raise the water container higher, the watering speed will also increase; if you lower it, it will decrease. Through experimentation, you can choose the optimal speed for an individual flower.
Important: if you transfer indoor vegetation to constant wick watering with a cord inserted into the drainage of the pot, you can do without laying a drainage layer.
Hydrogel or clay granules
This can be attributed to modern and high-tech methods. Containers or protruding bottles placed around flowers look ugly and unaesthetic, but hydrogel allows you to do without them. It consists of balls of a special material or granulated clay - they can be purchased at home and garden stores.
These substances quickly absorb water and gradually release it to the soil as it dries.
When laying hydrogel/clay for automatic watering, it is important to consider that after absorbing water they greatly increase their volume.
You need to choose a spacious and wide flower pot. A layer of the selected material is poured onto its bottom, and a plant with a lump of earth is placed on top. The free spaces between the walls of the tub and the lump are also filled with an absorbent substance. After watering, it will be enough to periodically add water, the hydrogel or granules will do the rest.
Important: after watering, the pot should be covered with film. This is done to avoid rapid evaporation of moisture.
The materials in question are reusable: they can withstand many watering-drying cycles, and such automatic watering of flowers can last for many years.
Automatic watering system from a medical dropper
Gardeners often use drippers to create “automatic waterers” in greenhouse beds. With the same success, these medical products can be used for indoor flowers.
This homemade automatic watering for indoor plants is somewhat similar to wick watering:
- the system tube is taken. A weight is attached to one end of it - it is needed to prevent floating;
- the second is fixed at the roots of the flower above the ground;
- a vessel filled with water is placed above the pot;
- then the end of the dropper tube with a fixed weight is lowered into it;
- the system opens, and the rate of water flow is adjusted by the regulator.
Watering with flasks
In stores you can buy colored plastic cones of various shapes with a long spout. They can not only become an effective DIY flower watering system, but also an original decoration.
The principle of use is simple: you need to take such a flask, fill it with water and insert the spout into the soil of the pot.
If the soil is damp, water will not flow out of the vessel. But when the soil dries out, it will allow oxygen to pass through, which will enter the flask and displace water. This is a very simple method of supplying liquid to plants using the laws of physics.
Capillary mats
This is a popular solution among gardeners. The capillary mat is a product of modern technologies for watering home gardens - a mat made of highly hygroscopic material. They absorb water well and effectively release it to the soil with planted vegetation.
To install automatic watering on mats, you need a couple of pallets of different sizes. Water is poured into the larger one. After this, a small tray is immersed in it, the bottom of which should contain perforations. A capillary mat is placed on the perforated bottom, and vegetation in need of watering is placed on it.
Another installation option, also somewhat similar to the wick one:
- the mat is laid on a flat surface (for example, a table);
- flower pots with drainage at the bottom are placed on it;
- the edge of the mat is lowered into a vessel filled with water;
- the material will absorb liquid and transport it to the greenery.
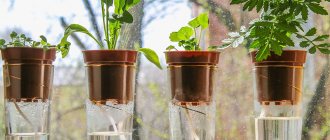
Pots with automatic watering
Enthusiasts often use automatic watering for indoor flowers based on advanced flower pots that provide the vegetation with water for about a month. Structurally, this is a container with a double bottom; You can simply use two pots of different capacities inserted into each other. Whatever the design, the principle is the same - double bottom.
Water is poured into the outer vessel. The inner one contains a drainage hole through which liquid enters the substrate. And from there the water is absorbed by the roots of the flowers.
Important: such a pot is not suitable for young house plants. Their developing root system is too short and is not able to “extend” to a depth sufficient to feed from the drainage layer.
How to use this device correctly:
- the bottom of the internal vessel is lined with a draining substrate;
- a young flower or other plant is planted on it in the prepared soil;
- The outer vessel is not filled with water at the first stage. The planted flower should be watered in the usual way, from above, until the root system gets stronger and reaches the drainage. As a rule, this process takes about two to three months - depending on the type of plant;
- After this, you can begin organizing automatic watering. The lower vessel of the flowerpot is filled with water: for this purpose, the product is usually equipped with a special tube and an indicator float. Water is poured until the MAX mark is reached;
- In addition to the last mark, there is also a MIN mark. When the float reaches it, it is necessary to repeat adding water. But you can postpone the procedure for another three to four days; the soil will still remain quite moist.
There are other ways to determine the dryness of the soil in a pot:
- on the float. It must be removed from the float chamber and wiped by hand. If drops of moisture are felt, add too early. If it’s dry, then most likely it’s time;
- using a wooden stick. Being stuck into the ground, it can either remain dry and clean, or stick to wet soil. In the first case, the plant needs watering.
Colorful cones
Original sprinklers were invented by domestic manufacturers - multi-colored cones that are filled with water, inserted into a thin stem and stuck into the ground.
As the soil in the pot dries, oxygen penetrates the stem, pushing out of the flask exactly as much water as the flower needs .
Ideal for watering house plants, as well as greenhouses, gardens, etc. This method has its advantages:
- practicality and originality of the solution;
- additional interior decoration;
- no threads, droppers, complex designs - everything is beautiful and simple.
How to organize the system yourself
You can do automatic watering for indoor plants yourself. There are several ways to create such structures.
What is needed for this
To build a self-watering system with your own hands you will need:
- mini-pump, preferably of higher power;
- hose to prevent sunlight;
- special inserts for connecting to the hose through which water will drip;
- timer - installed in a socket;
- faucets - they are used to create an extensive system.
It is recommended to purchase a hose first, and then a pump. Since the outlet of the latter is important, if it is wider than the hose, the water supply will be significantly lower.
It is necessary to make several cuts in the hose, the number of which depends on the number of flower pots. Droppers are attached to the holes. The watering time is set on the timer, and the pump is immersed in a reservoir of water.
What it is
Automatic watering is a special system that automatically irrigates the soil surface.
Atowatering is an effective way to care for plants, however, it can be used independently for no more than 14 days. After which you will need to add water or clean the structure.
For long business trips, automatic watering can be connected to the sewer system. This will ensure the plants have constant access to moisture.
Operating principle
Each element of the system plays its role:
- The controller is the “brain” of the design; it is the one that monitors the auto-irrigation timer, supplies water when needed and controls its level.
- Storage tank – heats water to the desired temperature.
- Pipeline - through it water enters the soil.
- The pump supplies it to the system.
- A sprinkler and a dripper are what water the plants. Depending on the settings, water is supplied in small or large drops.
The controller plays an important role in the automatic watering system. It is he who determines when the soil needs irrigation.
The need for automatic watering for indoor plants
Many plants can live without water for about three weeks. Here everything depends on weather conditions, soil structure, etc. It is difficult to imagine how a plant will behave in a drought, therefore, it is better to play it safe and build automatic watering for indoor plants. He irrigates the land strictly as needed.
Automatic watering is a convenient system that provides the level of moisture necessary for plant growth. Everything is produced according to the specified parameters, so there is no need to be afraid that too much or little moisture will be supplied.
Advantages and disadvantages
The advantages of such a system are:
- rational water consumption - the system itself analyzes how much moisture is needed for the soil;
- convenient - you don’t need to constantly walk around with buckets, the system itself will take care of each plant;
- improving the condition of the soil - with this irrigation option, water is consumed as much as necessary. A person pours “by eye”, which negatively affects the roots of plants, as well as their subsequent flowering and fruiting;
- easy installation of the system and maintenance of it - you can create the structure yourself.
Among the disadvantages is the high cost of purchased automatic watering systems, especially if several such systems are required. However, this minus is compensated by reduced water consumption.
Scheme
You can build automatic watering with your own hands in the following ways:
1. Double bottom of pots. To do this, place a 1-3 liter water container at the bottom of each pot. These can be bowls, cut plastic canisters, etc. In order to subsequently easily fill with water, a tube is installed in them in advance. The top is filled with gravel or pebbles and covered with cloth. Soil is poured on top of it, plants are planted, and then they are watered. If there is too much liquid, the excess comes out through the drainage hole at the bottom of the pot.
2. Wick system. To do this, you will need to make a wick from a synthetic material that will not rot with constant exposure to moisture. Immerse one end of it in water and the other in a container of water.
Pump.
As a pump, I decided to choose a centrifugal type pump. This is one of the simplest and most reliable pumps, which, nevertheless, can provide water lifting to great heights. I think it is clear that with such a scheme, the pump must create sufficient air vacuum in the pipe to lift water from the bottom of the tank.
Here it would be possible to use a submersible centrifugal pump like the one used in the Moskvich or Zhiguli car window washer, but such pumps have a relatively shallow immersion depth, which will not allow, for example, to lower it into an ordinary bucket of water. In addition, in our car market such a pump is very expensive - about $10.
But, on the other hand, you can buy a centrifugal pump from some foreign car for almost half the price. I found new pumps there for only $5 - $6. True, I was confused that they were all non-separable and somehow very Chinese. In addition, to secure such a pump it would be necessary to make a clamp.
But, I was lucky and I bought a used pump from some unknown car for only $3.3. It, located one meter above the surface of the water, lifts a liter of water to a height of two meters in less than one minute, even if there is initially no water in the hose. Simply put, the depth of the tank used and the position of the flowerpots are not limited in any way, unless, of course, you live in a castle.
To fasten the pump, I used one of my old ideas, namely the largest office clip.
Return to top to menu.
Important Operating Instructions
For proper operation of the system, it is necessary to take into account:
- Micro-drip irrigation is best connected to the water supply, especially with a large number of plants. Otherwise, you will need to take a large tank.
- To irrigate several pots, it is recommended to use structures from a 2 liter bottle.
- If the automatic watering system does not have a soil moisture sensor, it is recommended to purchase it separately. This prevents the soil from becoming waterlogged.
Pros and cons of this installation
Advantages of automatic watering:
- correctly adjusted water supply of the required volume;
- reduction of labor intensity;
- reduction in consumption - the system supplies a given amount of water, maintaining an optimal balance of soil moisture;
- the ability to carry out irrigation in the long-term absence of the owner.
Flaws:
- purchased systems with software are more expensive;
- the electronic system depends on the household electrical network;
- cheap analogues are not durable.
The most important advantage of simple automatic irrigation is the ability to create such irrigation with your own hands, without the use of complex electronics.
How to water flowers during vacation or business trip
In this case, a micro-drip automatic watering system, a flowerpot or a ceramic cone will be suitable. It is necessary to prepare for their arrangement in advance and check the system for correct operation. It is important that moisture is supplied as needed to prevent overdrying or waterlogging, which is detrimental to plants.
Top 5 ready-made systems (manufacturers)
Among the most well-known systems for automatic watering of plants are:
- Bug – .
- Water strider - from .
- A drop – .
- The harvest is from Tuboflex.
- The source is production.
Each of the systems operates on the basis of a drip tape (Bug, Drop, Harvest and Source) or a tube (Water Strider). For irrigation, a container of water or a pipeline (well) is used.
How to choose the right timers for drip irrigation
When installing automatic drip irrigation, you should set a timer. It performs the following functions:
- controls the irrigation system;
- controls the operation of the pump motor;
- starts and stops water supply;
- ensures the operation of several lines simultaneously.
The timer runs on batteries. When you change them, all programs on it are saved. The device can be equipped with a water meter function. There are mechanical and electronic timers. The first option operates on a spring, providing continuous watering for up to 24 hours. Mode adjustments are made manually. Any action cannot be programmed for an indefinite time. Such a device can be used for small areas where the irrigation process is constantly controlled by the owner.
An electronic timer allows you to program the process. The device has mechanical or software control. The first option is set for one week with a watering duration of no more than 2 hours. The innovative device is a program-controlled timer with 16 commands. It can be used to irrigate crops that have different watering regimes. The equipment is equipped with an air humidity sensor. This expensive option (in comparison with other devices) is recommended to be installed for watering large areas, as well as in greenhouses.
For watering greenhouses and large areas, it is better to purchase an electronic timer.
If the system is connected to a centralized water supply or pump, you should choose a device with a solenoid valve, and for watering from a barrel by gravity - with a ball valve.
How can I check that the selected option works?
It’s good if you have the opportunity to test the effectiveness of the device you created and see the plant’s reaction.
Automatic watering, although done by hand, must correspond to the type of plant. For those who love moisture, your supply may not be enough, but for cacti there will be plenty.
If the water supply comes from below, you need to make sure that the soil is moistened to the level of the roots. Plants with short roots may never receive it. Soil moisture can be checked with the same wooden toothpick or skewer.
Monitor how quickly the water is used. A larger container may be needed. Or not one system, but two.
It’s good if after a few days someone can still check the condition of the plants. Water supply systems can become pinched or otherwise malfunction. Coming and looking at the flowers is not as troublesome as watering them thoroughly. As a last resort, during their absence they can be monitored through cameras connected to the Internet.
Hydrogel and granular clay
Granular clay or hydrogel well saturated with moisture (buy at garden centers) is also used for automatic watering equipment. These materials have the ability to absorb large amounts of water and then release it little by little to plant roots as needed.
Lumps of clay in granules are placed in a separate pot (select a larger size), and then a plant with an undisturbed lump is transplanted into it and covered with a thick layer of clay (hydrogel) on all sides. Then the soil is covered with polyethylene.
Read about the features of caring for cyclomen at home in our material.
Find out how to plant and care for lavender in our article.
Read the secrets of caring and growing gloxinia at the link: https://sad-doma.net/houseplants/dekarativnotsvetushhie/gloksiniya/gloksiniya-uhod.html
Operating rules
Using pots with an automatic watering system will not cause difficulties even for inexperienced gardeners, but to obtain a large amount of green mass throughout the entire period of flower growth, you need to know and apply the advice of experienced gardeners:
- mandatory use of drainage materials at the bottom of the pot and special soil that matches the type of flower;
- using the usual method of watering during the formation of the root system, which should reach the bottom of the pot;
- the watering tank should be filled only with settled water at room temperature;
- the amount of water should reach the maximum mark on the indicator.
The frequency of filling the container with water depends on the following factors:
- volume of container with water;
- type of plant;
- level of development of the root system;
- season;
- ambient temperature;
- level of light and humidity in the room.
Well-known manufacturers provide detailed information on operating the device and caring for plants in the instructions for their products.
Beginning gardeners should pay attention to those pots that are sold together with special drainage material, which makes it possible to ensure optimal water supply and quantity. A special drainage composition can be replaced with ordinary vermiculite, gravel and expanded clay
To carry out root feeding of a plant, it is enough to simply dissolve the necessary organic or mineral fertilizer in water, which is poured into a special tank.
Between each filling of the container, a certain amount of time must be allowed to dry the nutrient soil. This procedure will prevent rotting of the root system, and replacing the top fertile layer will avoid the development of fungal diseases.
The most popular pots are the well-known brands Xiaomi and Parrot Pot, whose products are of high quality and have a long service life.
Xiaomi flower containers and Parrot Pot have special sensors and electronic applications that monitor the condition of the flower and inform its owner about the need to water or feed the plant.
Innovative technologies and modern equipment allow manufacturers to produce products that greatly simplify human life. One of the latest innovations on the modern market is the “smart” flower pot, which is popular with both interior designers and ordinary indoor plant lovers.
The use of this device will fill any interior with bright, lush and beautiful greenery of indoor plants and will make it possible to create unique compositions that can consist of several different types of flowers.
What ready-made options are there on the market?
Gardening stores have a wide range of systems for automatically watering indoor plants. The following is a description of the most popular devices.
GARDENA 1265/1266
Fully automated system from German manufacturers. Equipped with a timer, pump, filter and hose system with a total length of 30 meters. Allows an even supply of water to up to 36 individual pots.
Characteristics:
- Capacity with a capacity of 9 liters.
- 12 outputs from 3 distributors.
- Pegs with water supply regulator.
- Supply hose length 9 m.
- The length of distribution lines is 30 m.
- Minimum irrigation time 1 min.
- Flow from 15 to 60 l/min.
- Possibility of regulating flow for each type of plant.
The system is suitable for owners of a large number of plants. The approximate cost of the model starts from 3,400 rubles. Read about Garden drip irrigation in this article.
DEWDROP
Model from Russian manufacturers . It does not have an electronic component, therefore it is completely independent of the electrical voltage in the network. Consists of main lines and emitters with a water supply regulator.
The system can be connected to a water line or tank. One set is suitable for irrigating a greenhouse or indoor plants in quantities of up to 50 pcs. The cost of the set is from 350 to 500 rubles. Read more about drip irrigation Rosinka here.
Characteristics:
- hose length 20 m;
- number of droppers 50 pcs.;
- water consumption up to 2 l/h;
- working pressure up to 1 bar.
“Rosinka” is completely independent of the container when operating. The main thing is to regulate the water flow and monitor its volume.
Argus
This model is a ceramic cone. Irrigation is carried out through the controlled flow of water from a container (plastic bottle) or using a hose from a container located at a distance.
Characteristics:
- Number of cones 2 pcs.
- Hose length 1 m.
- Water consumption up to 0.5 l/h.
- The ability to connect the cone to the neck of a plastic bottle with a standard diameter.
Ceramic cones are great for irrigation throughout the day. The approximate cost of the model starts from 350 rubles.
We make automatic watering from an ordinary dripper
An ordinary dripper will allow you to do automatic watering yourself. You will need a regulator and a hose from the device, as well as any convenient container. To ensure that the liquid supply does not stop, we observe the following conditions:
- The tube should be straight, without bends.
- The tube should enter the ground at an angle; the excess length should be cut off.
- The container in which the settled water will be located must be secured above the plant.
To prevent the tube from moving, it must be tied lightly to a peg.
Lechuza Pots
Many people do not want to spend time creating automatic watering and buy a ready-made device for irrigating plants. The most common of the devices is the Lechuza smart pot. It has a built-in liquid level indicator and a shaft for pumping water, thanks to which the soil is moistened as naturally as possible. The shapes and sizes of pots are different, for every taste and color.
Lechuza-Pon substrate is offered as a gift for the device. Fans of indoor plants can use it to create excellent drainage.
Automatic system for watering flowers from waste bottles
A used bottle can get a second life and benefit your home flowers.
Watering with the help of such a device is effective, and even a schoolchild can make the device. For a small pot, you can use a liter bottle, but if the flower is large, then use a 2-liter plastic container.
In order to build an automatic watering system, you will need to follow a few simple steps:
- You need to make many small holes in the bottle cap. A gypsy needle or awl heated over a fire is perfect for this purpose. The more holes you get, the more intense the watering will be.
- In the soil of the pot you need to dig a small hole the size of the neck of the bottle.
- A bottle of water is placed in the hole with the neck down.
Autonomous watering can be done using another simple device. It is suitable for those cases when it is impossible to find a place to secure the bottle in the hole at the base of the plant.
- The plant must be placed in a suitable tray. You need to pour a small layer of water at the bottom of this pan.
- Take a bottle and make one watering hole in its bottom. An awl is also suitable for this purpose, but you don’t need to heat it.
- Having retreated upward 1.5-2.0 centimeters, you need to make another irrigation hole.
- Tighten the plug tightly, after which the container can be placed on the pallet. The water from it will begin to fill the pan exactly until the water level is leveled in the middle between the first and second holes in the container.
- Each time the liquid drops below the desired level, a small amount of water will pour out of the bottle again.
The main advantage of such automatic watering is the duration of its use. It can provide hydration for 2-3 weeks straight, which is very convenient.
How to check the effectiveness of automatic watering
It is very easy to check if the automatic watering system is working. And the check must be carried out before departure. To do this, we take the following steps:
- We install the flower pot and automatic watering in a tray.
- We wait for the liquid level to reach the desired mark between the first and second holes in the bottle.
- Remove some of the water using a soft cloth or syringe.
- Let's see if the liquid flows from the bottle to the tray.
- If the water level rises to the previous level, automatic watering works.
For which indoor flowers do you use automatic watering from a bottle?
This type of automatic soil moistening is not used for all flowers. It will cope perfectly with watering such varieties of indoor plants as:
- Bamboo.
- Anthurium.
- Tradescantia.
These plants are literally dependent on increased moisture, because they grow in a tropical climate. But for other types of flowers, active watering can cause root rot. And flowers can die, if not from drought, then from waterlogging. An alternative is a capillary type of soil moistening.