Do you have no indoor flowers because you often go on business trips? Organize automatic watering for indoor plants with your own hands and you will forget about worrying about the fact that your favorite flower may die from thirst in your absence. The instructions for organizing automatic watering will also be useful for those who do not know who to trust to look after their flower collection while on vacation.
DIY automatic watering system for one plant
My neighbor did not take credit for this idea, but said that he had seen a video on the Internet that described in detail the simple process of making self-watering drip irrigation for indoor flowers. He has already organized such a system at home and now he and his wife can live at the dacha for weeks without worrying about the plants left in the city apartment.
I also decided to use this option, although I’m not very good with technology. This time everything worked out great for me. I’m sharing a life hack with you, I hope it will be useful to someone. Before you begin, prepare everything you need:
- plastic bottle;
- corrugated straws for cocktails;
- soldering iron or screwdriver;
- glue gun with hot glue.
Automatic watering is done individually for each home flower. You will need as many plastic bottles as there are green pets living in your apartment. The container volume may vary. If your absence will not last longer than a few days, a liter bottle will be enough. If you are away for a couple of weeks, you will need to stock up on a larger container (well, at least a five-liter bottle).
Manufacturing instructions
You can create an irrigation system in a few minutes. I'll tell you how to proceed step by step:
- To begin, make 2 holes in the wall of the bottle (one higher than the other). The lower one should be located 2 cm above the bottom level. To make the holes the right size (look at the diameter of the straw) and with smooth edges, use a soldering iron or a screwdriver heated over a fire. Make the second hole 1 cm higher than the first.
- Apply hot glue to one of the straws and place its tip in the bottom hole so that the piece of straw that ends up in the bottle is quite long.
- Insert the second (upper) straw into another hole (its tip inside should be shorter) and also secure with hot glue.
- Now cut the outer part of the first tube shorter, and leave the second (upper) longer. The corrugated part of the straws should be on the outside, due to this it will be easy to give them the desired position.
The hot-melt adhesive hardens almost instantly, and the bottle is now ready for use. Fill it with settled water for irrigation, having previously clamped the ends of the tubes with office clips, “frogs”, so that the liquid does not spill out. After this, screw the cork onto the neck of the bottle.
How to use the device
The operation of such a device from a bottle is explained by the laws of physics. Place the automatic watering system next to the flower pot, directing the tubes into the tray. As soon as you remove the clamps from each straw, water will flow from the bottom and the top will begin to suck in air. When the water level in the pan reaches the spout of the top tube, air will stop flowing into the bottle and water will stop flowing.
At the moment when the roots of the flower draw moisture from the pan, the system starts working again and supplies a new portion of moisture. Please note that this method is only suitable for moisture-loving plants whose roots do not suffer from waterlogging. This list includes cyperus, bamboo, drooping reed, calla, rush, nephrolepis, spathiphyllum, balsam. Heat increases the water needs of these plants. For other indoor flowers, other automatic watering methods are more suitable.
Components of an irrigation system and their characteristics
The main element of the system is the water supply source. It can be represented by a water supply system, a well or a water-measuring tank, which is installed at a height of at least 1.5 m. The next required element is a filter for drip irrigation with your own hands, thanks to which the system will not become clogged with various small debris.
The device can be vortex, disk or mesh. The latter option is considered more popular, which is due to its low cost. The vortex filter is used for irrigation systems of large areas. The disk element is characterized by excellent performance characteristics and high cost, which is not at all justified for small summer cottages.
Metal or plastic pipes are used to transport water
If the source of water supply is a well or well, the system must be equipped with a pumping unit. The most appropriate option is considered to be a centrifugal type of device. The DIY drip irrigation distribution network consists of pipelines and hoses. For the main trunk network, metal or plastic pipes can be used. Metal products are strong, reliable and durable. However, the material is subject to corrosion, which will result in damage to the system.
Polyethylene or polypropylene pipelines are a more acceptable option. The products are characterized by strength, a smooth inner wall, which eliminates the possibility of deposits forming inside the system. Plastic pipes can withstand temperature fluctuations and the negative effects of aggressive substances.
DIY drip tapes for irrigation system
To organize outlets for each row, drip tapes in the form of a flat thin-walled tube, which has special devices for supplying water, are mainly used when arranging an irrigation system with your own hands. The tape is designed for pressure up to 1 bar. If it increases, the product may rupture. The maximum length of the tape is 100 m.
Drip tape for irrigation can be emitter or slotted
You can buy slotted or emitter drip tape. In the first option, there is a labyrinth along the entire length of the product, which distributes water evenly. At certain distances there are holes in it to release water. This type of belt is prone to clogging, so it requires the installation of a good filter.
Inside the emitter tape there are flat droppers equipped with a labyrinth system, thanks to which water is supplied to the plants. Emitters can be located at different distances in the range of 10-35 cm, which is determined by the type of crops being watered. The lower this value, the higher the cost of the product. Emitter tape is more reliable than slotted tape, and this is reflected in the cost of the product.
When choosing a tape, you should pay attention to its thickness, which affects the strength and durability of the product. The thinnest element will last no more than one season and is suitable exclusively for greenhouses.
Features of using drip tubes with external droppers
The drip tube is made of HDPE and is rigid and durable. It is produced without holes and is intended for self-installation of external drippers. The wall thickness of the product is 0.9-1.2 mm. The material is resistant to UV rays. The drip tube can withstand pressure up to 6 bar.
Drip tubes are rigid and durable and can withstand pressures up to 6 bar
External drippers are used when organizing drip irrigation at a dacha individually for each plant. To ensure normal operation of the system, it is necessary to have high pressure in the network. These devices can be connected through thin hoses or connected directly to the drip pipe.
There are several types of external IVs. Compensated ones are used for uniform irrigation with a very long drip tape, as well as in areas with a slope. They operate exclusively from a pressure system. Less prone to contamination by small debris. Uncompensated devices are used with a short length of drip pipe and on flat areas. This option is used for gravity flow systems from a tank. They can operate at low network pressure. There are also dropper pegs that are used for spot watering. The product is installed in the root zone of the planting.
Helpful advice! For drip irrigation of tomatoes, cucumbers, eggplants and peppers, it is advisable to use drip tubes with external droppers.
The advantage of such pipes is that you can independently choose the installation step and regulate the volume of water released. The disadvantages include the high cost of the product (compared to drip tapes), the labor-intensive and time-consuming process of cleaning the droppers.
Drip tubes are commonly used for watering tomatoes, cucumbers, peppers and other vegetables.
How to choose the right timers for drip irrigation
When installing automatic drip irrigation, you should set a timer. It performs the following functions:
- controls the irrigation system;
- controls the operation of the pump motor;
- starts and stops water supply;
- ensures the operation of several lines simultaneously.
The timer runs on batteries. When you change them, all programs on it are saved. The device can be equipped with a water meter function. There are mechanical and electronic timers. The first option operates on a spring, providing continuous watering for up to 24 hours. Mode adjustments are made manually. Any action cannot be programmed for an indefinite time. Such a device can be used for small areas where the irrigation process is constantly controlled by the owner.
An electronic timer allows you to program the process. The device has mechanical or software control. The first option is set for one week with a watering duration of no more than 2 hours. The innovative device is a program-controlled timer with 16 commands. It can be used to irrigate crops that have different watering regimes. The equipment is equipped with an air humidity sensor. This expensive option (in comparison with other devices) is recommended to be installed for watering large areas, as well as in greenhouses.
For watering greenhouses and large areas, it is better to purchase an electronic timer
If the system is connected to a centralized water supply or pump, you should choose a device with a solenoid valve, and for watering from a barrel by gravity - with a ball valve.
Automatic watering from drippers
Many people use medical droppers in their gardens. They can also be used for watering indoor flowers in the absence of the owners. The method is similar to a wick irrigation system. In this case, you don’t have to do anything:
- Fix one end of the dropper tube near the soil surface.
- Lower the opposite part of the tube with the attached weight into a vessel with water, which should be placed above the pot.
- Open the system by adjusting the water supply with a tap.
In your absence, water will enter the soil in microdoses. Practice adjusting the system; the moisture supply should be such that the soil does not become waterlogged. Using a large bucket as a container, you can water several plants at once in this way. Of course, each pot must have its own dropper.
How can I check that the selected option works?
It’s good if you have the opportunity to test the effectiveness of the device you created and see the plant’s reaction.
- Automatic watering, although done by hand, must correspond to the type of plant. For those who love moisture, your supply may not be enough, but for cacti there will be plenty.
- If the water supply comes from below, you need to make sure that the soil is moistened to the level of the roots. Plants with short roots may never receive it. Soil moisture can be checked with the same wooden toothpick or skewer.
- Monitor how quickly the water is used. A larger container may be needed. Or not one system, but two.
- It’s good if after a few days someone can still check the condition of the plants. Water supply systems can become pinched or otherwise malfunction. Coming and looking at the flowers is not as troublesome as watering them thoroughly. As a last resort, during their absence they can be monitored through cameras connected to the Internet.
To learn how to organize automatic watering of indoor plants using a dripper, see the video below.
Drip irrigation using a wick
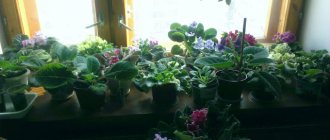
Wick irrigation is based on the principle of using a capillary system. Some people use a wick for this purpose all the time, but this method is only suitable for small plants, for example, violets. If you are suddenly going to the sea, you can temporarily switch to wick watering all the flowers in the house.
Another limitation is due to the fact that the soil in pots where this method of irrigation is used must be loose. Typically, a moisture-permeable substrate contains peat or vermiculite granules. Only in this case will water well moisten the earthen ball. For large plants you will need not 1, but 2-3 wicks per pot.
The cord should absorb water well. It is better to take a synthetic fiber rope. It is very easy to check the moisture permeability of the cord. Place it in a cup filled with water and watch how quickly it sinks. If the cord immediately sinks to the bottom, it means it can be used as a wick. Wick watering is convenient because several plants can be fed from one container at once:
- To arrange the supply of moisture, lower one end of the cord into a container of water standing on the windowsill.
- Secure the other end of the rope to the surface of the ground or dig it in lightly.
- Adjust the water flow rate by changing the height of the container. If you raise the vessel higher, the water will flow faster. And vice versa.
Do not use natural fiber rope as a wick. Due to moisture, it begins to rot and ceases to conduct water efficiently.
Principle of operation
The principle of operation of drip irrigation for domestic plants is based on the dosed supply of moisture. Moreover, water can penetrate either simply into the pot or directly to the root system. In the latter case, the root will be more powerful and spreading, which will produce larger greens.
If there is a need to arrange a small greenhouse, then drip irrigation will only increase its effectiveness. Water will be absorbed by the root system constantly in the amount it needs.
It is only important to choose the right container from which the plants will be fed . If the absence of the owners lasts no more than a few days, then a 1 liter bottle will be sufficient. If it is impossible to water for about 2 weeks, you will have to stock up on a container of at least 5 liters.
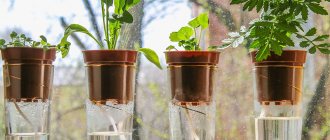
Watering through plastic bottles
The simplest watering can be made from an ordinary plastic bottle without any additional equipment. Many people are familiar with this method, again from their gardening.
How to organize it:
- Cut off the bottom of a clean 2-liter bottle. You will pour water into the resulting funnel.
- Make a small hole in the cork using an awl or drill.
- Screw the stopper onto the neck of the bottle, after covering it with a layer of gauze to protect it from clogging. The gauze should be pressed firmly against the lid, filling the threads.
- Turn the finished watering can upside down and dig it into the top layer of soil or hang it so that the lid almost touches the ground.
All that remains is to fill the bottle with water and the moisture will seep drop by drop into the ground. It is clear that the number of plastic bottles will be equal to the number of pots. For small pots, use smaller bottles.
Method one
So, how to make drip irrigation . First you need to prepare the containers. In each bottle, it is worth cutting off the bottom of the bottle, stepping back from the bottom about five centimeters. To avoid severely deforming the container, the lid should be screwed on. You should punch a hole in the bottom of the bottle and then just cut it off.
Up to 4 holes should be made in the lid or neck of the container, the diameter of which should be from 0.3 to 0.5 millimeters. The throughput of the structure depends on the number of punctures. In other words, the intensity of watering.
Ready-made structures must be dug near plant stems , deepening them by about 4 centimeters. A piece of fabric or nylon tights should be placed inside the containers. This will protect the holes from excess debris. If desired, such a unique filter can be attached to the bottom of the bottle. Thanks to this, the water will always be clean.
What if you hang it?
To prevent the holes in the lid or neck from becoming clogged with soil, you can hang the structure. The container can be fixed with the bottom or neck down. Such a system is much more convenient to fill out.
Bottles are best attached to wooden slats . To do this, you can thread a strong wire through the wall of the bottle, and then hang the container on the crossbars above the bed.
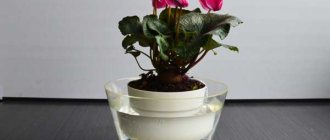
Purchased flasks
You've probably seen colored plastic flasks in gardening stores, painted to look like funny faces with a long narrow nose. So, they are used just for automatic watering. Additionally, the devices serve as original decoration. Fill each flask with clean, settled water and insert it into the pot with the plant, spout down.
According to the laws of physics, water will not flow into damp soil. Moisture will begin to flow out of the flask little by little when the soil dries. Due to the small volume of cones, this method will not help during your long absence. However, flowers will be able to survive separation from you for several days even in the heat.
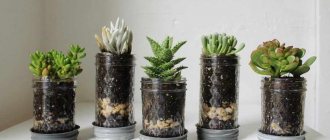
Using hydrogel
You can provide plants with the necessary supply of moisture using a hydrogel. Its granules first absorb a large amount of water, and then gradually transfer it to the roots of the plants. Whether to use this method is up to you. It is quite labor-intensive, but the pots look aesthetically pleasing without any overhanging “devices” and water containers cluttering up the windowsill.
Although, if no one visits the apartment in your absence, this circumstance does not matter. In this case, however, you will have to spend money on miraculous granules. The pots are transferred into more bulky containers, which may need to be purchased in addition.
How to do it correctly:
- Before leaving, move each flower along with a lump of earth into a larger pot, having first poured a 4-5 cm thick layer of hydrogel on the bottom of the container.
- Fill the voids on the sides with granules as well, tapping the walls.
- Then water the soil and hydrogel generously, adding water gradually, allowing it to be absorbed.
- After this, cover the surface with film to prevent the moisture from evaporating too quickly.
By the way, hydrogel is a reusable material; it can be used for a long time after transplantation. This option is convenient for summer residents who live on their property all summer and visit their city apartment from time to time. The hydrogel can be removed later, during the next transplant. This material is inert and does not harm the flowers at all.
LiveInternetLiveInternet
–Categories
- Automania (190)
- Zen (40)
- Poltos (2)
- Biglion (20)
- Blogger (11)
- Leave while in memory (8)
- Leave while in memory (2)
- WebMoney (23)
- Videos (116)
- Grandson (58)
- Hair, hairstyles (43)
- Weekend (578)
- country house (2442)
- Indian girls (226)
- quail (221)
- country house conversions (102)
- People, country characters (45)
- Turkeys (29)
- Guinea fowl (4)
- Seeds, seedlings, harvest (242)
- household chores (158)
- Interior design (1225)
- design (1042)
- Ikea (54)
- furniture design (657)
- Added via mobile phone (59)
- Achievements (93)
- Evgeny Urlashov – mayor of the city of Yaroslavl (31)
- Closed entry (27)
- Green house (146)
- Looking for a designer job (2)
- Personnel agencies (4)
- How to make your own website (12)
- Housing problem (234)
- Kremlin diet (23)
- Who is right? Lirushny showdowns. (40)
- Cooking (1416)
- Landscape design (151)
- Lirush lotions (192)
- Boys like boys (27)
- Manicure, nails (25)
- Medicine, health (703)
- Healthy lifestyle (48)
- Caring for bedridden patients (9)
- Donation (2)
- My thoughts (9482)
- My polls (88)
- My poems (169)
- Guinea pig (1)
- Music (60)
- Inheritance (8)
- News (1765)
- clothes, shoes, accessories (824)
- BOHO (73)
- Olympics (11)
- Them and us (146)
- crazy hands (1717)
- Felting (8)
- Ribbon embroidery (56)
- Crochet (61)
- Decoupage (132)
- For children (68)
- For the New Year and holidays (89)
- My alterations (39)
- Furniture remodeling (145)
- Newspaper weaving (15)
- Draw (59)
- Scrapbooking (18)
- Cold porcelain (4)
- We sew (779)
- Pension (124)
- Shopping, spending (406)
- guard (477)
- Crockery (127)
- About Lirushnikov (753)
- About work (1125)
- Travel (853)
- 2016 (123)
- Türkiye (3)
- England, London (5)
- Arkhangelsk (19)
- Veliky Ustyug (6)
- Vologda (18)
- Vyborg (1)
- Egypt (9)
- Italy (55)
- Kronstadt (2)
- Crimea (90)
- Summer 2013 (55)
- Summer 2014 (55)
- Summer 2015 (159)
- Peter (122)
- Rostov Veliky (27)
- Rybinsk (27)
- Totma (3)
- Yaroslavl (137)
- Yaroslavl region. Cities and towns. (110)
- Miscellaneous (149)
- Repair (452)
- Restaurants, cafes (13)
- Beauty recipes (244)
- parents-children (265)
- Wedding Planner (115)
- Wedding (164)
- dog (922)
- Slenderness (284)
- Counting calories (134)
- HOA (10)
- Türkiye (4)
- Ukraine (91)
- Study (463)
- Medical College (359)
- Lectures on gardening and horticulture (32)
- Fanatic from Yuri Bashmet (2)
- Flylady (391)
- Forex (36)
- Photos, pictures (1612)
- Freebie (9)
- Shabby chic (517)
–Tags
-Music
-Statistics
Capillary mats
This new product is a great help for gardeners who do not have the opportunity to regularly water their home plants. The capillary mat is a mat made of hygroscopic material. For watering, you will need two large trays of such size that one fits into the other. You need to pour water into the bottom tray. Place a second tray on top with holes made in the bottom, on which place one or more capillary mats (depending on the area of the tray).
Place pots with flowers on the resulting structure, which can absorb moisture coming from below through the drainage holes. You can do it differently by placing bowls with flowers on a mat, the edge of which is immersed in a container of water. In this case, the pots must be removed from individual pallets.
The choice of ways to water flowers in your absence is huge. Everyone can choose the least burdensome option for themselves. If neither method completely suits you, it is better to plant the plants in advance in special flowerpots with a built-in automatic watering system, which are containers with a double bottom. On average, the moisture reserve in such pots is enough for plants for a month.
Operating rules
Using pots with an automatic watering system will not cause difficulties even for inexperienced gardeners, but to obtain a large amount of green mass throughout the entire period of flower growth, you need to know and apply the advice of experienced gardeners:
- mandatory use of drainage materials at the bottom of the pot and special soil that matches the type of flower;
- using the usual method of watering during the formation of the root system, which should reach the bottom of the pot;
- the watering tank should be filled only with settled water at room temperature;
- the amount of water should reach the maximum mark on the indicator.
The frequency of filling the container with water depends on the following factors:
- volume of container with water;
- type of plant;
- level of development of the root system;
- season;
- ambient temperature;
- level of light and humidity in the room.
Well-known manufacturers provide detailed information on operating the device and caring for plants in the instructions for their products.
Beginning gardeners should pay attention to those pots that are sold together with special drainage material, which makes it possible to ensure optimal water supply and quantity. A special drainage composition can be replaced with ordinary vermiculite, gravel and expanded clay
To carry out root feeding of a plant, it is enough to simply dissolve the necessary organic or mineral fertilizer in water, which is poured into a special tank.
Between each filling of the container, a certain amount of time must be allowed to dry the nutrient soil. This procedure will prevent rotting of the root system, and replacing the top fertile layer will avoid the development of fungal diseases.
The most popular pots are the well-known brands Xiaomi and Parrot Pot, whose products are of high quality and have a long service life.
Xiaomi flower containers and Parrot Pot have special sensors and electronic applications that monitor the condition of the flower and inform its owner about the need to water or feed the plant.
Innovative technologies and modern equipment allow manufacturers to produce products that greatly simplify human life. One of the latest innovations on the modern market is the “smart” flower pot, which is popular with both interior designers and ordinary indoor plant lovers.
The use of this device will fill any interior with bright, lush and beautiful greenery of indoor plants and will make it possible to create unique compositions that can consist of several different types of flowers.