Planting a calla tuber in open ground in spring, which is carried out according to all the rules, allows you to grow a beautiful exotic flower on your site.
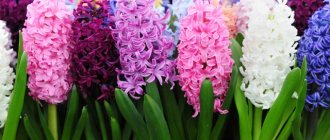
Calla or zantedeschia with massive leaves and showy flowers comes in several varieties. The most common is the classic one with a white flower, but there are varieties with buds of other shades.
Nowadays, many gardeners have begun to grow calla lilies in flower beds in the garden, so this article will describe in detail how to plant calla lilies in open ground and properly care for them so that they will delight you with beautiful flowering.
Important! Tubers can be planted in open ground, sprouted or not.
Characteristics of garden callas
Callas can be grown in open ground, so they cannot be called indoor plants. Zantedeschia is native to South Africa, however, this plant can also be grown in Russia. The plant has an unusual property - it develops during warm winters, so it can bloom not only in summer, but also in winter.
Bushes, depending on the variety, can grow from 30 to 150 cm. Therefore, callas can be planted in the center or along the edges of the flowerbed. But she also looks very beautiful alone.
Interesting! Gardeners who know the rules for planting and caring for dahlias will not have problems growing calla lilies. This is described in detail in the article: Dahlias - planting and care in open ground in spring after winter .
Flowering problems
Quite often, gardeners are faced with a problem: calla lilies do not bloom. In order for the plant to delight with beautiful flowers, you must follow several rules:
- monitor the degree of penetration of the bulb and rhizome;
- Avoid excessive application of nitrogenous fertilizers;
- faded flower stalks should be removed without affecting the young shoots;
- The plant needs to be planted in an area where there is enough light (it is recommended to plant some species in the shade).
In order for calla lilies to grow and delight with their beauty, watering should be carried out correctly. Typically, manufacturers indicate the degree of soil moisture and other care requirements on the packaging.
Popular types
There are two types of callas - tuberous and rhizomatous. Most often you can find the latter type of this plant on sale.
Rhizomatous - this is Ethiopian calla with white flowers. This type of calla grows near country lakes and under trees in soil with high humidity. Under such conditions, the shrub grows quickly all summer, growing up to 100 cm in height, regularly releasing new inflorescences.
Tuberous callas produce colorful buds:
- Remani;
- Elliot.
These flowers love sunny areas, but sometimes they need to be shaded.
When to plant callas in open ground: planting dates, in what month
You can plant tubers or calla lilies germinated in a pot in a permanent place when the soil warms up to 15 degrees Celsius (insert a thermometer into a hole 15 cm deep and measure the temperature). In this case, the risk of night frosts should be avoided.
The timing varies in different regions:
- In the south of the country - from April 15.
- In the central zone and Moscow region - from May 15.
- In Siberia, Leningrad region and the Urals from the beginning of June.
Important! For germination, tubers are planted in a pot in March.
You can also refer to the lunar calendar 2022. Favorable days:
- March - 12-17, 22-25;
- April - 6-8, 20-26, 29, 30;
- May - 6-8, 14-17, 21-23, 31;
- June - 1, 2, 9, 10, 11.
Unfavorable days:
- March - 6, 7, 21;
- April - 5, 1;
- May - 5, 19;
- June - 3, 4, 17.
Description and origin of the plant
Calla is also called calla calla, but its correct name is Zantedeschia.
The flower is called differently in different regions, the following names are known:
- Mother of God's help (common in the Urals).
- Pork bean.
- Wax plant.
- Meadow crustaceans.
- Whitewing.
- Swamp grass.
- Kapelushnik or hat maker.
- Marriage flower.
- Water root.
- Guska.
- Serpentine or snake-grass, snake.
- Frogman.
- Bear paws.
- Cockerels.
- Breadbox or bread bin.
The plant comes from the Araceae family, its natural environment is central and southern Africa. Callas grow in periodically dry and flooded areas - they can survive drought thanks to their rhizomes and revive when there is enough water.
Currently, 8 species of these interesting plants are known; they can be found almost all over the world (except Antarctica). In our country, zantedeschias are used as ornamental plants - mainly for cut flowers and as potted plants, and in spring and summer they can be grown in the garden, on the terrace. Calla lilies owe their popularity to their beautiful, often spotted leaves and spectacular inflorescences, which can be of different colors:
- white,
- yellow,
- orange,
- pink,
- red,
- purple,
- two-color.
The flowering period of calla lilies grown in open ground occurs at the end of summer. But it can be speeded up by growing the plant in pots at home before planting it in the ground.
Geographical distribution
Callas come from Central and Southern Africa (Nigeria, Tanzania, South Africa). Ethiopian zantedeschia was introduced to Europe in the 17th century. Currently, this species is considered naturalized in Europe (in the Azores, Madeira, Iberian Peninsula, Corsica, Balkan Peninsula, and in the UK, Western Europe, North and Central America (Costa Rica, Nicaragua), South America (Ecuador), islands of Oceania, Australia and New Zealand.In many places it is considered a dangerous invasive species, displacing native vegetation.
Morphology
These are medium-sized herbaceous plants, reaching a height of 120 cm.
- The stem is large, thick, underground. From a botanical point of view, the type of underground stem has not been definitively established. Sometimes it is assumed to be a rhizome, sometimes a tuber.
- Root . Roots, whose main function is to hold the plant in the ground, grow from the top of the underground stem. The roots are white, if they come to the surface they become dark green.
- Leaves . _ The plants produce many leaves that persist from late winter to late spring (Ethiopian Zantedeschia and Zantedeschia odorata), from spring to fall (other species), or all year round (Ethiopian Zantedeschia in some habitats). The leaves are oval-heart-shaped, thick, shiny. Petioles vary in length from 15 cm (Rehmann Zantedeschia) to 1.5 m (Ethiopian Zantedeschia). The leaf blades are veined, dark green, sometimes speckled white. The leaves contain hydathodes that mediate fertilization.
- Flowers . _ These are monoecious plants that form several elongated inflorescences - cobs. Female flowers are different from male flowers. Pedicels are usually longer than petioles, inflorescences are higher than leaf level. The inflorescence is narrowed, spirally twisted at the base, with a funnel-shaped opening in the upper part, with a deflected and sometimes pointed top. The number of stamens is 6-10. Pollinated by insects. The length and color of the inflorescence depend on the variety. They usually reach 10-25 cm.
- Fruits . Green or orange berries, ovoid or almost spherical, collected in fruit clusters. The seeds are ovoid, with a longitudinally grooved shell and a large endosperm. They ripen in the European part of Russia at the end of August.
Phytochemical properties
Poisonous plants. All parts of calla lilies contain sharp calcium oxalate crystals and toxic alkaloids. The inflorescences also contain:
- cytokinins;
- flavonoids: swertizin and swertiajaponin;
- anthocyanins: cyanidin, peonidin and ferulic acid;
- polyphenols;
- leukocyanidin - in the leaves and fruits of Ethiopian Zantede.
Contact of the plant with the skin can cause dermatosis; the plant also injures the mucous membrane of the oral cavity, causing swelling of the tongue, lips, and throat. Ingestion may cause diarrhea and gastroenteritis. Plants are very toxic to animals. In rabbits, eating green parts causes hypoesthesia and paralysis.
Calla lily rhizomes are included in the diet of wild boars and porcupines, and the berries are included in the diet of birds. Rhizomes of various species are the food of Hottentot goldfinches.
Types and varieties
The genus belongs to the Aroidae family and includes about 20 species. Main types:
- Zantedeschia aethiopica – Ethiopian zantedeschia;
- Zantedeschia albomaculata;
- Zantedeschia elliottiana - Zantedeschia Elliot;
- Zantedeschia jucunda;
- Zantedeschia odorata;
- Zantedeschia pentanii;
- Zantedeschia rehmannii Engl. – Zantedeschia Rehman;
- Zantedeschia valida.
Many of the world's calla lilies come from the Ethiopian Zantedeschia aethiopica, which blooms with white flowers in February and May. The colorful flowering calla lilies are derived from the intersection of several botanical species: Zantedeschia Rehman, Elliott and spotted calla lilies. Hybrids bloom in summer.
Recommended varieties:
- “Pink Mist” (Z. aethiopica) – white flowers, can be grown in the ground;
- "Green Godess" (Z. aethiopica) - white flower with green tip;
- "Albomaculata" - a variety with white flowers;
- “Captain Tendens”, “Black Magic” - with yellow flowers;
- “Crystal Blush”, “Captain Romance”, “Auckland” - pink flowers;
- "Cameo" - salmon flowers;
- "San Remo" - orange;
- “Schwarzwalder”, “Black Star” - dark burgundy;
- “Fire Glow” – orange-yellow;
- "Scarlet Pimpernel" - red flowers;
- "Auckland" - a low variety with bright pink flowers;
- "Mango" Mango - yellow-orange flowers;
- "Picasso" - purple-white;
- "Schwarzwalder" Schwarzwalder - decorative spotted leaves.
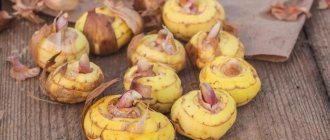
Selection of planting material (tubers)
Depending on the type, calla lilies can be planted with tubers or rhizomes. Callas Elliot and Remani are propagated by tubers, and white Ethiopian by dividing the rhizome of the mother bush.
Interesting! All types of calla lilies can also be grown from seeds, but this process is very labor-intensive. It does not preserve varietal characteristics.
Recommendations for choosing tubers:
- Calla lily tubers appear on sale in February. It is better to buy them at garden centers and stores .
- The tubers should be firm, like new potatoes. Sluggish and wrinkled specimens should be immediately discarded.
- The tubers should be free of rot, mold and signs of damage.
- The diameter of 1 tuber should reach 4 cm or more.
Advice! After purchasing, keep the tubers on a tray in a dry place with an air temperature of 5-7 degrees. In this case, it is necessary to regularly ventilate the room, and also constantly turn the tubers, then they will not germinate until planted in open ground.
Preparing calla tubers for planting
Before any planting (in pots for germination or directly in open ground), the tubers must be prepared.
The seed material is carefully inspected. Tubers with rotting, mold or dried out are removed - they can no longer be used for planting.
Important! If the damage and rotten areas are small, these specimens can be saved! Using a disinfected knife, cut the damage down to healthy tissue and treat these areas with brilliant green.
Before planting, the tubers are treated with a fungicide to destroy pathogens of fungal diseases . For this, use Fundazol or Fitosporin-M.
Advice! If the tubers are slightly wilted, they should be kept wrapped in a damp cloth for 2-3 days. After this, they must dry out, then they can be planted in the ground.
Reproduction
Callas reproduce in two ways:
- generatively – by seeds;
- vegetatively - by dividing shoots growing from rhizomes.
Sowing seeds
Calla lily seeds are collected when it becomes almost dry. The fruits are peeled (there are small balls inside - seeds) and immediately planted in a pot, only minimally covered with soil. The container with the seeds is placed in a plastic bag to keep the soil moist. The seeds germinate quite quickly. Grow seedlings at room temperature.
We must take into account that when planting calla lilies with seeds, we will not get a plant similar to the mother plant. After the season, the tubers will be slightly larger than peas. Next year these tubers are planted in fresh soil, and by the end of the second season there will be a tuber several centimeters in diameter. As a rule, the flower may not appear until the third year; a much faster way is to divide the larger tubers.
Photo. Calla lily seedlings grown from seeds
Reproduction by division
When propagated by tubers, each new tuber must have at least two buds, which will have a positive effect on the regeneration of the plant and ensure flowering next year.
Work progress:
- It is best to divide the rhizomes at the end of the rest period, when the plant is transplanted into pots.
- Using a sharp knife, we cut off the baby bulbs - they will acquire the ability to produce flowers 2 years after planting. New tubers are carefully cut off from old ones and left to dry for 2-3 days. Cut wounds can be treated with a fungicide to reduce the risk of fungal diseases.
- After a few days, the newly obtained rhizomes are placed individually in small containers.
- In the next year of growing, they are transplanted into slightly larger pots and provided with suitable conditions.
Attention! Callas are poisonous - their juice irritates the skin, so care should be performed with gloves. Children and pets should be monitored as eating this plant can cause food poisoning.
Planting tubers for germination in a pot at home
Experienced gardeners recommend that you first germinate the tubers at home, and then transfer the seedlings to open ground.
In this way, you can check the viability of the tubers and achieve earlier flowering.
For germination, soil intended for growing calla lilies is used. You can buy it at a garden store. You can also use slightly acidic soil for Saintpaulia.
If you wish, you can make your own soil mixture:
- 1 part each of peat, river sand and leaf soil.
- 2 parts turf soil.
Advice! The soil must be disinfected before planting tubers.
You also need to prepare a spacious 3.5 liter pot, with drainage holes at the bottom.
To properly plant calla tubers in a pot for germination, you must follow these steps:
- A layer of expanded clay or other drainage is placed on the bottom of the pot.
- Next, pour the prepared soil. Leave 3-4 cm of empty container to the edges.
- A small hole is made in the middle, into which with the tubercle upward (the tubercle is the upper part of the tuber) .
- The hole is filled with soil to cover the tuber with a small layer of soil. There should be no more than 1.5-2 cm of soil above it, since the roots grow along the entire height of the tuber.
- Water carefully without eroding the soil, and add more soil if necessary.
Advice! At the end, you can also pour in a solution of Fitosporin-M to prevent diseases.
Watch the video!
How to grow callas Caring for tuberous callas during germination at home before planting in open ground:
- Pots with plantings are left in a bright room with an air temperature of 18-20 degrees.
- Regular watering is carried out so that the soil is always moderately moist.
Important! The water that remains in the pan after watering must be drained.
- After the sprout appears, the pot is placed in a bright place without direct sunlight.
- When the sprouts reach 5-7 cm in height, add 2-3 cm of soil.
- Every 14 days, the planting is fertilized with complex mineral or humic fertilizers for seedlings (Potassium humate, Agricola).
Advice! 1-2 weeks before transplanting seedlings into open ground, they are hardened. To do this, open the window, then place the sprouts on the balcony or outside for 1 hour, increasing this time every day.
Growing conditions
The plants do not make great demands and are very resilient. Callas prefer warm, bright positions in the garden, but not directly in the sun. Botanical species prefer semi-shaded places. During the growing season they require abundant watering and sprinkling.
The choice of soil depends on the type:
- Ethiopian Zantedeschias grow best in neutral or alkaline soil;
- multi-colored hybrids prefer a slightly acidic reaction.
The substrate must be:
- humus;
- permeable;
- constantly moist during growth and flowering.
The optimal substrate is a mixture:
- 3 parts compost;
- 1 part peat.
The industrial cultivation of calla lilies uses a mixture of composted pine bark (70%) and pumice, coconut husks, peat and perlite. Sometimes plants are grown on mineral wool.
Zantedeschias are fertilized with a complex fertilizer every 2-3 weeks, or you can feed them with an organic compound. Callas need to be given a period of rest in a timely manner - this will stimulate the plants to produce new shoots and inflorescences.
After resting, they need to be dried, and after new leaves appear, replanted. Colorful varieties require a very light position.
Temperature
| Time of year and day | Optimal temperatures, degrees C | |
| summer | during the day | 24-28 |
| at night | 16-18 | |
| spring | at night | 11-12 |
| autumn | at night | 11-12 |
In spring and autumn, the temperature at night can drop to 11 degrees, which has a positive effect on the color of the inflorescences. The temperature of the substrate immediately after planting the tubers should not be lower than 15 ºC; in summer it should not exceed 22 ºC. Varieties should not be watered as abundantly as natural species. It is important to maintain moderate substrate moisture.
Rules and stages of planting calla lilies in open ground in spring
It is necessary to prepare for planting tubers and seedlings in open ground according to all the rules. The future flowering of plants depends on this.
Selecting a location
Callas need to choose the right place.
Important! Tuberous callas (Remani and Elliott) do not like excess moisture. But the Ethiopian calla, on the contrary, loves swampy areas and tolerates moisture well.
The area should be bright and warm, while protected from direct sunlight . Lightly shaded and semi-shaded areas are best.
Important! In the shade, callas may not bloom at all!
Calla loves moist air, so it can be planted near a pond, the main thing is that the soil in this place is not waterlogged.
Advice! The ideal place for calla lilies is slightly shaded with fertile soil.
Soil selection and preparation
Callas grow well in fertile, loose, slightly acidic or acidic soil. Therefore, it is important to prepare the land for planting in advance:
- Remove all stones, debris and weeds from the site.
- Then dig a trench 30-40 cm deep and an arbitrary width depending on the number of tubers.
- Next, the trench is filled with soil:
- For calla lilies, which are sold at the garden store.
- Prepared independently (according to the recipe described for the germination of calla lilies, consisting of equal parts of leaf soil, peat, river sand and two parts of turf soil).
- Mixed from humus, peat and garden soil, taken in equal proportions.
- It is also recommended to add mineral complex fertilizers, for example, Nitroammofoska (according to the instructions, 2 tablespoons per 1 square meter of area or dissolve the same amount in 10 liters of water). Then it will be possible to no longer apply fertilizing (except for potash for lush flowering).
Important! Preparing the site and soil are important steps in growing calla lilies in the garden.
Scheme of planting germinated seedlings
- The holes make a little more than the volume of a clod of earth in the pot. Interval - 20 cm (for low-growing varieties), 30-40 cm (for medium-growing varieties), 50-60 cm (for tall ones).
- Carefully remove the germinated seedlings with a lump of earth.
- Transfer them into holes, deepening them by 1.5-2 cm to preserve the surface roots.
- Cover with soil and lightly compact.
- Watered.
- When the water is absorbed, the plantings are mulched with 3-5 cm of peat.
Important! Calla lilies have a very sensitive root system, so replanting must be done carefully.
Planting tubers (without prior germination)
Tubers can be planted in open ground without germination:
- The holes are made 5-7 cm deep. The interval is the same as for germinated seedlings: 20-60 cm.
- Place the tuber with the tubercle facing up at the bottom of the hole.
- Cover with a 4-5 cm layer of soil for better germination.
- Lightly compact.
- Watered.
- When the water is absorbed, the plantings are mulched.
Watch the video! Calla lilies. How to plant tubers
Rules of care
Callas are quite strong, stable, unpretentious plants that develop well with the minimum necessary care, which includes the following basic steps:
- A prerequisite for obtaining spectacular plants is regular watering .
At the same time, callas cannot tolerate stagnant water or overflow, then they are affected by all kinds of rot. Advice . If there is a danger of excess moisture accumulating at the roots, be sure to add drainage under the planting in the form of brick chips, coarse crushed stone, or drain the area by digging a special ditch. - After watering, to facilitate air access to the roots, it is necessary to loosen the soil . You can make this task easier, improve the structure of the soil and reduce moisture evaporation by mulching the plantings with peat or humus.
- If the soil is properly charged with fertilizers before planting , the plants will have enough nutrients for the entire season of active development, since calla lilies are dug up in the fall.
Advice . You can acidify the soil not only by adding peat (which is best), but also by adding a small amount of sulfur powder to the soil mixture, which also has antifungal and acaricidal properties. - Regular weeding , inspection of vegetative plants for the presence of diseases and pests - these are the stages of care that are certainly present and routine when growing any flowers, including callas.
- Yellowed leaves affected by spider mites and fungal diseases are removed and disposed of.
- If there are lesions with a fungal infection, the plants are treated with one of the fungicides - foundationol, ridomil or topaz.
When attacking pests, insecticides are used - confidor, arrivo, decis, and if a spider mite is noticed - a sulfur suspension. Advice . Use a decoction of wormwood when attacking thrips or aphids. To prepare the product, pour 1 kg of raw material into 3 liters of hot water and boil over low heat for 20 minutes. and leave overnight. The next day, the resulting liquid is filtered, the volume is brought to 10 liters, green soap is added to improve adhesion and the plants are sprayed. - It is necessary to cut out faded flower stalks so that the formation of seeds does not take away nutrients from the vegetative plant. The leaves retain their decorative properties for a long time, remaining dark green, shiny and attractive.
- At the end of September - beginning of October, choosing dry weather, calla lilies tubers and rhizomes are dug up. The leaves are allowed to dry and then carefully removed. The resulting planting material is sent for storage.
Features of planting calla rhizomes
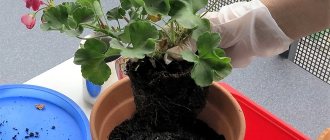
Calla lilies are best planted with rhizomes in the fall. Planting material can be purchased at garden centers or stores. You can also divide the rhizomatous bush.
To do this, carefully dig out the bush.
- Carefully break off the root collar from the main root. Soil should remain on the roots.
- Plant the shoot for germination in a large pot.
- Leave in winter in a humid room with an air temperature of 13-15 degrees.
- In the spring they are planted in open ground at the same time as the tubers, using the same technology!
Growing calla lilies with seeds
The most difficult method of growing calla lilies is from seeds, which is why it is not so popular among gardeners.
Calla lily seeds have poor germination, and the growing process itself is long and complex.
First, seeds are sown for seedlings:
- The seeds are soaked in a solution of growth stimulator Zircon, Epin-Extra, Potassium Humate.
- Next, they are germinated - laid out between layers of cotton pads or fabric, moistened, wrapped in a bag and kept in a warm place for about 7 days, periodically moisturizing.
- After germination, the seeds are planted as seedlings. To do this, use the same soil as for germinating tubers.
- When the seedlings grow up, they are planted in open ground.
Caring for callas in the open ground after planting
Rules for caring for calla lilies:
- Calla loves moisture very much, especially Ethiopian, but cannot tolerate its excess in the ground (this is detrimental to the Remani and Elliot varieties). Watering should be moderate but frequent. The main thing is that the soil does not dry out and is not too wet.
- Callas are responsive to fertilizers. If no fertilizer was added during planting, it is necessary to apply fertilizer for corm flowers every 3 weeks.
- During flowering, potassium sulfate is added (1 tablespoon per plant, lightly embedded in the soil. It is needed for abundant flowering.
Advice! You should not use nitrogen fertilizers, so as not to cause the growth of green mass.
- Loosening around the plant is carried out regularly after watering or rain for good access to oxygen to the roots. The main thing is that an earthen crust does not form.
Advice! It is advisable to populate the soil where callas grow with earthworms. They will loosen the soil and enrich it with humic compounds.
- After flowering, faded flower stalks are cut off to ensure the growth of new ones.
At the end of September, callas are prepared for wintering. The above-ground part is cut off, leaving an area with two or three leaves, and the tubers are dug up.
After flowering
Bulbs and rhizomes are cared for differently. In the latter species, the dormant period is observed in the summer. At this time, the flowers begin to grow slowly, then stop growing altogether, beginning to change the color of the leaves. At this point, watering is stopped. How to transplant calla lilies and when, if they are dormant in the summer? At the beginning of July, the plant is replanted, during which all old leaves and shoots are removed and the soil is replaced.
When are calla lilies dug out in the fall and how are they prepared for storage? These types of flowers are dug up in mid-late September. The tubers are dried and stored in a cool place. The flowers should be dried together with the above-ground part, without removing it. During the preparation of bulbs and rhizomes for storage, all accumulated nutrients from the leaves will pass into the roots. As soon as the above-ground part withers, it is removed, the bulbs are stored in a cool place, observing the temperature regime.
How to separate babies from calla tubers
If babies appear on the tuber, they must be separated after a bridge appears between the tuber and the baby (within 12 months). When the jumper is 5 mm or more, the baby is carefully broken off and planted in the ground.
If you break off the baby early, you will create a large wound on the tuber, which can result in infection, which will lead to the death of the tuber. and death of planting material.
Nowadays, calla lilies can be grown in Russia even in open ground, the main thing is to plant and care for the plant correctly. By following all the technology, a beautiful exotic flower will always bloom in your garden.
Watch the video! Secrets of caring for calla lilies in the garden and at home
Diseases
Due to the relatively humid environment, calla lilies can be susceptible to various diseases:
- rhizome rot (brown spots at the base of the stem, rhizome and root);
- wet rot of the base of the stem (rotting of the rhizome and roots, white coating);
- spotting (spots and stripes on leaves).
Pathogens develop at high temperatures and high humidity. As a precaution, it is recommended to sterilize the substrate before planting the tubers and ensure proper air circulation around the plant. The development of diseases is facilitated by excessive overwatering of plants and low soil permeability.
Another disease of callas is a fungus of leaves and inflorescences caused by fungi of the genera Coniothecium, Alternaria and Phyllosticta. The disease occurs when the leaf is over-sprayed at a relatively high ambient temperature.
Callas are also susceptible to leaf mosaicism caused by Dachenne mosaic virus and calla mosaic virus (Zatemchia Mic Mosais – ZaMMV). Viruses cause leaf discoloration, necrosis and plant death.
Heavily infested plants should be removed and burned to prevent the pathogens from spreading.