By installing drip irrigation in a greenhouse, in an open area or even at home, you no longer have to water the plants manually. Therefore, any gardener and florist would not mind acquiring one. You can do drip irrigation for a greenhouse yourself; in this article we will tell you and show you how. And in the end, we will analyze the options for ready-made systems that operate from a water supply or container.
DIY drip irrigation system assembly
Homemade drip irrigation is not difficult to make.
You must perform the following steps step by step:
- The barrel (up to 200 l) is raised above the ground to a height of up to 2 m. Holes are made in the lid for air access. If it is missing, then cover it with gauze - this is protection from insects and dirt.
- A hole is drilled near the bottom, a tap-tip is installed and the hose is brought in.
- The mains are installed at a slight slope - about 5 cm for every meter. For this, additional pegs are used.
- Pipes (hoses) are not made long - it is better to build several systems. Lay out carefully, do not drag or pull.
- They ensure precise joining of pipes - they are placed in a vice before cutting. Sealed with tow or fum tape. All connecting elements fit very tightly.
- The holes are made small (no more than 2 mm). An awl or nail is suitable for a hose, and a drill for PVC pipes. If you insert pieces of wire, water will flow down them.
- Purchased devices have colored marks - they are placed upward.
- The main hose is secured with a clamp. The lines are washed to prevent blockages, and a plug - a wooden plug - is inserted.
- They check that the water reaches each dropper, and the soil is moistened evenly.
Cucumbers – a drop at a time
The best way to learn how to maintain open ground plants under drip irrigation is with cucumbers. Their greenhouse and greenhouse varieties are still inferior in taste and other consumer qualities to garden cucumbers; especially gherkins. But, as you know, ground cucumbers can turn brown due to a sharp change in external conditions. Drip irrigation not only gives the plants optimum moisture, but also creates a more or less stable microclimate around the bushes, so it is best to do your first drip irrigation for cucumbers. Having learned how to get delicious, aromatic, crispy cucumbers “on the drop”, no matter what kind of summer it is, you can “plant on the drop” any other well-known crops.
The most important
Drip irrigation systems come in different types, see below. But even the simplest homemade drip irrigation must satisfy the main condition for all of them: supply water to the plants, and not between the rows, see fig. Otherwise, the plants will get worse, not better; to weeds and pests – on the contrary. In addition, the need for loosening, which injures surface roots, will not decrease, but, on the contrary, will increase. In addition, the wetted soil gets very hot in direct sunlight, so the rows will have to be covered with mulch, and underneath it the unwanted “cultivars” will be a real paradise. In general, one must not hope that the water in the soil will disperse. It needs to go where it needs to go right away; this is the essence of drip irrigation.
Incorrect and correct placement of irrigation drips
About holes
In the first experiments with homemade drip irrigation and then you will need to learn how to make dies in plastic - calibrated and profiled narrow holes for the flow of water. Due to viscous friction in the liquid, they will ensure a fairly stable flow of moisture from one dropper when the pressure fluctuates over a fairly wide range and good resistance of the system to clogging with soil particles.
To form the dies, you will need an electric soldering iron (preferably a soldering pencil with a bronze nickel-plated tip) and a piece of stainless steel bicycle spoke. It is sharpened like an awl and polished (required). The “piercing” tip is attracted to the soldering iron tip with a steel clamp with a screw clamp. Turn on the soldering iron and, when it heats up, tighten the screw tightly, because otherwise, due to thermal expansion, the tip will wobble.
Next you need a piece of transparent garden hose and a plastic bottle. The hose is attached to a hole in its bottom, its free end is bent and pulled together or plugged. The bottle is placed at a height of approx. 1-1.5 m. Then a series of holes are made in the hose with the tip, each time deeper and deeper into the plastic. You need to control how much the tip extends into the lumen of the hose! How much he got inside each time, we write it down, remember it, and record it in some other way. If, when pulled out, it immediately gets stuck and pulls the plastic, it is poorly polished.
Note: for greater stability of the resulting diameter and profile of the dies, it is advisable to select the temperature of the soldering iron tip using a household thyristor electric power regulator.
To complete the home OCD, we strengthen the perforated section of the hose horizontally with the dies down, and place a beaker under each die; an alternative is an indispensable Russian vessel, a cut glass. We fill the bottle with water and note the time during which 100-200 ml drips from the spinnerets into each measuring container. That's it, now you can make dies for a given hourly water flow, you only need to take into account the wall thickness of the working hose.
Calculation of watering time and volume of liquid supplied
The system design allows you to calculate water consumption and tank volume. Calculation example:
- highways - 15 m;
- between nozzles - 20 cm;
- required number of droppers - 1500/20=75 pcs.;
- consumption of one - 2 liters per hour;
- all nozzles - 2*75=150 l;
- barrel size - 150.
A long system will require a larger capacity, so several devices are usually made.
Individual watering times are calculated for each plant. Devices that consume 2 liters per hour include:
- cucumbers - for 60 minutes;
- tomatoes - 45 minutes;
- cabbage - 75 min.
Which containers to choose?
Before organizing drip irrigation, you should decide on the size of the plastic container you plan to use.
The choice depends on the type of crops grown. Small containers are inconvenient to use because they need regular replenishment, which forces the owners to frequently come to the site.
The best option is 2 liters . Used drink bottles will do. In greenhouse conditions, the temperature is higher than outside, so the bushes absorb more moisture. Consequently, water consumption will be greater.
DIY drip irrigation from plastic bottles
For a small area, the simplest system of ordinary plastic bottles is suitable.
They are hung on a peg, with the neck down, and a narrow tube or simply the refill of a ballpoint pen is inserted into it. Be sure to make a hole for air to escape.
The second option is to make holes in the bottom. Here it is important to take into account the type of soil and its ability to absorb moisture, since the number of holes depends on this:
- sandy - 8;
- clay -12.
Their size is small so that the liquid does not spill out quickly. You can make them with a needle.
A simple option is underground watering: the bottle is buried in the ground, and the neck remains above the surface. When the amount of water decreases, add it. The advantage of this method is that there is no crust on the surface that needs to be loosened. For example, in a greenhouse, one tomato bush will need 1 liter of liquid for 7 days.
The holes quickly become clogged if there is clay in the soil. To prevent this:
- put ordinary nylon tights on the part of the container with holes;
- make a little drainage - put burlap or grass in the hole before burying.
This is a good idea for people who are often away. The bottle is placed in the ground, tilted at 30-45° to reduce the water pressure and the rate of its consumption.
We start to drip
Let's start with point drip irrigation systems from dosing containers without water supply networks, as the simplest and cheapest. On large areas they are unacceptably labor-intensive, but on a plot of up to 2-4 acres this has little effect. And don’t think that you’ll have to resort to something high-tech: spot irrigation of small areas of open ground at home is nothing more than drip irrigation from plastic bottles. It can be produced in 3 ways: micro-sprinkling, surface and deep, see fig. Dispensers can also be canisters and pipes. But the former are not wasteful and expensive material, and the capacity of the latter, at optimal depth, is insufficient for the watering rate of most plants.
Methods for arranging drip irrigation from plastic bottles and other containers
Micro-sprinkling prevents clogging of the dispenser nozzles with soil, but requires stands for suspension, makes it difficult to fill dangling dispensers and does not allow water to be supplied exactly to the roots. Surface watering requires refining the bottles, which, given the required quantity of tens and possibly hundreds, is very labor-intensive. In deep spot watering from bottles, radical changes have recently occurred that have made it highly effective, see below.
Simple drip irrigation from bottles
The simplest surface drip irrigation can be organized using plastic containers or 1.5 liter bottles installed in rows between bushes, see fig. The dies in them are made at a height of 3-5 cm from the bottom so that sediment in the water does not clog them. Such irrigation is suitable for moisture- and light-loving crops with fruits located quite high above the ground, for example. tomatoes, eggplants. A serious drawback of this “system” is that mulching of the rows is required; why - see above.
Much better results are obtained by deep watering from inverted and cut bottles, left and center on the trail. rice. Mulch is no longer needed, filling dispensers is more convenient, and evaporation from them creates some kind of microclimate for the plants. However, a small, real revolution in bottle-drip irrigation was made by the appearance on sale of nozzles in threads for bottle necks with ready-made dies, on the right in Fig. They were first invented by indoor gardeners; tips of pastry syringes were used. In addition to other advantages of deep watering, you can stick dispensers into the ground obliquely, delivering water directly to the roots.
Deep drip irrigation from bottles
Other options
In addition to bottles, they sometimes try to use medical droppers for targeted individual drip irrigation, see next. rice. However, the consistently positive long-term results of such experiments are unknown. reasons due to the fact that medical droppers are disposable equipment:
- The thinnest filter gets clogged very quickly.
- Remove the filter - the needle becomes clogged with soil a little slower.
- The flow regulator clips quickly burst, the wheel pins come out of the grooves and the adjustment stops altogether.
- Hoses also quickly become cloudy, become slimy inside, and swell; the lumen of the hose is reduced, and then the tubes generally creep apart.
In addition, honey an IV costs money, and not very little. And if the medical staff, contrary to the strictest prohibition, does not destroy them after use (droppers for medicines cannot be disinfected), then who knows what patients were given them. And wouldn’t any of them share their ailments with you through a dropper...
On fairly large areas, up to 6 acres or more, surface drip irrigation from relatively available materials can be arranged, as shown in the figure:
Simple drip irrigation from buckets and garden hoses
Irrigation lines (irrigation tapes) are made from a PVC garden hose with a caliber (clearance diameter) of 3-8 mm, it is relatively inexpensive. The dies in them are made as described above. The holes in the bottoms of the buckets are drilled along the outer diameter of the thread on the neck; Such a spout is tightened with a standard plug; perhaps with a thin rubber seal. The holes in the plugs for the hoses are 1-1.5 mm smaller than their outer diameter, then seals will not be needed here. For a weekend home, this is perhaps the optimal solution: the entire system can be easily deployed, and before leaving it can be rolled up and hidden.
Note: a similar type of system, but much less expensive in all respects, can be built for growing seedlings at home, see video below.
Video: drip irrigation for seedlings at home
Automation of drip irrigation
It is possible to automate a drip irrigation system so that it turns on itself on time without human intervention. To do this, use a special device - a controller (timer).
The controller, which has fittings on both sides, is inserted into the drip irrigation pipeline system. It can also be used to control water intake when connected to a pump.
It is possible to do underground irrigation - this drip irrigation is distinguished by the laying of a pipeline that is placed at depth.
How to make it yourself?
There are several homemade options for plastic micro-drip irrigation systems, depending on the conditions of use and the type of crop being grown. Assembly requires a minimum of components that can always be found on the farm.
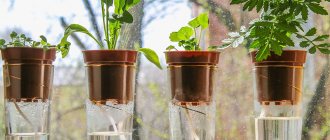
For indoor plants
Drip watering of home flowers is relevant when the whole family is planning a long absence or the gardener wants to make his work easier. Such hydration can be superficial or permanent .
Nowadays, specialized stores sell various drip irrigation systems. But they are not difficult to make yourself. They are identical in operating principle.
Typically, the device consists of a container from which thin tubes and a control system are extended. There are kits that do not operate on electricity. They are ceramic cone-shaped droppers with a plastic nozzle, from which water spontaneously flows into the ground.
For a week
If you are planning a short trip, then a small container will be enough to moisten indoor vegetation. In this regard, the same conical plastic nozzles sold in the store will help out . A short hose is connected to them, connecting them to a water source.
There is a membrane inside the device that controls moisture flow. You must use such a device carefully. The pores of the membrane can easily become clogged, which will render it inoperable.
Another effective option for micro-irrigation is the use of medical droppers.
You will need:
- empty plastic bottle 1.5 l;
- medical dropper.
Manufacturing instructions:
- Water is poured into the bottle.
- The lid is pierced with a dropper needle.
- Hang the container over the flower pot.
- The lower part of the system is stuck into the ground.
- Adjust the degree of water supply using a special wheel on the tube.
Another simple and inexpensive way to micro-water plants is to use an empty plastic bottle with holes in the right places.
First, prepare everything you need:
- bottle, up to 2 liters;
- awl or nail;
- lighter (for heating a sharp instrument).
Instructions:
- Several holes are made on the screw cap.
- Bury the vessel in the ground with the bottom up, which will need to be cut off, and pour water inside.
- You can hang the container upside down, fixing it in the bottom area. Wire is used for this.
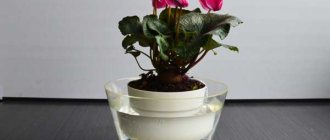
For 30 days
When a long absence is expected, it is recommended to use the same plastic cones for watering. Just take a larger container. So, a two-liter bottle is enough for a month.
It is enough to insert the nozzle into the ground next to the flower, attach the bottle, and fill it with water . The device operates automatically and does not require control from the owners.
There are different interpretations of ceramic cones - they come in the form of animals, butterflies, and birds. But they are unsuitable for long-term irrigation, as they require systematic “refueling”.
For open ground in the country
The soil is well saturated thanks to drip irrigation using ready-made or homemade systems. There are different options, but the most popular ones will be discussed below. They can be used around the clock, since moisture does not reach the leaves, so they are not at risk of sunburn.
Regular option
Required materials and tools:
- used empty plastic bottle, 2 liters;
- awl or nail;
- nylon;
- watering can.
Instructions:
- Several holes are made in the lid of the vessel. You can pierce it over the entire surface in different places - for the efficiency of the watering process.
- Before screwing on the cap, pull a nylon stocking over the neck.
- Now they bury the container, leaving the bottom open - it needs to be cut off. Pour water from a watering can.
You can make one hole in the bottle and insert a rod without a pen tip into it. The ink is first washed with ammonia. Direct the rod to the irrigation zone and fix it with plasticine or another method.
The manufacture of another universal irrigation device is as follows:
- Take an empty plastic bottle for sweet drinks or beer, with a capacity of 1.5-2 liters. Measure about 3 cm from the bottom. Make holes with an awl along the entire surface, right up to the neck.
- A hole is made next to the plant and a container is placed in it so that the narrowing protrudes above the ground.
- Wrap the vessel with cloth, add water and close the vessel.
It is recommended to regularly monitor the sprinkler, since the container may be compressed under the pressure of the soil. To avoid this, it is better to pierce the lid in advance and add fresh water on time.
Using harnesses
First of all, prepare everything necessary for manufacturing the system:
- plastic vessel 2 l;
- a regular dressing bandage or a piece of gauze;
- culinary foil;
- knife;
- marker.
Procedure:
- Cut off the bottom of the bottle, retreating about 6 cm. Compact the container in the ground.
- Then insert a one and a half liter bottle into it and mark with a marker the level to which the cut bottom reaches. At a distance of about 2 cm from the line, make a window measuring 1 by 1 cm.
- The bandage is folded in several layers to form a cut about 15-20 cm long.
- Twist it into a rope. Then cut off a small piece of foil.
- Wrap the bandage in foil so that the tube comes out. Lightly press it with your hand.
- The bottom of the vessel is placed near the culture, fixing it slightly. A strand of foil is immersed inside so that the lower part reaches the bottom, and the upper part is directed towards the base of the flower.
- Pour water into the bottle.
- Insert the vessel into the cut bottom.
- After a short time, the moisture saturates the bandage, and drops begin to accumulate at the end of the tube and penetrate into the soil.
Through the tourniquet, the irrigation intensity is 1 drop per second. The tighter the rope is twisted, the slower the water will drip. In this way it is not difficult to adjust the irrigation for several days in advance.
Using a sponge
What you will need:
- bottle of 1.5-2 liters;
- foam sponge.
Instructions:
- Prepare the same number of bottles and foam rubber as there are flowers to be watered.
- Unscrew the lid.
- Pour water inside, but so that there is space for air to the edge.
- Roll the sponge tightly and insert it halfway into the neck.
- Place the container so that the protruding sponge touches the base of the bush.
If moisture seeps through the sponge too quickly, you need to change to a larger piece. The required irrigation intensity is achieved experimentally.
The only disadvantage of such irrigation is the need to remove the foam rubber when adding water to the bottle.
For the greenhouse
The same designs are suitable for greenhouse irrigation as for open ground . The only thing you need to take into account is that the temperature inside the greenhouse is higher than outside, so the water consumption will be greater.
Upside down
For this method you only need a lemonade or beer bottle and a nail to make the holes.
Sequencing:
- With a piercing tool, holes are pierced in the plastic, at a distance of 3 cm from the bottom.
- To prevent them from becoming clogged with debris, they are wrapped in nylon.
- Water is poured into the neck.
- Now place the container near the crop being grown.
Suspended structure
To install the hanging structure you will need:
- plastic bottle;
- a carnation or an awl;
- knife with a sharp blade;
- rope;
- pegs (for support).
Next steps:
- The bottom part of the prepared vessel is cut off, but not thrown away - it will serve as a lid.
- Holes are made on both sides of the cut, at a distance of about 2 cm. A rope is threaded through them on which the sprinkler will hang.
- A small hole is pierced in the lid from which water will leak out.
- After collecting the device, hang it on a stationary support above the bush.
DIY drip watering of indoor plants
When leaving for a long period, a drip irrigation system will be useful for house plants. You can choose it in the store. For example, there is a special polymer that retains liquid and then releases it.
But you can make drip irrigation for indoor plants with your own hands. A few simple ideas:
They take a plastic bottle and attach a dropper and silicone tubes. The end is closed, and holes are made along the entire length.
Wick watering - place a container of water near the pot. The wick is lowered into it with one end and buried in the ground with the other. Used for porous soil. Not suitable for tall plants because They have large roots and the moisture they receive will not be enough.
Be sure to check the operation of the system before leaving, the rate of water consumption.
We make an irrigation and watering system from pipes
When installing a main pipeline from a water tank to an irrigation site, pipes and fittings made of the following materials are used:
- polypropylene;
- PVC;
- HDPE;
- PVD.
These pipes withstand contact with water perfectly, do not corrode, are chemically neutral and do not react to the flow of fertilizers through them. To irrigate a small area, in most cases a diameter of 32 mm is used.
Main pipes must be plastic. And what type you will need, choose for yourself.
It is necessary to connect tees at the points where the lines are branched off. And connect drip hoses or tapes to their side outlets. For this you also need to purchase adapters. They are attached using metal clamps.
For additional convenience, after each tee you can install taps that will regulate the water supply. This is convenient when different vegetables are grown in the garden.
Installation:
- We install the barrel on an elevated platform. This will help get pressure to supply water.
- We attach the main pipe (32 mm in diameter) to it. It will supply water to the distribution pipe.
- A PVC distribution pipe is laid along the entire perimeter of the garden.
- Holes for taps are made in it. This can be done with a screwdriver.
- Taps are inserted into them. And drip tapes or hoses are already installed on them.
- System installation is ready!
Review of ready-made drip irrigation systems
Many gardeners prefer to make a drip irrigation system with their own hands, but, as a rule, it is good only for not too large plantings. It is much more reliable and convenient to purchase a ready-made drip irrigation system that will serve you for many years.
We offer an overview of the most popular systems to make it easier for you to decide on the model and configuration.
"Bug"
The system got its name by analogy with a beetle - a long hose-body and many dropper legs arranged symmetrically. The manufacturer offers two types of systems, separately designed for greenhouses and greenhouses.
You will have to assemble the structure yourself; to do this, use an awl to make holes in the main hose where the droppers are inserted. True, doing this without additional lubrication is quite problematic.
Each kit comes with a special filter that prevents soil and sand from clogging the irrigation holes, but the timer is purchased separately; on the official website of the store it costs 2,186 rubles. with discount.
“Beetle” is produced both with water intake from stationary containers and from a water supply system. The system works well even at low pressure. The container irrigation kit includes a transparent tube through which you can monitor the water level in the barrel.
The manufacturer gives a choice of systems for 20, 30 and 60 plants, but, as practice shows, even the “Beetle” 30 is too small even for a classic greenhouse, while we will not consider 20 at all, although its price on the official website is only 623 rubles.
Many summer residents note that the quality of the plastic leaves much to be desired, the joints leak, and the timer has to be hidden in polyethylene to prevent water from getting inside it. The kit also includes plugs that allow you to adjust the direction of water movement and carry out selective watering, as well as a fitting that makes it possible to connect the system to almost any container that you will use as a water source. The storage container with water should be 1-2 meters above ground level.
Drip irrigation ZHUK with emitter tape
Drip irrigation ZHUK with emitter tape comes in 12 and 24 meters. Let's look at them in more detail in the table.
Drip irrigation ZHUK with emitter tape: equipment
These types are suitable for beginners, their size is small.
| System type | 12 meters | 24 meters | |
| Equipment | Main hose, m. | 4 | 6 |
| Connection connection to the container, pcs. | 1 | ||
| Fitting 1/2-3/4, pcs. | 3 | ||
| Large tee, pcs. | 2 | ||
| Level tube transparent, m. | 1 | ||
| Suspension for level tube, pcs. | 1 | ||
| Clamp for main hose, pcs. | 2 | ||
| Shilo, pcs. | 1 | ||
| Fine filter, pcs. | 1 | ||
| Crane, pcs. | 1 | ||
| Clamp for main hose, pcs. | 4 | 8 | |
| Emitter tape, m. | 12 | 24 | |
| Start fitting, pcs. | 2 | 4 | |
| Plug for drip tape, pcs. | 2 | 4 | |
| Operating pressure in the system | 0.1 - 1 atm | ||
| Emitter Ribbon Wall Thickness | 0.15 mm | ||
| Emitter Distance | 30 cm | ||
| Water flow per emitter | 1.6 l/h | ||
| price, rub. | 691 | 913 | |
Now let's look at the Zhuk systems from the water supply system :
Packaging of the Zhuk system from the water supply for 30 and 60 plants
| System type | 30 plants | 60 plants | |
| Equipment | Main hose, m. | 9 | 18 |
| Microtube, pcs. | 30 | 60 | |
| Collet tee 1/2, pcs. | 1 | ||
| Collet clamp 1/2, pcs. | 3 | ||
| Collet angle 1/2, pcs. | 2 | ||
| Compensated dropper, pcs. | 31 | 61 | |
| Arrow with clip, pcs. | 30 | 60 | |
| Fine filter, pcs. | 1 | ||
| Clamp for main hose, pcs. | 2 | ||
| Clamp for main hose, pcs. | 8 | 16 | |
| Awl for main hose, pcs. | 1 | ||
| Irrigation area (sq.m.) | 6 | 18 | |
| price, rub. | 1370 | 1923 | |
| Price with timer, rub. | 3389 | 3942 | |
Now let's look at systems that operate on capacity :
Packaging of the Beetle system from containers for 30 and 60 plants
| System type | 30 plants | 60 plants | |
| Equipment | Connection connection to the container, pcs. | 1 | |
| Main hose, m. | 9 | 18 | |
| Level tube transparent, m. | 1 | ||
| Suspension for level tube, pcs. | 1 | ||
| Supply hose 40 cm, pcs. | 30 | 60 | |
| Droppers, pcs. | 30 | 60 | |
| Small tee, pcs. | 15 | 30 | |
| Crane, pcs. | 1 | 3 | |
| Angle for main hose, pcs. | 2 | 3 | |
| Large tee, pcs. | 2 | 3 | |
| Plug for main hose, pcs. | 2 | 3 | |
| Clamp for main hose, pcs. | 16 | 18 | |
| Awl for main hose, pcs. | 1 | ||
| 1/2″ fitting (for connecting to a container), pcs. | 1 | ||
| Fitting 3/4 (for mounting the filter), pcs. | 2 | ||
| Fine filter, pcs. | 1 | ||
| Irrigation area (sq.m.) | 6 | 18 | |
| price, rub. | 1231 | 1785 | |
| Price with timer, rub. | 3251 | 3804 | |
Watch the video about the product:
Both types, from water supply and container, have the same advantages and disadvantages:
| Advantages | Easy installation, there are fastenings for fixing the central hose to the ground. Clear instructions, sufficient quantity of all elements. Possibility of unlimited expansion of the system. |
| Flaws | The timer is included in the kit for an additional fee, it will cost about 2000 rubles. Inserting the droppers into the tube requires additional lubrication. Not very high quality material. |
For those summer residents who find the number of elements in the kit insufficient as it is used, the manufacturer offers to purchase an expansion kit for drip irrigation from a container and from a water supply system Zhuk 20 plants. The only thing that needs to be taken into account is that when expanding the drip irrigation system, the container with water must be raised even higher, since the load on it has become greater (in the case of using a system from the container).
Overview of two types in tables:
Packaging of expansion kit for Zhuk tank
| Type of expander | From capacity and | |
| Equipment | Supply hose 40 cm, pcs. | 20 |
| Droppers, pcs. | 20 | |
| Small tee, pcs. | 10 | |
| Crane, pcs. | 3 | |
| Angle for main hose, pcs. | 5 | |
| Large tee, pcs. | 5 | |
| Plug for main hose, pcs. | 5 | |
| Clamp for main hose, pcs. | 20 | |
| Angle for main hose, pcs. | 2 | |
| Large tee, pcs. | 2 | |
| Plug for main hose, pcs. | 2 | |
| Clamp for main hose, pcs. | 18 | |
| Dropper type | Droppers-arrows | |
| Dripper water flow | 4 l/h | |
| Operating pressure in the system | From 0.1 to 0.2 atm. | |
| price, rub. | 443 | |
Packaging of expansion kit from Zhuk water supply system
| Type of expander | From the water supply | |
| Equipment | Microtube, pcs. | 20 |
| Arrow with clip, pcs. | 20 | |
| Compensated dropper 4l/h, pcs. | 20 | |
| Collet tee 1/2, pcs. | 1 | |
| Collet angle, pcs. | 1 | |
| Clamp for main hose, pcs. | 2 | |
| Clamp to the soil, pcs. | 8 | |
| Dropper type | Compensated droppers Dr.Drop | |
| Dripper water flow | 4 l/h | |
| Operating pressure in the system | From 1 to 4 atm. | |
| price, rub. | 623 | |
You can also purchase separately:
- Main hose 20 m – 567 rub.
- Connecting coupling 1/2 - 1/2 - 40 rub.
- Collet angle 1/2 – 43 rub.
- Collet tee 1/2 - 1/2 - 1/2 - 63 rub.
- Irrigation filter – 239 RUR.
- Fitting for a barrel – 87 rub.
- Clamps for the main hose (2 pcs.) – 54 RUR.
- Clamps for the main hose (4 pcs.) – 21 RUR.
- Awl for the main hose (1 pc.) – 53 RUR.
- Arrows for drip irrigation from a container (10 pcs.) – 110 rub.
- Large tee for drip irrigation from a 1/2″ container (5 pcs per package) – 59 RUR.
- Supply hoses for drip irrigation from a container (4 m in a coil) – 176 rubles.
- Corner for drip irrigation from a 1/2″ container (5 pcs per package) – 53 RUR.
- Small tees for drip irrigation from a container (5 pcs per package) – 26 rubles.
- A set of 1/2-3/4 fittings for watering from a container (2 pieces per package) – 54 rub.
- Tap for drip irrigation from a container (1 piece per package) – 87 rub.
- Compensated drippers for drip irrigation from water supply (10 pcs. per package) – 365 rub.
- Arrow with a clamp for drip irrigation from a water supply system (10 pcs. per package) – 130 rub.
- Micropipe for drip irrigation from a water supply system (10 pcs. per package) – 143 rubles.
Website: firm-tsikl.rf
"AquaDusya"
The Belarusian manufacturer offers a universal drip irrigation system “AquaDusya” of two types - for 50 and for 60 plants. There are kits without automation, and there are automatic systems that allow you to forget about watering the beds for the season. All automatic elements of the system operate on batteries, so there is no need to be afraid of power surges.
AquaDusya Start 50 AquaDusya Start LCD 50
The set is quite complete. All you have to do is pick up a barrel and lift it 20 cm from the ground for Start +50 and 3 m for AquaDusya WATER TAR. The main advantage of the system, which is noted by all users, is the long service life and reliability of the structural elements.
AquaDusya Start 60
AquaDusya WATER TAR
| System type | Start +50 | Start LCD | AquaDusya +60 | AquaDusya WATER TAR | |
| Hose length, m. | 15 | 12 | 15 | ||
| Equipment | Hose 7/9 mm, m. | 2 | — | — | |
| Supply hose 7/9 mm, m. | 15 | 12 | 15 | ||
| Hose 12/15 mm, m. | 2,5 | 3 | — | — | |
| Hose 14/12 mm, m. | — | 3 | |||
| Hose 4/6 mm, m. | 10 | 12 | |||
| Droppers, pcs. | 50 | (compact) 60 | |||
| Large tee, pcs. | 1 | ||||
| Small tee, pcs. | 25 | 30 | |||
| Hose clamps, pcs. | 4 | — | — | ||
| Pump block, pcs. | 1 | — | — | ||
| Electronic starting device, pcs. | 1 | — | — | ||
| Corrugated protective tube, pcs. | 1 | — | — | ||
| Bracket, pcs. | 1 | — | — | ||
| Faucet timer, pcs. | — | — | 1 | ||
| Water intake | From container | From a container, from a water pipe | |||
| Irrigation area, sq.m. | 18 | 21 | |||
| Water consumption | 200 l/h | 125 l/h | — | — | |
| Timer | + | — | + | + | |
| Water flow regulator | + | — | — | — | |
| Connector for connection | + | + | + | + | |
| Watering mode | Every 6/12/24 hours, every 3, 4 days, once a week | — | Every 6/12/24 hours, every 3, 4 days, once a week | ||
| Lifting the container | 20 cm. | 2.5 m. | 3m. | ||
| Water consumption per dropper | 4 l. | 2.5 l. | — | — | |
| Hole spacing | — | — | — | 40 mm. | |
| Maximum pressure | — | — | — | 4 bar | |
| price, rub. | 5000 | 5500 | 1800 | 3100 | |
| Advantages | Automatic controller, reliability, designed for many landings. Now they are releasing the Start option for 70 plants, with the possibility of expanding to 100. | Budget price, long service life | You can set launch time intervals both by day and by hour. Reliability of the design. Can be used for underground installation. A more modern model, Water Tap 2, has been released. | ||
| Flaws | There is no way to connect to the water supply, not enough hoses, price. | No automation, no water connection | There may not be enough hoses for a large area; you will have to purchase them additionally. | ||
The manufacturer also produces automatic machines for greenhouse ventilation under the DusyaSan brand.
Website: aquadusia.ru
"Istok" CPC
The Samara drip irrigation system is designed to draw water from a container and a water supply system. Its kit includes drip tape and fittings for fastening, and the more modern modification of the KPK 24K is equipped with a controller for organizing automatic watering, which runs on three AA batteries. If desired, you can choose one of the available 16 programs, and place the drip tape itself both on top of the soil and inside it.
| System type | Istok KPK-100 | Istok KPK-24/24K | |
| Length of drip tape, m. | 100 | 25 | |
| Equipment | Water tap, pcs. | 1 | Tape, fittings, filter/controller |
| Reusable water purification filter, pcs. | 1 | — | |
| Adapters, pcs. | 4 | 2 | |
| Tees, pcs. | 9 | 3 | |
| Corners, pcs. | 2 | 1 | |
| Drip tape emitter type 16 mm, m. | 100 | 25 | |
| Retaining ring, pcs. | 11 | 4 | |
| Ring sealing | 1 | — | |
| Adapter, pcs. | — | 1 | |
| Irrigation controller, pcs. | — | 1 (24K only) | |
| Water intake | From a container, water pipe | From container | |
| Irrigation area | 100 sq.m. | 25 sq.m. | |
| Watering range | — | 0.3 m | |
| Water consumption | 1.4 l/h | ||
| Hole spacing | 300 mm | ||
| Connector for connection | + | + | |
| Timer | — | + | |
| Lifting the container | At least 1 m. | 8 m. | |
| Maximum pressure | 0.8 atm. | ||
| Price, rub | From 2000 | From 1000 | |
| Advantages | Large area, easy installation. | Budget price, it is possible to purchase a controller (about 2000 rubles). Designed for 83 plants. | |
| Flaws | There is no possibility to connect to the water supply in the basic configuration. | ||
Website: www.istokpkf.ru
"Water strider"
The manufacturer from Dubna offers two system options - Vodomerka-Eco (a budget irrigation option) and Vodomerka. The difference between them is that the latter has a battery-powered controller that allows you to automate the system without requiring human intervention.
Water strider IVF
Water strider
This design only works with a container; connection to a water supply is not possible. A barrel of water, as summer residents note, should be plastic for ease of fastening; a prerequisite is to raise the container by about 50 cm above ground level.
Watering sensor
Hose, droppers
Another advantage of this system is the presence of a ball valve rather than a membrane valve, which allows it to work properly at any pressure. If necessary, it is possible to supplement the basic version with an extension kit, which allows you to capture another 2 meters of beds.
| System type | Water strider | Water Strider-Eco | |
| Hose length, m. | 12 | 12 | |
| Equipment | Starting device, pcs. | 1 | — |
| Hose, m. | 12 | ||
| Crane, pcs. | 1 | ||
| Shaped connector, pcs. | 1 | — | |
| L-shaped connector, pcs. | 2 | — | |
| Connector, pcs. | 2 | Specified set. | |
| Filter, pcs. | 1 | ||
| Hose pegs, pcs. | 4 | — | |
| Hole punch, pcs. | 1 | — | |
| Droppers, pcs. | 40 | ||
| Microtubes 50 cm, pcs. | — | 40 | |
| Water intake | From container | From container | |
| Irrigation area, sq.m. | 12 | 12 | |
| Maximum pressure | 1 bar | — | |
| Timer | + | — | |
| Connector for connection | + | + | |
| Watering time | 2-120 min | — | |
| Interval | 6 hours – 7 days | — | |
| price, rub. | 3000 | 1300 | |
| Advantages | Automatic controller, reliability. | Budget price, long service life | |
| Flaws | There is no way to connect to the water supply, cost, fittings are only suitable for plastic barrels | ||
Website: msk.teplicy.ru
"Signor Tomato"
developed several configuration options for the same drip irrigation system “Signor Tomato”.
A simple option - emitter tape and fittings 24
The simplest option is emitter tape and fittings. The footage can be selected from 24 to 100 meters. Such a system is attached to a barrel raised above the ground, and the tape itself is placed on top of the ground.
A simple option - emitter tape and fittings 50, 100
Another configuration option includes not a tape, but a drip tube with branching hoses, designed for 60 plants. If desired, you can additionally purchase a timer.
"Signor Tomato" with drip tube for 60 plants
And today’s most modern variation of “Signora Tomato” is a fully automated drip irrigation system powered by solar panels. In addition, it is already equipped with a submersible pump, so there is no need to additionally raise the water container above the ground.
"Signor Tomato" automatic watering system
“Signor Tomato Eco” in the table
| System type | 24 meters | 50 meters | 100 meters | |
| Emitter tape, m. | 24 | 50 | 100 | |
| Equipment | Emitter type tape | 1 | ||
| Tap | 1 | |||
| Tee for irrigation tape, pcs. | 4 | 5 | ||
| Plug for tape, pcs. | 4 | 5 | ||
| Repair fitting, pcs. | 1 | 2 | ||
| Plug for hose, pcs. | 1 | |||
| Water intake | From container | From container | — | |
| price, rub. | From 650 | From 950 | From 1350 | |
| Advantages | Easy to install. Budget price, long service life with proper care. | |||
| Flaws | At the end of the season, it requires washing and blowing, and needs proper storage. | |||
Other more expensive options:
| System type | Signor tomato 60 | Signor-tomato machine | |
| Equipment | Supply hose 7/9 mm, m. | 18 | |
| Hose for droppers 4/6 mm, m. | 12 | 17 | |
| Large splitter with plug, pcs. | 1 | ||
| Small splitter, pcs. | 3 | 30 | |
| Dropper, pcs. | 60 | ||
| Insert for barrel, pcs. | 1 | — | |
| Adapter for insertion, pcs. | 1 | — | |
| Plug for supply hose, pcs. | 3 | ||
| Solar battery | — | 1 | |
| Controller | — | 1 | |
| power unit | — | 1 | |
| Pump | — | 1 | |
| price, rub. | 1600 | 5900 | |
| Advantages | Reliable design, long service life, it is possible to purchase an additional timer | Completely autonomous system. Powered by a solar battery, supplemented with a pump. | |
| Flaws | Price | ||
Website: signor-tomato.rf
"A drop"
This drip irrigation system is an emitter tape with a complex arrangement of droppers inside. It practically prevents clogging when watering from a container or water supply, but if you plan to take water from a well, you will need an additional filter.
“Drop” involves manual switching on and off; the kit includes plugs that allow you to water only selected beds.
The system is additionally equipped with a function that allows you to add fertilizers to the water to increase the yield of your crops.
The manufacturer offers methods for connecting both to the water supply and to the barrel for water intake.
| System type | A drop | |
| Tape length | 50 m | |
| Equipment | Drip tape, m. | 50 |
| Crane with bunks 1/2″ thread for hose, pcs. | 1 | |
| Triplets for garden pipe and drip tape, pcs. | 4 | |
| Repair connection for drip tape, pcs. | 2 | |
| Plug for garden pipe/hose, pcs. | 1 | |
| Water intake | From a container, water supply, well. | |
| Maximum pressure | 1 atm. | |
| Irrigation area | 25 sq.m. | |
| price, rub. | 1399 | |
| Advantages | Variable method of water intake, reliable design, ease of installation, function of adding fertilizers to water, operation with low liquid pressure. | |
| Flaws | No controller or filter. | |
Website: bashagroplast.com
Homemade system of medical droppers
An equally effective method of irrigation is the use of ordinary medical droppers. Due to the fact that they are equipped with a special wheel, you can adjust the intensity of the liquid supply for each specific plant. To do this, you do not need to make several watering lines, which in turn can reduce the overall costs of organizing an irrigation system. The principle of operation is almost the same as indicated in the paragraph above. Only instead of special drip hoses we will use ordinary rubber or polyethylene pipes.
- Distribute supply pipes throughout the entire area;
- The wiring diagram should be such that you can reach all the plants;
- Use tees to connect elements;
- Now connect the entire system to a water source. This can be either a storage tank or a central water supply;
- Install plugs at the end of each hose;
- Now, opposite each bush, make a hole in the hose.
- It is most convenient to pierce rubber with an awl, and plastic with a self-tapping screw;
- The plastic end of the dropper must be inserted into each hole;
- Place dropper tubes under each bush and enjoy excellent results.
There is an easier way to set up an irrigation system using medical droppers.
In this case, droppers will be used together with a liquid container:
- Install a support for hanging the dropper in the required place. It can serve as an ordinary stick;
- Fill the reservoir with liquid, secure it to the support;
- Medical systems with thick needles or medical hoses with a diameter of 1-2 cm are used as supply hoses;
- Insert needles diagonally into the main hose and place the ends of the tubes in the desired location.
It probably couldn’t be simpler. Droppers clog quite rarely, and even if this happens they are very easy to clean. The disadvantages include the rapid overgrowing of the system with algae when it is exposed to direct sunlight. To avoid this, you can cover the structure with a dark cloth.
How to choose ready-made drip irrigation
All gardeners are divided into two types - those who permanently live in the country and those who come only on weekends and less often. When choosing a drip irrigation system, this fact must be taken into account. If you manage to get out to the dacha only a few times a month, purchase automated systems, taking additional care to ensure that the intake tank is filled with water on its own in a timely manner. The tank or barrel from which water enters the system must be in the sun; ice watering is detrimental to the roots.
The distance between the holes should correspond to the distance between plantings in the greenhouse. The most optimal step for crops familiar to our greenhouses is considered to be a step of 30 cm.
The average throughput of drippers for vegetable crops should be from 1 to 1.5 liters of water per hour. For trees, this figure is at least doubled.
Manufacturers offer three main types of drip irrigation system tapes:
- Slotted - inside it there is a branched channel that slows down the rate of water supply, which allows it to warm up evenly and not over-wet the plants.
- Emitter - flattened droppers are built inside it along its entire length. It is the most reliable type of tape today.
- Labyrinth - practically not used in modern designs due to unreliability and painstaking installation.
If a hose rather than a tape is used, then droppers are used. We discussed the types above.
Basic tips for operating a drip irrigation system
To extend the life of any system, proper and timely maintenance . To do this you need:
- Clean the filter from accumulated debris once a week. In the future, you can do this less often if you see that between cleanings there is not enough time for a lot of deposits to accumulate.
- Before watering for the first time, be sure to flush the entire system.
- If you want to use fertilizers, you can add them directly to the storage container. Choose easily soluble compounds. After using up the entire volume of water with fertilizers, the system must be rinsed with clean water. To remove remaining impurities, just let it run for 10-15 minutes.
- If you want to dismantle the system in the fall, first rinse it thoroughly and dry it thoroughly.
- After this, carefully fold the hoses or tapes, cover them with cloth or place them in boxes. To prevent small rodents from damaging the hoses, it is better to store them in a suspended state.
By following these recommendations, you can count on your system to serve you well for many years.
The article was written for the site.
Tags: Landscaping
Advantages and disadvantages of the drip system
The initial goal when creating drip irrigation was to compensate for the insufficient amount of water for irrigating plants. Later it turned out that this method is preferable to traditional means. The following advantages are noted:
- saving water resources - there is no expense for row spacing;
- obtaining early harvests - the development period is reduced, the fruits ripen quickly;
- saturation of the root system - slow moisture supply ensures
- rapid growth and obtaining more nutrients;
- reducing the possibility of soil waterlogging - the risk of developing diseases (powdery mildew, various types of rot, black leg, etc.) is reduced;
- no burns on the leaves - water goes directly to the root;
- reduction in the number of weeds - there is no excess moisture;
- no risk of soil erosion - best aeration;
- increase in yield by 30-40%;
- application of mineral and organic fertilizers during irrigation.
At first, this system was installed only in greenhouses or greenhouses, but later it began to be used in open areas.
However, drip irrigation also has disadvantages:
- Control over devices - incorrect calculation of water flow will lead to excess moisture and death of plants. You need to monitor the filling of the barrel. To ensure automatic watering, a timer is installed.
- Cleaning the holes - they become clogged due to their small diameter. You can't increase it, because... water will flow out without reaching all the nozzles. Use a filter installed at the beginning of the system (a piece of foam rubber), which can be removed and washed.
- The barrel and the receiver-distributor must be covered - this protects from debris and insects.
Drops in greenhouses
The use of drip irrigation for private farms in moderately humid climates is most economically profitable in a greenhouse. For example in Fig. Drawings of a drip irrigation system for a 6x3 m greenhouse and specifications for 2 options of components for it are given.
Greenhouse drip irrigation system 3x6 m
The costs of creating drip irrigation in a small greenhouse, given per unit of its productive area, are much lower than for open ground, and productivity is also much higher. Therefore, drip irrigation for greenhouses is quickly gaining popularity, and complete sets of their elements, including a controller, are available for sale for standard-sized greenhouses, on the left in the following. rice. The price of the kit is significantly lower than when purchasing components at retail. An additional plus is that conscientious sellers provide a guarantee on everything except the relatively inexpensive hose. Therefore, the system can first be tried on dry in a separate area, assembled, made a test run, and then, if everything is in order, installed on site.
A set of components for drip irrigation of a greenhouse
For drip irrigation in a greenhouse, you need a controller with a soil moisture sensor, otherwise, due to the small evaporation to the outside, it is very difficult to avoid acidification of the soil and all sorts of misfortunes to the vegetation. But what if the greenhouse is not electrified? Make an autonomous power supply? And if it is not yet serviced regularly, automation of watering is inevitable. With my own hands, because Turnkey automatic watering systems are very expensive.
Construction of a non-volatile greenhouse with drip irrigation
One solution to this problem is shown in Fig. The basis is a solar battery (SB) at (15-18) V (possibly homemade) with an area of 1-1.5 square meters. m and a 12V 65A/h car battery. The battery can be recharged simply through a 10A diode, because The short-circuit current of the SB is only slightly greater than the current contained in the battery. Buffer water tank – 200 l barrel.
It is better to use a 12V submersible pump. The 220V pump can be turned on via a household inverter 12VDC/220V 50Hz AC. To avoid draining the pump by the siphon effect, the barrel must be buried in the ground. For the same purpose, an electromagnetic shut-off valve is installed on the supply pipe in front of the flow meter/controller, electrically connected in parallel to the pump. That is, if the pump is 12V, then the valve needs a 12V valve, or both at 220V.
In this system, a reverse siphon effect is also possible, which will pull water and ground back, causing the drippers, pipes and filter to become clogged. The remedy against it is a check valve immediately behind the controller, if you look at the water flow.
How to make holes for seedlings in film on the ground
Types of drip irrigation
Several popular options for homemade drip irrigation:
Barrel - a tank with lines diverging from it from long hoses. The container is raised above the ground to a height of up to 2 m, which allows the liquid to fill all the guides and reach its destination.
Barrel irrigation
Bottle - plastic containers. Small holes (1-3 mm) are made in the bottom, and liquid is added as it is consumed.
Bottle watering
Install close to plants.
Bottle watering
Droppers - several pieces are fixed on a horizontal peg made of wood, metal or plastic.
The flow of water is regulated by a catheter directed under the root.
Plastic pipes - laid between rows and connected to a reservoir with liquid or a central water supply. Holes are drilled closer to the stems.
Plastic pipes
Watering using medical droppers
This type of watering is extremely convenient for several reasons:
- low cost of components;
- easy water supply to any plant, which is very convenient if your beds are not perfectly level;
- The water pressure can be adjusted using the wheel located on each dropper.
Types of droppers
External drippers are specially manufactured devices for inserting into laid pipelines. Their ends are small tubes that allow you to regulate the amount of water supplied.
There are three main groups of droppers, differing in design.
Adjustable
With real water consumption. It is installed according to the instructions.
There are also unregulated ones.
Uncompensated
There is less water at the end of the bed than at the beginning. Suitable for flat terrain or with slight elevation changes.
Uncompensated drip
Compensated
The liquid is dispensed in doses (there is a membrane, a valve). Ideal for use in areas with different levels.
Compensated drip
Droppers-spokes, arrows
This is a plastic tube in the form of a stand, in which there are channels through which water flows. Connect using adapters and splitters. Branched - for several plants at the same time (spider).
Anti-drainage
In addition, droppers can be anti-drainage. Water is present in the system even when the supply is stopped. This speeds up the restart, because no need to remove air.
Anti-drainage drip
It must be possible to disassemble. The cap is usually removed to clean when clogged.
Throughout the area
We have already come close to drip irrigation of fairly large areas from pressure water supply sources with water supplied through pipelines. A water-tube drip irrigation system is built according to a complete and simplified scheme, depending on the value of the initial pressure: with a normal pressure of 0.7-3 bar or a low-pressure of 0.1-0.3 bar. A pressure of 1 bar corresponds to a lift of the pressure tank of 10 m, i.e. in low-pressure systems, raising the pressure tank 1-3 m above ground level is sufficient. This greatly simplifies the installation of both the system itself and the pressure tank; the costs for them are correspondingly reduced. But it is difficult to ensure high-quality watering of beds longer than 10 m in a low-pressure system, and technically impossible for beds longer than 20 m.
Note: we do not consider high-pressure irrigation systems, e.g. mist irrigation, because making them with your own hands is unrealistic, and the cost of construction is very high.
The design of both drip irrigation systems is shown in Fig. top left and top right respectively.
Drip irrigation system design diagrams
In both cases, a squeegee (bottom center) is connected to the water supply source (water supply, general pressure tank, submersible pump in a well or borehole) - a device for preparing irrigation water, monitoring and regulating its flow. The squeegee, in addition to the shut-off valve, must be equipped with a special filter, because additionally unfiltered water will immediately damage the entire system. The main pipeline(s) with an optionally installed fertilizer solution injector are connected to the runoff, and distribution pipelines (drip pipes, irrigation tapes or just tapes) laid on the beds are connected to the main line. The tapes are equipped with droppers that carry out the actual watering.
Note: the design of individual elements and methods of installation of low and normal pressure drip irrigation systems differ markedly, see below. The reason is the varying degree of influence of viscous friction of water in pipes; in low-pressure systems it is relatively higher.
About pipes
Main pipes and, most often, tapes are made of low-density polyethylene (HDPE) and are sold as HDPE pipes or simply HDPE. “Low pressure” in this case characterizes the production technology of this plastic: at low pressure with the participation of a catalyst. HDPE pipes are inexpensive and very resistant, with a service life of over 40 years. However, when heated to more than 60 degrees, catalyst residues (cadmium) can be released, which is why food-grade and household polyethylene is more expensive and high-pressure.
Drip irrigation systems are assembled from HDPE pipes for laying in the ground, black with a longitudinal blue stripe. Pipes for internal distribution (green) in a temperate climate can withstand 5-6-10 seasons. PVC-reinforced irrigation hoses are not suitable for the construction of stationary irrigation systems, because... do not withstand constant exposure to the external environment for more than 1-3 years. The caliber of main pipes is taken within the range of 12-40 mm for areas of 6-40 acres with an aspect ratio of 1:1 to 1:3. The caliber of the tapes is 16-75 mm for their length limits of 10-100 m.
Low pressure
Low-pressure systems are suitable for summer cottages or personal plots of 6-20 acres. It is possible to make low-pressure drip irrigation from HDPE pipes with a wall thickness of 0.5-1 mm on simple fittings with a tension connection, bottom right in Fig. When designing them on slopes, it is necessary to route the highways horizontally, and run the tapes from them along the slope. This will to some extent compensate for pressure losses in the belts. Often in this way it is possible to obtain a uniform flow rate from cheaper and more reliable uncompensated drippers, see below.
Normal pressure
Installation of normal pressure drip irrigation systems is made from HDPE pipes with a wall thickness of 2-4 mm. When they are powered from a common pressure tank in the attic of a one-story house, a booster pump can be embedded into the main line. Normal pressure pipelines are assembled on fittings with pressure, bottom left in Fig. The tapes are removed from the main line using start connectors, which perform the functions of tees-branches and pressure reducers. Through start connectors with taps, tapes or areas are connected, the pressure in which should be significantly lower than the normal pressure; in this case, a greenhouse, a short single bed and a garden.
How to install drip irrigation yourself using ready-made components, see the video tutorial. And we will further deal with some essential details, following the flow of water.
Planting plants with drip irrigation
Creating a system begins with drawing up a planting scheme - a drawing with the indicated sizes of beds and intervals between seedlings.
This allows you to take into account all the features, requirements for the amount of water and soil moisture, and calculate the required fluid consumption per day.
Some parameters are collected in the table:
| Plant | Amount of water per day, l | Distance between bushes, cm |
| tomatoes | 1,5 | 30 |
| cucumbers | 2 | 20 |
| cabbage | 2,5 | 40 |
Nozzles (sprayers) should be near each plant.