What kind of method is this?
Definition
Cuttings are a fairly simple method of artificial vegetative propagation using a cutting separated from the mother specimen.
By choosing this method of propagation, gardeners preserve all the varietal biological properties of the plant.
What parts can be used?
Orchids are propagated by dividing the bush, by children or by cuttings.
Is it possible to propagate an orchid from leaves? It is impossible, because the leaves of this plant do not have growing points. The cuttings of an orchid can be its tip or peduncle , which is cut into pieces for propagation.
The shoots must be divided into parts. Each part should be approximately 10 -15 cm in size. It is imperative that each part has 2-3 buds. Each part should have its bud as low as possible.
Orchid propagation by seeds
You can propagate an orchid by seeds. This is one of the most labor-intensive and costly methods, which requires a lot of time. Getting seeds is easy. In order to get the seeds, you need to pollinate the orchid flower with a toothpick. If you are not ready to do this, you can use already purchased seeds. You need to open the boxes, remove the seeds from them, and prepare a special paste in which your seeds will grow.
Recipe for making paste for sprouting seeds:
- You need a sachet of agar-agar powder, 12 g of glucose and a few drops of phosphoric acid, calcium carbonate and 210 ml of purified water.
- Pour agar-agar with a small amount of water. Let it sit until it turns out something like jelly.
- Boil the remaining water and add the swollen agar-agar. Enter fructose, calcium carbonate, glucose, acid. You should get a substance without crystals.
- Jars with screw caps must be thoroughly sterilized. After that, wipe them with alcohol and let them dry well. Remember, everything must be absolutely sterile.
- Now pour 50 ml of the prepared solution into each jar. Screw on the lids and leave for about a week. Observe what happens to the solution.
- If mold has grown on the surface, you will need to discard this nutrient. If everything is in order, you followed all the instructions, then the solution will not show any signs of mold.
- Now you need to pour a 1% bleach solution onto the seeds. Leave for 15 minutes to disinfect the seeds. Remember to shake the container constantly to ensure the seeds are completely covered with the bleach solution.
- Take a sterile syringe and remove the needle from it. Use a syringe to suck out about 2 ml of the solution with seeds, pour it into the prepared solution through the lid, making a small hole.
- Close the container and place the jars in the greenhouse. After about six months you will get small sprouts, this is if your seeds germinate.
- Now you need to pour another 50 ml of warm, purified water into this jar and add 3 drops of 1% findazole. Leave the extracted sprouts in the prepared solution for 20 minutes.
- This will stimulate their root system. Now these sprouts can be transplanted into a container for further germination. You need to prepare a mixture of soil and bark. Place it in a pot, now add a few crushed fern roots and a little crushed activated carbon.
- Next, take a soft brush, which lifts the sprouted seeds and with its help everything is transferred to the nutritious soil. Only after six months you will be able to transplant the sprouts to a permanent place. Unfortunately, such a plant will not bloom earlier than 5 years after germination and planting in a permanent place.
Orchid blooms
Step-by-step instruction
Propagation of orchids by cuttings at home occurs in this way.
How to cut off a peduncle correctly?
The peduncle must be cut off as close to the base as possible.
To do this, you can use a sharp knife, scalpel or razor blade. Before carrying out the procedure, it is imperative to disinfect with alcohol or an antiseptic.- The resulting shoot should be divided into parts. Each part should be approximately 10 -15 cm in size. It is imperative that each part has 2-3 buds. Each part should have its bud as low as possible.
- Processing the cutting and the cutting site on the parent orchid.
- After cutting, be sure to treat all edges and cuts with activated carbon or brilliant green. This will prevent infection through the damaged area.
Greenhouse environment preparation
To create greenhouse conditions you will need a plastic container with a lid, a bag or a plastic bottle.
You can also choose a pot for planting, but it is more difficult to create greenhouse conditions in it. It is necessary to make holes in the selected container for ventilation .
Whatever dish you choose, be sure to cover it with film, a plastic lid or glass. Otherwise, it is impossible to provide the required level of humidity. Consistently high humidity is required for proper formation of the root system.
Planting in a greenhouse
You should definitely put sphagnum moss at the bottom of the container. Its main positive properties are its bactericidal effect and the ability to retain large amounts of moisture. The moss should be slightly moistened. Cuttings need to be laid on the surface of the moss .
It is necessary to position it so that the axillary bud is directed upward.
There is no need to cover or bury the cuttings. You can spray the substrate with a special biostimulant solution, so the root system will develop more intensively. The biostimulant is diluted in the ratio of 1 tablet per 1.5 liters of water.
Caring for a seedling
The container with cuttings must be placed in a room where the temperature is not lower than 25 degrees. After planting, it is recommended to take care of the shoots . Periodically you need to moisten the substrate. You should use a spray bottle to water approximately once every 3 to 4 days.
You only need to water with water at room temperature.
It is also worth taking care of lighting. The shoots should be well lit. But you should not expose them to direct sunlight. Otherwise, the temperature in the greenhouse will be higher than normal. If there is not enough light, you can use additional lighting with fluorescent lamps.
With proper care, roots and 2–3 young leaves may appear on the cuttings within a month.
Moving to the potty
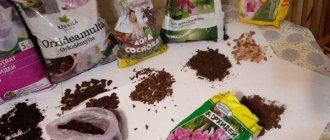
After the roots and leaves appear on the cutting, you should think about transplanting it into a separate pot. Not the entire cutting is used for planting, but the baby emerging from the bud . The young plant needs to be transplanted into a new substrate. You can buy it in the store or prepare it yourself.
Just mix pine bark, charcoal, sphagnum moss. For drainage, small expanded clay or pebbles are needed. Before mixing, it is necessary to boil and dry the pine bark. The bark particles must be approximately 8 - 10 mm in size.
It is recommended to soak sphagnum moss in a solution of potassium permanganate before use . Small expanded clay is sent for heat treatment.
- You need to choose a plastic and transparent pot.
- It is necessary to make holes in it to ensure free access of air. It also needs to be disinfected.
- Drainage is placed at the bottom of the pot.
- After this, the baby should be placed in the middle of the pot.
- Next, sprinkle it with a mixture of pine bark and charcoal. And lay sphagnum moss on top.
- The resulting substrate should be sprayed with water at room temperature from a spray bottle.
- Place the pot in a bright place and water it once every 3 days.
We wrote in more detail about the propagation of orchids through a peduncle in another article.
Orchid: propagation at home by children
Reproduction by children can be carried out in several ways. The fact is that in conditions of high humidity and temperature, children produce strong plants on their own. They can be located both on the peduncle and on the side stems. In order for the branch to develop strong roots, it is necessary to constantly spray it with a sprayer.
As soon as the roots appear, the baby is cut off and planted in prepared soil. If your plant does not have children, then you can stimulate their growth. For this, hormonal paste is most often used; it can be purchased at any flower shop.
Instructions for raising children with hormonal paste:
- You need to examine the peduncle as well as the side stems for the presence of white membranes. Now, using a thin blade, you carefully remove this film and use tweezers to pull it down.
- You will see a green dot on the stem or peduncle itself. This is a dormant bud from which children can grow.
- Next, you need to use a toothpick to treat this particular point with hormonal paste. Treatment is carried out once every 4 days. A total of 4-6 treatments are necessary. After them, the sleeping bud usually awakens and a baby grows from it.
- As soon as you see that a new sprout is hatching from this green dot, you need to constantly treat it with a growth stimulator, as well as with water from a spray bottle.
- After 4 leaves appear on the baby, as well as two strong roots, it can be cut off and transplanted into a prepared pot.
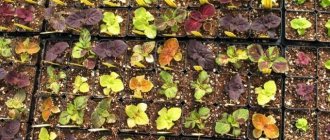
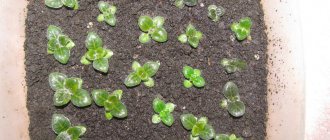
Orchid propagation by children
Photo
Below you can see photos of the orchid and its cuttings:
Problems with shoots after transplanting
The first roots on the shoots should be expected in approximately 30 days. However, the reproduction procedure does not always bring the desired effect. A known root cause of bad luck is failure to follow sterility advice.
Some gardeners germinate the petiole with a bud not in sphagnum moss, but in water. This method brings a small percentage of positive effects. When exposed to light, microbes rapidly multiply in water, causing decay. To improve the situation, it is allowed to use activated carbon and frequent changes of water.
Using dirty tools can infect the appendage with microorganisms or fungus. A similar difficulty arises among professionals. Due to practical experience, they discovered a method to solve it - at the first symptoms of mold, the shoot is immersed in a solution of potassium permanganate for 40-50 minutes.
Reproduction of orchids is the most exciting procedure, because their beauty is difficult to overestimate. To conclude, we can say the following:
- There are a huge number of propagation methods: cuttings, division, children, grains.
- For sympodial and monopodial orchids, various propagation methods are used at home.
- Each method will require large amounts of time and special care for young plants.
- Reproduction by grains is in most situations available either to high-quality orchid breeders or only in laboratory settings.
Further care
For further growth and rapid development of the orchid, optimal conditions should be created.
- Lighting . The plant must be kept in a bright room for at least 12 hours. It is better to choose a window on the east or southeast side.
- Temperature . The optimal temperature in summer is 18-25 degrees. In winter – 12-15 degrees.
- Watering .
It is recommended to water when it is noticeable that the substrate is drying out. In spring and summer, watering is carried out 1-2 times a week. In winter, watering is reduced to 2 times a month. An interesting way to determine watering is to water when the roots lighten. - Fertilizer .
It is necessary to feed approximately 2 weeks after planting the plant. Special complex fertilizers enriched with microelements and minerals are suitable for feeding. The dosage of fertilizer must be reduced by 3-4 times. To accelerate the growth of orchids, it is recommended to use fertilizers with a high nitrogen content. - Humidity . Indoor air humidity should be 60-70%.
The orchid is a rather capricious plant, so anyone who plans to grow it at home should be prepared for basic care requirements. If you provide the flower with comfortable conditions, it will delight you with its beautiful peduncle and pleasant aroma for a long time.
If you decide to start breeding orchids and don’t know how to do it, we suggest reading about the breeding features of the dendrobium species. Our experts will give useful advice on methods of reproduction, including by roots and children.
Propagation of orchids with peduncles at home
One of the least traumatic methods of division for a plant is propagation by peduncles. Mainly used when plants bloom regularly.
Instructions:
- After the plant has flowered, the peduncle is cut off at the very root. Next, this stem is cut into pieces 3-4 cm long.
- The cut area is treated with charcoal. These pieces of the plant are laid out on moist, light soil and covered. A mini-greenhouse is constructed using a plastic bottle or plastic film.
- Rooting and growth of children occurs at a temperature of 25-28 degrees. Therefore, we recommend that you control the temperature and humidity in this mini-greenhouse and constantly spray the plant.
- Do not let the soil dry out or any stem pieces dry out. After some time, new children and roots will appear.
Reproduction by peduncles
Recommendations for choosing a peduncle shoot
The beginning of spring is the optimal period for the propagation of orchids. Over the winter they gained strength and prepared for the active growing season. For cuttings, a peduncle that has completed flowering is taken. The long stem contains several dormant buds. The plant must be healthy; you cannot use material from an orchid that has suffered stress.
It is necessary to prepare for propagation by cuttings. To work you will need:
- scalpel or sharp knife;
- antiseptic;
- Activated carbon;
- a plastic container with a lid, a bag or a plastic bottle for a greenhouse.
Features of cuttings
Cuttings are a vegetative method of propagation, the process of separating a part of the mother plant and stimulating it to take root. This method is also popular when propagating monopodial Orchids (Phalaenopsis, Vanda, etc.).
For cuttings, a part of the plant stem that has a growing point is suitable. It is most effective to use a peduncle that is cut into small pieces. Root germination is carried out in water or on soil (sand or sphagnum moss) in an equipped greenhouse.
Mutual obligations
When buying an orchid, you want to enjoy its beauty for as long as possible. In principle, this gentle beauty is not too picky: she just wants not to be hidden from the sun, to be properly watered with warm boiled water, to regularly change the soil and to take into account her wishes regarding the composition of the substrate; do not place the flower pot near heating radiators; observed temperature and humidity conditions. That's probably all the wishes.
And if you fulfill your duties, then the orchid will fulfill its own - to delight you with its flowering for a long time.