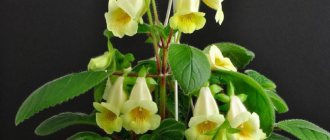
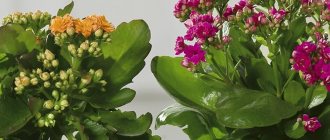
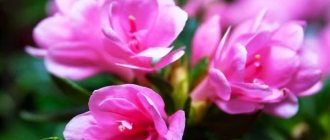
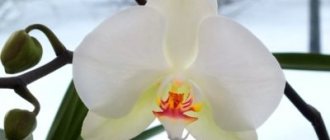
The lush and varied flowering of this plant can amaze the imagination of any flower lover.
Moreover, azalea blooms at a time when all other plants are at rest.
An avid gardener will definitely want to get a copy for his home collection.
But in order to grow and preserve this capricious beauty, you need to strictly follow certain rules for caring for her.
Azalea at home after purchase
Immediately after purchase, an azalea seedling needs to be transplanted into suitable soil, because in transport pots the soil is completely unsuitable for permanent maintenance of the plant. It is best to purchase land for azaleas that ideally meets the requirements for growing capricious beauties. You need to replant, trying not to damage the roots, since the plants take a very long time to recover after this procedure.
Free the root from the pot, place it in a new, larger pot and cover it with nutritious soil. You can place a small drainage layer at the bottom of the new pot to protect the plant from overflowing.
The video will tell you how to replant an azalea after purchase:
How to care for the first time?
Key points of proper care:
- To begin with, the plant should be placed in a bright place with a comfortable temperature.
- Maintain humidity 70-80%.
- If the seedlings are dense, they should be thinned out so that they do not stretch out. Or plant them in separate pots.
Growing rhododendron from seeds is a long and labor-intensive process. But this will not stop a true gardener, because a flower grown with his own hands is his well-deserved pride.
A more common method of propagating azaleas using cuttings is also described on our website.
Caring for azalea rhododendron at home
Often, received as a gift or purchased in a store, a magnificent azalea blooms magnificently for a long time, pleasing the eye, and then, unfortunately, dies - they decide to throw away the plant. In vain! Azalea is simply going through a period of adaptation to apartment conditions. Be patient and attentive: the bush will gradually regain its strength and produce new leaves. Having mastered the basic rules of care, you will become friends for many years with a magnificent beauty that blooms throughout the warm season.
Selecting a location, temperature and lighting
Azaleas need diffused light or weak partial shade along with cool air; the scorching rays of the sun will kill it. It is difficult to maintain coolness in summer: place the plant in the shade, preferably on a western or northern window, and ventilate the room more often.
It would be good to bury a pot of azalea in a shady part of the garden for the summer, protecting the beauty from direct sunlight. Even if you just put an azalea on the balcony, the summer rain will be very useful. You need to return the plant to the room before the start of the heating season. The ideal climate for azaleas can be compared to a warm, foggy autumn - 10-14 °C during the day, 6-8 °C at night, combined with high humidity. The plant feels quite comfortable even at 18-20° C, if you do not forget to constantly moisten the leaves.
Propagation by cuttings - advantages and disadvantages
It should be borne in mind that when growing a plant such as azalea, propagation by cuttings at home is fraught with poor survival rate, since the plant is quite whimsical. The main advantage of cuttings is that the species characteristics of the plant are completely preserved. To activate the growth of azaleas, the soil must always be moist. Heating and lighting play an important role in the development of culture, so they are created artificially. In the first year of life, the azalea should begin to actively develop. If this does not happen, she will most likely die.
Separation from the main flower
Young healthy shoots are chosen as the material. Use sterilized garden tools - a knife, pruning shears, scissors.
- The cutting is cut at an angle of 45 degrees, 1 cm away from the lower bud.
- The lower and upper leaves are removed, leaving 4 leaves, cutting them in half.
- The cut is treated with a root growth stimulator, the cutting is left for several hours so that the stem dries out and is saturated with Kornevin.
Their survival rate depends on how well the cuttings are selected for germination.
How to determine that the shoot is ready for separation?
- Deciduous rhododendron cuttings are ready to be taken as long as they are soft in the stem and do not break.
- Evergreen varieties of rhododendron show readiness for cuttings with a dry crease of the stem. At the same time, the characteristic crunch of breaking wood is heard.
The cutting is always taken from an adult healthy plant without signs of visible external damage. Azaleas are pruned into cuttings once a year so that the mother plant has the strength to further ripen buds and flower.
Mature azalea bushes need pruning to form a beautiful and even crown, so even if it is not propagated, this is part of basic care.
How to plant
Before planting in the ground, the cuts are treated with a solution of potassium permanganate. The stems are planted in the ground at right angles to a depth of 3 cm. The soil should be highly acidic. Soil for azaleas is sold at gardening stores. Prepare the mixture yourself, combining pine litter, sand and peat in equal proportions.
Attention! You can prepare the soil for seedlings yourself. Before planting the cuttings, the soil is calcined in the oven.
After planting the cuttings in a pot, cover it with film and place it in a warm place.
Rooting cuttings
Experienced flower growers know how to root an azalea in water using a growth stimulator. You can try this option for experimental purposes. Great results can be achieved by rooting cuttings in the ground.
The conditions for the survival of the stems are sufficient watering and the presence of a greenhouse, which must be constantly ventilated.
The seedlings are provided with a house temperature of +22..+25 degrees, humidity of at least 80%.
Rooting cuttings
What soil is suitable for rooting
Before rooting an azalea, the seedling is dipped in a root stimulator for 5 hours. Heteroauxin will come to the rescue, two tablets of which must be diluted in 1 liter of water. You can also use zircon or root.
Indoor rhododendron requires a special soil composition. For propagation, loose acidic soil is used. The shoots are buried 2 cm at a distance of 3-4 cm from each other or in a 4x4 pattern. Universal soil is not suitable for propagation and cultivation; you need to find a special mixture for azaleas/rhododendrons or slightly decomposed peat.
Which pot should I put it in?
Since not all rhododendron shoots can be rooted well even with careful care, experienced gardeners grow five or more young plants at a time . In this case, a greenhouse is built. For this purpose, take a box or box and, after planting the cuttings, cover the container with film or a light-transmitting cap to maintain a comfortable temperature for the young animals of 22-25 degrees. The plants are planted at a distance of 4 cm from each other.
This is interesting: Chestnut: types, planting and care
If you manage to obtain single cuttings for planting, you can use small pots with a diameter of 5-7 cm, which will need to be covered with a transparent bag or a cut plastic bottle.
Periodically, the container with seedlings needs to be ventilated to prevent the shoots from rotting. It is also necessary to turn it towards the sunlight with the opposite side for uniform illumination.
The cuttings rooted in the box are planted in separate pots, not earlier than they have begun to grow well. The size of the individual bowl should be slightly larger than the root ball with soil. As it grows, you can transfer it to a larger pot.
Azalea is not an easy plant to propagate and requires a lot of effort and attention , so you should approach every step of cuttings responsibly!
Humidity during rooting
Rhododendron loves high humidity. Watering is carried out moderately as the soil dries. If you're lucky, within a month the seedlings will take root. Good survival rate is indicated by the appearance of its own shoots. If this does not happen, the sprout will most likely die in the near future.
Note! Seedlings of large-leaved evergreen azaleas take up to four months to take root and simply do not grow for several more months.
The breeding season for azaleas at home lasts from March to October. Any manipulations can be carried out only after the plant has flowered. For better growth, seedlings are covered with a jar or film and can be sprayed. Once a week, the greenhouse is removed and the plant is ventilated.
After rooting, the sprouts are gradually accustomed to the dry air of the apartment. To do this, the film is removed from the seedlings first for 2-3 hours, then for 4-5 hours, etc. After transplanting the azaleas into separate pots, they are again covered with film for two weeks so that they quickly and painlessly take root.
Caring for cuttings after rooting
To understand how azalea reproduces and not to lose a seedling after rooting, you need to follow a number of rules for planting cuttings in the ground.
After the first leaves appear, remove the film from the greenhouse for several hours every day. After a week of hardening, the seedlings can be planted in separate containers with prepared soil.
Pots should be no more than 10 cm wide, with drainage placed at the bottom. The cuttings are replanted with an old clod of earth. Further care is carried out as for an adult bush. If buds appear, they need to be torn off to form a strong tree.
Temperature and lighting
For breeding, the brightest and warmest place in the house is used. For successful rooting, the air temperature must be maintained at about 25 ° C. There should be no drafts in the room, and the air should not stagnate, so the room should be ventilated periodically. If possible, the bottom of the pot is heated to 27 °C.
Cutting size
When can I expect results?
If the flower was planted 3 or 4 months ago and all planting conditions are met, then you can notice the first changes. As soon as the growth reaches 3 cm, you can remove the film from the greenhouse and plant the cuttings in separate pots, adding expanded clay to the bottom.
Do not suddenly abandon film cover. It is better to start accustoming a young azalea to changes in external conditions from one and a half hours a day, gradually increasing the time period by one hour a day.
How to water an azalea
The fundamental requirement for caring for azaleas is to water regularly, but not to over-water it, and to avoid stagnation of water and drying out of the soil. The soil should not be wet, but slightly damp. To prevent the soil from becoming alkalized after watering with tap water, alternate watering with plain water and acidified water - sometimes add 2 g of citric acid per liter of water and water the flower, but not often).
With the onset of autumn, after flowering has ended, reduce watering slightly. If the flower is in peat soil, which poorly absorbs moisture when it dries out, sometimes place the pot in a basin of water for up to two hours. It is important to remember that heat and dry air are detrimental to the plant: the azalea will begin to shed flowers and leaves.
During the heating season, constantly spray the leaves of the plant using a fine spray from a spray bottle. You can place the azalea pot on a tray of wet pebbles, but do not allow the pot to come into contact with water. Ideally, water and spray with rain, melt or river water, but at least with softened water - it should sit at room temperature; cold water should absolutely not be used.
Is it possible to get it yourself from a growing azalea and how to do it?
In the central zone of the Russian Federation, rhododendron seeds ripen well . It is good to collect them in late autumn: October - early November. By this time, the seeds in the boxes are fully ripened and turn brown.
The boxes may remain green. If you wait until the whole box turns brown, it will begin to crack and the change will spill out.
If suddenly the seeds in the box turn out to be unripe, then you should cut off the branch with the boxes and place it in water and in a cool place so that the seeds ripen.
The collected boxes are placed in a container for further drying. After a few days, the boxes will crack and the seeds will begin to fall out. The resulting seeds should be cleared of the remains of the capsules, because If you sow dirty seeds, mold rot may appear.
After collection, the seeds can be stored for several years, but it is better to grow azaleas from fresh ones (for better germination).
Transplanting and feeding rhododendron azaleas
Azaleas prefer acidic soil. A mixture of heather soil is ideal for azaleas, peat soil is possible, a mixture of coniferous soil in two parts and one part peat soil with a small addition of river sand is good, hydroponics is a good choice. Flower shops sell special soil intended for acidophilic plants, also suitable for azaleas. You should choose a pot that is not high, since the roots of the flower have a superficial structure.
Loosening the soil while caring for a flower is strictly prohibited in order to avoid destruction of the root system; for this reason, the plant is handled rather than replanted. Young flowers need transshipment only once a year in the spring, adult plants - once every 2 or 3 years. Replant without disturbing the earthen coma, adding a large amount of new soil.
To feed in spring and summer, use fertilizer for azaleas once a week; in autumn and winter, to plant buds, use a solution of 15 g of superphosphate per 10 liters of water every 2 weeks.
How to transplant an azalea, look at the video:
Features of seed material
What does it look like?
Like other representatives of the flora, the fruit with seeds in rhododendrons appears at the end of flowering. It is a five-leaf capsule with numerous seeds. It opens, quite unusually, from bottom to top. The shape of the seed resembles a stick, long and oblong. The size is very small from 0.5 to 2 mm in length. The color of the seeds is usually dark brown, closer to black.
Photo
Next you can see a photo of the seeds:
How to choose?
Of course, for the seed growing method to be successful, it is important to responsibly approach the purchase of seeds. There are a lot of companies involved in the production and packaging of seeds. However, not everyone sells quality material.
Often, beginners buy seeds, paying attention only to the cost and a beautiful picture. Subsequently, after planting in the ground, they get a sad experience.
Therefore you should:
- Purchase seeds from trusted, specialized stores. You can get qualified advice there and have product certificates.
- Pay attention to the packaging, it must be durable, free of defects, and made of good paper. The inscriptions should be clearly readable.
- Find out the number of seeds in a pack so you know how much to buy.
- Best before date.
If you stock up on seeds for future use, it is important to store them properly, in a dry and cool place. The shelf life of seed under such conditions is 2-3 years.
Where to buy and can I order from China?
To date, there is no shortage at seed sales points. There are even specialized stores that sell rare, exotic seed material. I would like to add once again that it is better to purchase goods in branded seed stores.
There are also many large garden centers where you can buy seeds or seedlings. And also additional accessories for planting seedlings, soil, containers and more. This will definitely save time. For example, in Moscow this is the Yasenevo garden center, OBI. The price of seed varies from 50-200 rubles.
Online stores are no less popular. When you don't have time to go shopping. Just order seeds and available materials without leaving home. Managers can also provide advice over the phone. The price of goods in these stores is 100 rubles for 10 pieces, 200 rubles for 30 pieces. Also, the cost of rhododendron seeds depends on the variety.
A large assortment and low prices are presented in online stores in China. You can buy rhododendron seeds from 26 rubles for 50 pieces, with an additional bonus in the form of free delivery.
Can I get it myself?
The ideal option, of course, is self-collected seeds. In central Russia, rhododendron seed material ripens successfully. They are collected in late autumn, always in dry weather. It is worth waiting until the seeds turn completely brown, but the boxes may remain green.
In a dry and warm room, they should be dried by placing them in paper boxes. A few days later, the boxes are opened, pouring out the seeds.
The seeds must be clean without impurities, otherwise rotting and mold may appear.
It is best to sow fresh seeds, as the germination rate is higher. An adult plant produces a large number of seeds. For cultivation on a non-industrial scale, such an amount is not needed. Therefore, the seed ovaries should be picked off while still green, so that the bush does not waste energy on them.
Pruning and shaping the azalea crown
Pruning an azalea can be described as shortening last year's shoots, removing weak, closely growing branches in order to create a neat crown with a uniform arrangement of flowers. For a beautiful crown, constant pruning and pinching is necessary. Remember, increased branching of the bush can interfere with flowering.
For late varieties of azalea, removal of excess shoots is carried out from the beginning of May, for early varieties - in March. When pinching the tops, leave 4-5 leaves on them, and also cut off the shoots next to the flower buds. At the end of summer, when the plant begins to lay flower buds, it must be pruned correctly; if pruning is late, the buds will not form. At your discretion, the azalea can be decorated as a tree, bush or bonsai.
Azalea after flowering
After flowering, rhododendron needs rest. This is the best time for pruning and replanting: remove all excess shoots, cut off the flower tips of the branches and carefully replant the beauty using the transshipment method, only partially replacing the soil. This procedure will allow the plant to gain strength for the next season. Remember that you can prune azaleas only until the end of summer so that the plant has time to set flower buds.
When the plant takes root, watering begins to be reduced, placing the azalea in dormant mode until approximately February.
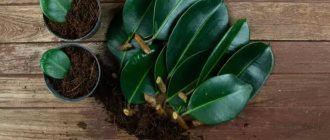
How to propagate azalea from cuttings
Azalea cuttings photo
Propagating azaleas by cuttings is the easiest and most successful way.
- In March-June, apical semi-lignified cuttings 5-8 cm long are cut, rooted in coniferous soil, having previously treated the cut of the cutting with a growth stimulant, and should be planted to a depth of 1-2.5 cm.
- Build a greenhouse using a glass jar, be sure to ventilate, irrigate, water, and maintain a temperature of 25 ° C.
- When new shoots appear, it will become clear: rooting was successful. Continue watering and irrigation, do not forget about acidified water. After a couple of months, the plants can be opened slightly and accustomed to the conditions of the apartment.
With due attention, almost all seedlings are accepted.
The video will tell you how to cut an azalea:
Difficulties and problems when propagating azaleas
Problems with rooting and development of young seedlings when propagating azaleas by cuttings are associated with improper care. To help the bush reproduce, you need to follow the watering regime and optimal temperature.
Not recommended! To avoid rotting of the stems, do not over-water the plantings.
Decay
Causes:
- If shoots taken are of unsuitable quality, for example, woody or diseased.
- If the soil is not suitable or it is contaminated with fungi and bacteria.
- If the instruments are not sterile and an infection was introduced during cutting.
- Cold soil in the greenhouse, especially if you propagate azaleas in winter.
- If you irrigate the cuttings with cold water.
Knowing all these nuances, you can prevent many problems when propagating azaleas.
Lack of rooting and growth
If a cutting was planted in a greenhouse three or four months ago, but young leaves do not appear, the shoot does not grow, this indicates that rooting has not occurred. In most cases, such plants are doomed.
Death
There are situations when the plant has taken root and started growing. And then it simply withered and died. For azaleas, such situations are not uncommon, since azaleas are quite capricious and react painfully to any changes in the environment (temperature, humidity, drafts, direct sunlight). To ensure that your work is not in vain, experienced ones should root more cuttings at a time. This increases the chances of a positive result.
Growing azaleas from seeds at home
Sowing seeds is a rather difficult method used to breed new varieties and is not recommended for use at home. However, many enthusiasts have successfully grown rhodendrons from seeds.
Azalea seeds photo
Armed with patience, begin sowing azalea seeds in January-February. Fry the prepared soil in the oven and cool; this procedure will protect the plants from many diseases. The seeds are laid out on the surface of the substrate at a distance of 1.5-2 cm, sprinkled with water and covered with a transparent lid or bag. The optimal temperature for germinating azalea seeds is 18-22°C. The containers are initially shaded with opaque material.
When the shoots appear, they are provided with good lighting, but the shelter is not removed yet. After a while, thin shoots need to be strengthened: with a stem height of 2-3 cm, peat is carefully poured between them. This way, new roots will form, and the seedlings will not become thin and fall down.
Azalea seedlings from seeds photo
When 3-5 true leaves appear, the plants are planted separately in cups, still providing greenhouse conditions (the cups are covered with bags). Only when the bushes grow and get stronger, will it be possible to gradually accustom them to independent life without shelter, removing it first for a while, and then for good.
Video about sowing and growing azaleas from seeds:
The successful experience of passionate gardeners confirms that it is indeed possible to grow azaleas from seeds, you just need to put in a little more effort. The process is not difficult, but it requires patience and diligence.
What conditions are required?
When planning to propagate this beautiful ornamental plant, it is important to pay attention to the quality of planting material. It must be obtained from a healthy, mature and well-developed plant, adapted to keeping at home. Plants that are too young and weak are not suitable for obtaining planting material, as they have low donor potential. Very mature and old azaleas are also almost never used for the procedure, since at this age stage their metabolic processes slow down and nutrients, micro- and macroelements are less absorbed. Together, these factors make older plants unsuitable for propagation.
Another equally important condition on which the results of the upcoming event depend is the quality of the soil mixture. Its composition and properties are of equal importance both when breeding azaleas by seeds and when propagating them by cuttings or dividing the bush.
Before use, the soil must be thoroughly treated: steamed or disinfected with a solution of potassium permanganate.
If sand is used in the soil mixture, it must first be sifted, washed and calcined.
Other conditions that ensure effective breeding of indoor azaleas are:
- creating a greenhouse effect;
- maintaining sufficient air humidity;
- ensuring stable temperature conditions.
The greenhouse effect is necessary for seed germination and rooting of cuttings. This can be achieved using an improvised greenhouse made from a plastic bottle cut in half, a container with a lid, or plastic film used to cover a container with planting material.
Considering that this ornamental crop is moisture-loving, when growing it it is important to ensure sufficient air humidity. This can be done through periodic spraying and irrigation. You can also maintain the required level of moisture in the air using a special room humidifier or a wide container filled with water and placed next to the plants.
When planning to propagate azalea using one of these methods, it is also necessary to take into account that many of its varieties have increased requirements for air temperature.
Despite the fact that to date, breeders have managed to obtain cold-resistant hybrids, when breeding azaleas it is still advisable to maintain the temperature at 22–25°.
How to replant an azalea and divide the bush
How to propagate an azalea by dividing a bush photo
Azalea bushes grow over time and become cramped in the designated pot. This means it’s time to start the process of transplantation and division. Water the plant thoroughly and leave for several hours. Afterwards, carefully remove the pot from the earthen ball and try, without damaging the roots, to divide the bush into separate parts. Azalea roots are superficial and quite fragile. We try to choose a wide, stable pot that will give the plant room to grow wider.
Reproduction methods
Many gardeners make the mistake of throwing away a flower immediately after flowering. And in vain, because azalea can be cultivated; in addition, there are several ways to propagate the flower, including:
- cuttings;
- propagation by seeds;
- dividing the bush.
Each method has its own advantages and disadvantages. To choose which option is better and more suitable for the gardener, you need to consider each method in more detail.
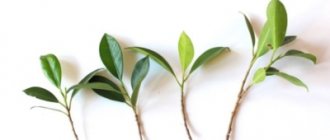
Cuttings
Cuttings are one of the most common methods of propagating azaleas. The procedure should be carried out in spring or summer. First you need to prepare the soil. Azalea grows well in acidic, light and loose soil. In this case, the substrate must be nutritious. Alternatively, you can purchase ready-made soil at a flower shop, but if possible, it is better to prepare it yourself. © https://ydoo.info/qa/kak-posadit-azalii.html For this you will need:
- coniferous soil (humus, which is formed from fallen pine needles);
- peat.
The components are taken in a ratio of 1:2, respectively. When the ground is ready, it is necessary to prepare the cuttings. They should be taken only from healthy and blooming flowers, and each branch for planting should be at least 20 centimeters in length. All leaves should be removed from the bottom of the cutting, as they will interfere.
Now you need to do the following:
- First, the prepared cuttings should be placed in a growth stimulator. You can use regular “Kornevin” or “Zircon”. The planting material can remain in the solution from 30 minutes to 6 hours (the longer the better).
- Now you need to fill the containers (these can be ordinary flower pots, the main thing is that they are not very deep) with the substrate. First, a drainage layer of expanded clay, pebbles or gravel is laid out.
- After this, the substrate is poured into which the cuttings are placed. The branches are buried four centimeters and sprinkled with substrate. Moreover, if several cuttings are planted in one container at once, then a distance of 3 centimeters must be maintained between them.
- The top of the cuttings should be mulched with sand.
- Now that the planting is finished, we need to organize a greenhouse for the cuttings. You can use transparent polyethylene or ordinary glass jars.
After planting, it is very important to provide the cuttings with proper care. The container with the planted branches must be placed in a room where the temperature is at least +25 degrees and the humidity is 80%, otherwise the azalea will die.
If the described conditions are met, then within forty days the cuttings will take root. But the greenhouse can only be removed after new shoots appear. The pot of azaleas must be rotated periodically so that the branches receive sunlight evenly. And daily airing of the cuttings will help harden the azalea and also provide the seedlings with oxygen.
Experienced gardeners claim that if all conditions are met, cuttings take root in 90% of cases. That is why cuttings are one of the most popular methods of propagation.
Seeds
Growing azaleas from seeds is not easy, and this method is used extremely rarely at home. Still, it is used more by breeders in order to develop a new variety. The difficulty of propagating azaleas by seeds begins from the very first stages. Collecting seed material is extremely difficult. In order for the flower to take root, you must use only fresh seeds, and it is almost impossible to obtain them at home. Of course, you can buy seed material at a flower shop, but the chances that each seed will germinate are very small.
If you managed to get fresh seed, then:
- First you need to prepare a spacious container and substrate (the same one used as for planting cuttings).
- A layer of drainage is poured into the pot, then the substrate. After this, the soil is sprayed with a spray bottle.
- Next, shallow grooves are made into which the seeds should be sown. There is no need to sprinkle the substrate on top of them, as there is a risk that the seed will not be able to germinate.
- Glass should be placed on top of the container; you can also use transparent polyethylene. Such an improvised greenhouse will create optimal conditions for future seedlings. After planting, you need to open the greenhouse daily, thereby giving fresh air to the seeds.
To water the substrate, you can only use warm and settled water. The container should be placed in a place where there is enough sunlight. It is also important to ensure that the temperature in the room where the seeds germinate does not fall below +25 degrees. If maintaining such a regime is problematic, then you can heat the soil with heating pads from the outside of the pot.
Azalea germinates slowly, so the first shoots can be expected only after three weeks. As a rule, the shoots rise unevenly, and this is a feature of the flower. When three or four leaves appear on the seedlings, they can be planted (planted) if they were planted in the same container. Now the azalea should be left alone for the whole summer, watering the sprouts moderately from time to time. And already at the end of August, the seedlings can be planted in permanent containers.
Dividing the bush
You can propagate an azalea by dividing the bush only after the plant has flowered. The flower is carefully removed from the pot and divided into several bushes. It is necessary to divide so that the root system is not damaged. You can’t cut the roots; you have to try to untangle them.
After dividing, you need to plant the plants in prepared pots with substrate. The soil conditions are the same as in the two previous cases. When the azalea is already in a permanent place, it should be watered with warm, settled water and placed in a room where it is light and warm.
Diseases and pests
Diseases:
Unfortunately, azalea is prone to many diseases of indoor flowers: powdery mildew, gray mold, rust, etc., but everything can be cured with appropriate medications that are easy to purchase at a flower shop.
Pests:
Greenhouse whitefly, with the accompanying sooty fungus covering the leaves, viral infections that come with the pest; mealybug leads to almost death. Moths, caterpillars - eat leaves; strawberry mite – leads to leaf curling and bud shrinkage; flat red mite - leaves turn brown and fall off.
Azalea is quite finicky and troublesome to care for, but having mastered the nuances and provided favorable conditions, you will get a plant of unique beauty, covered with outlandish flowers. With proper care, the plant will not be susceptible to disease, will take on a beautiful shape and will delight you with its magnificent flowering year after year.
Main problems
Main problems that may arise:
- Poor quality soil mixture. Mold may form in such a mixture.
- Contaminated seeds. Rot may appear.
- Overmoistening of the soil. If you have flooded the soil, you should wait 1-3 days until it dries completely before continuing to water.
What to do if mold appears:
- Dry the soil by aerating.
- Spray the soil with potassium permanganate.
- Sprinkle areas with sterilized sand.
- Use fungicides (Fundazol).
If gray rot has formed, then the drug “HOM” helps well.
Types of home azaleas with photos and descriptions
The enchanting azalea, called Azalea in Latin, is a member of the genus Rhododendron, family Ericaceae, making up a group of species that was previously only a separate genus of plants.
Giving flowering in cold winter and filling the house with a spring mood, azalea, also called rhododendron - “pink tree”, enjoys stunning success among gardeners.
In its natural environment, azalea grows in Japan, China, southern Europe and North America, including Southeast Asia. Revered in the East as a symbol of joy and peace, popular for bonsai. The flowering is striking in its beauty and variety: simple or double flowers, corrugated or fringed, white, red, various shades of pink, purple or variegated. This miniature, compact, well-branched bush is distinguished by its flowering period, which occurs earlier or later.
The ancestors of home breeding of azaleas were two original species:
Indian azalea or azalea rhododendron Sims Rhododendron simsii
Indian azalea or azalea rhododendron Sims Rhododendron simsii photo
The shoots are covered with bristles, charming flowers with a diameter of 3.5 cm are funnel-shaped, two-colored, and can be speckled.
Description
Azalea, or rhododendron, is a beautiful indoor or outdoor flower that blooms lushly and abundantly. But how to plant a plant correctly so that it grows for a long time? The fact is that azalea is a rather capricious flower, and gardeners have to put a lot of effort into extending its life.
The plant appeared on the territory of Russia not so long ago - only at the beginning of the 20th century. There are about 350 species of azalea in nature, but only two types can be grown indoors - Indian and Japanese. The main feature of the plant is its lush flowering.