An orchid is a very beautiful flower with an almost mystical meaning. It is sold, as a rule, as seedlings, or as an adult plant, and its cost is rather high. This is one of the reasons why some gardeners want to grow an orchid from seeds at home.
The second reason is pure interest, the desire to see how a plant develops from a seed to an adult state. The article will talk about the preparation of the substrate, planting material, the essence of the sowing process, caring for it, as well as their transplantation.
Orchid from seeds - breeding specifics
Propagation of a tropical flower by seeds is a complex and lengthy process.
The first flowering of seedlings appears 4–5 years after planting. First of all, seed material, available tools and substrate are prepared for the procedure.
1.1
Work equipment
To carry out the operation at home, only clean devices are prepared. All objects that will come into contact with the seeds are sterilized with hot steam. If pathogenic microbes get into the container for growing seedlings, they will destroy it.
To work you will need:
- Glass containers with screw caps (bottles, laboratory flasks) for growing seedlings. The container must close tightly. If there is no stopper for the flask, construct it yourself using foil and a gauze swab.
- Medical syringe or pipette.
- Bleaching powder.
1.2
Seed material
Each orchid fruit capsule contains about a million primordia. They are very light and small - the size of a speck of dust. Seeds lack endosperm - a shell that provides nutrients (such as protein, starch, etc.) and protection from the negative effects of the environment. In order for the plant not only to show its first leaves, but to grow and bloom, the grains are given special conditions for germination.
Before planting the seeds, they are disinfected. To do this, pour 100 ml of water into a container, add 15 g of bleach and stir for 10–15 minutes. The seed is dipped into this liquid and kept for another 10 minutes. Instead of bleach, a solution of potassium permanganate (1%) or hydrogen peroxide (2%) is also used. After disinfection of the grains, planting begins immediately.
1.3
Germination mixture
Orchid seeds cannot be germinated in a substrate intended for adult plants, much less in the ground. The seedlings are placed in a special nutrient helium medium, the composition of which replaces the endosperm layer for the rudiment. This mixture can be bought in a specialized store or prepared at home with your own hands.
To prepare a liquid substrate you will need:
| Confectionery thickener agar-agar | 10 g |
| Purified water (distilled) | 1 l |
| Glucose (sugar) | 10–15 g |
| Ferrous sulfate | 0.02 g |
| Ammonium sulfate | 0.7 g |
| Magnesium sulfate | 0.25 g |
| Manganese sulfate | 0.1 g |
| Calcium nitrate | 1 g |
| Potassium phosphate | 0.4 g |
Many gardeners add natural ingredients to the solution: animal proteins (fish meal, peptone, tryptone) and products of plant origin (grated banana, birch, pineapple, orange, apple juice, coconut milk). These components will speed up the process of embryo formation.
Pour agar-agar into purified water and leave for 2-3 hours. When the thickener swells, put the mass on the stove and bring it to readiness in a water bath, stirring constantly and adding the necessary ingredients one by one. When the solution has cooled, check the pH level. Optimal - within 4.8-5.8.
1.4
Sowing process
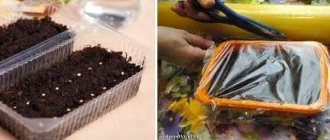
Transfer of seeds to the substrate is carried out under sterile conditions over hot steam. Using a grid, the planting container is fixed over a bowl of boiling water. A disinfectant solution with seeds is taken into a pipette or syringe and transferred to the flask. The container with future seedlings is tightly closed with a lid and left for 6 months at home, where the temperature ranges from +18–23 degrees and daylight prevails 12 hours a day.
If 2-3 days after planting the seeds, the substrate has not changed color and no plaque has formed on it, then sowing was carried out correctly. After a week, you can see the first shoots in the flask - small green balls. Rhizoids will then form, followed by leaves and roots. Seedlings are planted in separate pots after 9 months or 1 year.
Preliminary preparation
The main preliminary preparation is to create complete and absolute sterility. The dishes, the nutrient mixture, and the seeds themselves are disinfected.
In laboratory conditions, special autoclaves are used to sterilize dishes; at home, you can get by with a regular oven or pressure cooker. Flasks and jars are heated for at least half an hour at a temperature of 130–150ºС. Homemade plugs must first be heated by immersing them in boiling water.
Vessels for germinating orchid seeds can be sterilized in a conventional oven
Then the containers are sterilized again, along with the contents. 30–40 g of hot nutrient mixture per 100 ml of total volume is poured into each of them and closed tightly. The second procedure will take about the same time. When pouring it into a container, make sure that it does not get on the walls - this way you will create a breeding ground not for orchid seeds, but for bacteria.
You can also place the vessels in a pan of boiling water and keep in a water bath for about 20 minutes. Allow the vessels to cool, repeat the procedure twice at intervals of 24 hours.
Containers filled with nutrient mixture are sterilized again
The finished jars are left closed for 4–5 days to check the quality of sterilization. If during this time the nutrient mixture does not become moldy, the disinfection was successful. The plugs need to be additionally wrapped with a layer of foil. Do not tilt the container until the jelly has set. If there are no seeds, the vessels can be stored in the refrigerator for 2–3 months. To make the jelly liquid again, it is melted in a water bath.
The seeds are sterilized in a solution of calcium hypochloride, also known as bleach (10 g of the substance per 100 ml of distilled water). They are left in the liquid for 10–15 minutes, continuously shaking the vessel. Then they are sown immediately.
Peculiarities
When ordering seeds from China, you can often encounter unscrupulous sellers who pass off seeds of other plants and even lawn grass or weed seeds as orchid seeds.
In this case, many people feel sorry for the time and labor spent on trying to grow, and they become disillusioned with this idea. But, fortunately, they are inexpensive and if you have a strong desire to try growing them, you can order them again. After all, if you manage to grow a flower yourself, you will receive incomparable pleasure watching its growth, and then a beautiful adult blooming orchid.
How to distinguish real seeds from fake ones?
Real orchid seeds have a number of characteristic features that make them difficult to confuse with seed from other plants:
- The seeds ripen in peculiar boxes of light green color, oval oblong shape with several edges.
- One box can contain several million seeds, thanks to which real seed material will never be sold individually.
- Orchid seeds are very small and more like dust. Their texture cannot be seen with the naked eye.
Instructions for proper sowing
A day after sterilization, the whole process is repeated again. Before sowing the seeds, they check for the formation of mold on the walls of the flask. For observation, it is enough to leave everything for five days. If during this time there is no mold, then it’s time to start sowing.
Before sowing the seeds, they are also sterilized. This is done using a solution of calcium hydrochloride, which is diluted with distilled water in a proportion of ten grams per hundred milliliters of water. The seeds should remain in this substance for about 20 minutes, and they should be stirred constantly. Planting material is collected with a pipette or syringe and placed in the mixture.
Interesting! It is recommended to do the entire procedure quickly and over steam, so as not to infect the seeds with various microorganisms that are in the air.
To ensure that the seeded material is evenly distributed in the container, it is lightly shaken and covered with a tight lid. After this, the finished material is placed in a pre-selected place for germination.
Orchid Dendrobium Nobile: how to care for it at home Until recently, window sills were decorated with geraniums and begonias. Today exotic plants compete with them. Dendrobium Nobile…Preparing and sowing seeds
Seeds are also sterilized. First make a 10% bleach solution. The mixture is shaken for a long time to dissolve the bleach and filtered. The seeds are kept for 10 minutes and immediately planted.
For sowing, a simple device is used, which additionally sterilizes the seeds. Place a wire rack on a container of water and place the substrate in a flask on it. Sterilized seeds are pipetted from the solution and placed on the surface of the substrate. Next, the flasks should be closed with cotton swabs and placed for germination. Control the temperature: 18-23°, daylight hours should last 12-14 hours.
You can watch a video about sowing orchid seeds at the end of the article.
Planting methods
There are many ways to grow an orchid: from seeds, shoots, bulbs or children. How to plant an orchid is up to you. The most labor-intensive process is the seed planting method.
What do orchid seeds look like?
To get orchid seeds, you need to pollinate it yourself.
Using tweezers or a brush, pollen is carefully transferred from the flower of one plant to the flower of another. After which the seed pod will begin to form. After some time, the seeds in the box will ripen and you can start sowing.
Orchid seeds are very small, similar to fine yellow dust, and are almost impossible to see with the naked eye. But if you follow the germination technology, you can try to grow flowers from seeds at home.
You can see what orchid seeds look like in the video:
Orchid from seeds at home
How to plant orchid seeds? First of all, they need to be germinated.
To germinate seeds, it is necessary to create a special nutrient medium. It is made from a solution of agar-agar, glucose or fructose with distilled water.
You can use various hydrogels for orchids. The hot nutrient substrate is poured into sterile glass jars with lids and left for 5 days. If after this the substrate remains clean, without mold, seeds are planted in it.
Before germinating and planting orchid seeds, they need to be prepared. Before germination, seeds must be disinfected in a pale pink solution of manganese or a weak solution of calcium hypochlorite for 10-15 minutes.
Then use a pipette to carefully move the seeds into the substrate. It is advisable to do all this over steam, in a water bath, to ensure disinfection. Then the jar is tightly closed and left for germination at 18-25 C in a well-lit place.
Seedlings can be sown in the ground only a year after germination. The seedlings are carefully washed out of the substrate and transferred to prepared soil consisting of bark, moss and turf soil.
Keep them under glass in a warm room, avoiding the formation of condensation. After the first leaves appear, the seedlings are moved into separate containers and cared for as adult plants. Such an orchid will bloom only after 5-6 years.
Now that you know how to plant an orchid with seeds at home, let's look at other ways to plant an orchid at home.
You will learn what is needed to sow orchid seeds from the video:
Caring for seedlings in the first days after planting
Water small orchids by spraying the substrate, monitoring its condition very carefully to prevent waterlogging. The roots of young plants are very vulnerable to excess moisture, which instantly leads to their rotting, especially in low room temperatures.
Six months later, the grown and strengthened orchids are transplanted into a substrate for adult specimens and cared for accordingly. Exotics grown from seeds bloom after 4 or 5 years.
How to maintain crops
The place for containers with seeded material can be a small greenhouse or greenhouse. Planted seeds form over six months or nine months (depending on the type of flower).
It is important to create a comfortable environment for them. To do this, the room temperature should fluctuate between 22-29 degrees
Ambient humidity should not exceed 70%. It is important to remember about illumination, since crops need it for 15 hours. If you need to add additional light, then the light source must be set at least 30 cm from the containers. And it is important that direct sunlight does not fall on the crops, only diffused light.
First, small green balls appear on the surface of the mixture. Over time, rhizoids appear that absorb the necessary substances from the mixture. After this, leaves appear and only then roots. As soon as two or three leaves sprout from the orchid seeds, the plant is ready for replanting.
What kind of miracle orchid?
The origin story of the orchid has long been akin to mythological tales and legends. Some peoples considered the foremother of this wonderful flower to be the rainbow when it split into many pieces, while others are convinced that the orchid grew exclusively in the place where the beautiful Aphrodite lost her shoe. But no matter how they disagree, both consider this plant a symbol of rebirth, beauty and great love.
Orchid likes to sprout directly on trees
Brief overview of care
If you ignore the myths and legends of the flower world and turn to the real world of science, you can find out that the very first orchids were discovered more than 130 million years ago, although they spread to China and Japan only 2 centuries BC.
Orchid species number in the tens of thousands
In those days, orchids were considered a group of medicinal plants, and Confucius mentioned this in his writings . The orchid appeared in European countries not so long ago, just a couple of centuries ago, but during this time the number of its species reached 30 thousand.
For the opportunity to grow this flower crop indoors, we must say thanks to botanists. True, caring for an orchid can bring a lot of trouble to a beginner, but amateurs and professionals promise a gratefully flowering plant if the needs of the orchid are met in a timely manner, using special knowledge of how to care for it.
Lighting is very important for an orchid, but it must be chosen wisely. This flower loves bright, but certainly diffused light.
The orchid should be able to shade from direct rays
Direct sunlight will not destroy the orchid immediately, but it will lighten and stretch the leaves without any prospect of blooming. If you slightly shade the window with tulle or thin lutrasil, the orchid will regularly delight you with color.
From autumn to spring, a period of rest begins and shading the window no longer makes sense, since solar activity will also disappear. During this important period of time for the flower, the shoots ripen and the plant lays buds for the next season. During the rest period, it is better to slightly lower the ambient temperature and keep it within 13°C-18°C, while in the summer season the upper limit can rise to 27°C, and it is better to leave the lower limit the same. This is explained by the fact that in natural conditions the orchid tolerates quite good temperature changes and this contributes to its active flowering.
After a long and regular period of rest, the orchid will delight you with abundant color
Orchids should be watered abundantly, especially in the most active phase of growth, but in winter the amount of moisture consumed is halved. It is worth noting that drought is not as dangerous for an orchid as flooding, so you need to water the flower carefully and it is better to do it in the shower or leave the flower pot in a container with warm water for 15 minutes, and then let the excess moisture drain.
Video: how I water an orchid
Orchid seeds
Do they exist and where are they located?
Often, newcomers to orchid growing are interested in whether orchids have seeds, since it is almost impossible to find them on sale. But they still exist.
Seeds are formed on a plant where a flower on a flower branch has been fertilized by pollination. Pollination at home is carried out artificially using a natural brush. To do this, pollen from the stamens is transferred with gentle, light movements to the pistil, where, after successful pollination, the seed capsule is set.
Pollination of Phalaenopsis.
It is formed at the site of the inflorescence and, until maturity, stretches up to 10 cm in length. The seed pod is light green at first, but turns light brown as it matures. And at the moment when the seeds ripen, it bursts. The seeds are very small and resemble dust. Therefore, they are not removed from the box, but sown directly from it.
How to get it at home?
To get them, take 2-3 orchids and, using a squirrel brush, transfer pollen from three copies to the pistils of the flowers.
Bolls do not form everywhere, but it is quite possible to get a couple of bolls this way at home.
Seed pod.
Appearance
The boxes are very small, the opened bag inside is filled with brown dust - these are the seeds. Therefore, experienced flower growers do not wait for the box to fully ripen; they cut it off and wait for it to ripen in a paper envelope. So that a light breeze does not scatter the seeds across the floor.
How to germinate?
They are germinated in special solutions, for example, Knudson's medium. They must be sterile. Basic recipes for germinating plant seeds.
Recipe 1:
- 500 gr. tomato, juice is squeezed out of them using a sieve or gauze;
- 500 gr. coconut water;
- 1 gr. fertilizer intended for feeding orchid plants;
- 200 gr. potato starch;
- 1 liter of sterile water.
Orchid seeds can only be germinated in special solutions.
Recipe 2:
- 1.5 liters of filtered soft water;
- 300 ml. potato juice;
- 7 sugar cubes;
- 1 gr. fertilizers for orchid plants;
- 10 k lemon juice;
- 200 gr. potato starch.
Recipe 3:
- 1 liter of sterile water;
- 10 gr. brown sugar;
- 10 gr. honey;
- 1 gr. fertilizers for orchids;
- 6 gr. potato starch.
When using any of these solutions, it is necessary to sterilize it:
- First, the containers are sterilized in any convenient way;
- Then the cooled nutrient medium is poured into them. Pour into a container no more than 2 cm high, as this is quite enough for germination;
- Now the jars are placed in water at the level of the filled nutrient medium and sterilization begins, which lasts for 10-15 minutes.
IMPORTANT! Seeds are sown only when the mixture has completely cooled after sterilization.
Read more about seed germination here.
How to take or obtain seeds from a flower?
Pollination is required to produce seeds. In the natural environment, pollen is carried by insects. In an artificial one, you will have to work hard:
- Remove the cap from the stigmas. Under it there will be balls with pollen on legs (pollinae).
- Carefully open the cap. Remove the polylines with a toothpick or small tweezers, holding them by the stems.
- Find the column at the bottom. Place the pollinium in the recess located in it.
If pollination is successful, then within 24 hours the hole in the cap will close, the petals of the flower will begin to wither, and the base, which is attached to the peduncle, will swell.
When pollinating, do not touch the pollen balls. They are very gentle.
How to plant correctly?
Since growing an orchid from seeds is a rather complicated process, try to strictly follow all the recommendations that will be described below.
Equipment and its sterilization
- Glass flasks with a volume of 200-300 ml or simple glass jars, for example, baby food, always with screw-on lids.
- If planting material will be grown in flasks, you will need a tripod, as well as cotton wool plugs covered with gauze.
- Litmus paper.
- Hydrogen peroxide (2%).
- Disposable syringe (sterile).
If you decide to use regular glass jars, make a small hole in each lid and insert a glass tube into it. Plug the upper end of this tube with cotton wool.
Before planting, you need to sterilize all test tubes and jars along with their lids. This can be done in an autoclave, double boiler or medical sterilizer. The sterilization process must take place at a temperature of 120 degrees and last at least 30 minutes. After this, all containers must be cooled to room temperature.
Preparation of the nutrient medium
To prepare the mixture you will need:
- agar-agar – 8 g;
- phosphorus-nitrogen-potassium fertilizer - 1.5 g;
- glucose – 10 g;
- fructose – 10 g;
- activated carbon – 1 g;
- stimulator forming the root system – 5 drops;
- distilled water – 1 liter.
Step-by-step algorithm for preparing a nutrient mixture:
- Pour 0.5 liters of water into a clean container and boil it.
- Add glucose, fructose and agar-agar to the boiling liquid.
- Reduce heat and simmer the mixture until all ingredients are dissolved.
- Pour the remaining 0.5 liters of water into another container, heat it, add activated carbon, fertilizer and stimulant. Mix everything properly.
- Combine both compositions in one container.
- Check the acidity level of the finished mixture with litmus paper. It should be between 4.8-5.2 pH. If you need to lower the pH, add a little potash solution; if, on the contrary, you need to increase it, add phosphoric acid.
- Pour 30 mg of the finished mixture into prepared containers, close them and sterilize everything together for 30 minutes.
After this, carefully monitor the flasks for 4-5 days. If they become moldy, start the cooking process again.
If you don’t want to spend time and effort making a nutrient medium, just buy a ready-made mixture at a specialty store.
Video about preparing a nutrient medium for sowing orchid seeds:
Sowing
Before sowing, seeds must be disinfected. This way you will stop the development of bacterial and fungal diseases. To do this, the planting material is irradiated with an ultraviolet lamp or immersed in a 2% hydrogen peroxide solution for 5-10 minutes. Now you can proceed directly to sowing:
- Use a sterile syringe to remove the seeds from the disinfection liquid and place them on the surface of the growing medium.
- At this moment, try to gently rock the flask with the nutrient substrate. This is necessary for uniform distribution of seed over the entire surface.
- Cover the flasks with cotton swabs and set them for germination.
First care after landing
Containers with planting material must be kept under a special light source at a temperature of 20-23 degrees. Light should be exposed to the flasks for at least 12 hours a day. As long as the seeds are kept in sterile conditions, they do not require special care. The main thing is to carefully maintain sterility and maintain the required ambient temperature.
It is necessary to proceed to transplantation into a special substrate no earlier than after 10-12 months.
Problems and difficulties
The main problem with this method of growing is that the seeds may simply not sprout. There may be several reasons:
- poor quality planting material;
- violation of sterility;
- violation of temperature conditions and duration of exposure to light.
Now you know that the process of growing orchids from seeds is quite complex and lengthy, but interesting. If you have the desire and time, try to go through all the stages of growing, strictly following the instructions described in this article.
When should I remove it from the seed container and replant it in the substrate?
Sprouted seedlings are removed from the vessels with the nutrient medium no earlier than after a year. You can get them out using tweezers, carefully turning them in a clockwise circular motion so as not to injure the roots. You can simply pour the contents of the container into a bowl of warm water, to which 1-3 drops of a foundation solution have been added, rinse the seedlings and lay them out to dry on a clean, dry napkin or cloth.
They are planted for growing in small transparent disposable cups, which are filled with drainage and substrate from small fragments of fern rhizomes, sphagnum moss and pine bark, taken in equal parts.
Pollination
In the absence of specific insects that pollinate orchids in natural conditions, this process is done manually at home:
It is important to choose two healthy plants that bloom at the same time. If the specimens differ in size, then pollen from the larger one is transferred to the smaller flower, then during germination the probability of fertilization increases; You cannot pollinate plants that are blooming for the first time; The flower on which the pollen will be placed must have been open for several days
Its own pollinia is removed; Pollinia from one flower are placed with tweezers on the stigma of another flower and pressed;
After pollination, the flower withers within a few hours. It is necessary to cut off its petals so that the column does not rot;
The column will swell in a week, and the ovary will increase; The seed capsule of an orchid matures in approximately 9 months. Before opening, the fruit is wrapped in tissue paper to prevent the seeds from spilling out, cut off and placed in a glass container to dry. After this, the seeds are ready for planting.
Collecting seeds
Collecting seeds is difficult, but doable. As the box grows, a napkin is tied to it in the form of a pocket so that dust does not fly away when the walls begin to crack. A mature capsule turns brown (in rare cases it remains green).
When the boll is dry, cut it off and transfer the seed dust onto a piece of paper. Planting such small seeds is very difficult. This is another reason why seed propagation often fails.
How orchids grow
Orchids or Orchids (Orchidaceae) are a family of herbaceous perennials. They can be found everywhere, from the tropics to the forest-tundra, but, of course, the brightest varieties, captivating with their exotic coloring and the shape of large flowers, live in tropical forests. It is impossible to calculate the exact number of representatives of the family - at the moment, about 35,000 different orchids are known, including natural hybrids (plants have the ability to cross, including interspecific ones) and varieties bred through selective breeding. The eight hundred genera included in the family make up approximately 10% of all plants in the world.
Blooming orchids amaze with a variety of shades
Orchids vary greatly in appearance. It is difficult to suspect “relatives” in many of them, even distant ones. But most of them lead an epiphytic or semi-epiphytic lifestyle, living in trees. They use the “host” only as a support, without parasitizing on him.
Most orchids in nature live on trees, but there are also those that grow on rocks (the so-called lithophytes)
Orchids obtain the necessary moisture and nutrients from the atmosphere, absorbing them using a developed system of aerial roots covered with a thick layer of special tissue - velamen.
Orchid roots sticking out of the pot are normal; they participate in the process of photosynthesis and help absorb moisture from the air.
Based on their growth characteristics, they are divided into two groups:
- Monopodial orchids. The growth point is the apical bud of the shoot. It persists throughout the life of the plant, disappearing only when it ages or dies. Such varieties stretch upward, peduncles and side shoots are formed from buds “hiding” in the axils of the leaves. Most often, adult plants resemble vines or their leaves gradually gather into a rosette.
- Sympodial orchids. As soon as the youngest shoot is recognized by the plant as sufficiently developed, having reached a certain size, the growth point at its top dies. At its base, the rhizome forms a new one, from which another shoot or peduncle appears. These orchids only grow in one direction.
Monopodial orchids grow predominantly upward, sympodial orchids - to the side
Orchid flowers vary greatly in size (from a few centimeters to almost a meter in diameter) and color (the expression “all the colors of the rainbow” does not even come close to describing this variety of shades and tones), but their structure is approximately the same. The upper part consists of three sepals, which often grow together to form one “petal”. The lower one consists of two true petals of a smaller size, between which there is a third one - the so-called lip, which sharply contrasts in color with the overall color of the flower. It contains a nectary. In shape it resembles a bag, a shoe or an elongated gramophone horn. Often the flowers are collected in inflorescences (each with an average of 4–16 buds).
The structure of the flower is approximately the same in most types of orchids, despite the variety of petal colors
When can you collect seeds?
If pollination is successful, fruits ripen - boxes or pods filled with seeds. They are so light that they do not fall to the ground, but glide, caught by wind currents. In order for the seeds to germinate when they reach the soil, it is necessary to have a mycelium in this place, which will provide them with the necessary nutrition.
Orchid seeds are very small, it is impossible to examine them without a microscope.
Orchids have simple, monocotyledonous leaves, most often a rich dark green color. There are no petioles. On each stem thickened at the base (tuberidia, more often called pseudobulbs), from one to three leaves are formed. The shape of pseudobulbs resembles cylinders, spindles, and eggs. Orchids store moisture and nutrients in them.
In thickenings at the base of the stem (pseudobulbs) the orchid stores a supply of nutrients.
Recommendations and tips for growing
While caring for an indoor orchid, over time we notice that it begins to develop so-called aerial roots - shoots that develop outside the ground, trying to leave the pot. There is no need to force them into the ground - they are quite capable of receiving the necessary moisture directly from the air.
Another tip related to growing orchids relates to the choice of pot: do not plant the crop in a ceramic container. The fact is that the roots of the orchid can grow to the walls, and then, if you need to replant, you will definitely damage them. And lastly: an indoor orchid can easily do without regular watering if you remember to spray it with a spray bottle.
Growing an orchid from a small seed is a troublesome and difficult task; until recently, many considered it simply unrealistic. But today, with the proper skill and ardent desire, many amateur flower growers quite successfully achieve results by germinating at home seeds purchased on Chinese websites for mere pennies. We wish you good luck in this difficult matter and hope that our advice will be useful.
Choosing seeds
Let's start with the choice of seed. Several types of these plants are suitable for the home indoor “climate,” but the phalaenopsis orchid varieties are the most common and are well adapted to our natural conditions. Gardeners also choose the seeds of vanda, cymbidium, zygopatelum, and dendrobium.
To choose high-quality material on the Internet, you can focus on the degree of recognition and scale of the manufacturing company. This, of course, is not a 100% indicator, but large enterprises are less likely to risk selling counterfeits. The best option is to consult with other gardeners who will suggest reliable companies. Flower gardeners often purchase orchid seeds in China through special websites. This method is more reliable and less expensive.
The essence of the process
It is immediately worth noting that the process is very long and labor-intensive, and takes four to five years before flowering begins. Despite the capriciousness of the plant, many gardeners manage to grow full-fledged orchids from seeds. You can purchase seed material either in online stores or collect it from an existing plant by pollinating a flower living in the house and waiting for the seed pod to ripen. Then it is carefully separated from the plant, and the seed is removed.
Botanical description and homeland of the plant
Chinese Belamkanda (Belamcanda chinensis) is an ornamental species of the Belamkanda genus, belonging to the Iris family. Externally, the plant resembles a cross between an iris and a lily: the rhizome and leaves are like the first, and the six-petaled flowers with touching stamens are similar to lilies.
Fleshy roots lying in a horizontal plane are located close to the soil surface. The length of the wedge-shaped hard leaves is 35-50 cm.
When does belamkanda bloom?
Flowers bloom in late June and early July. The flowering period will last until mid-September. The corollas open in the first half of the day; at night they are twisted with a screw.
The flowering stem is a meter long, at its top there are about 20 corollas with a diameter of about 6 cm, the color is monochromatic or spotted. The color scheme is in yellow-brown, orange, pink tones, the shade of the spots is contrasting. Belamkanda is also called leopard flower, leopard lily, Chinese orchid.
After flowering, a large oblong seed capsule is formed. When it dries and opens, round black seeds, similar to berries, will become visible, but they should not be eaten.
Perhaps belamkanda can be found in garden plots more often than in the wild. It grows in the Far East, East Asia, Malaysia, Indo-China and is protected by the Red Book.
It is preferable to grow in an open, warm area with moderately moist humus-rich soil. Belomkanda winters in open ground without shelter if the temperature does not drop below -15 °C. Can be cultivated at home.
Problems and difficulties
There can be many difficulties when germinating seeds yourself:
- It is almost impossible to obtain seeds from an orchid at home.
- It is not always possible to buy high-quality planting material.
- At any stage, death of seeds or seedlings may occur, since sterility for cultivation must be absolute.
At home, unfortunately, it is difficult to properly grow orchids using seeds, so think before you decide on this not very simple process. There are more affordable ways to propagate this exotic plant. But if you do everything according to the rules and be patient, a positive result will not be long in coming.
Important points
We recommend that you read
Despite the fact that modern varieties have the ability to adapt well to cool climates, growing orchids from seeds can have a number of difficulties, since everything is not as easy as it might seem at first glance. Nothing is impossible, and gardeners are able to grow this flower from seeds, but to do this, you need to follow a special algorithm. First of all, it is necessary to clearly understand that this plant is very different from the indoor flowers we are used to. This means that in the process of cultivating orchids it is necessary to adhere to special conditions.
The plant has very small seeds. In addition, they lack endosperm. This is the necessary supply of nutrients that is needed for the formation of an embryo and its further development. In this regard, the soil in which the seeds will germinate must have these necessary substances. In addition, the existence of an orchid is possible only in the case of symbiosis with fungi. They must be in the substrate so that the plant not only grows, but also is healthy.
It is important to pay attention to the fact that orchid seeds are very small. Because of this, they can only be viewed using a microscope. People involved in orchid breeding already have a store of knowledge, and they are capable of this task
Beginners, seeing the seeds, decide that it is simple dust
People involved in orchid breeding already have a store of knowledge, and they are capable of this task. Beginners, seeing the seeds, decide that it is simple dust.
Advantages and disadvantages
There are aspects that can be attributed to the disadvantages of growing orchids from seeds:
- labor intensity and complexity of the process;
- requirements of planting material for sterility and nutrient mixture;
- duration;
- the risk of purchasing low-quality planting material.
But, despite this, you can also find certain advantages in this process - this is the pleasure that can be obtained from observing the process of seed germination. And when these small seeds grow into beautiful, flowering plants, all the disadvantages will turn into advantages. But it is worth remembering that you will get a flowering plant only after 5 years .
How to plant orchid seeds at home?
Any plants that reproduce by seed can be grown from seed manually. Orchids are no exception. Any species can be grown if you have fresh seeds on hand, the appropriate technical base, as well as the necessary knowledge and skills on how to plant seeds.
Features of online shopping
Buying orchid seeds online is always a lottery. This is especially true for foreign sites and suppliers. Since the seeds quickly lose their viability, the risk that the buyer will receive a low-quality product is almost one hundred percent. Usually, when ordering on Aliexpress, the florist receives anything but orchid seeds.
Seeds from Aliexpress.
To be sure, it’s easier to get them yourself, ask friends or order them from a nursery that has a good reputation.
Attention! A distinctive feature of orchid seeds is their size - they are microscopic, dusty, beige or light brown in color.
Step-by-step instruction
Before planting seeds, you need to prepare everything you need in advance. You will need:
- seeds;
- nutritional substance;
- glassware for growing (flasks for germination, glass jars, bottles or chemical glassware);
- means for disinfecting planting material (bleach or hydrogen peroxide) and utensils (pressure cooker, steamer or screen for steam sterilization);
- ethanol;
- tools (tweezers, syringe, etc.).
Since the material will be in a sealed container for 1 year, the sterilization process must be approached with the utmost care. Any negligence or inattentive actions can nullify all efforts to sow seeds.
Before sowing the seeds, the room can be quartzed. Surfaces at the workplace must be treated with alcohol. Dishes and lids are sterilized in a pressure cooker, double boiler or steamer (15 minutes for containers up to 1 liter). It is absolutely ideal if you have a medical sterilizer. It is necessary to work in sterile gloves and a gauze bandage.
Then the nutrient substance (Knudson’s medium) is poured into the container. You can purchase it online or prepare it yourself. The first option is preferable, since preparation involves the use of microdoses of a list of components, the exact measurement of which is unlikely in an ordinary urban kitchen. However, with accurate scales this is possible.
Germination of seeds in Knudson's medium.
Agar-agar with the addition of glucose, micro- and macroelements is also used as a nutrient medium. The recipe is as follows (g/l):
- Calcium nitrate (calcium nitrate) – 1 g;
- Ammonium sulfate – 500 mg;
- Potassium phosphate – 250 mg;
- Magnesium sulfate – 250 mg;
- Ferrous sulfate – 25 mg;
- Manganese sulfate – 7.5 mg;
- Agar-agar – 15 g;
- Glucose (sucrose) – 20 g;
- Distilled water – 1 l.
The acidity of the environment is 5.1-5.5 pH. To regulate and equalize the acidity of the solution, use potassium carbonate or orthophosphate acid.
The nutrient medium is loaded hot - in the amount of 30 ml of solution per 100 ml container. The flasks are then closed and sterilized again along with the nutrient medium in a pressure cooker for 30 minutes.
After the procedure, sterility control is carried out - the flasks are left for 4-5 days. If mold has appeared during this time, the substrate is not suitable for use.
Before placing seeds in flasks, they are also sterilized. The procedure is carried out in a container with 3% hydrogen peroxide or in a bleach solution (10 ml per 100 ml of water), for 10 minutes, then immediately plant the seeds. To do this, it is convenient to use a syringe or chemical pipette.
Important! It is necessary to load seeds into flasks over steam, preferably in a silicified room.
Germination time
Germination takes about two months. You need to be patient, since sealed flasks in an apartment can only be opened after a year. Unsealing before this period for the purpose of transplanting onto a non-sterile substrate is fraught with infection.
Seeds germinate in about two months.
What does germination depend on?
Germination primarily depends on the freshness of the material. The most suitable seeds are those freshly collected from a burst capsule. Germination is lost gradually, approximately 10-25% per month, depending on storage conditions. However, this is partially offset by the huge number of seeds.
Where and at what price are they sold, how to assemble it yourself?
Orchid seeds can be found in specialty stores or ordered online. The cost of planting material is influenced by the following factors :
- variety;
- quality;
- trade brand;
- packaging material.
On average, the cost of a bag of 20 seeds varies from 200 to 300 rubles.
Planting material from China: possible problems
Planting material ordered on Chinese websites costs approximately 50-70 rubles per 100 pieces.
However, such parcels contain only seeds; they do not contain instructions, the name of the variety, the date of collection, etc. In this case, the consumer runs the risk of receiving regular lawn seeds instead of an orchid. Germinating Chinese seeds is similar to playing the lottery when the end result is unknown.
The quality of goods ordered on such sites directly depends on the integrity and honesty of the seller.
How to check the authenticity of a purchase?
When purchasing orchid seeds, you should pay attention to several nuances:
- Manufacturer (seller) . It is recommended to choose planting material in large specialized stores with a good reputation.
- Price . As a rule, seeds that are too cheap are of low quality.
- Packaging Features . The bag must be well sealed and contain readable text with the name and description of the product.
After examining the correct packaging, the consumer will receive the following information:
- manufacturer's name and contact details;
- the exact name of the orchid (according to the Register);
- best before date;
- mass (in grams);
- batch number;
- GOST
Receipt on your own
To obtain seeds on your own, you need to perform several steps:
- move pollen from one inflorescence to another using a soft brush;
- Faded plants will form boxes, which should be removed after 3 months and wrapped in a napkin;
- pour the ripe seeds from the cracked box onto a napkin and divide into parts;
- Place each share in a plastic container and leave in the refrigerator until planting.
Step-by-step instructions for moving a flower from a transparent container to a pot
It is worth mentioning right away that the orchid does not tolerate frequent moving from place to place, so the acclimatization flask should be placed on the windowsill on which the pots with plants in the substrate will subsequently be located.
Before transplanting young plants, they must be carefully released from the flask so as not to damage the delicate roots and leaves.
If the flask is glass and has a narrow neck, then it is impossible to pull the seedlings through it without damaging it.
You need to do the following:
Wrap the flask in several layers of soft cloth and break it with a hammer
You need to act very carefully so as not to cut yourself. Then select young orchids and rinse them in warm, running water from the nutrient mixture. In order for the seedlings to adapt to life in the air, they need to be dried by leaving them in the air at a moderate temperature for some time. After the young plants are removed from the flask, washed and laid out to dry, they should be carefully examined
If the roots are small or are only in the bud, then they will need to be increased
After the young plants are removed from the flask, washed and laid out to dry, they should be carefully examined. If the roots are small or are only in the bud, then they will need to be built up.
Extension is done in the following way:
- Spray young orchids with a fungicide solution and leave for 30 minutes.
- Place small plants in a mini-greenhouse. To do this, sphagnum moss is steamed and disinfected. Then moisten and place on the bottom of a large glass container.
- Then place the young seedlings on the moss and cover the container with glass on top. This design will create a tropical atmosphere with high air humidity.
- If condensation appears on the walls, it must be wiped off immediately and the greenhouse must be ventilated daily. If this is not done, the young orchids will simply rot.
- The greenhouse should not be exposed to direct sunlight - the light should be diffused. Do not forget to spray the moss in a timely manner - it should not dry out.
- As soon as the seedlings grow roots of at least 5 cm, you need to begin to accustom the plant to life in the air; to do this, leave the greenhouse open for 2 weeks, starting with 20 minutes and gradually increasing the time by 20-30 minutes every day.
Now the seedlings are ready to be placed in the substrate.
The algorithm of actions is as follows:
Prepare the substrate and pots - you can take simple plastic cups with several holes in the bottom to drain excess moisture. Pour 1/3 drainage into the bottom of each cup. Then cover the drainage with a small amount of substrate. Place the orchid roots in a glass and gently spread them to the sides. The growing point should be at the level of the edge of the cup. The substrate is added with extreme caution so as not to damage the delicate roots. To compact the substrate, shake the pots several times. Place young orchids on the windowsill in the usual conditions - do not water.
Plant care algorithm:
- Before transplantation, young orchids must go through a period of adaptation and root growth, if necessary.
- After transplantation, the plant begins to be watered on the 4th day, preferably with a spray bottle, just to moisten the substrate.
Fertilizing can be done after a month. Maintain a comfortable temperature and humidity for the orchid.
Read more about how to plant an orchid here.
Necessary equipment
You may be interested in: Does aloe bloom: description, flowering features, care, photos
Anyone who is interested in how to plant orchid seeds needs to know that ordinary containers or pots are not suitable for these flowers. It is necessary to purchase special glass flasks or containers with a narrow neck for chemical reagents, with a volume of about 300 ml. A conical Erlenmeyer flask, for example, will do. If it is not possible to purchase such dishes, use glass jars with tight-fitting lids. Containers must be sealed tightly.
As a rule, stoppers are also sold complete with flasks. If you don't have any, make your own - roll up a tight gauze or cotton swab and wrap it in aluminum foil. Four holes with a diameter of several millimeters are drilled in the lids of the jars and clogged tightly with cotton wool.
Choosing a suitable substrate
Soil is the main element of any plant. It is on this that the well-being and well-being of the flower rests. If this is your first time starting to grow orchids, then buy suitable soil at the store. And if you have many years of experience and a wealth of knowledge in this area, then it will probably not be difficult for you to prepare a high-quality mixture yourself. In this case, it is necessary to take into account a number of soil characteristics.
- The soil components must be crushed. Huge pieces of bark are no longer a substrate, but a block.
- Do not use garden soil that has low breathability.
- Remember that soil is not only the basis for a plant, but also a home for all kinds of bacteria. So be sure to sanitize all ingredients before preparing it.
What should the soil be like?
Even special soil for orchids, which is sold in specialized stores, is not suitable in our case. The question arises: “In what soil should I plant orchid seeds?” Some gardeners sow them in finely chopped wet sphagnum moss, but it is more advisable to use a special nutrient mixture. The fact is that when using moss it is difficult, and often impossible, to maintain complete sterility, the required level of acidity and at the same time ensure nutritional value.
The basis of the mixture is agar-agar, which is a mixture of polysaccharides that is obtained from certain varieties of red and brown seaweed. A white or yellowish powder that turns into a jelly-like mass when dissolved in hot water. You can prepare the mixture yourself. To do this you will need:
- 10-15 g agar-agar;
- 200 ml distilled water;
- 10 g each of glucose and fructose;
- solution of potash or potassium carbonate;
- orthophosphoric acid.
The last two ingredients are used to create the necessary acidity. For orchid seeds, the optimal pH is 4.8–5.2. You can check its value using special indicator strips made of litmus paper. They are sold in chemical stores. Add alkali and acid a few drops at a time and immediately check the acidity of the mixture.