When and how to plant geraniums in open ground in a flower bed
As for the timing of planting geraniums in open ground, first of all you should monitor the weather - it should already be quite warm during the day, naturally, the return of spring frosts should pass, which means that pelargoniums should be transplanted into the garden from the second half of May.
Planting pelargonium in open ground is more than simple:
- chose and prepared a place;
- dug a planting hole slightly larger than the size of the pot;
- they pulled the seedling out of the pot (and didn’t forget to spill it first) and put it in a new place of residence;
- sprinkled with fertile soil on the sides, compacted around the seedling;
- spilled plenty of water.
As for the planting location, the plant should not be planted in an area that is too open, otherwise the sun will burn the leaves and the plant will have an unsightly appearance and poor health.
For geraniums, it is optimal to find a place in light partial shade.
Video: planting pelargonium in open ground - when, where and how to plant
When should you sow pelargonium seeds for seedlings?
Many people know that pelargonium is propagated by cuttings, but now the seeds of the plant are on sale. Therefore, propagating geraniums at home has become even easier.
The advantages of the seeds are that they germinate quickly and well, the plant has a compact shape and blooms constantly. Young shoots of the plant bloom by 5 months.
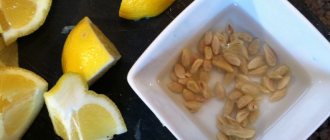
What do pelargonium seeds look like and what should you do with them before planting them in the ground?
The seeds of the plant are hard, large and oblong in shape and brown in color. To plant seeds, you need to prepare the soil; it must be loose.
The composition of the soil should be approximately this: 2 parts turf soil and one part sand and peat. To prevent the plant from fattening, the substrate should not be rich in nutrients.
Before planting, it is necessary to disinfect the soil (steam, calcine or water with a solution).
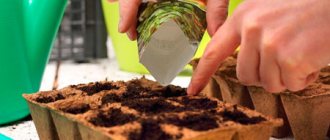
To sow seeds, you need to prepare a shallow container. Distribute the seeds over the surface at a distance of two centimeters from each other. Cover the seed with soil, about 1 centimeter. Be sure to keep the container with the seeds warm. The soil should not dry out, so moisten it with warm, settled water.
Also, in order for pelargonium seedlings to germinate faster, you can cover it with film, but be sure to make holes in it for ventilation. As soon as the shoots appear, remove the film immediately. Seedlings should be kept in a well-lit place. The soil should be moderately moist, not allowed to dry out and not flooded. Avoid exposure to direct sunlight.
Caring for pelargonium seedlings
Growing pelargonium seedlings is a pleasure. This process is very interesting and exciting not only for an adult, but also for a child. Shoots will appear in about a week. It’s so nice to watch how velvet leaves emerge from each seed. Everything is fine, of course, but you need to transplant the pelargonium seedlings into separate pots. Therefore, we do the following procedures:
- As soon as four leaves appear on the plant, it is time to transplant them into a pot. You will need a container with a diameter of about 8 centimeters.
- The plant must be pruned. This means that each plant must be transplanted from common soil (container) into a pot.
- Using a small spatula, remove each plant with a small lump of earth so as not to damage or disturb the roots.
- Plant pelargonium in your pot.
- The soil in the pot should not be rich in nutrients. Therefore, if you use a purchased mixture, and it is mainly peat, it must be diluted with garden soil and compost.
- After planting, you can now observe the growth rate of the plant. If you follow all the rules, then geranium grows by leaps and bounds.
Now all that remains is to wait for flowering.
Of course, many people believe that a young plant blooms after a year, do not believe the rumors. You will have to wait about five months for flowers. You may also encounter problems such as yellowing of leaves and the appearance of brown and yellow spots. This may be due to the heat. Therefore, many gardeners and flower growers plant geraniums in the garden. The result surprises many. Since the plant becomes even more beautiful, it blooms constantly, there are no yellow leaves. This method can be used to save your favorite flower during the hot season.
With proper care, the plant does not get sick and is not damaged by pests. Therefore, let this amazing and unpretentious flower please you for many months.
Video: sowing and caring for pelargonium
Propagation of pelargonium by seeds is interesting because it makes it possible to grow your own specimen, which is not similar to the parent plant. This is a rather labor-intensive process that has a number of nuances that you need to know.
In this article we will talk in detail about how to prepare pelargonium seeds for sowing, what kind of soil to plant them in and how to further care for the young seedlings of the plant. You can also watch a useful video on the topic.
Breeding rules and terms
In fact, there is no specific time frame for planting pelargonium. It can be cultivated all year round, however, the flowering period will depend on the month of planting. Also, when pelargonium blooms is influenced by the method of breeding.
Reference: Carl Linnaeus was the first to describe 25 species of this plant and named them geranium.
If you are interested in growing pelargonium at home, then you need to know about the methods of propagating this flower. There are several methods for propagating young geranium flowers.
Propagation by cuttings
This method is perhaps the easiest to implement, short-term and most effective. It also allows you to preserve all the varietal properties of the mother plant.
The key to a successful operation lies in meeting two conditions - maintaining optimal temperature and constant lighting.
The advantage of this method is that cuttings can be done several times a year. However, it is worth considering that in certain months the plant is at rest (November-January), and therefore it will not be possible to grow a strong plant from cuttings. And if you want pelargonium to bloom this year, then you need to start propagating it already in March, since it is during this period that all the vital forces of the plant are activated and active sap begins. And geraniums planted in April will bear flowers only next year.
Advice: it is also not recommended to start propagating pelargonium before March, for example, in January or February, since caring for the seedlings will be long and painstaking. It will be necessary to artificially illuminate young plants, additionally feed them, and create the most comfortable conditions.
You can also cut pelargonium in the fall (September-October), during routine pruning after flowering. These cuttings will grow well during the autumn-winter period and will produce their first color the following summer.
Cutting technique:
- The apical shoots, which have 3-4 leaves, are suitable for propagation. The length of the cutting should be approximately 7 centimeters.
Please note: if a bud or bud remains on the cutting, then such a shoot will not produce roots for a long time. Therefore, all flowers and buds must be removed.
- Cuttings are cut only with a sterile instrument, and the entire operation is performed with gloves so as not to inadvertently introduce infection into the cuts.
- The taken material is removed for several hours in a shaded place so that the cut area is covered with film.
- To prevent the cut from starting to rot, it is sprinkled with coal or “Kornevin”.
- The cuttings are immersed in water and wait for roots to form. Then the shoot is planted in the ground.
- You can avoid overexposure in water and plant the cuttings directly in the ground. The soil must be moistened and disinfected in advance.
- Containers with shoots are covered with a lid or other protective material, creating a greenhouse effect. In some cases this is not required, for example, if the cuttings are strong and healthy.
The plants are provided with comfortable conditions - the room temperature should be +22-23 degrees, air humidity - 80%.
Pelargonium propagated by cuttings grows roots very quickly, and there is practically no waste.
Propagation by seeds
For many gardeners, it is a real pleasure to propagate pelargonium from seeds. This, of course, is not as popular a method as cuttings, however, it has its advantages. For example, this method allows you to obtain a new individual plant variety with unique properties.
In addition, pelargonium seeds have very good germination. They grow quickly and amicably. And the flowering of plants grown by seed (and planted in the spring) occurs within 5-6 months.
Sowing geranium seeds can be done all year round. However, in winter there will be additional hassle in the form of artificial lighting, control of humidity levels, etc. Therefore, the most optimal time for planting geraniums is spring and summer months.
Please note: if sowing is done in summer or autumn, young pelargonium will bloom only after 10-11 months.
Geranium seeds are large and easy to plant. For seedlings, loose and light soil is prepared, with a minimum amount of nutrients (so that the seedlings do not fatten). The soil mixture is usually made up of two parts garden soil and one part peat or sand. You can also add a little humus, since seedlings will not grow in very poor soil.
Before sowing, the soil must undergo a mandatory disinfection procedure. It can be calcined in the oven, poured with boiling water with the addition of manganese, or steamed. Then the soil is packaged into shallow containers and watered abundantly.
Geranium seeds are laid out on the surface in orderly rows at a distance of two centimeters from each other. The future flowers are sprinkled with a centimeter layer of soil on top and carefully watered (preferably from a spray bottle) with warm water. In order for the seedlings to manifest themselves faster, the crops are covered with a film or a transparent cover, creating a greenhouse effect inside.
All plants need to start growing is a warm and moist environment. Therefore, it is important to ensure that the soil in the container always remains slightly damp. A lack of moisture will quickly turn the surface of the earth into a crust, through which fragile sprouts will not be able to break through. Excessive humidity is also detrimental to crops: the seeds will simply rot in the ground before germination.
Before germination, it is better to keep boxes with crops in a well-lit place, but not in direct sunlight. And when the green shoots emerge in an even formation, the film is removed from the box, and the seedlings are placed on the windowsill to rise, bathing in the warmth of the sun.
If sowing was done at the end of March, then the number of hours of sunshine will be enough to support the growth of seedlings. But planted geraniums in February will need to be artificially illuminated.
It is very exciting to watch the development of seedlings. The first juicy and fragile shoots will appear in a week. And after 14-18 days the shoots will acquire 3-4 leaves. This will indicate that the seedlings have already grown enough to continue their long life in a separate container.
The vast majority of plants do not like picking (geranium, by the way, too), so the procedure must be taken responsibly.
For seedlings, larger containers are selected, the volume of which is 200 milliliters (8 centimeters in diameter). Geraniums are transplanted into fresh soil, which is supplied with a small amount of mineral components. Using a spatula or teaspoon, carefully transfer each flower bush into a new container, trying not to damage the fragile white roots. After transplanting, the seedlings are watered and exposed to the sun.
Please note: the diving procedure can be avoided if you sow the seeds in peat tablets. When the time comes to transplant the shoots into large containers, the plants are transferred to a new place along with the “mother” container.
After transplanting, all that remains is to wait for the abundant and rainbow flowering, which will delight the eye for many months.
Along with cuttings and seed propagation, there are two more simple ways to increase the number of pelargonium flowers at home. One of them is dividing the bush. The essence of the method is that when transplanting geraniums, for example, in the fall, from open ground to a pot (or simply when changing the container), the bush is carefully divided into separate parts. New bushes are planted in fresh and light soil, watered and cared for in the same way as all other plants.
Pelargonium, as you can already understand, reproduces well vegetatively. You can grow a whole garden of flowers through a leaf. The subtlety of this method is that you need to select the correct leaf as possible, which will serve as the material for propagation. On the plant you need to choose the healthiest and largest leaf with a strong cutting. It is carefully cut at an acute angle and the end is placed in water. After a few days, the shoot will acquire white roots. As soon as the root system has grown sufficiently, the leaf is transplanted into the ground.
How to grow a crop from seeds: step-by-step instructions
Planting pelargonium with seeds is considered the best method. The grown seedlings are unpretentious, resistant to diseases and are characterized by abundant flowering.
Not all types of pelargonium reproduce well by seeds. In this way you can grow zonal geranium.
Ampelous pelargonium is very beautiful, but capricious when propagated from seeds. Even experienced gardeners prefer to propagate it by cuttings.
When to sow?
Some gardeners advise growing pelargonium from seeds from November to April, others in December-January, and still others only in spring. Everyone is right, since it can be planted at any time. In central Russia, February-March is considered the best time. By the time of germination and the beginning of growth, the length of daylight hours increases. When sowing earlier, additional lighting is required.
Information: 5-6 months pass from sowing seeds to flowering.
Preparing soil and material for sowing
Before sowing, it is necessary to prepare the seeds. For faster germination, a scarification procedure is carried out, that is, using fine sandpaper or a nail file, the hard shell is slightly destroyed
You need to do this carefully, remove only the top layer and try not to damage the seed itself. If this procedure is neglected, seedlings may appear only after 2-3 months. After scarification, the seeds are soaked for 10 minutes in a solution with zircon or epin
To prevent various diseases, you need to keep the seeds in a weak solution of potassium permanganate or ordinary hydrogen peroxide for 20 minutes.
After scarification, the seeds are soaked for 10 minutes in a solution with zircon or epin. To prevent various diseases, it is necessary to keep the seeds in a weak solution of potassium permanganate or ordinary hydrogen peroxide for 20 minutes.
Disinfected seeds are poured with water at room temperature for three hours to swell. It is recommended to disinfect the soil before planting. You can place it in a preheated oven for five minutes or pour hot water with potassium permanganate. You can also use commercial biofungicides.
How to plant?
Dishes for sowing can be plastic containers or individual cups. They are also disinfected with a solution of potassium permanganate. Holes are made at the bottom, drainage is poured and prepared soil is poured on top. Water with water or root solution.
In a large container, the seeds are planted at a distance of 5 cm from each other, 6-7 cm are left between the rows so as not to damage the roots when diving. One seed is planted in cups. The seeds are deepened by about 50 mm and sprinkled with a thin layer of earth or sand. You can simply deepen the seed a little with a match.
It is convenient to grow seedlings using small volume peat tablets. In this case, the root system is not injured when transplanting into a pot. The tablets are placed in a container and filled with warm water, and they increase in size by about 6 times. The seeds are placed in special recesses and lightly sprinkled with peat from the tablet.
Before germination, the crops are covered with film or glass and placed in a bright, warm place. Most varieties of pelargonium germinate 7 days after sowing.
Seeds of ivy-leaved pelargonium do not sprout for 2-3 months. It is necessary to remember this and continue to care for the crops.
Detailed instructions for sowing pelargonium can be seen in this video:
Choosing a pot for planting
After the first two leaves appear, the seedlings are picked. To do this, you need to select narrow and tall pots. It is recommended to use pots with a diameter of about 10 cm. It is advisable to use clay pots that allow air to pass through well.
Indoor pelargoniums do not like large pots. They will not begin to bloom until their roots fill the entire earthen ball.
Choosing soil for growing plants
Pelargonium is planted in loose, medium-density soil. You can buy a special mixture for geraniums in the store, or you can prepare it yourself. The following options are recommended:
- Peat, sand and turf in proportions 1:1:2.
- Peat, perlite in a 1:1 ratio.
- Peat, sand in a 1:1 ratio.
Disinfection and soaking of seeds
Before growing pelargonium at home, you need to properly prepare the seed. It is necessary to partially remove the seed shells to speed up the growing process. To avoid damaging the seed too much, it is better to use sandpaper. Clean only the top layer with it.
As a disinfectant for seeds, a weak concentration of potassium permanganate solution or peroxide is used. After disinfection, it is necessary to soak them in water at room temperature so that they swell for 2 hours.
When to transplant to a permanent place
Transplantation of strengthened sprouts is carried out at the end of spring. 1-2 days before transplantation, the substrate is moistened so as not to damage the root system and the healthiest plant can be planted in a permanent place. In open ground, the distance between plantings is at least 20-25 cm.
At home, you can grow almost any flower, even an exotic one, from seeds. For some species, the seed planting procedure involves a series of complex activities. Geranium, in turn, is easy enough to sow and achieve a positive result.
It is important not only to choose high-quality planting material, but also to follow all the rules for caring for a young plant
In China, for example, this species has been recognized for many decades as a symbol of wealth and prosperity. To propagate a flower, the seed method is most often used. Pelargonium can become a real decoration not only for the home, but also for the garden plot.
https://pocvetam.ru/komnatnye-rasteniya/tsvetushchie/semena-gerani.html
Proper care of seedlings
A well-executed planting procedure is part of successful care of pelargonium seedlings. It is better to grow seedlings in favorable conditions.
Seedlings need:
- timely watering;
- correct temperature setting;
- good feeding.
Watering the seeds
The amount and frequency of watering seeds depends greatly on the time of year. In hot summers, it is better to water every 3 days, and in winter they moisten once a week. Before watering, it is necessary to place a thick layer of drainage under the bottom of the container, since pelargonium does not tolerate strong excess moisture. The moistening itself is carried out as soon as the top layer of soil dries out.
Geranium grows well only with sufficient light, but direct sunlight should be avoided. For good development of pelargonium, daylight hours should be at least 15-16 hours.
Picking sprouts
As soon as the first sprouts of pelargonium appear, it is necessary to transplant and pick the seedlings into individual containers. The sprouts are buried at a distance of 2-3 centimeters. Transplanted into containers that are shallow in depth.
Pinching pelargonium
The sprouts should be pinched at about 6-8 leaves. But pinching should not be carried out during flowering and the formation of buds. Mature species of pelargonium are pruned in spring and autumn. Timely pruning of weak and damaged shoots allows you to obtain pelargonium of extraordinary beauty that can bloom longer.
Pinching pelargonium seedlings promotes better formation of lateral shoots and significantly more luxuriant flowering
External factors
Before growing pelargonium, it is necessary to create the right conditions. This culture grows well only in bright rooms, but the plant should not be kept in direct sunlight. The daylight hours of pelargonium should be at least 15-16 hours. In summer, it is recommended to take the plant out into the fresh air.
Temperature changes are unacceptable for young shoots, otherwise they will be severely damaged. On average, the required air temperature for pelargonium should be no lower than 7 degrees, but not higher than 22.
Plant nutrition
The mixture for fertilizing pelargonium is selected taking into account its needs. The best options for feeding are those that contain the following substances:
- copper and zinc;
- manganese and phosphorus;
- boron, iron;
- calcium, nitrogen.
They use complexes of mineral substances, but before purchasing you need to read the composition.
At the initial stage of growth of the stem, leaves and roots, it is necessary to add nitrogen to the fertilizer so that pelargonium grows faster and there is no fading in the flowers.
It is recommended to feed in this way at the beginning of spring, but you need to take precautions and dosages recommended by the instructions. As soon as the first buds begin to bloom, it’s potassium’s turn
Since it is the main component for the appearance of flowers in pelargonium, and phosphorus will stimulate the strength of its leaves and stems
As soon as the first buds begin to bloom, it’s potassium’s turn. Since it is the main component for the appearance of flowers in pelargonium, phosphorus will stimulate the strength of its leaves and stems.
Iodine serves as a stimulant for the formation of a large number of buds. Therefore, in addition to peroxide, iodine is added to the soil. Preparing the fertilizer is simple, and after 2-3 procedures the effect will be noticeable.
Step by step action:
- Before planting, the soil must be moistened.
- Prepare a solution consisting of 1 drop of iodine, 1 liter of water and 1 ml of peroxide.
- Pour along the walls of the container, avoiding contact with the trunk and leaves.
For one watering it is necessary to use no more than 50 grams of fertilizer, and repeat the procedure at intervals of 3-4 weeks. The work is carried out long before the abundant flowering of pelargonium. You should not use this fertilizer too often, so as not to burn the flower.
The most popular varieties with photos
The most popular types of pelargonium are zonal, ivy-leaved and fragrant. The plants are not particularly demanding on the composition of the soil, grow quickly, are unpretentious in fertilizing and are characterized by a long flowering period. Each species has the most popular varieties, which are presented in the photo below.
The Early Universal variety is the most common among amateur flower growers. The period from planting seeds to flowering is more than 2 months
Zonal species of pelargonium propagate well both by seeds and cuttings. They can be grown in containers, flower pots, and flowerpots. They are recommended for open and closed ground. The colors of the buds are rich and varied.
Colorama belongs to the zonal species of pelargonium. The bushes are low, with large flowers. The leaves have a characteristic dark horseshoe-shaped pattern.
It is preferable to grow colorama in pots, since with a compact root system, the green ground part is very fluffy and voluminous. In summer, it can be planted in open ground.
The variety Summer Rain belongs to the group of ivy-leaved or ampelous
Thin but strong shoots of pelargonium Summer Rain fall up to 100 cm. The leaves are smooth, dark green, and flowering is abundant. There are different shades. Indispensable for decorating balconies, gazebos, terraces.
The leaves of the Black Velvet variety differ from other varieties in their chocolate, almost black color. The inflorescences are bright, velvety
Young shoots and leaves are always light green, but after a few weeks they begin to darken. Most of the flowers on sale are red in color.
The Cabaret variety can be identified by its lush green leaves with wavy, ribbed edges. It does not exceed 30 cm in height. The yellow core is clearly visible at the base of each flower.
Pelargonium Cabaret has spherical flowers 10–12 cm in size. It is susceptible to direct sunlight and does not tolerate dry soil. It comes in colors from dark burgundy to snow-white.
The Orange Ice variety is characterized by a juicy red-orange color of the inflorescences and a pale yellow-green tint of foliage
During the flowering period, the Orange Ice bush reaches up to 35 cm in diameter. Suitable for both indoor and outdoor decor. It is unpretentious, grows quickly, and differs from other types in its early flowering.
The Violet Chandelier is a unique look with rich purple or blue buds
The Chandelier Violet variety is distinguished not only by its abundant, but also long flowering - from May to October. The leaves are small, with pointed edges, almost invisible under the buds.
Victoria is a tulip-shaped pelargonium variety from the latest series of selection. Popular due to the unusual structure of the buds
All tulip-shaped types of pelargonium are characterized by small but numerous inflorescences (up to 50 pieces), located on tall, strong stems. They grow up to 70 cm in height. They are easy to propagate, have a pronounced aroma, and bloom for 3–4 months in a row.
Is it worth planting pelargonium seeds by ordering them from Aliexpress?
Most customer reviews about purchasing pelargonium seeds from Aliexpress are negative. Only a few confirm that the seeds really germinate well and the flower grows as stated in the description on the pack.
More than 80% of sellers send seeds of the wrong variety or of poor quality with almost zero germination. Therefore, to prevent such risks, it is still worth abandoning Chinese seeds and spending a little more money on a quality product from a domestic manufacturer.
Caring for polyanthus rose
After planting, new shoots will appear on the rose bushes in about half a month. At this time, the culture needs especially careful care.
Trimming
This procedure is carried out for the first time before and after planting polyanthus roses. First, all damaged shoots on the roots are removed from the seedling, and the shoots are cut to a length equal to the root.
Important! After planting, all shoots of the rose bush are shortened by a third. In autumn, the shoots are shortened again, leaving no more than 8 buds on each
During the flowering period, it is important to cut off dry buds, this will stimulate the appearance of new ones. Broken, dried shoots are also regularly removed.
In autumn, the shoots are shortened again, leaving no more than 8 buds on each
During the flowering period, it is important to cut off dry buds, this will stimulate the appearance of new ones. Broken, dried shoots are also regularly removed.
The next year in the spring, after removing the protective insulation, sanitary pruning of polyanthus roses is carried out: dry and old stems are removed, and young ones are shortened by a third.
When to pluck geraniums after germination + video
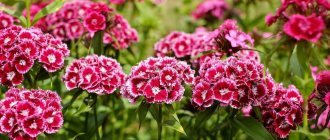
Geranium or pelargonium will delight the eye in the cold season on the windowsill, and in the summer - in the flowerbed. This flower is distinguished by bright flower caps that cover almost the entire bush. Therefore, most housewives love geranium very much and are glad to have it in their home. To do this, you need not only to be able to care for it, but also to know the secrets of geranium propagation, so that if the plant dies, the window sills will not be left empty. You can grow geranium using cuttings and seeds. Recently, more and more flower lovers are choosing the second method, since such a plant takes on the appearance of a neat small bush with a large number of flowers. Therefore, we will discuss how to grow geranium yourself using seeds.
Natural way of reproduction
Propagation by seeds and cuttings are the most common methods. At the same time, the first one is more natural. Flower growers use seeds obtained from a plant that has been growing on the windowsill for a long time, or purchased in a specialized store. In the first case, a hybrid is obtained that does not absorb the properties of the parent plant. To preserve the desired characteristics, they practice the vegetative method of propagation. The second method is cuttings. You can find out more about how to properly propagate geraniums by cuttings at home.
Before growing geraniums, prepare the seeds for planting. The first step is scarification due to their dense and hard shell. Having abandoned this procedure, they are not upset when they see the first shoots after 2-3 months. A plant that is ground with fine-grained sandpaper between two sheets will sprout faster. After scarification, pelargonium is planted in the ground, and after 2-3 weeks they enjoy the long-awaited shoots. Purchased seeds are not subjected to it, since they are already prepared for planting.
Other articles about geranium propagation will be useful to florists:
- How to root geranium easily and without problems?
- Peculiarities of propagation of geranium leaves.
How to care for geranium seedlings
Correctly carried out planting procedure is part of a good result. Seedlings need to be grown in favorable conditions. Geraniums require timely watering, correct temperature conditions and good feeding.
First shoots
Watering
The amount and frequency of watering directly depend on the time of year. In hot summers, moisturizing is carried out every 3 days. In winter - once a week. The bottom of the container is laid with a thick layer of drainage. The plant categorically does not tolerate excess moisture. Watering is carried out only when the top layer of soil dries.
Feeding
The first feeding is carried out only 14 days after picking. At this stage, the plant requires potassium and phosphorus. Agricola and Effecton are well suited for these purposes. Fertilizers are applied to the soil from March to October. Frequency – once every 20 days.
On a note! In winter, any feeding is suspended.
External factors
Before growing geranium from seeds, it is important to create the right climatic conditions for it. The flower grows only in well-lit places
But, as with other indoor species, direct sunlight should be avoided. Daylight hours for pelargonium should be at least 15-16 hours. In summer, the plant is taken out into the fresh air.
Due to the fact that geranium leaves are covered with a special protective layer, it is strictly not recommended to spray the species. Any moisture on the stem and leaves can lead to rot on the flower.
The flower painfully tolerates temperature changes. For young shoots this is unacceptable. The optimal air temperature is 20-22 degrees above zero, the minimum is +7 ℃.
Picking
After the first sprouts appear, the seedlings are picked and transplanted into individual containers. The depth should be 2-3 cm. Young flowers are transplanted into small and shallow containers.
Picking a view
Pinching
It is recommended to pinch geraniums at the level of 6-8 leaves. Adult species must be pruned in spring and autumn. Timely pruning of weak and damaged shoots will allow you to get an unusually beautiful plant that will delight you with lush flowering for a long time.
On a note! Pinching should not be carried out during the formation of buds and during the flowering period.
Scheme for growing at home
In order to successfully germinate orchid seeds at home, you must follow all the rules for planting and caring for seedlings.
Sowing seeds
The procedure must be carried out very quickly, over boiling water, since there is a high risk of infection. A grate or tripod is installed above the steaming container, where the vessels with seeds are placed.
Pre-planting material is sterilized again. It is placed in a clean test tube, a few drops of hydrogen peroxide (2%) are added and kept under a closed stopper for 5-10 minutes. Then, using a pipette, the seeds are transferred to the prepared substrate. In this case, the flask can be slightly tilted in different directions for better distribution over the surface.
The containers with the nutrient medium are observed for 1 week. If pathogenic microorganisms do not appear on the surface, the seeds have taken root successfully.
Approximate time frame for orchid seeds to be ready for sowing
Seedling care
It is better to grow seedlings in small greenhouses or florariums. The first shoots appear 6–9 months after planting. All this time, the flasks with seeds should be kept under certain conditions:
- diffused light for 12–14 hours a day (additional lighting should not be closer than 30 cm);
- stable temperature 25–28 °C above zero;
- air humidity 70%.
Phalaenopsis seedlings look like small green peas. Over time, hair-like threads (rhizoids) sprout from them, with the help of which the young plant feeds. After 2–3 leaves appear, the orchid’s root system begins to form.
It is better to grow seedlings in small greenhouses or florariums
Planting sprouts in a pot
Young seedlings can be planted in the ground no earlier than a year after sowing the seeds. It is better to use a soil mixture consisting of pine bark, fern roots and sphagnum moss in equal proportions. Before planting the seedlings, all components are filled with water for half an hour to get rid of parasites. Then the liquid is filtered, and a homogeneous substrate is prepared from the crushed components.
The bottom of the pot is laid with a drainage layer of fine crushed stone, broken brick, or river sand. The soil mixture is poured on top and a small hole is made. The young plant is carefully placed in the recess, straightening the roots.
Transplantation and fertilization
Do the seedlings have 3 leaves? - it's time to transplant them into pots. Do not take a large pot - there is a high probability of flooding: it should be no more than 10 cm in diameter.
It is better to replant by transshipment - this is a less traumatic method in which the root system is not damaged. The plant is simply removed from the small pot and placed in a larger pot, sprinkled with soil.
IMPORTANT: You can fertilize the plant after transplantation no earlier than 2 weeks.
Any complex fertilizer with a high potassium content is suitable for feeding pelargonium - it helps maintain the bright color of flowers and long flowering.
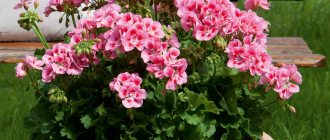
In summer, pelargonium can be planted in the garden or in a flower bed - this has a beneficial effect on the general condition of the flower: the plant receives more sun and watering with soft rainwater. The temperature during the day and night is optimal - pelargonium blooms more luxuriantly, and the color of the leaves becomes more saturated.
There is nothing complicated in planting pelargonium with seeds, and besides, it is very interesting: you can find out how your plant will bloom only 3 months after planting. The key to success is the correct selection and preparation of seed material, as well as compliance with all care recommendations.
2 of the best online seed stores in Russia, verified by summer residents!
- sad-i-ogorod.ru- “Garden and Vegetable Garden” - Gardens of Russia is an online store of seeds and seedlings.
- abekker.ru - “Becker” is a popular store of seedlings, seeds, bulbs, delivery throughout Russia!
Zonal pelargonium (Pelargonium) is a familiar grandmother’s flower, which many are accustomed to calling geranium, in fact, according to the botanical classification, it is from the “Geraniaceae” family. She is originally from South America. It loves warmth, unlike its cold-resistant relative - true geranium, which is found in central Russia in meadows and fields.
Zonal pelargonium received its name for its characteristic border - a dark-colored ring zone - on round, notched leaf blades. The leaves and stems of the plant contain essential oils, so when touched it emits a specific smell.
Pelargonium zonalis is a perennial herbaceous shrub up to 90 cm high. The growth rate of shoots is high - 20-30 cm per year. Needs renewal every 2-3 years.
Blooms all summer. The inflorescences are simple or double, collected in multi-flowered umbrella-caps. The palette ranges from white to fiery red.
| Growing quickly. In one season, the plant gains 25-30 cm in height. |
| It blooms from late spring to early autumn with large, bright flowers. |
| The plant is easy to grow. |
| Perennial. |
How to sow pelargonium (geranium) for fast maximum germination.
January is the best time to sow pelargonium or geranium.
, as this flower is called in the old fashioned way. Sowing is carried out so early in order to obtain flowering plants by summer for planting in open ground.
You can sow geraniums all year round, but if sown in summer, the plants will bloom only next year, and if sown in February or March, the beginning of flowering will be delayed by a month, respectively, it will begin in June and July.
Growing pelargonium from seeds is one of the ways to propagate this flower.
. Many people prefer to propagate geraniums by rooting cuttings, but by buying seeds you can get new varieties of flowers. Also, pelargonium is grown from seeds as an annual garden flower by those who do not have the opportunity to preserve flowers in winter until spring, so they are grown from seeds when sowing seedlings every year.
New plants obtained from seeds or through rooting cuttings always bloom more abundantly and longer than biennial plants
, so it is recommended to renew geraniums every year. From new varieties of geranium grown from seeds, you can collect seeds for sowing next year.
Despite the fact that pelargonium is an unpretentious plant and requires simple care, difficulties often arise when sowing seeds - seedlings appear for a long time, there are few or no seedlings
. The fact is that pelargonium seeds are enclosed in a dense hard shell; it must collapse in the soil so that the embryo begins to receive moisture to start the germination process.
Even if you buy high-quality seeds treated with special compounds, this is indicated by the color of the seeds, there is no guarantee that you will get quick and friendly shoots. Since there are very few seeds in a pack of rare varieties (3 to 5), we want to get maximum germination in a short time. Typically, manufacturers indicate on geranium seeds that the emergence of seedlings should be expected in 2-3 weeks.
How to sow pelargonium?
Pelargonium seeds are not too small, approximately 2-3 mm long with a dense brown shell.
In order for geranium seeds to germinate quickly, you need to scarify or carefully damage the outer shell of the seeds so that moisture and a solution can get inside, which will stimulate their germination
To carry out scarification you will need fine sandpaper. Place the seeds on the sandpaper, pressing lightly with your finger, drag each seed along the relief surface for 2-3 cm. After scarification, you can see lightened areas on the seeds; there is no need to do more damage or damage, so as not to damage the insides of the seeds.
After scarification of the seeds, we stimulate their germination by soaking
. To do this, simply immerse the seeds in warm water for 5-6 hours. You can use the stimulating drug “Zircon” to soak the seeds, 1 drop per half glass of water is enough and keep the seeds in this solution for 1-2 hours before sowing.
After two stages of preparing seeds for sowing - scarification and soaking, sow
. You can sow geranium seeds in a bowl or individually in small cups filled with loose, damp soil for seedlings. Pelargonium seeds should be buried no more than 5 mm into the soil when sowing. Crops need to be covered with film to retain moisture and placed in a warm place.
After complete preparation of the seeds, the first shoots of pelargonium began to appear within 2 days, 2 weeks earlier than stated.
Geranium seedlings need to be protected from “black leg”,
Sprinkling the surface of the earth with a thin layer of wood ash or crushed tablets of activated carbon.
Caring for geranium seedlings is as usual as for any flower seedlings.
The seedlings need maximum sunny lighting, moderate watering, and the soil in the pots should not be allowed to dry out or become waterlogged. Fertilize the seedlings after 2 weeks, using complex mineral fertilizer dissolved in water for irrigation according to the instructions. Replant growing bushes as they grow; a month to a month and a half after germination, the size of the cups should be doubled. The formation of pelargonium is done by pinching the tips of the shoots above the fourth or sixth leaf.
The article was useful - like it and subscribe to the channel!
Source
Optimal timing is better than planting
Pelargonium begins to bloom 3–4 months after planting the seeds. Experts recommend taking these terms into account to obtain flowering in a given period.
For those who want to please themselves with hanging varieties for the design of a summer terrace, it is better to have the seedlings ready in April. This means that pelargonium seeds should be planted in February - March.
The Early Generalist variety, sown in early March, will delight you with bright and abundant flowering in early May. Pelargonium Black Velvet should be planted 2-3 weeks earlier for these purposes.
When growing indoors, you can plant seeds all year round.
In different regions
- In the conditions of the northern region, where there is little sun and light, it is better to sow seeds at the end of April - May.
- In mid-latitudes, the optimal time for obtaining mature seedlings for planting in open ground is February - March.
- In the south, plants are brought to the terraces at the end of March, so the seeds need to be sown in December. By the beginning of spring, they will already be actively blooming and delighting with their beauty.
Best sowing dates according to the lunar calendar 2022
Pelargonium cannot be planted on the full and waning moon. The seedlings will be uneven, and the plants themselves will be weak, with a poorly developing root system. When picking seedlings or transplanting them into the ground, low survival rate is noted.
The most favorable dates in March are: 10, 11, 12, 15, 16, 23, 24, 28, 29. And it is better to dive seedlings on the 1st, 2nd, 15th, 16th, 19th, 20th, 22nd, 28th, 29th.
In April, it is recommended to sow pelargonium seeds: 7, 8, 11, 12, 18, 20, 21, 29, 30. You need to seat: 2, 3, 7, 8, 11, 12, 16,17.
Seed requirements
In order for pelargonium seedlings to sprout and develop successfully, it is necessary to select high-quality planting material. The seeds should be brown, oblong in shape and always hard. Other options for seeding material can either produce low-quality seedlings, or even leave the grower without a “harvest.” To avoid such troubles, you should not buy seeds at the market or in supermarkets. For this purpose, it is better to visit a specialized store, the quality of the goods in which will be guaranteed to be high. Good seeds are sold ready for sowing, so you don’t have to do any complicated manipulations to get them to germinate.
What geranium seeds look like - photo
Large size garden geranium seeds. They are hard, oblong in shape and brown in color. Next you can see in the photo what geranium seeds look like:
The seeds of indoor pelargonium are small, slightly elongated, shiny.
How to collect geranium seeds
If the plant is indoors, it is possible to obtain seeds only by pollinating the pelargonium yourself. To do this, pollen from the stamen of one flower is very carefully and carefully transferred to the pistil of another using tweezers, a toothpick or a cotton swab.
Soon a box will appear in the middle of the flower, which will gradually ripen, dry out and fall off. Next, how to collect pelargonium seeds is very simple and clear, but you should be warned that from such seed material plants will grow that will be inferior in color saturation to the mother’s.
Selection of pelargonium seeds
To avoid possible mistakes, you need to carefully select and prepare planting material
When choosing seeds, you should pay special attention to the following points:
- Color. High-quality pelargonium seeds have a rich brown color. Slight dullness and light tint are allowed.
- Form. The developed seeds are oblong, with slight depressions visible on their sides.
- Size. The planting material is quite large.
- Shell. Pelargonium seeds are characterized by a dense, leathery shell.
Also, when choosing planting material, pay attention not only to the beauty, shape and richness of the shade of the buds, but also to the maintenance conditions that the flower will need to provide for healthy growth and full flowering. If creating the appropriate conditions necessary for growing the selected type of geranium from seeds at home seems too difficult to you, it is better to opt for another variety of pelargonium
Processing of seed material
As already mentioned, geranium seeds have a dense shell, which makes their germination difficult. Sometimes you have to wait quite a long time for germination, but the seeds still do not germinate. The reason for failure is improper seed treatment before planting or lack thereof.
Before planting, geranium seeds must undergo scarification - a procedure to remove the dense film. It is not difficult to carry out this procedure yourself. To do this you will need fine sandpaper. With its help, only the top dense layer is removed from the seeds, and no deep tears remain.
After this, they are treated with phytohormones (“Epin”, “Zircon”) and soaked in warm water for several hours.
If you purchased high-quality seeds from a well-known company, or, for example, bought seeds from China, then you will not need to carry out complex preparatory procedures. All you need in this case is to store the planting material in a dry, dark place, protected from insects and sunlight.
If the packaging with seeds indicates that the material is not prepared for planting, or you have some doubts about the quality of preparation, additional processing will be required. To do this, use phytohormones (“Epinom”, “Zirconom”), after which the seedlings are soaked in warm water for several hours. Carrying out such procedures helps accelerate seed germination and improves the quality of seedlings.
Reproduction of zonal pelargonium
Pelargonium is propagated by cuttings and seeds.
Propagation of pelargonium by cuttings
Cuttings are the fastest and easiest way to propagate many plants. This method is valuable because it transfers characteristic varietal characteristics from the mother plant to the daughter plant.
Cuttings 7-15 cm long are cut in early spring or late summer - early autumn. The stem is cut half a centimeter below the leaf node. The bottom sheet is torn off. Large leaves are cut in half to reduce evaporation.
If there is a peduncle on the prepared section, it is better to remove it so that it does not take away the plant’s strength to form roots. If the cutting is taken from a weak plant, then the lower end can be treated with a root-forming stimulant.
The percentage of rooting of cuttings in pelargonium is very high. At a temperature of 20-25°C, roots appear within 2 weeks. Pelargonium zonalis easily takes root in plain water. It is important that the window sill is not cold, otherwise the cutting runs the risk of rotting due to the “black leg” disease.
Growing pelargonium from seeds
Pelargonium zonalis is easily propagated by seeds. The seed shell is quite hard. To improve germination, it is advisable to scarify them - rub them on fine-grained sandpaper.
The seeds are then soaked for several hours between layers of cloth. Then they are sown in a container with a moistened substrate consisting of peat and perlite in a ratio of 1:10. Sprinkle with soil and cover with glass. Containers with seeded material are kept at a temperature of 20-23°C. Make sure to maintain the moisture content of the top layer. Seeds hatch within 2 weeks. The glass is removed and the container with the seedlings is placed in diffused light. After 2-3 true leaves appear, the seedlings are picked.