The topic of aerial roots is one of the most important and relevant for gardeners. Since most orchids are epiphytes, they have an aerial root system that must be properly cared for.
Otherwise, this may lead to the death of the flower. The appearance of aerial roots in epiphytic plants is a completely natural process , since exotic plants absorb sunlight through them, and also, in the absence of watering for a long time, are saturated with moisture accumulated in the roots.
New roots may appear as a result of a dry climate.
Thus, the orchid shows that it has become hot. In this case, it is urgent to change the plant’s habitat.
Another option is to create comfortable conditions for phalaenopsis without changing its “place of residence.” For example, increase the air humidity around the plant. In this way, the aerial roots will be saturated and the flower will continue to delight the gardener.
Features of the root system
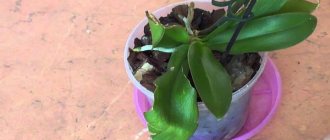
Orchid aerial roots are roots that grow outside of the potting medium. They can grow from stem nodes at the top of the stem or emerge from potting soil. Some orchids produce many aerial roots, while others have few or no roots.
Orchids are natural epiphytic plants. This means they grow on other plants rather than in soil. Roots are responsible for anchoring the plant in place of growth, as well as for absorbing necessary water and nutrients.
Aerial roots are not that rare. But if you are new to growing phalaenopsis orchids, this term may not be familiar to you. The appearance of roots above the surface of the pot does not mean that the orchid has become cramped in the pot and needs to be replanted - just air outlets have begun to grow in the plant.
Also find out what to do if the peduncle of an orchid has dried up.
Structure
The structure of phalaenopsis aerial roots is very different from the structure of ordinary roots of land plants. The spongy tissue velamen covers the inner filamentous part of the root with a thick layer of epidermal cells. Velamen helps orchids cling to tree branches, absorb water and nitrogen from the air , protects them from damage and retains moisture, thereby providing water to the entire plant and protecting it from drying out.
Aerial roots are natural to epiphytic species that grow on other plants in tropical forests. Unlike terrestrial orchids, which root in the ground, epiphytic species naturally grow above ground, using their roots to attach themselves to tree branches and reach brighter areas among the foliage.
Unlike other plants that attach themselves to trees, phalaenopsis orchids are not parasitic or invasive. Epiphytes, with a unique root system, use their roots to absorb nutrients, moisture and carbon dioxide to grow and survive directly from the air, without feeding on tree sap .
We recommend reading how to propagate an orchid from cuttings at home.
Appearance
Although aerial roots do not improve the aesthetic appearance of the flower, nothing needs to be done with them - this is the natural development of the plant. They are cylindrical or flat in shape and should be firm to the touch.
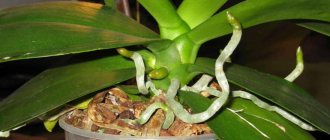
The aerial roots become bright green immediately after watering, which is a sign of healthy roots. As they dry, they first turn silver and then gray or whitish, which means that the orchid may need watering . Just soak the roots for 2 minutes or spray them with water and they will turn green again.
What is used instead of soil?
The orchid feels great even not in soil saturated with humus, but on the trunks, branches, and roots of some tree. The components necessary for the development of a flower are not obtained from the soil at all . The atmosphere remains the source of nutrition.
An orchid needs soil only so that it can somehow gain a foothold and stay in a certain area. So when choosing components to be used instead of soil, you need to take into account their permeability to moisture and air.
In most cases, the main component for a homemade soil mixture is tree bark. You can pick it with your own hands or purchase it at a specialized store. Most often, gardeners choose pine bark, although the bark of oak and conifers is excellent. To assemble it, you will have to use sawn logs or dead wood.
To ensure the safety of the plant and protect it from pests and bacteria, pieces of bark must be cleaned of softened areas and dried thoroughly .
In addition to bark, flower growers actively use sphagnum moss as soil. Its main purpose is to make the soil loose, retain moisture without compacting the soil, absorb harmful salts and have a bactericidal effect.
In addition to tree bark and moss, expanded clay and activated carbon, which also has disinfectant properties, are suitable for orchids.
We invite you to watch a video about the types of soil for growing orchids:
The reason for the appearance of aerial roots
The growth of a plant and its root system is a natural cycle of development and renewal, so the appearance of new roots more often indicates the healthy and proper development of the orchid . The appearance of 2-3 aerial roots is normal and should not cause concern.
But sometimes the reason for the intensive growth of aerial roots above the potting substrate can be excessive moisture or increased dryness and too warm air (for example, when located next to a heating radiator) - growing out of the pot, the flower tries to find a more comfortable place.
Read more about how to care for orchid roots.
Advantages and disadvantages
| pros | Minuses |
|
|
How are they different from regular ones?
Aerial roots are similar in many ways to normal roots growing in a substrate—it's just a different root arrangement. They are slightly thicker and are the healthiest on the plant, as they grow in conditions close to the flower's natural habitat.
Household orchids are usually grown in a soilless mixture based on pine bark or sphagnum moss to mimic natural growing conditions in trees . Over time, this potting mix breaks down and requires replacement, and the internal roots are at high risk of developing root rot and fungal infections.
The orchid seeks new sources of nutrients, light and moisture, so its roots twist and turn in all directions, but most of them remain in the drainage pot. If the orchid does not have above-ground roots, then most likely when they appear, they are rooted in the substrate
What to do with the peduncle, or how to trim an orchid after flowering
When the flowers have already fallen and there are no buds visible, it’s time to start working with the peduncle. At this time, the plant enters the sleep stage. You need to calculate the time - for the varieties presented in our country, the optimal period for pruning will be in October - November.
For beginners, this procedure can be somewhat intimidating. We hasten to reassure you that this manipulation, when performed correctly, is safe for orchids. This is very important for young plants (as we already mentioned, frequent flowering can “exhaust” the flowers).
Different species have their own signs that indicate readiness for pruning. For some, the signal is browned stems, but in the case of phalaenopsis it is better not to delay - the flowers have faded, you can act. It is better to check with sellers for information on rare hybrids.
Trimming an orchid after flowering at home requires a minimum of tools. A regular knife or scissors will work fine, although it will require some dexterity. If you have pruning shears at hand, then this is only a plus - when using it, you will not injure the stem itself, and the leaves will probably remain intact.
This simple remanent should be disinfected (with chlorine solution). At the same time, be careful not to feel an unpleasant burning sensation in your fingers.
An important nuance is that the peduncle is removed only after it has completely withered. This is indicated by a yellow, less often, purple or brown color.
- The stem is not completely cut off, leaving a small (about 1 cm) shoot.
- The core at the cut site may be hollow. Remember that with further watering, water should not get there (then there is a risk of rotting of the stems themselves and death of the flower).
- Beeswax is used to treat and seal the wound.
- If there are dormant buds, the cut is made one and a half centimeters above the bud itself. True, new buds and flowers may never appear in this place. This is due to the distribution of nutrients (for dendrobium, for example, it is easier to support old stems than to “transfer” forces to new ones).
Sometimes gardeners carelessly cut off green stems. It's unpleasant, but there is still a way out. By placing it in a jar of water, you can wait for the “baby” to appear.
We have already figured out how to prune an orchid after flowering, but after flowering the focus is not only on the peduncle, but also on the roots. Brittle and withered roots definitely fall under cutbacks. A healthy rhizome is elastic and gray or green in color.
Why does an orchid need aerial roots?
The health of an orchid depends on the condition of its root system. Aerial roots actively participate in photosynthesis and serve to replenish moisture reserves and further use it.
Functions of air roots:
- fastening and support - epiphytes have completely abandoned underground roots and use aerial roots to anchor themselves on tree branches;
- absorbing water from the environment and storing it for use in drier conditions;
- obtaining nutrients from water, air and symbiosis with fungi (mycorrhiza);
- photosynthesis - similar to leaves, they convert light energy into carbohydrates necessary for plant growth.
Did you know? Orchids, known as lithophytes, use a similar anchoring strategy to epiphytic species, but are anchored on rocks rather than trees.
Choosing the right filler for planting
Another common reason for the appearance of aerial roots is the wrong mixture for planting orchids. Phalaenopsis should be planted in specially prepared bark and moss; under no circumstances should an earthen substrate be used. Soil is a very dense substance for phalaenopsis roots, so they do not grow into the ground, but shoot up. Those who had experience of planting orchids in an earthen substrate could see from their own experience that the roots of the orchid rot in the ground.
This is the real cause for concern. You need to act immediately before the plant is completely destroyed. To do this, the rosette of the plant along with the roots must be removed from the pot, the roots must be thoroughly washed, disinfected, blotted from excess moisture and carefully removed the rotten shoots of the roots. After all the procedures performed, the plant must be planted in a new transparent flower pot filled with fresh bark prepared for planting orchids.
Immediately after transplantation, phalaenopsis can be watered for some time only with purified water without adding fertilizers, so as not to burn the weakened roots with the mineral solution.
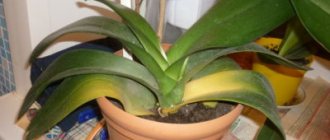
The orchid has many above-ground roots
Sometimes a large number of above-ground roots indicates the need to transplant the flower into a larger pot.
Orchids generally like to be root-bound to the substrate, just like a tree in its natural environment, so most of the root system remains in the pot. However, as the plant grows, the potting medium becomes so clogged with roots that they become crowded and grow outward. In such cases, you should consider replanting the plant.
Signs of root disease
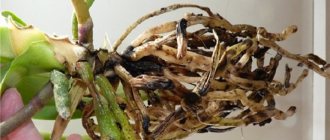
Damage or disease of the root system of a tropical guest can be judged by a change in its color, as well as by visual and palpable disturbances in appearance.
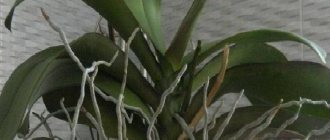
Healthy roots look elastic, smooth and dry , and when touched they leave a feeling of dense filling. The color scheme varies somewhat depending on the type of orchid, but mainly has a green and light gray (for cymbidiums - white or beige) tint in young ones and brownish in older specimens. The color is shaded by a silvery coating due to the velamen contained in the roots and becomes richer when moistened.
Healthy roots.
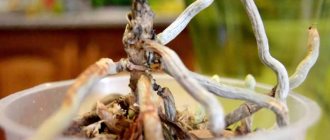
A change in color indicates the need to examine the root system for damage. Diseased roots are distinguished by a brown, white or yellowish color with a white coating.
Root disease can also be characterized by isolated dark spots, the presence of mucus, softening, leakage of fluid upon palpation, or drying out . Often, when pressed, a healthy-looking root turns out to be soft and empty - this is a sign of a dead root.
Is it possible to trim and when to do it?
A flower's aerial roots should not be pruned because they are a living part of the system the plant uses to absorb nutrients and water. Trimming aerial roots can cause the plant to become sick or even die due to disease or inability to absorb enough elements to grow.
Important! Any unhealthy roots should be removed to healthy tissue using sterile instruments (wipe with alcohol or heated over fire), and the cut areas should be dried and treated with activated carbon or cinnamon powder.
There are several ways to control aerial roots:
- double pot - the main container with the substrate is placed in a decorative pot, which hides part of the air outlets;
- replanting the orchid into a large container with deepening the roots that have crawled out of the potting mixture beyond its boundaries. At the same time, you should not bury the aerial roots growing on the stem.
Only diseased, dry, dead and damaged parts of the roots should be removed. Trimming is carried out until healthy and clean tissue
Difference in cultivation
Using this method of growing orchids, you need to take a more careful and responsible approach to the care process.
Unlike the traditional method, in this case there is no need to select soil or prepare it yourself, which reduces time and money. But there are more stringent requirements for growing conditions: suitable humidity, timely watering.
And the most important difference is that an orchid grown in soil gets sick much less often than one for which the soil mixture is not used.
We invite you to watch a video about the difference between growing orchids in closed and open systems:
Problems and their possible solutions
The aerial roots of epiphytes do not require special care - they will also be healthy if you take good care of the flower itself. However, they may experience the same problems as the stems and roots inside the pot.
Why do orchid roots dry out?
If the roots are gray, dry and wrinkled, or there are no growing tips on them, then the orchid is not receiving enough moisture. This may occur due to the coarse fraction of the potting mixture, which does not allow the roots to better contact the substrate when watering.
We recommend reading how to revive an orchid if its roots dry out.
Low air humidity in the room, which often occurs during the heating season, is also the cause of dry roots - you can place a container of water near the plant and spray it regularly. Try to keep the humidity above 40% to prevent the aerial roots from drying out too quickly.
The roots can also dry out when exposed to direct sunlight, especially at midday - try shading the orchid with a transparent curtain or moving it away from the window
Why does the root system rot?
When roots begin to rot, they become brown and soft and cannot properly absorb water and nutrients. The only thing you need to do to help the plant is to trim the rotten roots back to healthy tissue.
Important! Sometimes the roots turn brown due to hard water and salt deposits on their surface. But unlike rot, salt stains are hard and similar to rust.
The causes of rot can be excessive watering and stagnation of water in the substrate, as well as high concentrations of fertilizers and incorrect temperature conditions.
Only aerial roots remain
If for some reason the flower has only aerial roots left, then the following planting option will help the plant recover:
- cut off all problem roots at the base and sprinkle the sections with cinnamon or activated carbon. Dry the orchid in the air for 3–5 hours so that the wounds from the cuts heal and dry;
- prepare a pot according to the volume of the root system with holes for draining water and ventilation;
- use a fine fraction of bark as a substrate, and lay a layer of sphagnum (1 cm) on top, after dousing it with boiling water;
- give the flower a reliable support so that it does not wobble or tip over in the pot, injuring the roots. Place the root collar at the very surface of the substrate - all parts of the orchid should be in the air and not touch the water;
- leave aerial roots on the surface;
- water not by submersion, but by generously spraying sphagnum moss to stimulate root growth down to the moist surface.
Important! The orchid is very tenacious and can survive by using aerial roots.
Moldiness
Mold on a plant can appear due to decomposition of the potting mixture, excessive humidity and high temperature, which leads to the pot fogging and condensation. In such cases, it is necessary to change the conditions of keeping the orchid and dry the substrate.
Mold is sometimes caused by fungal microorganisms, and here you will need to replant the flower with replacement of the mixture and treatment with fungicides
Aerial roots turn black
Blackening of the roots can occur for the following reasons:
- the plant was exposed to direct sunlight for a long time and received burns. Such blackening is also possible on the leaves;
- long-term decrease in temperature (+4...+6°C) with high air humidity;
- watering or spraying with cold water;
- increased concentrations of fertilizers (only a quarter of the specified norm of flower fertilizers is required);
- deposition of salts in the substrate when watering with hard water;
- pathogenic diseases.
Find out what to do - the orchid's leaves are falling.
In what container should the plant be kept?
When growing an orchid without soil, the hardest part is choosing the right pot. For this plant, it is worth choosing a container of this type and structure so that the flower has a place to develop, does not dry out and is not subject to the harmful effects of dry air in the room where the plant is kept. When choosing a pot for growing without soil, you should give preference to glass vases or plastic and ceramic containers. In addition, they must meet the following criteria:
- Containers must have water drainage.
- The size of the pot and the size of the plant should match each other.
- The volume of the container should be such that the root system of the plant can be located there freely and does not touch the walls.
We invite you to watch a video about choosing a container when growing an orchid in an open system:
Plant care
Caring for orchids is simple and does not require much effort - just learn the basics:
- Most epiphytes require moist and well-drained mixtures . There are several types of nutrient media that can be used for plants - fir or pine bark, sphagnum peat, stones, cork, charcoal, sand. The fraction of the bark depends on the type of orchid being grown - the coarse fraction is suitable for phalaenopsis, but the plant should not be buried.
- The best location would be windows facing east or south - the plants in question prefer diffused, indirect bright light . Lack of lighting leads to poor flowering, and direct rays at midday can cause leaf burn.
- Temperature and humidity are also important for indoor orchids. A temperature of +18°...+25°C and a humidity of 60% throughout the growing season are considered comfortable, but for the plant to bloom, the night temperature must be 8–15°C lower than the daytime temperature.
- The flower is watered by immersion once every 10–14 days. This is the only case when the epiphyte roots remain in water, but for no more than 3–5 hours. It is advisable to use soft or boiled water, with a temperature of about +30...+35°C. The flower should dry well between waterings.
- During the growing season and plant growth, use a weak solution of houseplant fertilizer every time you water it. No fertilizing is carried out during flowering .
- The flower is replanted every 2 years with a complete replacement of the substrate.
- It is necessary to carefully monitor the plants in order to promptly notice signs of disease or pest damage and take action.
- At home, the phalaenopsis orchid reproduces by children , which grow on peduncles or stems. Propagation by seed or tissue culture is best left to commercial growers as it requires special laboratory equipment.
Remove stem
After the orchid blooms, the peduncle can be cut off. This is a prerequisite for some types of orchids, such as Cambria, Cymbidium or Oncidium, since such a peduncle will not produce more buds. In the Lady's slipper orchid, the stems with a single faded flower are immediately removed, but if this is a variety with “revolving” flowering (that is, the flowers bloom in turn and no more than two on the peduncle at the same time), then such a branch is removed only after its tip begins to dry out . But in Miltonia, it is recommended to remove flower stalks “in advance”, when they are just fading, and not wait until the flowers fall off completely.
Household dendrobium needs pruning only if the pseudobulb is clearly drying out. If there are live buds on it that have not yet bloomed, it is better not to touch it and wait for new flowers to appear. In addition, nutrients accumulate in the pseudobulbs of dendrobiums.
As for phalaenopsis, you can remove the completely green peduncle as soon as it fades, since it is almost impossible to understand in advance whether it will still bloom. To some owners, the appearance of a home orchid with a faded, bare stem seems unsightly, and it drains power from the plant. You can do this a little later, if you understand that the sleeping buds do not intend to awaken this time.
It is not difficult to remove the flower stalk. After the orchid has bloomed, it is cut off with a knife, scissors or pruning shears. Tools must be disinfected before doing this. It is recommended to leave a shoot of about 1 cm. The cut is treated with crushed charcoal or other antiseptic. Some experts advise “sealing” the cut with natural beeswax.
It should be taken into account: many of the orchids have hollow stems, and after you have removed the peduncle, you should be especially careful when watering - if water flows inside the “stump”, this can lead to rotting of the faded orchid and its death.
By the way, if the cut arrows have buds, they can be used as planting material for propagation by cuttings. This method is suitable for Vanda and Epidendrum species.
Orchid transplant
Repotting is necessary to ensure good health and optimal growth of the plant. If an orchid remains in the same pot for a long time, the flower will begin to weaken and fade. Over time, the substrate decomposes and becomes compacted, its air permeability is impaired, and the plant lacks air, which will increase the risk of disease and lead to stress.
The frequency of repotting depends on the type of orchid and the type of potting mix. An orchid must be replanted regularly, and phalaenopsis only benefit from frequent replanting. Be sure to use new potting mix when doing this. A composition made from crushed coconut shells will last longer than a mixture of fir or pine bark.
Did you know? Vanilla is the most famous and widely used spice and is obtained from the only commercially grown orchid.
Some experienced gardeners believe that using a mixture of perlite and peat in the potting mix produces fewer aerial roots than pine bark. In any case, when replanting, do not deepen the aerial roots, because they may rot. The new pot for the plant should be transparent and have drainage holes to drain water so that the orchid's roots are not in the water.
An orchid transplant is necessary in the following cases:
- a recently purchased flower is replanted to assess the quality of the roots and general condition, but if it blooms, you should wait until the end of flowering;
- the growth and development of the plant leads to the fact that the pot becomes cramped, and the flower needs a larger container;
- a pot that is too large is also a reason for replanting a flower, since the orchid will grow roots to the detriment of the development of the leaf part and flowering;
- there are signs of disease or pest damage.
Features of orchid propagation taking into account the time of year
As with other plants, the time of year affects the life processes of orchids. This must be taken into account when planning the propagation of your favorite flowers.
Autumn and winter
Autumn and winter are not the best time for orchid propagation, despite the fact that these plants do not have a pronounced dormant period. It’s just that during the cold season, orchids do not have enough lighting, the air in apartments is dried out by heating devices, and there may be drafts and temperature changes.
An attempt to reproduce during this period will most likely end in failure. The exception is emergency cases when it is necessary to save a plant that has lost its roots for one reason or another (due to hypothermia or overwatering). But here we are talking not about reproduction, but about the restoration of the maternal specimen by rooting its top.
Spring
If there is simply a need to rejuvenate the plant in the same way (with the top), it is better to wait until spring. The top of an old orchid is cut off and rooted in the substrate with aerial roots, and the stump is left to grow in the same pot. With a high probability, he will soon give birth to a basal baby.
In spring, sympodial orchids are also propagated by dividing the bush. After winter rest, the plant is full of strength, growth processes in it proceed faster. In spring, there is a greater chance of reproduction by pseudobulbs when dividing the orchid roots into parts. Spring is also suitable for separating and rooting children.
Summer
Orchids also show active growth in the first half of summer, which means this period is also suitable for reproduction. You can root children, divide the bush into parts, or use roots with pseudobulbs for planting.
However, there are some limitations when working with the mother plant. It is better not to disturb an orchid that is growing a flower stalk or has just released a new leaf. In the case of children, they cannot be separated from the mother specimen until 2-3 leaves grow and the roots become 4-5 cm long.
What is hydroponics?
Hydroponics is an alternative way of growing phalaenopsis in water, which we have already briefly discussed below and which includes a small amount of expanded clay. It is popular among orchid lovers, so we decided to look at it in more detail. So, not all water is suitable for hydroponics. The liquid from which the domesticated orchid will receive vitamins must meet two criteria:
- the water should be soft;
- Fertilizers should be present in the water in small quantities.
Planting an orchid in water is a simple matter. There is nothing complicated in this process, but we will still describe it step by step, step by step.
- We remove the phalaenopsis from the soil in which it grew before, and carefully wash the roots under running water to wash off the remaining soil from their surface.
- In a plastic container that will serve as a pot, we make several holes, stepping back from the bottom about 3 cm upward. These holes are necessary to aerate the roots and regulate the water level.
- We pour a small amount of expanded clay onto the bottom of the container, literally 2 cm high, so that the level of expanded clay does not reach the level of the holes we made.
- We install the phalaenopsis on the expanded clay layer.
- Having installed the flower, we pour a little more expanded clay into the pot so that it acts as a substrate.
A domesticated orchid, for which hydroponics was used as a planting method, must be fertilized with useful compounds diluted three times. That is, the dose of water indicated in the instructions must be multiplied by three.
Hydroponics allows you to free yourself for a long time from the need to regularly replant phalaenopsis, and also protects the epiphyte from the negative influence of insect pests.
How to grow an orchid on blocks?
Some gardeners get serious about it and create almost natural living conditions for their collection of phalaenopsis. They grow flowers on hanging blocks, due to which the epiphyte feels virtually the same as in the jungle when it lives on a palm tree or any other large plant. But let’s make a reservation right away: to implement the method of growing using blocks, you need a built-in greenhouse in which a certain level of humidity will be maintained. Otherwise, with the arrival of summer, as well as with the onset of the heating season, when humidity becomes more and more difficult to regulate, the roots risk drying out and the orchid will die. If you have the opportunity to create greenhouse conditions in your apartment, house or balcony, then below you will find recommendations on how to implement the method of growing phalaenopsis on blocks.
- We take a block of bark, which is devoid of resin and does not decompose.
- We fix sphagnum (moss) on this block.
- We carefully wrap the main roots of the phalaenopsis to the block.
- We again form a layer of sphagnum on top of the roots and fix the moss.
When implementing this method, it is extremely important to provide the plant with the necessary level of humidity in summer, winter, and in the off-season. Otherwise, the work done is doomed to failure.
Please note: the best and only possible period for planting a plant on a block is spring. If the phalaenopsis is sick or affected by pests, do not take risks: in this case, transferring to a block will negatively affect the health of the orchid.