Petunia takes pride of place in home gardens, thanks to its attractive appearance, long flowering, and a huge selection of varieties. Some people prefer to buy ready-made seedlings, while others grow them themselves. And even inexperienced gardeners can do this.
In central Russia, sowing petunia seeds can begin in the second half of February, especially if you have the opportunity to add additional light to the seedlings. If you are not going to use lighting and your windows face north, start sowing in late February - early March. During this period, the day is already long enough, and the seedlings will be provided with the necessary amount of light.
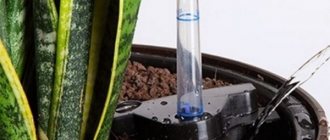
How to water correctly
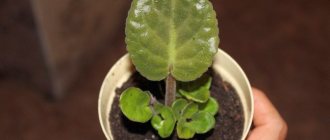
You need to water with settled water at room temperature. After some time, they are picked and transplanted into separate small seedling or peat pots. Picking is carried out after the appearance of three or four true leaves.
To prevent strong stretching of seedlings, the pots are moved to a darker, well-ventilated place.
A month after transplanting, the pots with young seedlings can be taken out onto the balcony or veranda. For hybrid forms, as well as plants that grow quickly, for better formation of bushes and abundant flowering, it is necessary to pinch the shoots at the level of 4-5 pairs of leaves.
The sooner you pinch, the more new shoots will appear on the bushes. The second pinching is carried out when the length is about 20 cm. Further pinching is carried out as it grows. After the seedlings have grown a little, you can fertilize them with complex nutrient mixtures.
Disease and pest control
Common pests of petunias include aphids, whiteflies, thrips and spider mites. Outdoors it is difficult for them to defeat a healthy plant. Rain, wind, night coolness, ladybugs and birds inhibit their spread.
At home, petunia can die from these pests. To combat them, insecticides are used: Intavir, Konfidor, Aktaru. You can treat with garlic or dandelion infusion. As a preventative measure, maintain air humidity, spray, periodically treat with soap suds (then be sure to rinse off!).
Among the diseases to which petunia flowers are exposed, the most common are black leg, gray rot and powdery mildew. They arise as a result of improper care and weak plant immunity. To avoid this, you need to:
- maintain an interval between seedlings of at least 2-3 cm;
- avoid over-humidification in cold air;
- use neutral soil.
If the plant is sick, treat it with a fungicide. For example, Fitosporin-M, Maxim are suitable.
How to care for petunia seedlings after picking before planting in open ground
Picking petunia seedlings has already been described in detail in this material. The event is not difficult to complete if you prepare and follow the plan. After diving, you need to slightly adjust the care of young petunias:
- For the first 1.5 weeks after the procedure, the same temperature should be maintained as before. Then after 10-14 days you should slightly reduce the temperature to 18 degrees during the day, 15 at night.
- For the first 2-3 days after the procedure, it is necessary to shade the plants so that they are protected from direct sunlight.
- If the plants feel good, grow normally, and do not stretch out, then you can not additionally illuminate them during the day with phytolamps in cloudy weather.
- After a couple of days, you can spray the plants with a growth stimulator , for example, Zircon, Epin. Such spraying will help petunia seedlings to take root and recover faster.
- After a week, you can ventilate the room . The so-called preparation for hardening before planting.
- A very important stage in caring for petunia seedlings after picking: hardening before planting in open ground (optimally 2 weeks). The event will strengthen the plants’ immunity, making them stronger and more resistant to environmental factors; hardening will help the seedlings to more quickly and easily survive the stress of new conditions and replanting. You must first open the window for several hours a day, then after a few days move it to a glazed balcony or loggia. 5-7 days before planting, it is recommended to take the plants outside or to an open balcony (the time spent should be increased gradually, starting from 1 hour and ending with the whole day).
Despite some features and a long development period, growing good petunia seedlings is very easy. If you properly care for it from the moment of planting until planting it in open ground in a permanent place, then in the summer the plants will delight you with lush, long-lasting, beautiful flowering!
Preparatory work
Before understanding the question of how to grow petunia from seeds, you should pay attention to the need for preparation. There are a number of tips that you should follow.
Seeds
Before sowing, purchased seeds are subjected to stratification, which consists of the following steps:
- Wet sand is loaded into the bottom of the container.
- Seeds are placed on top.
- Cover with transparent film.
- The container is placed in the refrigerator for 2 months.
- If it dries out, the sand is periodically moistened.
Store-bought material does not undergo the procedure. But in this case, the seeds are checked for germination. To do this, moisten gauze with a weak solution of potassium permanganate and wrap the seeds in it. High-grade material will hatch after 7 days.
The choice of soil should be made taking into account the needs of the flower.
Priming
In addition to the seeds, soil is prepared for sowing. Gardeners believe that any composition will do. But petunia grows best in loose, moist and nutritious soil, neutral or slightly acidic.
The ideal option is sandy-clayey, loamy or sandy-loamy soil. Such land is sold or prepared independently.
Soil mixture options:
- Mix sand, turf soil, and humus in equal volumes. Add 2 parts of peat, ½ part of soil, 1 tbsp. a spoonful of potassium fertilizer, a handful of perlite.
- Three parts clay plus seven parts peat.
- Sand, loam, peat in a ratio of 1:2:1.
- Equal volumes of peat and loam (or perlite).
After thorough mixing, the soil mixture is sifted through a sieve twice, freeing it from debris and stones.
24 hours before sowing, they are disinfected by watering them with a concentrated solution of manganese, or heating them in the oven for 1 hour.
Container for sowing
The following container options are used:
- plastic containers and pots, easy to carry;
- cassettes with small sections (diameter 10 cm);
- peat tablets, good quality and practical (4.5 cm in diameter);
- plastic cups for sour cream, yogurt, and other products.
There are no special instructions for choosing containers
. The main thing for containers is their disinfection before planting with a solution of manganese or boiling water, the presence of drainage holes in the base. And a lid is desirable to obtain a greenhouse effect.
The containers are filled with soil, leaving 2 cm to the edges. The thickness of the soil is at least 6 cm. A day before sowing, it is watered abundantly so that the substrate is completely saturated with moisture.
The result of all of the above
Currently, a large number of varieties of petunias have been bred. This flower is considered a hardy, low-maintenance plant. However, there are varieties that are less resistant to unfavorable conditions. Therefore, when purchasing petunia plant seeds, it is advisable to familiarize yourself with how to plant correctly and when to sow in advance.
Petunia variety Starry Sky
The average development time of this plant from sowing to flowering is 90 days. But you should still be guided by a certain group to which the flower belongs. To obtain strong, healthy petunia seedlings, cultivation and care should include: hardening, watering, lighting, fertilizing and loosening.
Grown petunias are planted outside after all the spring frosts have passed.
When propagated by seeds, hybrids may lose their qualities. Also, the color of petunia's petals may change. Therefore, cuttings are used. Terry and hanging petunias are propagated using this method.
Caring for adult petunias is not difficult, the main thing is to carry out feeding, pinching, and pruning in a timely manner. Petunia seeds are mainly collected from single-colored varieties. If hybrids are propagated in this way, the children may differ from their parents.
Common pests of petunias include aphids, whiteflies, thrips and spider mites. Among the diseases to which petunias are exposed, black leg and gray rot are more common.
Caring for petunia seedlings after emergence
The seedlings of this flower crop can be described as very tender and sensitive to conditions. Seedlings grow and develop slowly, so you need to provide proper care for seedlings and petunias and follow cultivation techniques.
Removing the cover
After germination of seedlings, it is necessary to ventilate more often and for longer (preferably 3 times a day for 1 hour). The mini-greenhouse is completely disassembled at the moment when the seedlings have their first true leaf. However, to avoid unnecessary stress, you need to remove them gradually, increasing the time the seedlings spend without shelter every day.
Temperature
The correct temperature regime is extremely important at all stages of growing petunia seedlings. At what temperature should seedlings be grown after germination? Immediately after seed germination, it is necessary to gradually lower the temperature to 18-20 degrees Celsius (daytime), and to 16 (at night).
Lighting
Petunia seedlings should be located on the brightest windowsill (a window facing south or southwest is best). In addition, it is necessary to additionally illuminate the petunias with phytolamps, because in February or March there is not enough natural sunlight.
Important! If you grow seedlings without phytolamps, then you need to turn the container with the plants on the window every day so that they are illuminated evenly. Seedlings can easily become distorted if they receive uneven lighting.
In order for seedlings to fully develop and grow normally, it is necessary that the daylight hours be 12 hours. It is necessary to turn on the phytolamps in the morning, evening and during the day in cloudy weather. It is recommended to maintain a distance of 20 centimeters between plants and phytolamps.
The lack of adequate lighting can lead to unpleasant consequences: stretching of seedlings. In such a situation, the plants begin to stretch in search of a light source, become thinner, and weaken.
Advice! When solar activity is high enough (in April, early May), it is recommended to somehow shade the plants at midday from direct sunlight or diffuse the light.
Watering seedlings
Moisture is vital for young plants. But the most important thing is to maintain the correct watering regime. Without regular watering, plants can wither, weaken, stop growing, and even dry out and die. With excess moisture, the likelihood of petunia seedlings becoming infected with fungal diseases, such as blackleg, increases. Overmoistening can also lead to mold. The seedlings of this flower crop have an extremely negative attitude towards moisture deficiency and excess!
Important! Petunia is prone to the dangerous disease blackleg. It leads to the death of seedlings and cannot be cured. The main cause of blackleg: excess moisture, so be very careful about watering.
It is difficult to say how often to water petunia seedlings, because you need to focus not on the conditional timing, but on the condition of the substrate. Watering should be done sparingly as the top layer dries. The soil should always be moderately moist!
By the way! The first week after germination, you need to moisten the soil with a small amount every day.
Basic rules for watering petunia seedlings:
- When watering, water should not fall on the aboveground part (stem, leaves) of the seedlings.
- Water for irrigation must be clean (preferably filtered), settled, soft, and must be at room temperature (optimally 20 degrees).
- In cloudy weather, it is better to perform the procedure in the morning, and in sunny weather - in the evening.
- You need to water carefully, without pressure, so that the water does not erode the soil above the roots and damage the plants themselves.
- If you have added too much moisture, you can scatter calcined river sand over the surface of the soil.
You can water petunia seedlings in one of 3 ways:
- along the edge of the container (with a syringe, a small watering can for watering indoor plants);
- drip into the root zone with a syringe;
- turn pallet.
Feeding petunia seedlings
Feeding is an important procedure for caring for petunia seedlings. It helps to obtain strong, healthy, good seedlings, which in the future will delight you with lush flowering in the garden in the summer.
Important! However, excess nutrients can harm young plants and even destroy them, so you need to be very careful when feeding!
If, after sowing, the seeds germinate poorly and unevenly or grow poorly in the initial stages, you can carry out foliar feeding by spraying with a growth stimulant , for example, Zircon, Epin, Hb-101, Heteroauxin. One or two sprays are enough. Prepare the solution and use the medications according to the instructions.
The first feeding of petunia can be done 10 days after picking. Any complex fertilizer for seedlings (or indoor flowers) will do. The solution must be made according to the instructions and be sure to follow the dosage.
Important! Before applying fertilizers, it is necessary to water the plants with plain water.
It is best to apply fertilizer early in the morning.
The second feeding of petunias at home is optimally done 10-14 days after the first procedure. It is also necessary to feed with complex fertilizer for seedlings. Can then also be repeated after 10-14 days.
Important! You can feed seedlings no more than once every 10 days.
Loosening the soil
A crust may form on the surface of the soil with seedlings; it usually appears after watering. The phenomenon is undesirable, because the soil crust prevents normal soil aeration and the root system of seedlings cannot receive oxygen in a normal volume.
To prevent such undesirable processes, it is recommended to periodically loosen the soil surface (to a depth of no more than 0.5-1 centimeter). It is advisable to do this after watering, 5-6 hours later. In this case, loosening should be carried out very carefully so as not to damage the stem and root system of petunia seedlings.
Prevention of traction
Seedling pulling is a serious problem that can lead to weakened, low-quality seedlings or even lodging and plant death.
The causes of the problem may be lack of light (the main reason), high temperature, failure to comply with sowing dates, excess moisture in the soil due to frequent and abundant watering, excess fertilizer, thickened plantings, and violation of picking dates.
To avoid petunia seedlings being pulled out, you need to carefully care for them and provide all the necessary conditions: suitable temperature, compliance with the watering and fertilizing regime.
Pinching petunia seedlings
Pinching (that is, removing the top of the seedling) is a care procedure that is necessary for the bushiness of the plant and lush flowering in the future. To perform pinching, it is necessary to pinch off the upper part of the central shoot with the growing point above the 4-5 leaf. Thanks to this, the plant will begin to grow shoots from the axils of the leaves in different directions.
Carried out after picking. More precise timing for pinching is determined by the appearance of the petunia: the seedlings must grow, become stronger, and have 4-6 true leaves.
Growing from seeds
Indoor petunia - care and cultivation at home
The average development time of this plant from sowing to flowering is 90 days. But you should still be guided by a certain group to which the flower belongs. And also according to the timing of landing on the street.
- So, ampelous varieties are sown in the middle of winter. This allows them to grow long shoots by summer.
- Multifloras are planted in February, late-blooming petunias with large flowers - in March.
- Dwarf varieties are also sown in late winter - early spring, as they bloom quickly.
Important! When sowing, plants are given extra light, as they may not have enough sunlight. Otherwise, the seedlings will stretch out and be frail.
Selection of capacity
Petunia easily tolerates transplantation, so it can be sown directly into containers or seed boxes. The depth of the container should be 6-7 cm.
If the containers have already been used before, they must be cleaned and disinfected before planting. The containers must have a hole to drain excess water.
Preparing soil and seed
The soil for planting seeds should be rich in nutrients, light, neutral. A ready-made mixture for violets, which is sold in garden stores, is suitable. Self-prepared soil includes: turf soil, peat and coarse sand.
A few days before planting, the soil is calcined or poured with boiling water and treated with a solution of potassium permanganate.
Petunia seeds are very small and contain few nutrients. That is why granulated seeds are made for better germination. The disadvantage of such seed material is that its quality is not visible.
Sowing petunia seeds
Planting seeds
For this you will need:
- seeds;
- soil;
- containers for planting;
- scoop, tweezers (the one for lenses is convenient);
- sprayer;
- water;
For the petunia plant, sowing seeds at home begins with placing expanded clay at the bottom of the container. Then a layer of soil, which should be pressed down a little. The substrate is moistened with a spray bottle. Using tweezers, seeds are distributed into containers. The planting material is lightly pressed down; it is sprayed. The top is covered with a glass lid or a plastic bag. Sign the sowing date. It's better not to use a pen - it can wear off over time.
Additional Information. For ease of planting, seeds can be mixed with sand and then simply sown. There is an option for planting on snow, which is poured in a thin, even layer into a container. And the seeds are placed on top. Thus, they are sown evenly over the entire surface and germination promises to be friendly.
After planting, the containers are placed in a room with a temperature of about 24 °C.
Petunia: description, methods of reproduction
The nightshade family has amazing flowers - petunia. Breeders have been improving the varietal and species characteristics of the plant for more than a century. Thanks to their efforts, flower growers have a huge selection of petunias to decorate garden plots, houses and city streets.
Planting petunias according to the rules and caring for flowers in pots makes the flowering plant mobile. It is carried, transported and planted in certain places. Often a flowering bush is left in a pot to create hanging phytocompositions.
Description
You will recognize Petunia by the following signs:
- bush with creeping or erect stems 15–70 cm;
- leaves are oval, 5–12 cm in diameter;
- funnel-shaped flowers of various bright shades;
- inflorescences are fringed, double, terminal, axillary and simple.
The popularity of the flower is added by long flowering and different forms, which allow petunia to be planted in pots or in a flower bed. They are divided into two types: bush and hanging. But there are universal varieties of petunias (“tango”, “avalanche”, “ramblin”) that look beautiful anywhere.
Petunia: YouTube/Garden Without Secrets
Reproduction methods
Petunia, planted from seeds or seedlings, blooms all summer until the first frost. Planting material is harvested throughout the summer. Then seedlings are grown from small grains, starting sowing in February. Bush species are sown directly into the beds.
Petunia propagation by cuttings is used to preserve the species characteristics of hybrid varieties. To do this, a mother plant is left in the fall, from which cuttings are cut for young bushes.