Summer residents appreciate petunia for its abundant and long-lasting flowering, rich palette of shades, and ease of care. Plants take root in all climatic zones and grow on depleted soils. They stretch in the light and react neutrally to drought. When growing petunia from seedlings, some gardeners have difficulties. Therefore, even before cultivating flowers on the site, lovers are advised to familiarize themselves with the little tricks of planting petunia seeds and the rules of agricultural technology.
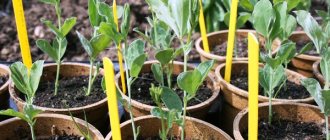
Multi-colored petunia grown from seeds
Sowing petunia according to the LUNAR CALENDAR in 2022
To begin with, we provide a list of favorable and unfavorable days in order to know when it is recommended to plant petunia seedlings in 2022 according to the lunar calendar, and when, on the contrary, you should refrain from sowing.
- Favorable days in 2022:
- January
– 3, 8, 9, 10, 11, 15, 16, 23, 24 - February
– 3, 4, 7, 8, 9, 10, 11, 12, 13, 14, 15, 22, 23 - March
– 3, 6, 7, 8, 10, 11, 12, 16, 17, 21, 22, 23, 29, 30 - April
– 3, 4, 5, 6, 7, 9, 12, 13, 14, 15, 26, 27
Unfavorable days for planting will fall, as usual, on new and full moons. Also, if possible, it is better to avoid those days when the moon is in the sign of Aquarius (one of the most barren periods).
- Unfavorable days in 2022:
- January – 2, 4, 5, 18
- February – 1, 2, 16, 28
- March – 1, 2, 18, 27, 28
- April – 1, 16, 23, 24, 25
For those who are used to navigating by the lunar calendar, a list of specific dates is certainly necessary information. However, it is worth little if you don’t know in what month it is better to plant petunia in your region, what is the difference between the planting times for hanging and bush varieties, when you need to plant these plants, based on the length of daylight hours and the required time for the start of flowering. It is this information that will help you start sowing on time, so that the plants will then develop normally and be able to bloom together. We recommend that you continue reading and learn more about planting dates, as well as how to organize the process itself as simply as possible.
Adviсe
- When buying ready-made seedlings, choose plants that do not have dry leaves that have begun to turn yellow. Inspect the petunia from all sides; there may be harmful insects in the soil and on the underside of the leaves. Also pay attention to soil moisture. Drying out or excess moisture can subsequently affect the health of the plant.
- Cuttings of the plant can be used for planting; they produce roots quite quickly, but bloom later than the mother plant.
- In rainy weather, it is necessary to fertilize ground petunias more often, as fertilizers are washed out of the soil.
- Drying flowers must be removed regularly so that the plant does not waste energy on producing seeds and produces a large number of inflorescences.
All work carried out on a suburban site for the first time always seems difficult. But even a beginner in floriculture can handle the process of replanting petunias into soil or flowerpots. This culture is quite “friendly” towards other colors, which makes it possible to create beautiful compositions. And the beauty of this plant is simply mesmerizing and can transform any garden.
We choose the timing of when to plant petunia seedlings in different regions
It is important to understand when planting time is in your region. For different climatic conditions, the optimal periods will be quite different.
Middle zone (Moscow region)
The most suitable time throughout the middle zone will be:
February March
Southern regions
Here you can start planting earlier. It is perfectly acceptable to sow:
from the second half of January
North-West, Urals, Siberia, Far East
In these regions, the timing is quite extended and depends on additional lighting when growing seedlings (more on this later) and the location of further planting of seedlings. In general, it is better not to rush and plant during the following period:
end of February – beginning of April
Petunia cuttings
For vegetative propagation, well-developed and healthy uterine shoots are collected in the fall. The most difficult thing is to preserve these queen cells during winter when there is a lack of light.
The cuttings themselves should begin from the end of February - beginning of March. To do this, the required temperature should be 12-15 degrees, the room should have good lighting.
For cuttings, take the tops of shoots, the length of which is 4-6 centimeters. For large-leaf varieties, it is advisable to remove the bottom leaf and make the rest shorter. The cut cuttings must be placed in a light and moisture-absorbing substrate. Covering with lutrasil will help keep the cuttings moist.
When rooting, the temperature should be from 20 to 22 degrees. The formation of roots will occur in 6-10 days, and after 10-12 days the cuttings must be transplanted into pots, pinching the tops in advance.
How seedling planting conditions affect sowing dates
Now let's look at the important clarifications regarding the above deadlines.
From the moment of sowing petunia for seedlings until transplanting the seedlings to a permanent place, 11-13 weeks should pass.
Focus on these numbers. That is, if you plan to plant seedlings in open ground in early June, then you need to sow in early March. Petunia is a heat-loving plant, so be sober about when it can be moved to a permanent location. The landing conditions for it should be as follows:
- There is no threat of return frosts.
- The soil warmed up to +10-12 degrees.
Think about when this time comes in your area, and count back the indicated 11-13 weeks to determine the earliest sowing time. For example, in the middle zone (Moscow region), the planting time that meets the requirements is in the second half of May, which means that you can sow from approximately mid-February.
When making these calculations, keep in mind that petunia is also very light-loving. If you have phytolamps and the ability to supplement the seedlings literally from the moment of sowing, then you can safely plant the seeds in February or even January, but if not, then you should not sow them before March. With a lack of lighting, seedlings, unfortunately, easily stretch out and become thin and weak.
With additional lighting, petunia can be planted as seedlings much earlier; without additional lighting, it is better not to rush and sow no earlier than March, regardless of the region.
Additional lighting is required in winter
If for some reason you want to start planting earlier, but you won’t be able to provide additional light to the seedlings, then choose the brightest window to place them and in the future be sure to pinch the bushes so that they branch better and are denser, but know that the risk is still very high that young plants will be weakened.
If you plan to plant seedlings not in open ground, but place them, for example, on a warm glazed balcony or in another place where it will be comfortable regardless of the weather, and at the same time you have the opportunity to supplement the seedlings for a long time, then the sowing dates can be moved further the earlier side. In this case, it is possible to sow even at the beginning of January, and get well-developed plants already at the end of March - April. But this is still rather an exception, since mostly petunias, of course, are intended for planting in the open air.
Seedling care
If everything is done correctly, the first shoots will be visible in a week. Care for flower seedlings is very important:
- watering;
- feeding;
- lighting;
- temperature regime;
- dive;
- topping;
- control of diseases and pests.
Watering
Petunia seedlings need moderate humidity. The soil should not be wet. This can lead to rot and disease. But overdried soil is also detrimental to seedlings.
Young plants need drip watering. For watering, use a syringe or pipette, pour at the root, do not get on the leaves. You can pour water over the wall, or use a tray for watering. Water for irrigation needs to be settled, at room temperature, or slightly warm.
Two minutes before watering, add lemon juice to the water. Water the flowers, depending on the weather. If the day is sunny, water in the evening. If the weather is cloudy, then watering is carried out in the morning.
Top dressing
Feeding young plants is also very important. It is recommended to apply fertilizers systematically. In the first two weeks, you will need to spray the petunias with a weak solution of potassium permanganate or Pervikura. After the appearance of the fourth leaf, the plants are fertilized with a solution of yellow “Kristalon” in the amount of half a tablespoon per 5 liters of water.
Fertilizing can be done either by foliage or by adding fertilizer to the soil. For foliar feeding, use “Kristalon” and “Uniflora micro”. Seedlings are fed three times a week, using two methods alternately. After picking, it is recommended to use fertilizers that stimulate root growth. Such as “Aquarin”, “Solution”, “Plantofol”. Everything is prepared according to the instructions.
Temperature
Petunia seeds germinate at 25 degrees. If the temperature is low, the seeds simply will not sprout, and if it is higher, the plants can become very stretched and begin to hurt. After the shoots appear, you will need to open the plants twice a day, starting at 20 minutes.
The covering is completely removed when the plants grow to it. The temperature is reduced to 20 degrees during the day and to 16 at night.
Lighting
Flowers need lighting almost around the clock. Good lighting allows young plants to grow well and speeds up the flowering period. The duration of the required daylight hours is 12 hours. The lighting is turned on in the morning at 7 o'clock and turned off in the evening at 22 o'clock.
Additional lighting is installed at a height of 20 cm from the seedlings. For this purpose, LED, fluorescent, and phytolamps are used.
Picking
Picking seedlings is carried out only if they grew in common boxes. For picking, select 250 ml cups with holes for drainage. When the shoots are 5 cm in height, begin picking.
- Using a sharp garden knife, plant the plants to a depth of 3 cm. The knife is inserted at an angle of 45 degrees. It turns out that by pinching off a piece of the root, the development of the root system is stimulated.
- The flower is placed in a separate container.
- Add substrate to fill the voids. Watered.
- The temperature is reduced by three degrees for a week, and sunlight is avoided.
- You can feed only after a week and a half.
If the seedlings are grown in tablets, then the seedlings can be planted in an individual container along with it.
Pinching
Pinching is done for all varieties of petunias, except for hanging varieties. It consists of removing a piece of the stem at the 4th and 5th leaf along with the growing point.
Young shoots will emerge from each leaf axil, and in the future such plants will bloom profusely. After half a month, a second pinching is carried out. To get a lush bush, pinching must be done several times.
Improper watering and excess moisture can lead to blackleg disease. A dark spot forms at the base of the shoot, the tissue underneath becomes soft and rots. A constriction forms and the plant falls.
All diseased seedlings must be destroyed, and the soil must be watered with a solution of potassium permanganate or Formalin.
Often, due to excess moisture, petunia seedlings may experience iron deficiency. In this case, iron chelate, which is contained in the Ferovit product, should be added to the soil. Conversely, excessive dryness leads to the appearance of spider mites, which settle on the leaves. For the fight, special drugs are used: Neoron and Fitoverm.
We sow ampelous and bush petunias at different times
Depending on what type of plant - hanging or bush - you plan to grow, the optimal planting time will be slightly different.
- Reference:
- Ampelous - have long (50-120 cm) flexible shoots. Ideal for hanging planters and vertical gardening.
- Bush - have erect shoots, either compact (up to 30 cm), or spreading and quite long (up to 60 cm). Used in various flower beds.
Ampelous varieties and hybrids require a little more time to grow and develop. They are sown earlier.
It is better to sow ampelous petunias 2 weeks earlier than bush petunias.
Hanging varieties are very effective in hanging flowerpots
Where to start: choosing a variety
Blooming Petunia Grandiflora
Mainly cultivated forms and varieties of large-flowered hybrids are used. Large flowers of various shades with smooth, slightly wavy or jagged fringed edges look very impressive. They can be simple and terry. Petunias are represented by numerous varieties: low-growing, which have a height of 20-30 cm, and tall, reaching 70-75 cm.
There are 7 groups in the classification of petunias:
Petunia Grandiflora superbissima
1 Group 1. Grandiflora.
The height of these plants is up to 60 cm, spreading bushes with long stems. Flowers are up to 9 centimeters in diameter, with wavy edges of the petals.
2 Group 2. Grandiflora superbissima .
Plant height up to 75 cm, spreading bushes, weakly branched. Flowers are up to 12 cm in diameter, with smooth wavy edges.
Petunia Grandiflora fimbriata
3 Group 3. Grandiflora fimbriata .
These plants are compact, branched, up to 60 cm high. Flowers with wavy serrated edges of petals or with a fringed limb reach 8 cm in diameter.
4 Group 4. Grandiflora plena .
Plant height is up to 40 cm, width – up to 65 cm, spreading bushes. Flowers are up to 10 cm in diameter, with wavy, corrugated, jagged or fringed petal edges.
Petunia Multiflora
5 Group 5. Multiflora .
The height of these plants is up to 40 cm, the bushes are spreading and highly branched. The flowers are smaller and more numerous, up to 6 cm in diameter, the edges of the petals are slightly wavy.
6 Group 6. Multiflora of captivity (Multiflora plena).
These plants are up to 40 cm high, spreading bushes, highly branched. Flowers are up to 7 cm in diameter, the edges of the petals are fringed or wavy.
7 Group 7. Nana compacta .
Plant height is up to 45 cm, the bushes are compact and branched. Flowers up to 6 cm in diameter, with smooth edges.
Petunia Nana compacta
Grandiflora are groups of petunias with a small number of large flowers. Multi-flowered petunias Multiflora have smaller flowers, but they cover the plants with a continuous carpet. Petunia Floribunda an intermediate position between these two groups. Such plants produce medium-sized flowers in medium numbers.
According to their form, bush and ampelous petunias are distinguished, which are called Pendula . Cascading petunias externally represent a middle option between the bush and ampel form.
Ampelous petunia
Hybrid or garden petunias (Petunia) with large flowers have played a leading role in landscaping flower beds and balconies for many years. Therefore, small-flowered varieties could not seriously compete with them. They received the nickname “mini-petunias,” although from a botanical point of view, these plants are separated into an independent genus, which is called Calibrachoa.
Calibrachoa
They have everything to take pride of place among hanging plants for pots and baskets: the beautiful calibrachoa flowers are small, but there are fantastically many of them.
They are more resistant to atmospheric influences than their large-flowered “relatives”. In addition, the flowers of many calibrachoa varieties are decorated with filigree designs. The spectrum of their colors is much wider than that of large-flowered petunias, since it even includes the orange color, which is still absent from large “brothers”.
Choosing a landing site
Petunia in landscape design
Petunia is a light-loving plant. Mature bushes grow well in open sunny areas, but in the shade they stretch out and may not bloom. The soil in which petunias grow should always be slightly moist and not too alkaline. Petunia is unpretentious to soils, but on soil richly seasoned with humus or manure it will “grow fat.”
Petunia can be planted in open ground or in containers. These flowers grow well in containers with limited soil volume. Plants in pots, vases and hanging baskets can be used to decorate loggias, balconies and open verandas.
Petunias are beautiful both in single plantings and in combination with other annual plants.
In flower beds, borders and mixborders, petunias look great in combination with flowering plants: verbena, snapdragon, marigold, ageratum or rudbeckia. In carpet plantings, they can be planted next to various ornamental foliage plants, for example, coleus or cineraria.
Deciding when to sow in order to achieve flowering in the right month: April, May, June, July
Petunia seedlings, as a rule, are planted already flowering, which is due to the peculiarities of the growing season of this crop: from sowing to planting, as already mentioned, approximately 3 months pass, and less - about 2.5 months until the flowers appear (the first buds may appear even earlier, especially if the variety is early). So it turns out that young plants often bloom even before they are transplanted to a permanent place.
Therefore, if you need to get flowering bushes by a certain date, then subtract 2.5 - 3 months from it.
It turns out:
- To achieve flowering in mid-April, you need to sow in mid-late January (mandatory long-term additional lighting will be required)
- To achieve flowering in mid-May, you need to sow in mid-late February (at first you will need additional lighting)
- To achieve flowering in mid-June, you need to sow in mid-late March
- To achieve flowering in mid-July, you need to sow in mid-late April
Propagation of petunia from cuttings
Rooted cuttings
This method is usually used for propagating double large-flowered varieties. Cuttings are taken from healthy, developed mother plants, which are kept in winter in a bright, well-ventilated, cool room at a temperature of 10-12 °C. Cut cuttings 6-8 cm long, leaving 2 to 4 leaves.
When propagated by seeds of varieties with double flowers, only 40-50% of the “daughter” plants turn out to be double. That is why the cutting method is used to propagate such petunias.
Cuttings are planted in December-January in pots or picking boxes, which need to be filled with sand or a mixture of sand and peat. They take root at a temperature of 18-20 °C. As they grow, rooted cuttings are transferred to larger pots. Such plants bloom in 4-5 months.
Choosing suitable seeds
Further subtleties concern not the timing, but the preparation and the planting process itself. It must be said that there are quite a lot of nuances in this matter. First you need good seed material. After a certain time, it loses its viability, so you should avoid overdue ones that have been stale.
The shelf life of petunia seeds is up to 5 years.
But if possible, it is, of course, better not to keep them for that long - as practice shows, their optimal germination is within 3 years. However, during storage it is important that they are kept in suitable conditions: a dry and dark place. Best when cool. Sometimes there is a direct indication on the packages that it is recommended to store them in the refrigerator - at such temperatures, viability lasts longer. It follows that:
For better germination, we take fresh seeds - 1-3 years old.
Older (up to 5 years) planting material can also be used, but only if all storage conditions have been met, and then there are no guarantees in this case.
The bags are best stored in the refrigerator
Petunia seeds are very small (0.5 mm in diameter) and dark, merging with the color of the soil. Planting such crumbs is problematic, so manufacturers have now mainly switched to producing them in pelleted form: they are covered with a special colored nutritious shell, which makes them larger and more noticeable.
At the stage of selecting varieties and hybrids for planting, decide what type of seeds you will sow - regular or pelleted. Both have a number of advantages and disadvantages.
Regular seeds:
- Minuses
- very small
- poor assortment today
- indistinguishable on the ground
- pros
- cheap
- no additional dissolution of the shell is required
Dried seeds in capsule
Dried seeds:
- Minuses
- the shell sometimes dissolves with great difficulty
- expensive
- small quantity per package
- You may get empty pellets
- pros
- larger than normal size
- have a noticeable color
It is better to take planting material from trusted agricultural companies, since the germination of petunia seeds is a sore subject. Even fresh ones, alas, can sprout poorly.
Due to their extremely small size, petunia seeds are difficult to plant, and for the same reason they are not subjected to any pre-sowing treatment - this is simply unrealistic.
Description
Petunia belongs to the category of bushy plants, which are distinguished by the presence of creeping or erect shoots. The height can reach 25-70 cm. The densely branched stems are literally dotted with oval-shaped leaf plates. The length of the foliage is in the range of 5-11 cm. The formation of funnel-shaped flowers is concentrated in the area of short pedicels. The leaf blades are painted in a bright green palette. The surface of the foliage is covered with small fibers.
Petunia - an exquisite flower
Flowers can be:
- terry;
- fringed;
- ordinary;
- axillary.
Most decorative flowers are painted in the following shades:
- scarlet;
- pink;
- snow-white;
- purple;
- dark blue.
The flowering period lasts from mid-summer to the end of September. After flowering is completed, fruits begin to form on the bushes, resembling bivalve boxes, inside which seed material is collected.
Note! Petunia can be grown not only in a flowerbed, but also in spacious pots, displaying them on balconies or on window sills on the south side.
Petunia, which is not difficult to care for and grow at home, is becoming more and more popular among gardeners every year. It is difficult to find at least one flower bed in the yards where these wonderful flowers do not grow.
Preparing the soil
Any high-quality commercial soil for seedlings or universal soil is suitable for planting petunias. In this regard, the plant, fortunately, is not overly capricious - the main thing is that the soil is loose, nutritious and can sufficiently retain moisture. The soil reaction should be neutral or slightly acidic.
If possible, the soil should be steamed (or calcined in the oven) for 40-60 minutes to prevent the seedlings from developing blacklegs.
Good soil is the key to success
Before pouring it into the container where planting will take place, all large foreign elements - roots, stones, lumps, etc. - are first removed from the soil. You can also sift it so that it has a uniform and loose structure. If possible, it is worth adding a little vermiculite.
It is also possible to independently prepare the soil mixture, although from the point of view of the ratio of results and labor costs, this option is not the most optimal. Nowadays, it is much easier to purchase ready-made soil for planting, especially since you only need a little of it at first. In general, we present the composition and proportions for the mixture with your own hands, rather just in case: 1 part humus, 1 part leaf soil, 1 part turf soil, 1 part lowland peat, ½ part sand.
Flower care
Care consists of:
- in timely watering;
- in systematic feeding;
- in the picking of withered flowers.
Petunia should be watered only in dry weather, preferably in the evening. The plant does not like excessive humidity and when water stagnates in the hole. It is enough to simply moisten the soil around the roots a little. The next day, the ground is loosened so that a crust does not form, and the weeds are removed.
The beauty and duration of the flowering period of petunia depends on regular feeding. After 10 days, the plant is fertilized for the first time. Use nitrogen-containing fertilizers. Nitroammophoska has proven itself well.
During the formation of buds, potassium salt and superphosphate are used. You can use wood ash from a fire. If the leaves begin to turn yellow and fall off, the plant may have developed chlorosis. This means he lacks iron. In this case, Ferovit will help. They spray petunia 3-5 times with a period of three days.
Flowers that have bloomed are removed. This pushes the plant to form new buds and prolongs flowering. Using the pinching procedure, the bush is given a beautiful shape.
You can make a bush in the form of an unusual flower ball with many blossoming buds.
Selecting containers
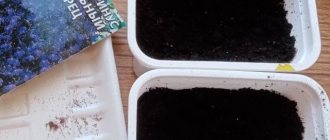
Option 1. The classic method when sowing petunias is to plant a large number of seeds in common containers with further picking. To do this, it is optimal to use plastic containers with tight-fitting transparent lids. If there are no lids, think in advance how you will cover the containers at the initial stage, since they must be covered on top with something moisture-proof and transparent (glass, plexiglass, film).
Sowing in a common container
Regular food containers with lids are a great planting solution.
Container sizes need to be small, since petunia seedlings are very small.
Don't forget about drainage holes in containers - they can be made in thin plastic using a soldering iron or a hot awl.
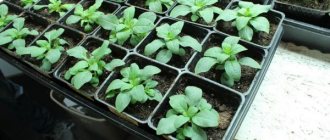
Option 2. In addition, there is an alternative type of sowing: planting in individual containers without picking. Such individual containers can be individual small glasses, cassettes or peat tablets.
Sowing in cassettes
Which sowing option to choose is largely dictated by the type of seed. Usually:
Ordinary ones are sown in a common container, and panned ones are sown in individual containers.
At the same time, among the forms of individual sowing, the undisputed leader today is planting in peat tablets. Sowing in cassettes or cups is a little less common. The main subtleties of planting in peat tablets will be discussed a little further.
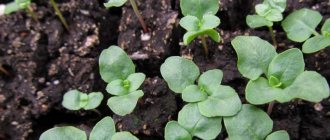
Why transshipment?
For a while, petunia will feel great in small glasses, but it grows very quickly and it will become crowded there.
Nina_25 FORUMHOUSE participant
I tried leaving several plants in small volumes, but later, when transplanted into a larger volume, such plants immediately threw out their buds and had to be torn off.
As soon as the root system has mastered the clod of earth, petunia needs to be planted in a large volume.
There are two seedling bushes in the photo: the left plant grew in a small glass, the right one was transplanted in a timely manner.
This is exactly how unscrupulous sellers prepare seedlings for sale: they keep them in small cups for as long as possible, and then transplant them into spacious containers. The plants immediately produce buds, and the buyer likes it.
Sow in a common container: classic method
When planting in a common container, it is first filled with soil with a layer of 4-6 cm. There should be about 3 cm between the soil level and the upper edge of the container so that the seedlings have enough vertical space. The soil is leveled, compacted and watered abundantly. After this, they begin sowing. Regular (not coated) seeds are poured onto a light plate, and using a toothpick or wooden skewer, previously soaked in water, they are transferred one by one to the surface of the soil.
The seeds are laid out on the surface, not buried and not sprinkled with soil on top.
The peculiarity of sowing petunia is that the seeds should be placed ON the ground, and not in depth. If there is a layer of soil on top, they will not germinate.
After the required number of seeds have been spread out, they are sprinkled with water from a spray bottle on top, and then the container is closed with a lid and put in a warm place.
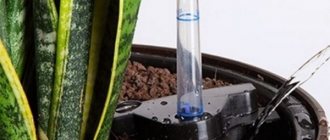
We organize watering
Petunia seedlings prefer to grow in conditions of moderate humidity. Too wet soil promotes the development of fungal infections, and a lack of moisture will lead to the death of young and fragile plants.
It is best to use drip irrigation. A syringe is used for this purpose. With its help, water is supplied directly to the root of the plant. Do not allow liquid to get on the surface of the leaves. You can also pour water into a tray or onto the wall of a container.
Soft, settled water without chlorine is suitable for irrigation. It should be at room temperature. You can also add a small amount of lemon juice to the watering liquid.
It is best to water the seedlings in the evening.
We sow in a common container: in the snow
Distributing microscopic seeds one after another is a tedious task, so various tricks are used to make the process easier and faster. The most common one is to use snow.
The soil is placed in the container in the same way as in the previous (classical) planting method. Then clean snow is laid out on top in a continuous layer (1.5-2 cm thick) over the entire surface, after which the seeds are carefully scattered over the snow, trying to do it as evenly as possible. Dark dots are clearly visible on a white background, and if desired, they can be redistributed over the surface using a toothpick. The snow is then allowed to melt and the seed appears on the ground as required.
Sowing in the snow
When using this method, the container must have drainage holes so that after the snow melts, excess moisture can drain.
The planting material is sufficiently moistened, so no additional spraying is needed. The container is covered with a lid, glass or film and placed in a warm place.
We use an alternative approach: we sow in peat tablets
For pelleted seeds, a good planting method is individual sowing in peat tablets.
To do this, place dry peat tablets in a plastic container and fill them with water. Wait for swelling, adding water if necessary. When it is clear that the tablets are already well soaked and have reached their maximum size, excess water is drained and sowing begins. Pelleted seeds are poured onto a saucer and, with a damp toothpick or skewer, transferred one at a time to the center of each peat tablet. Just as when sowing in a common container, the seeds should not be buried under any circumstances - they should lie on the surface of the substrate.
Peat tablets are very convenient for sowing pelleted seeds
It is very important, after the seeds are spread out, to generously spray each tablet on top using a spray bottle.
The pelleted seeds must be generously moistened, otherwise their shell may not dissolve and they will disappear without hatching.
After this, the container with the tablets is closed with a lid and placed in a warm place.