The main school flowers, gladioli, have bloomed, and now we have to dig up the corms and properly preserve them until a new planting. It seems that there is nothing complicated here, but the simple rules of gladioli agricultural technology are difficult to apply to specific climatic conditions. You have to retreat from them, and this may ultimately affect flowering next year. In this article we will tell you what members of our portal do with gladioli in September.
And on our portal you can read an article about how to make a school bouquet of gladioli and other country flowers.
When to dig up gladioli
According to agricultural technology, gladioli are dug out 35, and for late varieties - 40-50 days after the end of flowering. In reality, this is not always possible: flowering may end with the onset of stable frosts, and if you wait a month and a half, you will have to dig the corms out of the snow. Therefore, agronomists advise not to be afraid and to harvest gladioli earlier - if you provide them with good storage conditions, overwintering will go well.
It is also recommended not to delay harvesting because in cold and damp soil the corms begin to rot and become sick. This, first of all, concerns varieties with early flowering and dark-colored gladioli, which are characterized by low immunity to fungal diseases. They are the ones that are removed first. The gladioli that we grew from children can be removed later.
All gladioli are dug up before the onset of stable frosts.
The ideal day for digging is dry and warm; the soil should not be wet, but it should not be dry to a stone state, otherwise there is a risk of losing a large number of babies.
Timing for digging up gladioli
Also check out these articles
- When to plant tomatoes for seedlings in 2022
- Clematis Multi Blue
- The best early varieties of cucumbers
- How to choose quality pet food: types and tips
When to dig up gladioli? The time of digging depends on the flowering period of the crop and climatic conditions. The easiest way to calculate when to do this is to follow the golden rule of all gardeners. Namely: 30-40 days should pass from the moment of cutting the peduncle to digging up the bulbs.
From the moment of cutting the peduncle to digging up the bulbs, 30-40 days should pass
Interesting!
You can also determine when to dig up gladioli for the winter using the Lunar calendar.
If you dig up the bulbs too early, they won't survive until spring or simply won't bloom next year. And if you leave them in the ground in the fall, they may begin to rot. If there are a lot of thrips in the area, it is worth digging up the bulbs before the temperature drops below +8...+10 degrees. It is then that thrips begin to look for places where they can hide from the cold and often infect gladioli bulbs.
When to dig up diseased gladioli
The leaves of gladioli are often affected by spots, especially if the summer was rainy and not very warm. This indicates that the plant is suffering from a fungal disease and looks like this:
If the lesion is quite large-scale, and not two or three spots on the entire plant, it makes sense to dig up the corms earlier than usual so that they, too, are not affected by the disease.
Structural features
The structure of gladiolus has some features that explain the need to dig up the plant in the fall:
- Gladiolus is a heat-loving bulbous plant, the thickened stem of which forms a corm in the lower part. The soft, juicy core of the onion, which contains a large amount of nutrients, freezes at the first subzero temperatures, the scales die off, and with a further decrease in temperature, all layers freeze.
- If in winter the temperature is low, but not minus, the bulb can survive the winter, but is very often damaged by fungi that quickly multiply in damp soil.
- “Children” are formed on the bulb, storing information about the variety. They are able to withstand frosts down to -7°C while maintaining their properties; at -10°C, germination is reduced by 50%, and at -12°C, the tuber buds die. In the event of a warm winter, the children that have overwintered in the ground produce a different variety.
- The sweet, juicy pulp of the bulbs attracts rodents, and they can destroy the plantings.
Based on these features, we can conclude that if you do not dig up gladioli in the fall, you can destroy the seed material or get it with great damage. This is especially important when breeding rare and valuable varieties.
How to dig up gladioli
The stems of gladioli can be mowed before digging, or trimmed after digging. The corm is trimmed with pruning shears so that nothing unnecessary remains; both the roots and the entire above-ground part are cut off (but you can leave a stump up to 1 cm in size).
Trimmed corms are placed in a foundation solution (0.1%) for half an hour, then washed and placed in a solution of potassium permanganate (0.3%) for another half an hour. This, of course, is an ideal processing option, but in extreme cases you can be content with the minimum.
GALE Member of FORUMHOUSE
It is imperative to treat with at least a dark cherry solution of potassium permanganate (30 min.).
When and how to take it out after winter storage?
Gladiolus bulbs are taken out of the refrigerator thirty days before planting (the necessary period for the formation of full-fledged arrows and pecking of the bud).
Considering that it is recommended to plant bulbs when the air temperature in the morning reaches at least 10°C (beginning of May), it is necessary to remove flower tubers from the refrigerator no later than the beginning of April.
After removal from the refrigerator, each onion is freed from scales and sorted by size and appearance. Quality tubers are shiny, pale yellow or cream in color, with dense white root buds. Wrinkled, shriveled, and spotted bulbs are planted separately.
After the planting material has been sorted, the tubers are placed in boxes (in one layer), tops up . The box is placed in a dry, warm, dark place. After 2-3 weeks, when the dormant buds have hatched and reached at least 4 cm, the flower tubers can be planted in the ground.
Gladioli tubers planted in the ground immediately after refrigeration will take root, but you should not expect lush flowering from such plants.
How to cull corms
Below in the photo we see a fully matured corm.
Signs of maturity of the gladiolus corm:
- Full-blooded root scales; the baby is “dressed” in scales.
- The scales of the baby are dense and dark.
- The baby is easily, without effort, separated from the corm.
During the growing season, one peduncle grows from the corm, and one young (replacement) corm with children is formed. Beginners often worry that they won't be able to figure out where the babies are and how to get them off.
Mariska Member of FORUMHOUSE
The children are impossible not to notice. Association: a large river mother mussel with a bunch of baby mussels clinging to the shell.
It happens that not one bud awakens in the corm, but two or three. In this case, two or three peduncles will grow and two or three replacement corms will form. In the spring, inspect each corm again, and if you notice that there is not one sprout, but two or three, leave the strongest one and break off the rest.
On average, corms of one gladiolus replacing each other live 3-4 years; Every year the corm becomes flatter, and its productivity and immunity decrease. It is because of this that old bulbs are discarded and burned, but unscrupulous sellers willingly slip them to newcomers. Unfortunately, it will not be possible to obtain a good, flowering plant from such a corm. When buying, look carefully, here are the signs of an old onion:
- it is flat;
- she has a wide bottom.
Otherwise, there may be such a sad picture - it looks like there is a flowerbed full of gladioli, but you still won’t get any flowers.
Valucha Member of FORUMHOUSE
This year I have a problem with gladioli - none of them bloom fully, all the buds turn yellow and wither.
We also do not take into storage children whose shells have burst or their corms are damaged.
Adviсe
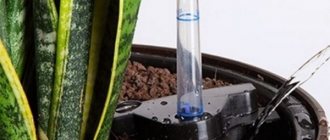
To prevent gladioli tubers from taking root during storage, before storing them in the refrigerator, they are thoroughly dried and placed in gauze nets.
Alternatively, the tubers can be wrapped in toilet paper (as soon as the paper starts to get damp, it is changed).
Gladioli bulbs are dug up for storage thirty days after the flower shoots wither. There is no point in keeping the tubers in the ground. High humidity and low temperatures activate the process of tuber rotting and the proliferation of bacteria and fungi.
If it is not possible to wait for the gladiolus to bloom, first of all, cut off the still blooming arrow, and after fifteen days, dig up the tuber. It is better to dig up bulbs not with a shovel, but with a pitchfork . This will protect the planting material from damage by the sharp blade of the bayonet.
How to prepare gladioli corms for storage
Treated gladioli are placed on a dry, clean litter and dried for 10-15 days at a temperature of +25 - +30 degrees in the open air or indoors with good ventilation.
GALE
I keep it at the top of the kitchen cabinet near the hood.
After this, we carefully separate the replacement, young corm from the old one and the remnants of the roots. If we have properly cared for our gladioli, the bulb will be wrinkled, small, almost hidden in the roots. We separate the children. Many people do not like to tinker with them, however, it is better to spend time on them if you want to preserve the variety for a long time.
Sveta2609 Member of FORUMHOUSE
It's not difficult to collect children. I choose the largest ones, the size of a pea, and store them in a nylon stocking in the refrigerator. If you save only large bulbs, then after 3-4 years you can lose half of the varieties, because Gladioli bulbs degenerate over time. And the large children will begin to bloom in a year.
We send the young corms for further drying for another three weeks to a month at +18-+22 degrees. Children dry in less time; they cannot be allowed to dry out. And corms need a minimum amount of moisture for successful storage.
How to properly remove bulbs
Choose a time when the soil is dry and the weather is warm. It is better to dig during the day, when the dew has dried, so that there is less moisture. Prepare a shovel, or better yet, a pitchfork, so the likelihood of damage is much less. Carry out work in the following sequence:
- Insert a pitchfork or shovel into the ground at a distance of 15-20 cm from the gladiolus so as not to damage it. Carefully lift the earthen ball. If it is dense, it is better to put the soil on a film and let it dry for half an hour; if the soil falls apart into lumps, remove the bulbs immediately.
- Do not press on the surface of the corms when removing soil, do not hit each other or other surfaces. Be careful not to damage the outer covering.
- Rinse under running water or in a bucket. Remove items that show signs of rotting or damage.
- Separate the bottom, do not press too hard. If it holds up well, put it in the sun to dry for 2-3 days, only then remove it when the bulbs are ripe.
- Tear off the roots along with the stumps. After this, rinse the gladioli well again and place on a cloth to dry.
You cannot cut the roots and leave stumps. They often rot during storage, especially if the humidity level is high.
If the stems were not cut before harvesting, do so immediately after digging. Leave petioles no longer than 2 cm. You should use garden pruners or sharp scissors; you cannot twist or tear off the dried part, as this can damage the inside.
How to store gladioli in winter
During the entire drying time, we monitor the corms and if we see that some are starting to deteriorate, we throw them away. After drying, we place the corms in paper bags (or thin stockings, very convenient!) and send them for storage. Children are kept separately.
It is advisable to store babies in a paper bag. As a rule, all members of our portal store corms in a vegetable drawer in the refrigerator, in a box on the windowsill in a heated country house, or on a glassed-in loggia. The main thing is that the temperature is stable throughout the entire storage period and is +5-6 degrees. Proper storage can, among other things, prevent the development of a dangerous pest - thrips.
Krysya Member of FORUMHOUSE
Here's what I learned today about gladioli: they can be infested with thrips. These are small black or white, flea-like creatures that chew out the flower stalk.
These bulbs are infested with thrips.
These bulbs are infested with thrips.
To get rid of thrips, you need to treat the corms with mothballs. Or do it simpler: add a few heads of garlic to the wintering gladioli. Or here’s another newspaper-dichlorvos method:
Samaritan Woman Member of FORUMHOUSE
After drying and cleaning, I put the bulbs in a plastic bag, along with crumpled newspaper sprinkled with dichlorvos, and tie them up for two or three days. Removes thrips completely.
Bulb storage conditions
After the gladiolus bulbs have been dug up for the winter, dried, and disinfected, they must be properly stored. The conditions for comfortable storage of bulbs are as follows:
- room temperature –4–7°С,
- humidity - 65–75%;
- complete darkness; there should be no sunlight, otherwise the bulb will begin to sprout;
- regular ventilation.
During storage in winter, it is recommended to inspect specimens for the appearance of diseases so that they do not infect other tubers. If all storage conditions are met, the bulbs can easily survive the winter and germinate the next year. The flowering remains just as lush and beautiful.
What to do if the corms wake up in the middle of winter
In winter, gladioli corms go through two phases. The first phase, the natural resting phase, lasts about 40 days. At this time, the corm will not sprout, even if it is warm and humid. Then comes a period of forced dormancy, and here it can already germinate. If this does happen, you will have to take out the corms, lay them out for a week to dry in a room with the heating on, and put them back in a cold place. When there are 2-3 weeks left before planting, the storage temperature will need to be increased to +15 degrees.
On FORUMHOUSE you can find any information on the agricultural technology of gladioli and information on the agricultural technology of other bulbous plants. Check out our gladiolus show: photographs of the most beautiful blooming gladioli grown by members of our portal. Read the article on how to store, root and divide dahlias. Watch our video about forcing, keeping and planting bulbs.
The best varieties of gladioli for planting in the Urals
The Urals have a typically mountainous climate. Precipitation is distributed extremely unevenly here, not only within the regions, but also in populated areas. This zone is also characterized by sharp frequent changes in night and day temperatures. Taking this into account, when looking through the list of gladiolus varieties, it is worth focusing on those that are characterized by the highest resistance to these factors.
Important! Any types of gladioli will need to be tied up in windy weather. Otherwise, the delicate pedicels will break under the weight of the inflorescences.
It is best to give preference to early varieties that bloom from July to September from the following list:
- Ben Venuto — designed for cutting and landscaping the area. The flower heads are large, from 20 cm, painted in a peach shade. Plant height up to 2 m.
- Oasis - a plant up to 140 cm high. Each inflorescence contains 22 flowers with a diameter of 14–18 cm. Lemon petals with a bright blurry streak of scarlet color closer to the base.
- Sonata — a spike contains up to 16 flowers, painted in a rich fuchsia color, ideal for making bouquets. Plant up to 1.5 m high.
- Gladiolus grandiflora Vista - stems reach 1.3 m. The inflorescence is spike-shaped, including up to 28 flowers, painted in bluish-blue tones.
- Ocilla - snow-white large flowers that will give the site a festive look. The plant reaches a height of 1.3 m.
- Azurro - representative with blood-red flowers. Its stems reach 100 cm.
- Passos - another of the large-flowered species. Its flowers are painted in several shades of purple and lilac, with ruffled petals.
- Cook - distinguished by bright, rich salmon-colored colors.
Thus, the choice is quite varied, and besides, these are not all early varieties of gladioli that can take root well in the Ural climate.
Growing gladioli in open ground in the Urals
Growing gladioli in the Urals is not so difficult: the technology for cultivating these flowers will not differ from that for other regions. The main thing is to constantly take into account weather conditions, which change frequently: this will be the main difficulty.
Everything else happens according to the standard:
- preparatory work with planting material;
- organization and preparation of the site;
- planting in open ground;
- basic care throughout the season, consisting of watering and fertilizing;
- harvesting bulbs in the fall.
Preparation of planting material
The process of preparing planting material for planting should begin 2 weeks before the expected time of manipulation.
Important! If you don’t have potassium permanganate on hand, you can replace it with copper sulfate. To soak gladioli bulbs (for 2 hours), make a solution at the rate of 5 g of powder per 1 liter of water.
At the first stage you should:
- Inspect the bulbs, discard those damaged by pests and rotten.
- Dry and damaged upper scales should be carefully removed.
- After this, you need to place the bulbs in a slightly pink solution of potassium permanganate for 2 hours.
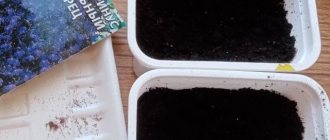
- Next, transfer the planting material to a dry towel and, after waiting for the liquid to drain, place it on a baking sheet lined with parchment paper.
- In this state, leave the raw materials for a week in a warm room under diffused light.
You don’t have to waste extra time and plant the bulbs immediately after the above-described manipulations.
However, growing gladioli that are additionally germinated before planting is more effective. You can do this in several ways:
- Yarovaniye . You need to place the bulbs with their bottoms down in a warm and bright room, wait until the arrows appear.
- Using sawdust and straw . Place a 2 cm high layer of sawdust or straw (can be mixed 1:1) in a transparent plastic bag. Moisten the material with water so that it is wet but does not release liquid. Place the bulbs evenly on its surface. After this, collect the bag at the top and start blowing air into it with your mouth until it looks like a balloon. Tie the bag and leave it on a light windowsill until the arrows sprout.
5 hours before planting, regardless of whether the material has germinated or not, it should be placed in the Epin solution (2 ml/5 l of water).
Video: germination of gladioli
Site selection and soil preparation
When choosing a location on the site, be guided by the following criteria:
- lighting - abundant;
- wind, draft - high-quality protection is necessary;
- location of groundwater - more than 1.5 m;
- the soil is light, loose, highly nutritious, including humus and river sand;
- soil acidity - 5–7 pH;
- bad neighbors and predecessors for the flower - horseradish, radishes, cabbage.
Taking this into account, it is best to place plants on the south or east side of the site, not far from outbuildings, hedges or fences. But at the same time, it is important that the wind barrier does not cast a strong shadow on the flowers, otherwise they will develop poorly.
Find out whether and how to plant gladioli in the fall.
It is worth starting to prepare the soil on the site in the autumn, when the harvest is harvested:
- Clean up plant debris and dig up the soil to a depth of 20 cm.
- After this, disinfection should be carried out by spraying each m² of area with a 1% concentration of copper sulfate solution (100 g of powder per 10 liters of water).
- After a week, you need to add 20 kg of sand and 10 kg of manure to each m².
- Dig up the prepared area to a depth of 20 cm.
Immediately before planting, about a day before, the area should be dug up again to a depth of 20 cm. If the spring turns out to be dry, then you need to water the area 2 days before planting (2 buckets of water per m²), and after a day, dig up the soil.
Landing
You should immediately mark rows at a distance of 30 cm from each other. This can be done by drawing lines with a squeegee. The bulbs themselves in the rows should be placed at a distance of 15 cm. When planting daughter bulbs, a step of 20 cm is left between the rows, and 5 cm between the planting material.
Did you know? In the Middle Ages, ground gladioli corms were mixed with wheat flour when baking bread.
When leaving a distance between plants, it is important to understand that the larger it is, the easier it is to maintain in the future (the gardener will have free space to move around the rows).
The planting depth depends entirely on the soil structure and the size of the bulbs. On loose, light soils, tubers over 3 cm can be planted in recesses of 15 cm, and children - 5 cm. On heavy soils for planting material with the same dimensions, the depth should be reduced to 10 cm and 2 cm.
Step-by-step planting instructions:
- Pour water into the marked furrows - you want the soil to become moist, but not swampy.
- Place the bulbs in the furrows at the required distance and depth, following the recommendations above. If the depth required is shallow, then the bulbs can simply be pressed into the ground.
Landing
The Ural climate, especially in the spring, can present different surprises every year: either frost until June, or heat at the end of April. Therefore, planting gladioli in the Urals in the spring should begin not at any exact time, but based on temperatures and forecasts.
If the air warms up to 18 °C - 25 °C during the day for several days, then the soil will warm up to 14 °C - 18 °C. It's time to plant sprouted and processed bulbs.
Selecting a location
The place where flowers are planted should be protected from the wind. After all, gladioli are so tall that it is very easy to break a stem with a gust of wind. On the other hand, you can arrange supports with tied twines and thus protect the stems from creases.
Gladioli will grow well in a well-lit place, definitely not in the shade of walls, trees, etc.
The main enemy of planting gladioli is stagnation of water in the soil. These flowers love well-drained, loose soil.
Soil composition, planting depth
How to please gladioli in choosing soil? Its composition should be neutral, slightly acidic; there is no need to add any explicit organics due to the threat of fungal diseases.
If the soil is not of this composition, and in the Urals there are a lot of heavy, clayey soils, then you can proceed as follows:
- add sand to the bottom of the planting hole (to prevent stagnation of water);
- humus (from compost);
- ash;
- a little mineral fertilizer (you can use simple superphosphate).
Skewer can be planted either in rows or in heaps. Any planting method gives an excellent decorative effect.
When planting in rows, the depth of the hole should be approximately determined as the ratio of one bulb height to three of its dimensions in the soil depth (1:3). The smaller the tuber, the shallower the depth.
When planting in heaps, it is convenient to use some kind of lattice container and plant the bulbs in it. At the end of flowering in the fall, it will be very convenient to extract all the tubers together at once.
The distance between the bulbs is about 15 - 20 cm.
Mulching
After embedding gladioli into the soil, it is necessary to lay mulching material on top. If spring in the Urals (and this also happens) is immediately hot, the mulch will create a favorable microclimate for the bulbs. They will not dry out or overheat.
If, on the contrary, cold weather sets in after planting, mulch will save the tubers from the cold.
Mulch will also protect gladioli from weeds, preventing them from spreading under the stems.
What can be used as mulching material?
- last year's leaves
- tree bark
- paper
- pine or spruce needles
- wood chips
- grass
Note: The famous gardener L.P. Zaikina from the village. Vishnegorsk, Chelyabinsk region in the magazine “Floriculture” No. 6 1980, published an article about her experience. It consisted in the fact that the close proximity of gladioli to violas gave an unexpected result - all the dug up corms in the fall turned out to be absolutely healthy.
Gladioli care
Watering and loosening
Throughout the entire period of growth and flowering, it is important to ensure that gladioli do not suffer from moisture starvation. Although in the Urals the summer period is most often accompanied by rain and low temperatures, there are still dry months.
It is best to water at the root so that water does not get on the leaves.
Loosening of the root zone and row spacing is required. Let your favorite flowers be able to “breathe” easily. There should be no weeds! Gladioli are neat flowers. They don’t like “weedy” neighborhoods.
Fertilizers
For beautiful flowering, you need to monitor feeding. You can get by with three main ones:
- The first is nitrogen. When the plants sprout their first shoots and reach 10 - 15 cm, you can feed them with urea or ammonium nitrate. Dissolve 20 gr. per bucket of water (10 l).
Gladioli are very responsive to simple feeding with fermented infusion of herbs. You can add ash to it. 1 liter per bucket of water (10 l). Use this simple solution once every 3 weeks until the flower stalk emerges.
Important! Apply nitrogen-containing fertilizing only when there are no signs of disease on the seedlings.
- The second is complete, nitrogen/phosphorus/potassium (Kemira, MicroMix, Fertika Lux, etc.).
The second full feeding is carried out at the time when the gladioli have formed 4 - 5 true leaves.
- The third is phosphorus-potassium fertilizers, without nitrogen (Autumn, AVA, etc.). Phosphorus should be taken 30 - 40 grams. for 10 liters of water. Potassium 15 – 20 gr. for 10 liters of water.
This last feeding is carried out when the gladiolus has thrown out its peduncle.
Protection from pests and diseases
During wintering, gladioli can suffer from thrips and other pests. Thrips penetrate under the husk and suck out all the juice from the bulb, causing it to die. protect tubers from pests and diseases in the following ways:
- Garlic. The chopped cloves must be placed in containers where the bulbs are stored. When checking planting material, all dried garlic is replaced with fresh garlic.
- Paraffin. The paraffin film protects gladioli from moisture loss, as well as from pests and infections. During spring planting, it can be easily removed by hand. But you need to take into account that this procedure will not save a diseased tuber.
If pests appear on the flowers, treatment with Zineb is recommended. The tubers should be immersed in it for half an hour and then dried for 2-3 days in a well-ventilated area. After the procedure, they are put back into storage.