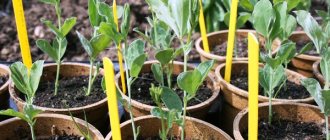
Planting indoor plants is the basis for good development and growth. This process is more likely to apply to existing plants. Which require planting in a permanent place and in the main pot.
Planting is the foundation for the health of your plants. Proper planting will not only minimally injure your plant, but will also allow it to quickly adapt to new conditions. There is no need to rush when planting, do everything slowly, and you will not have to replant it again.
Sowing petunia according to the LUNAR CALENDAR in 2022
To begin with, we provide a list of favorable and unfavorable days in order to know when it is recommended to plant petunia seedlings in 2022 according to the lunar calendar, and when, on the contrary, you should refrain from sowing.
- Favorable days in 2022:
- January
– 3, 8, 9, 10, 11, 15, 16, 23, 24 - February
– 3, 4, 7, 8, 9, 10, 11, 12, 13, 14, 15, 22, 23 - March
– 3, 6, 7, 8, 10, 11, 12, 16, 17, 21, 22, 23, 29, 30 - April
– 3, 4, 5, 6, 7, 9, 12, 13, 14, 15, 26, 27
Unfavorable days for planting will fall, as usual, on new and full moons. Also, if possible, it is better to avoid those days when the moon is in the sign of Aquarius (one of the most barren periods).
- Unfavorable days in 2022:
- January – 2, 4, 5, 18
- February – 1, 2, 16, 28
- March – 1, 2, 18, 27, 28
- April – 1, 16, 23, 24, 25
For those who are used to navigating by the lunar calendar, a list of specific dates is certainly necessary information. However, it is worth little if you don’t know in what month it is better to plant petunia in your region, what is the difference between the planting times for hanging and bush varieties, when you need to plant these plants, based on the length of daylight hours and the required time for the start of flowering. It is this information that will help you start sowing on time, so that the plants will then develop normally and be able to bloom together. We recommend that you continue reading and learn more about planting dates, as well as how to organize the process itself as simply as possible.
Pots for plants.
Before planting houseplants, you must prepare. You should already have the appropriate pot. It depends on the size of the plants and your preferences. Pots come in different colors and are made from different materials. Clay pots are durable, but heavy and not always attractive. Plastic ones are lighter and have a wider range. Variety of colors and sizes.
You can choose the right size pot by knowing the soil of the plant you purchased or need to plant. The pot should be slightly wider than the previous one in which the plant grew. Plants are sold in small plastic pots - these are transport pots. They grow plants for sale. It is not recommended to further grow plants in such pots. The choice of pots for indoor plants is very large. Some prefer clay, others plastic. Self-watering pots are very convenient, but their cost is much higher than usual. Try to match the pots to the interior of your home; it’s better when they are all in the same style.
I use the lunar calendar, you can choose favorable days for planting indoor plants. The most favorable day for planting is the waxing moon.
We choose the timing of when to plant petunia seedlings in different regions
It is important to understand when planting time is in your region. For different climatic conditions, the optimal periods will be quite different.
Middle zone (Moscow region)
The most suitable time throughout the middle zone will be:
February March
Southern regions
Here you can start planting earlier. It is perfectly acceptable to sow:
from the second half of January
North-West, Urals, Siberia, Far East
In these regions, the timing is quite extended and depends on additional lighting when growing seedlings (more on this later) and the location of further planting of seedlings. In general, it is better not to rush and plant during the following period:
end of February – beginning of April
How seedling planting conditions affect sowing dates
Now let's look at the important clarifications regarding the above deadlines.
From the moment of sowing petunia for seedlings until transplanting the seedlings to a permanent place, 11-13 weeks should pass.
Focus on these numbers. That is, if you plan to plant seedlings in open ground in early June, then you need to sow in early March. Petunia is a heat-loving plant, so be sober about when it can be moved to a permanent location. The landing conditions for it should be as follows:
- There is no threat of return frosts.
- The soil warmed up to +10-12 degrees.
Think about when this time comes in your area, and count back the indicated 11-13 weeks to determine the earliest sowing time. For example, in the middle zone (Moscow region), the planting time that meets the requirements is in the second half of May, which means that you can sow from approximately mid-February.
When making these calculations, keep in mind that petunia is also very light-loving. If you have phytolamps and the ability to supplement the seedlings literally from the moment of sowing, then you can safely plant the seeds in February or even January, but if not, then you should not sow them before March. With a lack of lighting, seedlings, unfortunately, easily stretch out and become thin and weak.
With additional lighting, petunia can be planted as seedlings much earlier; without additional lighting, it is better not to rush and sow no earlier than March, regardless of the region.
Additional lighting is required in winter
If for some reason you want to start planting earlier, but you won’t be able to provide additional light to the seedlings, then choose the brightest window to place them and in the future be sure to pinch the bushes so that they branch better and are denser, but know that the risk is still very high that young plants will be weakened.
If you plan to plant seedlings not in open ground, but place them, for example, on a warm glazed balcony or in another place where it will be comfortable regardless of the weather, and at the same time you have the opportunity to supplement the seedlings for a long time, then the sowing dates can be moved further the earlier side. In this case, it is possible to sow even at the beginning of January, and get well-developed plants already at the end of March - April. But this is still rather an exception, since mostly petunias, of course, are intended for planting in the open air.
You brought a purchased flower home, how should you care for it?
Typically, flowering hyacinths are not replanted, but this rule does not apply to plants purchased in garden stores.
Hyacinth bulbs can be purchased at any time of the year. If there is no intention to immediately send it for forcing, then place it in a cool place for storage at a temperature of 6–9°C. This will stop the growth processes and begin a period of rest. If a bulb is purchased in a pot, it is placed in a well-lit place for forcing.
Is it worth replanting from a store pot?
As to whether it is necessary to replant hyacinth from a store pot, gardeners have differing opinions. Some believe that it is undesirable to injure a flower by transplanting. Others do not see any danger to the plant in this process. In order to decide what to do next, we evaluate the situation according to several parameters:
- flower condition: rooted bulb, there are sprouts, blooming;
- pot size;
- what will be done with the plant after it blooms.
Most often, hyacinths are sold in their best commercial form: blooming. Moreover, the bulbs are planted in such small containers that the soil is almost invisible. The vegetation of plants in such conditions is maintained by watering with chemicals. Once this process stops, the flower may die. Therefore, in order to save the life of the flower, after purchase, the hyacinth must be transplanted into a pot with soil, regardless of whether it blooms or not. If it was purchased in a container with a sufficient amount of substrate, it is better to refrain from replanting. After the hyacinth has bloomed, the bulb is dug up and sent for a period of rest.
Recent Entries
Lilac perennials that are beautiful, compact and do not crowd out other plants Why when buying seedlings you should not take the sellers’ word for it and how to determine the age of the plant using 3 signs Tomato seedlings have turned purple or whitish: why the color has changed and how to save the plants
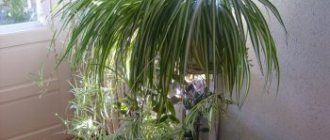
Conditions for growing hyacinth in a pot
Try not to place hyacinths on windowsills, where there is a high probability of drying out from radiators
A pot of hyacinth is placed in any bright, warm place. Proximity to heating devices: radiators and various heaters is undesirable. For normal growing season, the plant needs room temperature.
During the period of ripening of the buds, hyacinth can be illuminated in the evenings with an incandescent or fluorescent lamp. The optimal temperature for flowering is 20°C. Watering should be moderate but constant. The soil should not be allowed to dry out. It is important to prevent water from getting on the top of the bulb and in the axils of the leaves.
Therefore, water is added at the edge of the pot. This will inevitably cause gradual erosion of the substrate. In order to avoid this, the container with the flower is periodically turned. This is also useful for making the plant trunk grow vertical. If necessary (if the soil is not nutritious enough), fertilizing with mineral fertilizers is possible.
The conditions listed above are considered ideal for growing hyacinth in a pot. But it is not always possible to provide them. However, there is no need to worry about this: hyacinth is quite unpretentious and will definitely bloom at room temperature and normal indoor lighting.
We sow ampelous and bush petunias at different times
Depending on what type of plant - hanging or bush - you plan to grow, the optimal planting time will be slightly different.
- Reference:
- Ampelous - have long (50-120 cm) flexible shoots. Ideal for hanging planters and vertical gardening.
- Bush - have erect shoots, either compact (up to 30 cm), or spreading and quite long (up to 60 cm). Used in various flower beds.
Ampelous varieties and hybrids require a little more time to grow and develop. They are sown earlier.
It is better to sow ampelous petunias 2 weeks earlier than bush petunias.
Hanging varieties are very effective in hanging flowerpots
Balsam
For replanting for winter cultivation, balsam varieties with dark-colored flowers are chosen, since light-colored ones are less tenacious. The pot for replanting should not be too spacious, so that the presence of excess space does not provoke increased root growth to the detriment of flowering.
Transplanted plants are installed in a well-lit room, but not in direct sunlight - balsams love light, only diffused. It is best to place them some distance from the window or cover them with a light curtain. The temperature in the room should be maintained at +15°C, and moderate watering is required.
Deciding when to sow in order to achieve flowering in the right month: April, May, June, July
Petunia seedlings, as a rule, are planted already flowering, which is due to the peculiarities of the growing season of this crop: from sowing to planting, as already mentioned, approximately 3 months pass, and less - about 2.5 months until the flowers appear (the first buds may appear even earlier, especially if the variety is early). So it turns out that young plants often bloom even before they are transplanted to a permanent place.
Therefore, if you need to get flowering bushes by a certain date, then subtract 2.5 - 3 months from it.
It turns out:
- To achieve flowering in mid-April, you need to sow in mid-late January (mandatory long-term additional lighting will be required)
- To achieve flowering in mid-May, you need to sow in mid-late February (at first you will need additional lighting)
- To achieve flowering in mid-June, you need to sow in mid-late March
- To achieve flowering in mid-July, you need to sow in mid-late April
What flowers should not be planted at home?
Not all plants can be placed at home, even if they seem the most beautiful to you. Representatives of certain types of exotic vegetation are capable of releasing toxic substances into the air that are dangerous to all residents. Therefore, before you buy a seedling you like, you should ask the seller about the possibility of growing it at home.
The list of “undesirable” house flowers includes the much-loved Dieffenbafia. It is indeed often used to decorate homes, but if the juice gets on the skin, it leaves burns and can cause severe poisoning.
This fact made the plant conditionally safe, while some others were included in the list of completely prohibited for home cultivation.
These are exactly what they are:
- Mimosa. The flower has an interesting ability to respond to human touch by folding its leaves. This feature attracts the attention of many gardeners, but the aroma it spreads is dangerous to health. When constantly kept indoors, mimosa causes prolonged toxicosis and promotes hair loss.
- Monstera. It does not emit any toxic fumes, but its juice is even more toxic than that of Dieffenbafia and can cause serious burns.
- Nightshade. This plant is safe only until bright orange fruits appear on its shoots. They contain toxic substances and should be kept away from children and animals.
- Azalea Sims. This variety is much more dangerous than other similar plants with attractive lush leaves. The juice of the flower can cause severe poisoning, accompanied by colic, cramps and stomach pain.
- Indoor spurge. If the juice comes into contact with the skin, burns occur, and ingestion causes nausea and stomach upset. In some cases, burns of the mucous membrane and dizziness are possible.
Of course, careful handling of these types of indoor plants can reduce the risk of poisoning, but it cannot be completely eliminated, so it is better to choose completely safe flowers for your home.
Choosing suitable seeds
Further subtleties concern not the timing, but the preparation and the planting process itself. It must be said that there are quite a lot of nuances in this matter. First you need good seed material. After a certain time, it loses its viability, so you should avoid overdue ones that have been stale.
The shelf life of petunia seeds is up to 5 years.
But if possible, it is, of course, better not to keep them for that long - as practice shows, their optimal germination is within 3 years. However, during storage it is important that they are kept in suitable conditions: a dry and dark place. Best when cool. Sometimes there is a direct indication on the packages that it is recommended to store them in the refrigerator - at such temperatures, viability lasts longer. It follows that:
For better germination, we take fresh seeds - 1-3 years old.
Older (up to 5 years) planting material can also be used, but only if all storage conditions have been met, and then there are no guarantees in this case.
The bags are best stored in the refrigerator
Petunia seeds are very small (0.5 mm in diameter) and dark, merging with the color of the soil. Planting such crumbs is problematic, so manufacturers have now mainly switched to producing them in pelleted form: they are covered with a special colored nutritious shell, which makes them larger and more noticeable.
At the stage of selecting varieties and hybrids for planting, decide what type of seeds you will sow - regular or pelleted. Both have a number of advantages and disadvantages.
Regular seeds:
- Minuses
- very small
- poor assortment today
- indistinguishable on the ground
- pros
- cheap
- no additional dissolution of the shell is required
Dried seeds in capsule
Dried seeds:
- Minuses
- the shell sometimes dissolves with great difficulty
- expensive
- small quantity per package
- You may get empty pellets
- pros
- larger than normal size
- have a noticeable color
It is better to take planting material from trusted agricultural companies, since the germination of petunia seeds is a sore subject. Even fresh ones, alas, can sprout poorly.
Due to their extremely small size, petunia seeds are difficult to plant, and for the same reason they are not subjected to any pre-sowing treatment - this is simply unrealistic.
Propagation of hyacinths at home
In nature, hyacinth reproduces by children. Moreover, the bulbs take a very long time to grow: 3–5 years. For obvious reasons, this method is of little use for home propagation. Over the years of breeding bulbous flowers, several optimal methods for their propagation have been found:
- seeds;
- children;
- cuttings;
- cutting out the bottom;
- dissection of the bulb (reproduction by scales).
The first method of propagation is the most labor-intensive and time-consuming: by seeds. It is most often used if you want to get flowers of a rare variety, the bulbs of which are not commercially available.
Reproduction by children
Reproduction by children is the easiest
Highly productive, most commonly used method. Beneficial for several reasons:
- the first flowering occurs in the third year after planting;
- all characteristics of the mother plant are inherited;
- high survival rate.
Stimulation of the formation of children is carried out by cutting the bottom of the mother's bulb crosswise.
Cuttings
Cuttings are harvested during the period of bud formation.
- Select a leaf with a cutting and cut it as close to the plant trunk as possible.
- The cut is treated with a disinfectant and growth-stimulating drug.
- Planted in a container with substrate or under film.
After 3–4 weeks, rooting occurs. After 50–60 days, the first shoots of a new plant appear. In the first two years, the bulb is not dug up; it is left to overwinter under a thick layer of mulch.
Cutting the bottom
This method is best used by experienced gardeners.
With this method of propagation, large bulbs are used. The sequence of actions is as follows:
- wash the seed from soil residues;
- laid to dry for 5–7 days;
- Using a sharp knife, cut out the bottom of the bulbs so that a cone-shaped hole is obtained;
- the cut site on the bulb and the cut bottom is treated with a fungicide solution (crushed charcoal can be used);
- The cut bottoms are laid cut side up and covered with plastic wrap.
The first babies with a diameter of 5–10 mm appear after 2–3 months. If the air temperature allows (not lower than +30°C), you can plant in the ground.
Bulb dissection
This method of propagation requires dense, large bulbs. Using a sharp knife, they are divided into 5-6 parts. Each slice is disassembled into scales. All sections are treated with a disinfectant. The resulting seed is stored in plastic bags. In the first month at a temperature of +20–25°C, in the second – +17–20°C.
If you wish, you can grow beautiful hyacinths in a pot at home. Detailed instructions on each stage of preparation and germination of seed and caring for a flowering plant will help with this.
- Author: Ollgga
Rate this article:
- 5
- 4
- 3
- 2
- 1
(75 votes, average: 3.5 out of 5)
Share with your friends!
Preparing the soil
Any high-quality commercial soil for seedlings or universal soil is suitable for planting petunias. In this regard, the plant, fortunately, is not overly capricious - the main thing is that the soil is loose, nutritious and can sufficiently retain moisture. The soil reaction should be neutral or slightly acidic.
If possible, the soil should be steamed (or calcined in the oven) for 40-60 minutes to prevent the seedlings from developing blacklegs.
Good soil is the key to success
Before pouring it into the container where planting will take place, all large foreign elements - roots, stones, lumps, etc. - are first removed from the soil. You can also sift it so that it has a uniform and loose structure. If possible, it is worth adding a little vermiculite.
It is also possible to independently prepare the soil mixture, although from the point of view of the ratio of results and labor costs, this option is not the most optimal. Nowadays, it is much easier to purchase ready-made soil for planting, especially since you only need a little of it at first. In general, we present the composition and proportions for the mixture with your own hands, rather just in case: 1 part humus, 1 part leaf soil, 1 part turf soil, 1 part lowland peat, ½ part sand.
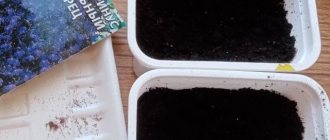
Preparing soil and containers for flowers
Before sowing seeds, prepare the container and soil. Clay pots perfectly allow air to pass through to the roots, but pathogenic microflora easily accumulate in them. Therefore, plastic containers are an ideal option for flowers. Rinse the containers thoroughly with hot water and baking soda and rinse with cold running water. Read on the seed packet for soil requirements. Different plants may have different requirements. But most often, ready-made soil or a mixture of sand and peat serves as excellent soil.
Selecting containers
Option 1. The classic method when sowing petunias is to plant a large number of seeds in common containers with further picking. To do this, it is optimal to use plastic containers with tight-fitting transparent lids. If there are no lids, think in advance how you will cover the containers at the initial stage, since they must be covered on top with something moisture-proof and transparent (glass, plexiglass, film).
Sowing in a common container
Regular food containers with lids are a great planting solution.
Container sizes need to be small, since petunia seedlings are very small.
Don't forget about drainage holes in containers - they can be made in thin plastic using a soldering iron or a hot awl.
Option 2. In addition, there is an alternative type of sowing: planting in individual containers without picking. Such individual containers can be individual small glasses, cassettes or peat tablets.
Sowing in cassettes
Which sowing option to choose is largely dictated by the type of seed. Usually:
Ordinary ones are sown in a common container, and panned ones are sown in individual containers.
At the same time, among the forms of individual sowing, the undisputed leader today is planting in peat tablets. Sowing in cassettes or cups is a little less common. The main subtleties of planting in peat tablets will be discussed a little further.
Dividing and planting rhizomatous perennials
In spring, gardening stores, nurseries, and private traders offer a wide range of rhizomatous perennials - flowering and decorative foliage plants. Hostas , heucheras , astilbes , small-flowered chrysanthemums , phlox , clematis, roses, peonies, sedums, speedwells , delphiniums , bush hydrangeas , spirea , cinquefoil , honeysuckle and others. The species and varietal diversity is amazing! To guarantee survival, it is better to buy seedlings with a closed root system, which are sold in containers or pots.
It is advisable to choose a place in your garden a couple of weeks before the intended planting, taking into account the plant’s requirements for environmental factors and prepare the soil.
In the spring (until mid-May), the perennials that have grown in the dacha are divided, but only those that will bloom in August and autumn: asters, helenium, goldenrod, rudbeckia, phlox, chrysanthemums. To divide, the bush is dug up entirely and cut into pieces with a knife, each of which should have 3-5 buds and a piece of rhizome with a good root lobe. The cuttings are disinfected with ash, dried in the open air and planted. The renewal buds are buried 3-5 cm. The daughter bushes are watered and mulched.
The mother plant can be carefully divided without digging: the soil is raked off on one side, part of the visible rhizome is cut off and separated
Many rhizomatous crops are characterized by a process of particulation , in which the mother bush disintegrates due to the destruction of the main root. The curtain breaks up into daughter plants, which no longer bloom as luxuriantly as before. This happens in the 3-5th year of the perennial’s life. To prevent the natural process of degeneration, the bush is divided every 2-4 years or the planting is renewed with new plants grown from seeds. Nielweed , kareopsis , forget-me-not , delphinium , and lupine are subject to particulation .
Sow in a common container: classic method
When planting in a common container, it is first filled with soil with a layer of 4-6 cm. There should be about 3 cm between the soil level and the upper edge of the container so that the seedlings have enough vertical space. The soil is leveled, compacted and watered abundantly. After this, they begin sowing. Regular (not coated) seeds are poured onto a light plate, and using a toothpick or wooden skewer, previously soaked in water, they are transferred one by one to the surface of the soil.
The seeds are laid out on the surface, not buried and not sprinkled with soil on top.
The peculiarity of sowing petunia is that the seeds should be placed ON the ground, and not in depth. If there is a layer of soil on top, they will not germinate.
After the required number of seeds have been spread out, they are sprinkled with water from a spray bottle on top, and then the container is closed with a lid and put in a warm place.
Reasons why you shouldn’t hesitate to replant indoor flowers
- The pot is not the right size . The flower has grown and the root system no longer has enough space in it. This can be determined by the fact that the soil dries out quickly and the roots of the plant are visible from the drainage system and holes at the bottom of the pot.
- The flower looks unhealthy. The leaves fall off or quickly turn yellow, and the plant has a lethargic appearance.
- Acidic soil. Excessive watering and poor drainage can deteriorate the soil, as evidenced by an unpleasant odor and the appearance of a light brown coating on the walls of the pot.
- The plant has not been replanted for a long time. If a green pet has lost its former beauty and has not pleased its owners for a long time with its flowering, this may mean that the earth has exhausted its properties.
Transplanting flowers - New flower. A plant purchased in a store may be planted in soil that is unsuitable for it; peat is often used. Once you bring it home, you need to examine the soil and replant if necessary.
- The houseplant has outgrown its pot. The flower has grown so much in the pot that it is just starting to crawl out of it. For example, there were a lot of children around and there was not enough space for everyone.
There are also times when you do not need to disturb the plant. If it blooms in the spring, you must wait until the end of flowering and only then replant.
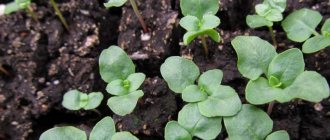
We sow in a common container: in the snow
Distributing microscopic seeds one after another is a tedious task, so various tricks are used to make the process easier and faster. The most common one is to use snow.
The soil is placed in the container in the same way as in the previous (classical) planting method. Then clean snow is laid out on top in a continuous layer (1.5-2 cm thick) over the entire surface, after which the seeds are carefully scattered over the snow, trying to do it as evenly as possible. Dark dots are clearly visible on a white background, and if desired, they can be redistributed over the surface using a toothpick. The snow is then allowed to melt and the seed appears on the ground as required.
Sowing in the snow
When using this method, the container must have drainage holes so that after the snow melts, excess moisture can drain.
The planting material is sufficiently moistened, so no additional spraying is needed. The container is covered with a lid, glass or film and placed in a warm place.
Common mistakes
Both planting and replanting indoor plants usually do not cause difficulties even for novice gardeners, but no one is immune from mistakes in carrying out the procedure.
Did you know? To improve your personal life, flower growers recommend placing pots of violets in the house, in particular on the windowsill in the bedroom. Its energy will give inner peace, help cope with stressful situations and set the owner in a romantic mood.
The most common of them include the following:
- incorrect selection of soil (in some cases, even universal options have to be “adjusted” based on the needs of exotic flowers, thereby achieving a decrease in density, or, conversely, even greater compaction of the substrate);
- incorrect selection of pot (in very large containers the alkalinity of the substrate decreases, the root system rots and problems with flowering appear);
- incomplete replanting: do not try to preserve the maximum amount of “native” soil on the roots of the purchased plant, because it is only a temporary place of growth during sale and transportation (you can soften the old substrate with warm water, and this must be done so that there is no even the smallest grains of sand);
- increased content of nutrients in the soil (applying a large amount of fertilizing immediately after replanting threatens the growth of green mass while simultaneously crushing the flowers themselves);
- replacing the pot in plants that do not need it (for example, for hippeastrums, cramped space is even useful, as it does not allow children to grow and at the same time stimulates the flowering process);
- joint planting and pruning of flowers (this injures the plant twice as much and does not allow it to recover quickly).
We use an alternative approach: we sow in peat tablets
For pelleted seeds, a good planting method is individual sowing in peat tablets.
To do this, place dry peat tablets in a plastic container and fill them with water. Wait for swelling, adding water if necessary. When it is clear that the tablets are already well soaked and have reached their maximum size, excess water is drained and sowing begins. Pelleted seeds are poured onto a saucer and, with a damp toothpick or skewer, transferred one at a time to the center of each peat tablet. Just as when sowing in a common container, the seeds should not be buried under any circumstances - they should lie on the surface of the substrate.
Peat tablets are very convenient for sowing pelleted seeds
It is very important, after the seeds are spread out, to generously spray each tablet on top using a spray bottle.
The pelleted seeds must be generously moistened, otherwise their shell may not dissolve and they will disappear without hatching.
After this, the container with the tablets is closed with a lid and placed in a warm place.
Caring for indoor plants
Proper planting is only the first stage on the path to obtaining beautiful decorative flowers, because the success of their cultivation largely depends on further care. This definition usually means watering, fertilizing, pruning and transplanting grown seedlings, and each of the processes has its own characteristics.
Fertilizer
For good growth and prosperity, almost all house plants need calcium, phosphorus, iron, nitrogen, potassium, magnesium and sulfur, which they can receive along with regular self-fertilizing or by fertilizing during watering.
The application of nutrient formulations with water is becoming increasingly popular, which is explained by the ease of preparation and use of the nutrient solution (crystalline or liquid fertilizer just needs to be mixed with water, in a dosage clearly defined by the manufacturer, and then soak the soil with it).
In order not to harm the flowers, at the initial stages of using fertilizers, you should adhere to the minimum standards for their use, which can be increased only in the case of obvious signs of a lack of nutrients.
This also applies to the so-called prolonged preparations, which are produced in the form of capsules and, upon contact with groundwater, spread throughout the entire thickness of the soil for 30, 90 or 150 days (the exact duration of action depends on the specific substance located inside the capsules).
The best time to apply nutrients is when flowers are actively growing, but it is better not to fertilize them while the plants are dormant or immediately after replanting, since there is always a risk of burning the tender roots.
Watering
The rate and frequency of watering indoor plants directly depends on their type. For example, all aroid flowers do not go into a dormant state even in winter, but only slow down their growth, so watering can be reduced, but should not be stopped completely.
At the same time, representatives of the Mulberry family (for example, Ficus Benjamin) stop growing with the arrival of cold weather, which means they practically do not need moisture. Ornamental plants with succulent leaves often survive the winter without watering at all, since they have enough moisture accumulated inside.
There are several recommendations regarding proper watering:
- the addition of liquid should always be moderate (you should not overwater the plants, even if they are moisture-loving species);
- Watering should only be done after checking the soil moisture (if the soil is moist, you can wait a little longer);
- You can water your house plants only with settled water at room temperature; cold liquid with chemical compounds present in the composition will destroy the flowers;
- It is advisable to spray only those species that are favorable to such a procedure with a spray bottle, otherwise the leaves will curl and hurt.
On average, indoor plants are watered 1–2 times a week, but external climatic conditions play a big role in the regularity of this procedure: air humidity and room temperature.
Trimming
Novice gardeners are very wary of pruning indoor plants, but in fact it is simply necessary. Correctly performed decorative and sanitary shortening of shoots will not only not harm the plants, but will also significantly improve their appearance, so you should not exclude it from the care plan.
The best time to carry out the procedure is the beginning of summer, although the removal of yellowed leaves and diseased shoots should be done all year round to prevent the proliferation of harmful microorganisms.
Some types of flowers require formative pruning, which will stimulate the active growth of shortened lateral buds and the appearance of new flowering shoots (usually this applies to roses, ficus, hibiscus and citrus fruits).
Important! It is better to trim young and not overgrown plants to a minimum so that they slightly lose their decorative value.
Most often, cutting 2/3 of the length of the shoots is considered safe, even if only 2-3 live buds remain on the bush. Subsequent feeding of the flower will contribute to its rapid revival, and the decorativeness of the plant will only increase: it will have the strength to form new shoots.
Transfer
Contrary to popular belief, replanting does not need to be done for all problems with the flower. Thus, yellowing leaves and slow growth often indicate a lack of nutrients, and not a lack of space in the pot.
You can check your guesses only after carefully removing the plant: if, after turning the earthen ball upside down, you notice that the roots have actually pierced the entire soil, then you will still have to think about replanting.
For large plants, this procedure should be performed once every few years, while not forgetting to focus on the speed of their growth after the previous transplant.
If it comes to replacing the pot, it is better to postpone the transplant to the spring, choosing a larger container in advance. For large flowerpots, sometimes it is enough to simply replace the top part of the soil, but medium and small plants will have to be completely removed from the old pot, while being careful not to damage the root system.
If there are dried or damaged parts on it, it is better to cut them off, after which you can place the flower in a new pot, lined with a drainage layer and a soil mixture of a suitable composition.
All further actions are carried out in the same way as when planting seedlings: the plant is placed in the center of the container and, having straightened its roots, it is simply covered with soil. The root collar (the place where the stem transitions into the roots) should coincide with the line of the surface of the substrate.
The remaining soil mixture is poured on top and compacted around the stem of the plant so that there are no empty spaces between the roots. From the surface of the soil to the top edge of the pot you need to leave at least 1–2 cm of free space.