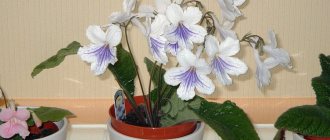
Streptocarpus is rightfully considered one of the most beautiful and unusual houseplants. The magnificence of shades and patterns on the petals of its flowers amazes even the most experienced gardeners. A luxurious head of flowers crowns a dense rosette of beautiful velvety leaves. Imagine that on just one streptocarpus bush there are up to a hundred bright buds, and flowering can last up to six months.
It is not surprising that streptocarpus is gradually becoming an increasingly popular houseplant. This is also facilitated by botanical breeders, who every year develop new, even more sophisticated varieties. In addition, unlike many beautifully flowering representatives of domestic flora, streptocarpus is unpretentious and does not require complex care.
In Europe and America, this home plant has gained immense popularity. There are entire groups and societies of enthusiasts growing streptocarpus. Due to their spectacular beauty, streptocarpus often become participants in flower shows common in the West and receive gold medals at floristic exhibitions.
Interested? Well, let's get to know Streptocarpus better.
The discoverer of the exotic flower is considered to be the botanist James Bowie, who at the beginning of the 19th century collected a collection of new plants in South Africa for the British Museum. Among other representatives of the tropical flora was streptocarpus, or rather one of its species, Streptocarpus rexii. The plant received a name consisting of two Greek words (streptos> - “curled”, karpos - “fruit”) and was allocated to a separate genus of the Gesneriaceae family (lat. Gesneriaceae).
The homeland of streptocarpus is the tropical forests of Central, Eastern and Southern Africa, or rather the wooded parts of mountain slopes. The plant is considered a lithophyte (representatives of the flora growing on rocky rocks) or epiphyte (using large trees as support).
Caring for streptocarpus at home
In general, among flower growers, streptocarpus is considered an unpretentious representative of the home flora. Caring for it is much easier than, for example, caring for Saintpaulias, which are also representatives of the noble Gesneriev family. Therefore, if capricious violets have not taken root on your windowsill, it makes sense to get streptocarpus, which is not inferior to them in beauty.
The homeland of streptocarpus is Africa, but not the hot desert part of the continent, but mountainous areas in which the temperature does not rise above 25°C. This is why streptocarpus does not like excessive heat. Another feature of flower care is the special composition of the soil. Like other Gesneriaceae, Streptocarpus does not tolerate too heavy acidic substrates. Let's add to this generous feeding and a sufficient amount of sunlight - these are all the main nuances of growing a magnificent flower at home. If you want more details, read on.
Temperature and lighting
The optimal summer temperature range suitable for streptocarpus varies between 20-25°C. In winter, when the flower is resting, it may be a little colder - 15-18°C.
Streptocarpus cannot be classified as one of those house plants for which a period of rest is vital. And yet, some gardeners prefer to give it a cold winter. In this case, the plant is moved to a glazed balcony, loggia or any other room whose temperature is about 10°C. You shouldn’t put the bowl in a dark place; streptocarpus needs sunlight at any time of the year.
Both excessive heat and extreme cold are equally harmful to the gentle African guest. The maximum summer temperature is 28°C; in winter the thermometer should not fall below 8°C.
Streptocarpus prefers fairly bright lighting; morning and evening sun rays have a particularly beneficial effect on the flower. The best location for the plant will be the window sills of south-eastern and south-western windows with slight shading on especially hot summer days. On northern, north-eastern and north-western windows, if flowering occurs, it will be very sparse.
[!] In summer, in good weather, not too hot and not rainy, you can take the plant out onto the balcony. Fresh air stimulates bud setting and flowering.
Watering and air humidity
Streptocarpus does not tolerate excessive watering, and would rather prefer the substrate to dry out. The fact is that tender roots are susceptible to rot, which is caused precisely by too wet, acidified soil. The plant should be watered when the substrate has dried by about one third, more often in summer, and a little less often in winter. Excess moisture formed in the pan must be drained each time.
If a flower has experienced a short drought and dropped its leaves, it can be revived by watering.
Despite the fact that streptocarpus does not like intensive watering, it has a positive attitude towards high air humidity. The only thing you shouldn’t do is spray water directly on the leaves and flowers. Droplets of water can cause unsightly brown spots to appear on delicate velvety leaves and flower petals. To humidify the air, you can:
- place a container of water next to the streptocarpus,
- use a household humidifier,
- spray around the plant.
Soil, replanting and fertilizing
The soil in which the African beauty grows should be light and loose (water- and breathable). The optimal soil acidity for planting streptocarpus is 6.7-6.9 pH.
You can make the soil yourself or use a ready-made one. To prepare the soil you will need leaf and turf soil, as well as humus and sand in a ratio of 2:1:1:1. From store-bought substrates, mixtures based on high-moor peat, universal ones, or soil for Saintpaulia are suitable.
Perlite, vermiculite, mog sphagnum and crushed activated carbon should be added to both prepared and store-bought soil. This will give the soil additional looseness, and will also protect the plant’s roots from rotting. In general, the landless part should be at least 50% of the total volume of the substrate.
Do not forget about a sufficient drainage layer, thanks to which water will not stagnate at the roots. The drainage height should be at least 2-3 cm.
Streptocarpus quickly master the earthen ball, entwining it with roots, so the frequency of replanting the plant should be at least once a year. Each subsequent container for a flower should be approximately 1.5-2 cm larger than the previous one. As for the shape of the bowl, the best choice would be the classic version - not too tall, but not wide either.
Since the soil for streptocarpus is poor in microelements, and large leaves and bright flowers require good nutrition, the plant needs to be additionally fed. Moreover, it is better to alternate fertilizers. In the spring, when streptocarpus awakens and intensively grows green mass, fertilizers for decorative deciduous plants with a high nitrogen content should be used. After the buds appear, you need to choose a fertilizer with a high content of phosphorus and potassium. This is what these fertilizers are called - for beautifully flowering plants.
The time for applying fertilizers is from the beginning of spring until the end of flowering. If streptocarpus continues to bloom in winter, feeding must be continued.
Trimming
Periodically, especially in late autumn, old streptocarpus leaves turn yellow and die. This is a completely normal phenomenon, as the plant is preparing for winter. At this time, streptocarpus needs to be helped by removing dried parts: leaves, faded flower stalks. This procedure stimulates the formation of new young leaves and buds. In addition, a well-groomed streptocarpus looks much more attractive.
[!] Some streptocarpus have a very interesting feature - before wintering their leaves dry out, but not entirely, but about half. Moreover, which part of the leaf plate will dry out can be seen in advance - it becomes lighter. In spring, such “halved” leaves continue to grow again.
Streptocarpus flowering
Usually all species of this representative of the Gesneriev family bloom profusely, and flowering often begins already in the baby. But sometimes, some gardeners have a problem - streptocarpus does not bloom. Let's try to figure out why this happens.
Firstly, the time of year matters. Most domestic streptocarpus begin to bloom in spring and end in autumn, and only a few varieties bloom year-round. That is why you should not wait for buds to appear in the cold months. Secondly, the age of the plant is also important. Depending on the variety, flowering can occur either at the very beginning of streptocarpus development, or much later, after streptocarpus has gained a thick green mass.
If your streptocarpus is old enough, but there are still no flowers, there may be mistakes in care:
- Poor lighting. Moreover, the intensity of sunlight and the duration of daylight also matter. Even a short distance from the window glass can be the reason for the lack of buds. In addition, streptocarpus should be placed so that the main surface of the leaves is facing the light.
- Excessive watering. When there is too much moisture in the substrate, the roots are the first to suffer - rot appears on them. If the roots are unhealthy, you can forget about leaf growth and, especially, flowering.
- Insufficient feeding. Streptocarpus spends a lot of energy on setting buds and subsequent flowering, which is replenished with minerals from the soil. That is why the plant should be fertilized abundantly.
- Extra leaves. It happens that single small leaves appear on the petioles of the main leaves instead of peduncles. They must be removed, as they interfere with the development of peduncles and thicken the streptocarpus bush.
Reproduction
Propagating streptocarpus is a fascinating activity, because a new plant can be obtained from literally any part of the mother plant. In general, there are several methods of propagation: seeds, division, leaf cuttings.
Propagation by seeds
On the one hand, this is a fairly easy method - the seeds germinate quickly and take root well in the future. On the other hand, seeds obtained from a varietal plant do not always retain its hybrid qualities. This means that it is better to purchase seed from reputable sellers rather than collect it yourself from a plant you like.
Sowing of streptocarpus seeds begins at the end of February-March. The planting technology is quite simple:
- First you need to prepare the substrate. Each grower, as a rule, has his own preferences, but the classic composition of the soil for seed germination is peat and sand in equal proportions;
- The substrate should be placed in a greenhouse (ready-made or made from a plastic container) and moistened generously with water from a spray bottle;
- Scatter the seeds on top, without burying them - sunlight is necessary for germination. Due to their small size, there is no need to pre-soak them. The exception is glazed seeds; for better germination, the shell must be soaked in warm water.
- Cover the greenhouse with a lid, glass or bag and place it in a warm and bright place;
- Approximately once a day for 15 minutes, the covering structure must be removed for ventilation. In addition, it is necessary to maintain sufficient soil moisture by irrigating it from time to time with a spray bottle;
- The seeds will sprout within 10-14 days.
Reproduction by division
This method is best used during the annual transplant of adult streptocarpus. The bottom line is that an adult plant with several leaf rosettes is divided into two or three identical parts. Each part must have an above-ground growing point and a sufficient number of roots. It is necessary to moisten the substrate generously, remove the streptocarpus from the pot, shake off the soil and divide the plant with a sharp knife. To prevent the appearance of rot, the cut areas on the roots should be sprinkled with crushed coal. Then each resulting part must be planted in a separate container.
Propagation by leaf cuttings
For novice gardeners, propagation of streptocarpus by leaves may seem too unusual, but experienced lovers of house plants know that most representatives of the Gesneriev family (Gloxinia, Saintpaulia) are capable of producing new shoots from leaves.
We take a streptocarpus leaf that is not too old, but not too young, and cut it:
- across into two or three parts;
- lengthwise into two parts, cutting out the central vein;
- into four parts - two longitudinal and two transverse, also cutting out the central vein.
The central vein will no longer be needed and can be discarded. Then we plant the prepared leaf fragments, cut side down, in a greenhouse filled with a peat-sand mixture. We place the container with the cuttings in a bright, warm place, periodically moisten the soil and wait for the shoots to appear. As a rule, shoots begin to sprout no earlier than two months later.
Diseases and pests
The main disease that threatens streptocarpus is the fungal disease root rot. The disease appears due to excessive watering, especially in combination with low air temperatures, and its symptoms are loss of leaf turgor, its wilting, weakening of petioles, and the appearance of brown spots on various parts of the plant. If root rot has already begun, only replanting the plant with a complete replacement of the substrate will help. In this case, the rotten areas must be cut off to healthy tissue, and the cut areas must be sprinkled with crushed coal.
Fungi can also settle on the above-ground parts of streptocarpus. In this case, gray rot or powdery mildew appears.
The pests that most often attack streptocarpus are thrips. The most favorable environment for insect development is excessively dry and warm air. In addition, spider mites and aphids pose a danger.
If any insects are detected, immediate action must be taken. To begin with, to prevent other plants from becoming infected, streptocarpus should be quarantined. Then wash off the pests with water, and treat the flower with any modern insecticide (Aktara, Bazudin, Fitoverm) and place it in a plastic bag for 24 hours. After 7-10 days the treatment must be repeated.
In general, proper care and periodic inspection of the plant guarantee good health of streptocarpus.
***
Extraordinarily beautiful, and also unpretentious, streptocarpus will delight any enthusiastic gardener. This truly royal flower will decorate the interior and give its owner many pleasant moments, delighting with a riot of colors.
Streptocarpus from seeds (master class)
Streptocarpus is a flowering plant from the Gesneriaceae family, which today is very popular among collectors and indoor floriculture enthusiasts.
Streptocarpus is unpretentious in growing and caring for it, like some of its other brothers. Indeed, today many varieties of streptocarpus have appeared with flowers of various shapes and unusual colors. And this is due to the fact that flower growers have studied methods of care and propagation of streptocarpus. There are several ways to propagate this plant. This is dividing the bush, propagating by leaves and seeds. I do not take into account the meristem method of reproduction, since this method is used by professionals. In this article I will tell you how to sow streptocarpus seeds and how to care for the seedlings. I would like to immediately warn you that when streptocarpus is propagated by seeds, parental characteristics are not always transmitted to children. But this is an excellent method of propagation to obtain new colors, flower shapes, and the only way to obtain new varieties. Streptocarpus seeds are very small, slightly larger than a speck of dust.
Freshly collected seeds have the best germination rate. The seeds that I sowed were collected from varieties of streptocarpus by Yulia Sklyarova. The best time to plant streptocarpus seeds is the beginning of spring.
I sowed the seeds in a plastic box with a lid.
At the bottom of which perlite was poured, vermiculite is also suitable,
moistened it and poured the prepared substrate from Jiffy tablets on top, which contains all the necessary substances and microelements for germination and rapid development of seeds.
How to prepare a Jiffy tablet for planting? Jiffy tablets are sold in sizes of 3.6 centimeters and 5 centimeters in diameter. I like the big ones better. I noticed that the small ones come with a large fraction and a large addition of coconut.
I prepare the tablet for planting like this: put it in a container and fill it with warm boiled water without removing the mesh.
Someone pours boiling water on it, I think that this should not be done. Boiling water kills all living microflora, both good and bad. When the tablet absorbs water and swells, I squeeze out the excess water.
You shouldn’t squeeze it too hard; the soil for streptocarpus should remain moist. I release the substrate by cutting the mesh,
I loosen it a little with my hands and put it in containers for planting.
Having leveled the tablet substrate and flattened it with a spoon,
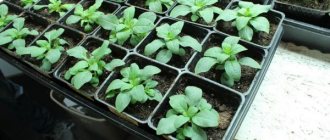
sow seeds on top of the substrate. It is convenient to do this by pouring the seeds onto a sheet of paper and spreading them evenly over the surface of the substrate. Do not pour out the seeds in a heap, otherwise it will be difficult to pick them out. And pay attention, the seeds sprout in the light! Do not cover the seeds with soil or anything else. Since the substrate in which we planted the seeds is wet, there is no need to water it. We cover the box with a lid, in which holes have been previously made to allow moisture to evaporate, and place it in a bright place. This could be a well-lit window sill, or a backlit flower rack. My seedlings are growing in natural light on a windowsill. Don't forget to write a label with the name of the crop and the date.
Despite the fact that there are holes in the lid, moisture can accumulate in the box with seedlings. If this occurs, you should periodically remove the lid for a few minutes and ventilate. Shoots from seeds appear on average on the 5-9th day. At first they are so small that they can only be seen with a magnifying glass. A magnifying glass is a necessary item when growing streptocarpus from seeds. This is what 2 week old seeds look like
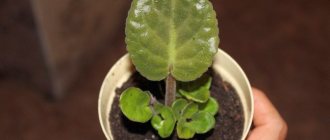
In the future, it will be needed for picking seedlings. Since the size of the seedlings is very small, they grow slowly. But among gardeners there is an opinion that frequent picking accelerates their growth. I didn’t notice this after the first dive, but I had to dive. I make the pick with a magnifying glass in one hand and a toothpick in the other hand. I separate the seedlings and transfer them to a new place of residence using tweezers or directly on the tip of a toothpick. I made the first picking of seedlings about a month after sowing the seeds. I’ll show you for comparison with minisinningia seedlings planted on the same day (streptocarpus on the left). The box is completely filled with seedlings, just some are so small that they are not visible. These are already picked seedlings after a month.
If the sowing is not done densely, seedlings can be planted in the same box in which they are planted.
Over time, the moisture from the bowl evaporates and there is a need for watering. How to water streptocarpus seedlings, which are very small, without injuring them? Watering should be done by spraying from a spray bottle, from which water is sprayed in the form of fog. A strong jet will kill babies. For these purposes, you can choose empty bottles from various liquids that we use in everyday life. In professional sprayers, the water supply is regulated.
Growing streptocarpus from seeds is a long, but very exciting journey. At best, seedlings grown from seeds bloom in 8-9 months.
Photos of my seedlings can be viewed on our forum.