My love for these beautiful plants manifested itself after the very first secretly plucked off a leaf from a friend. It has long been known that stolen cuttings take root better, and I was able to verify this myself, because the long-awaited children did not take long to arrive.
Now I have a huge collection, but I still continue to impatiently walk around the shelves in anticipation of flower offspring. Now I have a lot of experience, but before I had a very vague idea of when to place violet babies from the leaf. I am happy to share useful tips with beginners.
The appearance of violet babies
I have already told you about a simple way to root a violet leaf in water and about transplanting a rooted violet cutting into a cup with soil. After some time, the cuttings will produce babies. You will have to wait from three weeks to three months for new violets to appear. Leaf cuttings can form one to five new plants.
When most violet babies produce several pairs of leaves, they need to be separated from the mother leaf and transplanted one at a time into separate cups. So let's talk about how to separate and transplant the babies.
How many pups should be kept and what to do with removed leaves
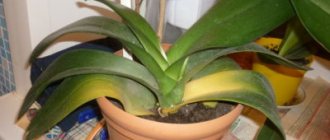
When I first started getting interested in violets, I brought everything that was in bloom into the house - “pink, blue.” 3 years passed and I “got tired”, i.e. became more picky and picky in choosing varieties. Now, basically, I leave in my collection varieties that are unique, recognizable and, which is very important for me, form a symmetrical rosette “without cultivation”, on their own.
Who needs to read the title to know Buckeye Seductress or Blue Dragon or Blue Mist? Of course, there are similar varieties, but I made this decision and will stick to it, given the lack of space on the shelves. This is one of the shelves with my violets. But on the top shelf are violets for sale at the upcoming exhibition in April. As you can see, due to lack of space, I put violets on greenhouse glasses. I really don't like it - it looks like a mess
There is nowhere to expand, so I am “cleaning the ranks.” I think this has already been discussed on the site, but we have a lot of new forum members and I decided to raise this topic again - how many children should be saved and what to do with the removed leaves.
So - for beginners. Some varieties produce a lot of babies. Do not plant all the children unless you are selling violets. I'm sharing my experience, but I think everyone has gone through these stages. Then you don’t know WHAT to do with them, throw them away - you can’t raise your hand, so you start pestering everyone: “take a violet, it’s easy to care for, it blooms all year round!” And you find out that not everyone likes flowers in the house (which is strange for us, lovers of house plants). And you have to hide your resentment for the refusal and pester the next person. Why, when you can immediately “agree with yourself”: I plant only the 3 largest children of fantasy varieties in case of getting a sport (as I was advised), and a couple of simple ones just in case - and in order to avoid “just in case”, i.e. . death of the baby, it is better to be patient and let the children grow properly around the mother leaf.. There are varieties that do not sport at all, so why take up space on the shelves? I made a new Russian-speaking friend from Pittsburgh, PA, who found me through the site. She is just starting to collect a collection of violets and, of course, planted all the leaves that she removed. This woman immediately listened to my advice without arguing. She explained that it was an “experiment.” Well, good, I have satisfied my curiosity “how great, they are sprouting”, and now there will be a serious approach to the propagation of violets. Why take up shelf space with identical varieties? This is what is going on on my shelves now - it will all go away (I hope) at the exhibition
I have to keep some violets directly on the floor, closer to the light, because... there's simply no room
These are not all shelves filled with greenhouses and pallets with cups
As they say in Odessa: “Do you need it?” After last year's exhibition, we, members of the Columbus, OH Violet Club, were asked to raise more children for the exhibition next year, that is, this year. This is understandable, because Part of the money from all sales goes to the club's treasury. So my crammed shelves can be explained. BUT! I repeat once again: if you are not engaged in sales, value space on the shelves. Here I showed “How violets live among people.” Here is my ideal for keeping violets (well, maybe without napkins)
I hope that my tips are useful to you.
Transplanting violet babies
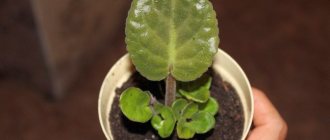
My leaf cuttings rooted in water and were planted in the ground on July 16th last year. Each of the two leaf cuttings produced more than two babies.
- Pruning plants (Part 1): is it necessary to prune? Why trim?
To make it easier to remove the plant, I carefully knead the glass with my fingers and take out the entire bush along with the earthen lump. Freeing the children from the now unnecessary cuttings, I hold the mother leaf with the fingers of one hand by the lower part of the petiole near the roots, and with the fingers of the other hand I immediately separate the entire bunch of young violets.
Now we need to disassemble this bunch into separate rosettes: I take one baby by the base near the roots and try to carefully separate it from the rest. During this manipulation, the lower leaves sometimes break off from the children, but this is not scary: the main thing is that the rosettes with roots are preserved.
Based on the number of rosettes obtained, you need to prepare cups with a volume of 80-100 ml: make drainage holes, put small pieces of foam in the cups, and pour the prepared soil over the drainage layer, filling the cups to three-quarters of the height.
To speed up the rooting of violets, I need a little hydrogel: I make a hole in the center of the soil and put half a teaspoon of swollen hydrogel granules in it, then I plunge the roots of the children into the hole and sprinkle them with soil. The baby needs to be seated so that the center of the rosette is half a centimeter below the edges of the cup.
If there is not enough soil, add it, but do not bury the center of the rosette: it should be above the surface. Now all that remains is to water the planted violet and plant all the others in the same way.
As you can see, there is nothing complicated in the transplant procedure. By the way, it is not at all necessary to put hydrogel in the soil. I used it to speed up the rooting process and provide moisture to the violets. I wish you all success in growing indoor plants.
- Photo of clivia cinnabar
From the experience of collectors. From leaf to baby
You have purchased new varieties or simply decided to propagate your favorite violets using leaf cuttings. The question arises - what is the most correct, convenient and faster way to root them?
Since 2000, we have tried many methods for propagating violets using leaf cuttings and want to share the most convenient and favorite options for us.
If you took a cutting from your healthy plant, you can begin rooting without any preliminary steps. If you received it from someone else’s collection, it is advisable to wash the leaf in a weak (pale pink) solution of potassium permanganate - this will remove possible microorganisms.
If the cutting has lost its elasticity, for example, after a long shipment, it is necessary to completely immerse it in water for a while until it acquires normal turgor (on average for several hours).
The question arises: what is the best way to root - directly into the substrate or first germinate in water? For an experienced violet grower there is no difference (we plant directly in the substrate). But for a novice amateur, we would still advise you to first put the leaf in water. If he doesn’t like something and the cutting starts to rot, you will immediately see it and be able to update the cut and root it again. In the substrate, there is a chance that you will not notice it in time.
According to our observations, cuttings produce roots well in both transparent and opaque containers (glass, plastic). However, cuttings do not form roots in a crystal container!
What kind of water should I take? We rooted in boiled water, in ordinary water from the tap (settled for 1 day), and in a weak solution of complex fertilizer - the result was good in all cases. We tried to take water passed through a household filter - the majority of the cuttings did not produce roots.
If you are rooting a cutting in water, it is not necessary to place it under a plastic bag (greenhouse). Watch the leaf carefully: if everything is fine, tender roots will appear in 2 weeks. Don't wait for them to outgrow: 0.5-1 cm is enough to transplant the cuttings into the substrate. If the cut begins to rot, make a new cut, wash it in a weak solution of potassium permanganate and place it in a clean container with another water.
There is an excellent method of rooting (it is also suitable for capricious varieties that stubbornly do not want to grow roots in water): take sphagnum moss, fresh (from the forest) or stored raw, and place it loosely in a plastic bag. Leaves are laid flat on it, the cuts are symbolically covered with moss. We tie the bag tightly (ziplock bags work well), put it in a warm (24ºC) place, lighting does not play a special role during rooting. With this method, the roots are thick and all equally developed. This will take the same 2 weeks. If you pay attention, you will notice that the moss began to grow during this time. This suggests that it actively secretes sphagnol (a bactericidal phenol-like substance), and, apparently, this is why the cuttings practically do not rot.
So, your cutting has roots. What will you grow it in next? We tried several substrates. Growing in chopped sphagnum moss on wick irrigation with a microfertilizer solution has proven to work well. There are a lot of children, they are well developed. For regular irrigation, it is better to use a mixture of cut sphagnum moss in half with red weathered peat. The results are also very good. If you root in substrates that contain any soil, the percentage of rotting cuttings increases. A prerequisite (regardless of the composition of the substrate) is to place the cuttings in a greenhouse or under a plastic bag.
Many people use peat tablets for rooting. For those who do not have a very large number of violets, this is a convenient way.
If the cutting has successfully taken root, feels good, but does not want to produce babies, you need to stimulate it! To do this, we usually cut off the top third of the sheet. As a rule, this helps - after a while, children appear.
Features of rooting directly into the substrate. Before rooting, make a fresh oblique cut. The length of the petiole is approximately 3 cm, which is buried 1-1.5 cm into the substrate at an angle. The substrate should be sufficiently moist, but not too wet. To prevent the leaf from losing excess moisture, cover it with a plastic bag. Cuttings root well at temperatures above 20 degrees. On average, roots appear after 2-3 weeks. Depending on the variety, children are formed within 1.5-3 months from planting. According to our observations, if a cutting does not produce children for more than three months, then, as a rule, there will be no offspring from it.
In some varieties with curly leaves, the children, growing up, begin to rest against the lower part of the leaf. We advise cutting off these “curls” so that they do not interfere with the development of the younger generation.
In our experience, the size and “age” of the baby are not decisive when separating from the cuttings - each variety has its own period. The main thing is that the child develops at least a few roots of his own. Then the separation from the parent will be successful. Usually, from the rooting of the cutting to the separation of the baby, an average of 2-3 months passes.
There may be this option: when several children are separated from the cuttings, some of them already have roots, while others do not. Do not throw away the babies: plant several of them in one pot and cover them with film - the same way as all the separated babies. Most of the little ones will take root and will soon catch up with their larger brothers.
If a leaf has only one baby, you can plant them together in a pot without separating them for some time. Then you can simply pinch off the leaf.
To properly separate the babies from the cuttings, grab all the babies at once in one hand, and the cuttings in the other. And, gently rocking, separate them. After this, the children separate from each other very easily.
Children from variegated varieties often appear completely white. You must wait until they grow up and at least some of the leaves become green - only after that they can be removed from the cuttings. Otherwise, white babies will die without the nutrients that are produced with the help of chlorophyll.
The mixture for replanting the baby will depend on how you plan to water the plant. If it is wick irrigation, then we recommend using a soilless mixture. If watering is normal, then you can use the following mixture: one part of leaf or garden soil, one part of cut sphagnum moss and one part of weathered red peat. With sufficient watering and regular feeding on such a substrate, you will grow a beautiful, healthy plant.
Approximately 10 days after separation, the baby must begin to be accustomed to the conditions where it will grow further: periodically we open the cellophane slightly and observe its condition.
At this stage, you can already guess what to expect from the baby. For example, pay attention to the unusual shape or color of the leaves - most likely such plants will not bloom according to the variety. However, sometimes the sport can turn out to be much more interesting than the variety. But the best thing about propagating violets using leaf cuttings is that each leaf usually produces several children, most of which will bloom according to the variety!
Galina and Marina Krutov
How to divide violets at home: preparing the substrate
How to divide a violet
In order for the violet to develop in a timely manner, bloom magnificently and for a long time, it requires a special soil mixture - very light, moisture-absorbing and breathable. This soil condition can be achieved by adding coconut fiber, sphagnum, perlite, peat or river sand to the substrate. There is no need to add these components in large quantities, otherwise it can harm the plant. Thus, it is known that moss and peat are capable of acidifying the soil, while violets are suitable for soil with a slightly acidic reaction. In addition, beginning gardeners often use vermiculite as a leavening agent. However, unlike perlite, this mineral retains moisture for a long time, and this can lead to waterlogging of the soil, which is completely unacceptable for violets.
To provide the plant with useful substances and elements, you can add ready-made mineral fertilizer complexes to the soil mixture. If there are no fertilizers at hand at the time of preparing the substrate, then fertilizing is carried out after replanting the plant, by applying a liquid nutrient solution under the root. Before applying fertilizer, experts recommend watering the plant.
The planting container must have a drainage layer to prevent the soil from becoming soaked and moisture stagnating. Fine expanded clay, fragments of clay pots, pebbles, fine crushed stone or broken brick can be used as drainage. By the way, more and more gardeners are using ordinary padding polyester for the same purposes. In addition to the fact that this material perfectly allows moisture to pass through, it also does not allow soil to spill out through drainage containers and the trays under the pots will always be clean.
Today, specialized stores offer a wide range of ready-made soils for violets, which contain both the minimum required number of components and various additives, including complex fertilizers.
However, flower growers who grow violets on an ongoing basis still advise, if possible, to compose the substrate yourself, especially since all its components can be purchased at the same garden centers. In order to prepare a soil mixture that is optimal in composition, take leaf or turf soil as a basis and add sand, peat and perlite. After the components are well mixed, the finished substrate is disinfected by calcining it in the oven or by steam treatment.
How to divide a violet: determining the transplant date
How to divide a violet
The most obvious sign indicating the need to replant violets is the appearance of young rosettes - “babies”. As a rule, up to several of them are formed at the same time, which causes competition for food and lighting. As a result, the most developed and strong rosettes remain, and the weak ones die. The leaf on which the babies are formed also dies, giving all its nutrition to the growing young rosettes. With a large number of formed children and dead leaves, the condition of the plant itself worsens.
At the time of division and transplantation, new rosettes must have at least 2 pairs of developed leaves. This recommendation is relevant for most varieties, with the exception of variegated violets. In the case of these varieties, the children should have at least twice as many well-developed leaves. It should be remembered that the development process of children occurs much more actively when the plant is well illuminated. In addition, it is necessary to take into account that young rosettes of variegated varieties are often white in color, their leaves are completely devoid of chlorophyll. Experts recommend planting such rosettes only after their foliage acquires the appropriate color. Until this point, the children are not able to develop independently; they are completely dependent on the mother plant, and premature separation will most likely cause their death. You can also focus on the height of the new sockets; it should be at least 3 - 6 cm.
Spring is the best time to plant violets. In autumn and winter, with a constant lack of lighting and too dry air, it is difficult to provide conditions conducive to easy adaptation and rooting of transplanted plants. And in the summer you will have to constantly maintain the level of air humidity and ensure that direct sunlight does not fall on the plants.