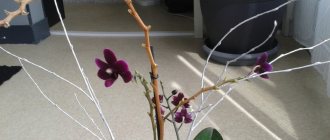
Schefflera (Schefflera) - a spectacular decorative deciduous tree with beautiful leaves that look like small umbrellas is increasingly found on the window sills of our apartments and houses.
Schefflera attracts the attention of flower growers not only with its luxurious appearance, but also with its unpretentiousness. Schefflera is an evergreen perennial shrub or tree belonging to the Araliaceae family, a distant relative of ginseng. In its natural habitat - Australia, the Pacific Islands, Southeast Asia - there are more than 200 species of this plant. About 10 of them are grown indoors.
In an apartment, shefflera can grow up to 2 meters, adding 30-40 cm per season. The leaves have a palmate-dissected shape with 4-12 lobes, resembling a palm with outstretched fingers. Because of this leaf structure, Schefflera is sometimes called an umbrella tree.
The color of the leaf blade is plain green or with white, cream, yellow spots and streaks. White, yellow or crimson flowers are collected in racemes or paniculate inflorescences, similar to tentacles. In indoor conditions it blooms very rarely.
| Growing quickly. In one season, the plant gains 30-40 cm in height. |
| It blooms very rarely. |
| The plant is easy to grow. |
| Perennial. |
Schefflera at home care photo
In this article we will talk about such a plant as sheflera, learn how to grow it, care for it, and also tell you how to form a crown for sheflera.
Schefflera is a capricious, but incredibly beautiful indoor plant. It has the shape of a tree and leaves that resemble umbrellas. If you care for it correctly, it will bloom and grow up to 2 meters high. It is difficult to maintain such a giant in a city apartment, so flower lovers resort to a trick and cut off its branches. When everything is done correctly, Sheflera does not grow in height, but forms a lush crown. You will have your own exotic tree in your home or office. The formation of the crown of the plant should be treated with caution; when pruning is done at the wrong time or in the wrong way, the plant will die
Forming a tropicana correctly
Lovers of indoor gardens are often lost when it comes to pruning exotic plants. The procedure can often cause harm. Let's deal with everything in order.
Is it possible to prune Schefflera?
First of all, you need to remember that the event significantly reduces the decorative effect. Therefore, flower growers often do without it. The degree of importance of shortening the sheffler is determined by the species or varietal:
- Radiant-leaved species, which have a single stem, are allowed to grow without intervention.
- Tree-like branches are shortened as they grow, which saves space.
Why does Schefflera need pruning?
Exotic grows quickly, but sometimes growth slows down catastrophically for no reason. It happens that a plant, or rather its stems, begin to bend on their own, taking on a shape that does not closely correspond to the owner’s intentions.
To stimulate the normal growth of the tropical guest, part of the shoot is removed. They do the same thing to form a lush crown - it rarely shows the ability to branch without external influence. And maintaining a neat shape without “surgical intervention” is simply impossible.
When is the best time to prune an umbrella tree?
The optimal time for formation is the beginning of spring, still during dormancy, but awakening is about to begin.
Note! The first-year flower is only formed with a trunk, but not shortened.
Trimming tools
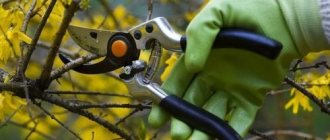
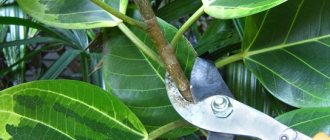
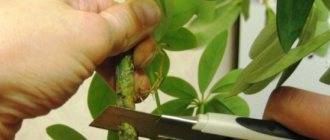
By the end of the season, young shoots become woody and the bark becomes dense. A sharpened garden pruner is considered the best tool; a kitchen pruner is suitable if the shoots are thin. Important condition! The tool must be disinfected before starting work.
How to properly trim a plant at home?
When pruning ficus at home, you must adhere to the basic rules:
- Disinfect tools with vodka or cologne. Wash your hands thoroughly with soap.
- When inspecting a plant, outline in advance which branches need to be trimmed and which ones should not be touched.
- Dry branches are removed first. Next comes work on creating the desired shape.
- It is recommended to mark the cutting boundaries with chalk so as not to accidentally cut off too much.
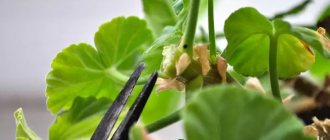
- Sections are made just above the kidneys.
- The resulting shoots are left for plant propagation.
For sanitary and preventive purposes
If the ficus is sick, it is necessary to carry out sanitary pruning. This will remove damaged or diseased shoots and stop further death of the plant. After preventive pruning, the ficus directs all its efforts to its restoration. Trimming is done in the following sequence:
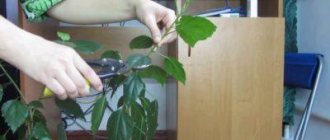
- Use garden pruning shears that have been previously disinfected. If you don't have pruning shears, you can use scissors.
- We find all diseased or dry branches of the plant.
- We remove all damaged branches, use tweezers to trim hard-to-reach branches.
- Trimmed shoots are burned or disposed of. They should not be used for compost, as this leads to the development of infectious diseases.
Sanitary pruning of ficus must be carried out not only for branches, but also for roots. And it is performed according to the following algorithm:
- Carefully remove the plant from the pot.
- Slowly remove the soil from the roots. We inspect the root system for the presence of black or rotten roots. Healthy roots are always light in color.
- We cut off all diseased roots. The cut should be made with a margin towards the healthy root to prevent further spread of diseases.
- We prepare new soil and plant a tree in it.
For rejuvenation
From time to time, ficus needs rejuvenating pruning. You need to do it like this:
- First, a check is made on the care of the tree, its living conditions and watering.
- We make sure there is sufficient lighting and a comfortable temperature for the plant.
- We mercilessly remove all dried, diseased branches and leaves.
For a ficus to live comfortably as it grows, it is necessary to select a pot of the appropriate size so that there is enough space for the growth of the root system. You should not overuse fertilizing; it is enough to do it once a month.
In addition, as the plant grows, you should transplant it into a larger container where its roots will have enough space to grow and receive nutrients. You should also not forget about feeding the ficus; it is usually carried out monthly throughout the year.
Ficus weave
Ficus benjamina is beautiful in any form. It's not just plants with a crown that are interesting. Trees grown by ficus weaving can be called a real work of art. Such plants have bare trunks intertwined with each other in a special pattern. Such ficuses are valued because of their beautiful trunks. The crown of plants is usually formed in the form of a ball.
To obtain such a beauty, all varieties of ficus with thin shoots are suitable. But the Viandi variety is absolutely not suitable because it has thick and crooked stems.
To obtain intricacies, several seedlings (their number can be large) of the same size are planted in a pot. Both plants must grow at the same time. The seedlings must be of the same variety, because then they will grow at the same speed. There are various ficus weaving patterns. The simplest ones are the spiral and the braid.
How to braid Ficus Benjamin to get a spiral? To do this, you need to plant two seedlings in a pot. But for the braid you will need three young plants. There are also more complex schemes. Sometimes up to 20 seedlings have to be planted to bring them to life. Only real professionals can grow such trees. To weave trunks, it is necessary to remove side shoots. All weaves should be fixed with copper wire or woolen thread. The shoots are fixed above the plexus. In the future, the ficus is cared for as usual. As soon as the cuttings grow a little, another weaving is done.
The fastening points should be checked every two months. Sometimes they need to be weakened, because during growth the trunks gradually thicken. If the fixation is too strong, it may damage the plant bark. Once the braid or spiral reaches the desired length, you need to fasten the trunk from above. The attachment point will be securely hidden by the crown, so it will not be visible. After a few years, the stems will grow together and turn into a single whole. At this point, all fasteners can be removed. They are no longer needed.
Trunk weaving
Forming a Schefflera in this way is not as easy as ficus Benjamin, but the effect is stunning. Main difficulties:
- Only the growth of the current or last year bends well;
- you should work very carefully so as not to break the plant;
- Schefflers do not root very well, and you need a lot of cuttings at once, all of the same size.
Among the advantages is not only the exotic appearance of the weave, decorated with tufts of carved finger leaves on long petioles. The trunks do not have to be spliced - after they harden, their position can only be changed by breaking the shefflera.
Column
Several cuttings are planted in one pot close to each other, tied in 2-3 places. Lateral growth is removed by pruning.
Spiral
A support is dug into the pot. The stems of two or three sheffleras are wrapped around it in different directions. They secure it and trim off the “extra” branches. The formation of the crown is at the discretion of the owners.
Pigtail
Cuttings are planted nearby. The trunks are intertwined and lateral growth is removed by pruning. The composition looks especially beautiful, the formation of which was carried out not by single, but by two shoots taken (from 6 plants).
What varieties are found?
At home, they grow eight-leaf bush sheflera, which has an elegant appearance. Its drooping petioles are cream-colored. They bear shiny, dark green, lancet-shaped leaves. Their length reaches 40 cm. The plant is light-loving, and does not have enough color days to bloom on the windowsill. Under artificial light, a flower appears that resembles a light green sea mollusk in shape.
Schefflera eight-leaved
For bonsai lovers, Schefflera arborescens is suitable. You can grow the Amate variety with green leaves or the Gold Capella variety. This variety of sheflera looks like a miniature palm tree with variegated leaves, which are about 20 cm long.
Schefflera arborescens
Schefflera radiata (or star-leaved) has a brown trunk and elongated shiny green leaves. The Nova variety is distinguished by its leaf, similar in shape to oak leaves.
Schefflera radiata
Characteristics of Schefflera and species diversity
Belongs to the Araliaceae family, of which there are about 200 species in nature, growing in tropical areas. Outwardly, it resembles a small tree or bush with leaves of an unusual shape, which are divided into many parts, similar to an open umbrella.
There are a little more than ten species adapted for home breeding, but it is almost impossible to achieve flowering from them. The most common indoor types of shefflera:
- Eight-leaved. Can be found in China, Japan, Vietnam, Tibet, India and Taiwan. In natural habitats it can grow up to 15 meters. The petioles of Sh. eight-leaved are drooping, reach 30 cm in length and have a cream color. The rosettes consist of 8 green oval leaf plates (in some cases up to 11).
Schefflera eight-leaved
The glossy top of the leathery leaf is combined with a matte back side. At the end of autumn, the inflorescences bloom with white flowers, and by the beginning of winter, fruits appear in this place. The wood is used to make matches, and also together with leaves in alternative medicine. - Tree-like.
Native to Taiwan and Hainan. An evergreen shrub that has proven itself well in apartment conditions. Capable of growing up to 4 meters. Palmate-compound leaves have from 7 to 9 twenty-centimeter plates. The flowers look like branched panicles. Sh. tree-like is taken as the basis for breeding such varieties as: Amate (even less demanding in care and susceptible to pests), Gold Capella (looks like a palm tree, green leaves are spotted yellow). This type of plant is used in bonsai culture because of its unpretentiousness and aerial roots, which, having reached the soil, take on the functions of ordinary ones, but at the same time have an amazing appearance that looks very unusual. However, to stimulate the growth of aerial roots, very favorable conditions are required that can be recreated. - Palmate.
New Zealand Schefflera in nature grows up to 8 m. The leaves are similar to palm trees, open like an umbrella and contain up to 10 thin pointed plates. This species is gradually dying out, as New Zealanders are cutting it down en masse for raw materials for making souvenirs. Sh. palmate blooms with small flowers in large umbrella inflorescences, the juice of which is used by local healers in the treatment of skin diseases. The purple fruits of the plant are edible and are attacked by birds. - Radifolia. Tree-like evergreen plant reaching 12 meters in height. The leaf may consist of 16 individual radiate plates. Young leaves may have a sparsely toothed structure. It blooms with red flowers and produces black, purple-tinged fruits that feed on birds and mammals. Amazing fact: this particular type of Schefflera was awarded an award for decorative services in the UK.
Schefflera flower care at home crown formation - Growing and care at home
Like any home flower, sheflera is demanding of air humidity and uniform watering. The plant needs moderate lighting, without direct sunlight.
Schefflera flower: home care, crown formation, pruning, propagation
Some tips on keeping Sheflera
- Place the flower on south-east or south-west windows; keep the plant on the south side in winter. It is worth remembering that variegated sheflera is more light-loving, and if there is not enough light, the leaves will lose their bright colors.
- Try not to overwater the flower; the soil in the pot should be moderately moist, and the water for watering should be settled. If the indoor humidity is low, for example on hot summer days or when the central heating is on, try misting the plant periodically. Place the flower pot on expanded clay immersed in a container of water.
- The suitable temperature during active plant growth ranges from +22...+27C. In winter you can reduce it to +18C, as the plant needs a period of relative rest.
Schefflera flower - home care crown formation
Correct pruning and crown shaping
When growing a flower such as a shefflera at home and providing it with proper care, you are faced with the need to form a crown and pruning. This procedure is carried out in early spring, pursuing the following objectives:
- Form a compact and aesthetically beautiful bush.
- Give impetus to the growth of young shoots on already lignified plant stems (rejuvenating pruning).
- Take young cuttings for propagation.
- Carry out sanitary pruning after the winter dormant period.
Schefflera flower - home care, pruning
Advice from experienced flower growers
- When pruning and shaping plants, use only sharp, good quality pruners; do not wound the plant with scissors.
- Schefflera, although not a demanding flower to care for, requires proper crown formation at home. To create it even and beautiful, the branches of the plant that are too long are cut off by 1/3, and if necessary, more, leaving the top bud looking outward of the bush. If the thickness of the cut branches is more than 1 cm, cover the cuts with garden varnish or warm wax to prevent infection from entering.
- In adult plants, over time, crown growth may go to the periphery (top), to avoid this, pinch the ends of the shoots in a timely manner for greater branching and growth of young leaves.
Schefflera flower - home care, propagation
Diseases and pests
Difficulties with shefflera most often arise due to violation of the conditions of its maintenance. Here are some problems and their causes:
- Roots rot due to overwatering.
- Elongated and elongated shoots - lack of light or too high temperature.
- Schefflera leaves turn yellow and fall off - insufficient lighting.
- The leaves have turned black - excessive watering, the soil does not allow moisture to pass through well, lack of drainage.
- Schefflera leaves have become faded due to lack of lighting.
- Schefflera curls - lack of sunlight.
- The tips of the leaves are brown - low air humidity in the room.
- Schefflera green leaves fall off - the temperature is too high or too low.
- Brown spots on the leaves indicate excess moisture in the soil.
- Light spots on Schefflera leaves indicate excess light.
Among the pests that are dangerous for schefflera are spider mites, scale insects, mealybugs, and aphids.
Growing problems
Very often, during the growing process, flower growers encounter various difficulties. Most often, beginners complain that Benjamin's ficus drops its leaves. There are many reasons for this behavior of plants.
If a bush sheds its leaves in autumn or winter, this is a natural process associated with a dormant period. In this case, there is no need to worry.
Another reason for leaf fall is a change in usual conditions. Houseplants do not respond well to rearrangement, drafts, or lower temperatures. Therefore, the ficus must be kept in its usual conditions.
Excessive cold or heat also affects the foliage of the plant. Temperature conditions and its stability are one of the main conditions of detention. During periods of active growth, ficus needs feeding. The lack of microelements affects the beauty of the crown and decorativeness.
There are many reasons for leaf fall. If you encounter such a problem, you need to find out the reason. And then it needs to be eliminated. After this the situation returns to normal.
When to pinch shoots from an apple tree
If in some place of the crown you need to form a branch that is small in size and well covered with generative formations, pinch a strongly growing shoot approximately above the fifth true leaf. It can be a little shorter or longer. Do not pinch short shoots and shoots of continuation of the main branches.
Time the pinching to coincide with the time when there are 2-3 weeks left before the end of shoot growth. It's not worth it before. The 1-2 buds closest to the pinching site will awaken and give off strong shoots. And this is undesirable. They may not ripen and will freeze very much in winter. And in general, the goal will not be achieved. A later pinching is also not suitable: it will not give any effect.
Remove the tops of the shoots with whatever you want: pruners, scissors, fingernails. If after this short shoots such as ringlets and spears grow from the axillary buds, that’s good. Leave everything as it is. If one strong shoot grows from the top bud, pinch it off above the third to fifth leaf. If many strong shoots form, cut the pinched branch above the lowest one, and in turn pinch it above the fifth or slightly higher leaf.
Pinching does not always have an immediate effect. Here is the culture, the variety, and the condition of the plants, and believe it or not, the character of the gardener has an effect. Therefore, master pinching shoots slowly and thoroughly. In some cases this technique is simply irreplaceable.
When to Shape and Trim
The best time for operations is March and April. Schefflera is full of strength and vital juices, will redirect plastic substances to dormant buds, and the active formation of lateral processes will begin.
It’s bad when pruning was done in the summer, and new shoots actually appeared in the fall. They will not have time to get stronger by winter, and will most likely die before spring. We'll have to start all over again.
Additional fertilizing and lighting are unlikely to help deceive biological rhythms - the shefflera has already spent its energy on the growing season. At least you can try.
When weaving, on the contrary, side shoots are not needed, and thin stems bend more easily. They can be pruned at any time.
Sanitary pruning of plants
Sanitary pruning of barberry is carried out annually. In the process, you can also begin to form a crown. It is recommended to trim only healthy shoots, but do not be too zealous. Weak branches are removed completely.
The crown can be formed only in the second year of the plant’s life. In this case, it is worth familiarizing yourself with the diagram in order to make the correct haircut and not damage the flower. The procedure should be carried out in the spring, before the buds bloom, and before winter, when the harvest has already been harvested.
Next spring it is recommended to shorten the shoots to 10 cm above the ground. The procedure will increase the density of the bush, it will begin to branch. At the 3rd year of life, 15 cm of shoots are left above the soil level. For a single plant, this method of cutting barberry will allow it to be kept in a ball shape for a long time. Border plantings and hedges require this procedure.
Scheme of sanitary pruning of barberry
How to make a bush
There are two ways to make a beautiful fluffy bush:
- Shorten a shoot that has formed at least 8-10 leaves. Cuts are made over the remaining buds to stimulate tillering.
- Several seedlings are planted side by side in one pot.
Important! Even with a great desire to quickly form a crown, after each pruning they wait at least a year, allowing the flower to recover from the unpleasant procedure. The event is best held in the spring.
Scheffler's home flower, description
Schefflera (Araliaceae family) pleases with a variety of natural forms - tree, bush, liana. Particularly interesting are the leaves, similar to wide-open palms, colored in emerald green; some varieties have a variegated color. They are especially popular. Types suitable for home floriculture:
- radiate leaf (Shefflera actinophylla);
- eight-leaved (octopus, Sh. Octophyla);
- tree (Sh. Arboricola);
- palmate (Sh. Digitata);
- most graceful (Sh. Elegantissima);
- Veitch (Shefflera veitchii).
The plant remains decorative all year round, although home conditions are not conducive to flowering.
Basics of plant care.
Sheflera came to our latitudes from the hot and humid subtropics. Under natural conditions, it blooms beautifully and even bears fruit. Do not rush to rejoice, the decorative species has practically lost the ability to bloom at home; it is an exception to the rule. But you still have a chance to enjoy all the beauty of sheflera, all you need to do is:
- Maintain optimal temperature. It fluctuates in the range of 18-23°C.
- Provide adequate lighting. To do this, it is enough to place a pot or tub with a tree near a window on the east or west side.
- Monitor the humidity level. The plant can be saved from pests by regular water treatments and spraying.
- Feeding with minerals will be very helpful. Especially in the spring and summer.
If these rules are strictly followed, you can move on to the next stage - crown formation.
How to form a crown: popular methods
There are several types of crowns that can be formed by pruning ficus. The most popular of them:
- bush;
- standard;
- spiral;
- arc;
- fence;
- braid
Let's figure out what kind of crowns these are and how to form them.
Bush
- To form a crown in the form of a bush, 2-3 cuttings are planted next to each other.
- When the cutting reaches a height of 15 cm, pinch it from above, leaving more than 5 leaves. This is a stimulating effect for the appearance of 4-5 side shoots.
- When the length reaches 15 cm, the side shoots are cut so that the upper buds are directed outward of the crown. Don’t forget to treat all cuts with charcoal.
- When shoots of the third level reach a length of 15 cm, you will already have a dense bush. If it turns out to be very thick, then it can be thinned out by removing several branches from the middle.
Important! When growing a bush-shaped crown, it is necessary to change the side of the ficus facing the sun so that the crown develops evenly.
The easiest way to green a room.
Stamb
- It is necessary to plant one cutting, during the growth process we remove all the lower shoots, leaving only the 3-4 top ones. With a tree height of 0.5 m, the length of the trunk at the bottom without branches should be 20 cm.
- When the desired height is reached, the top shoot must be pruned by 6-10 cm.
- Next, we begin to form the crown. To do this, we intensively grow side shoots within the crown, and remove everything outside.
- Further formation proceeds like a bush; when pruning, the outer buds should face outward.
Reference. The standard crown can be of different shapes. The most popular are spherical and oval shapes. If you form a spherical shape, then do not forget that the shoots must be the same length.
The standard crown is suitable for houses with high ceilings.
Arc
- When the plant reaches sufficient height, cut off the top.
- Now you need to bend the plant and secure it, being careful not to break it. In this position, the shoots begin to grow upward.
- When the required shape is acquired, the fixation can be removed.
Spiral
We'll need one escape. Weaving is carried out as follows:
- We plant the cuttings in a pot.
- Depending on the width of the required turns, we select the diameter of the support, which we will install next to the handle. A bamboo stalk or some kind of tube may work for this.
- At a height of 15 cm, the stem is wound onto a support. To obtain uniform turns, inserts are used for a short time. We leave the inserts for a short time so that they do not begin to grow into the stem.
- As soon as the tree reaches the required height, the support is removed.
The spiral looks unusual and decorative.
This video shows how to form a spiral crown:
Scythe
For a braid, you need to braid several plants at a distance of 5-10 cm from each other, or you can use one tree with 3-4 side shoots. Work on the desired shape begins when the tree reaches a height of 15 cm:
- If there is one plant, then it is necessary to change the direction of growth of the outer parts of the braid from the central one in opposite directions, tying them to a branch. If there are several plants, then this action is omitted.
- We take the right shoot and throw it over the middle one at an angle of 45 degrees.
- We secure it in this position using threads.
- We wait until the plants stretch out.
- We cross the resulting center with the left shoot.
- As we grow, we repeat the steps.
Make sure that the loops are the same.
This video shows how to braid a ficus crown:
Fence
For the fence, trimmed plants are used. The shoots are planted in a box in one row. In young plants, the top layer of bark is cut off, the juice is wiped off and the stems are connected by tying them. The trees will begin to grow together, the more light there is, the faster they will grow together.
This video shows how to weave a ficus fence:
Formation of a beautiful crown
From a shefflera trunk cut into 2-3 leaves, a single shoot directed upwards will most likely grow. The same thing will happen when pinching the crown.
To guarantee a fork, at least 6-7 internodes must be pruned on a large shefflera, 4-5 on a small one, up to 50 cm. However, a tree simply forked at the top is unlikely to look attractive for a long time.
Bush
You can plant several cuttings close to each other in a common pot. But it’s not difficult to make a shefflera growing in one stem look like a shrub.
You need to wait until the tree reaches at least 50 cm and cut off the top in early spring, leaving 3-5 lower nodes. The plant will bush well and return to its decorative appearance by the next season.
branchy tree
The shefflera is tied to a support so that it grows evenly. It is necessary to trim the side branches (if they appear), but it is better not to touch the leaves. Without them, the trunk will stop growing in thickness. Over time, the plates will fall off on their own; at home, their lifespan is a maximum of 3-4 years.
When the trunk reaches the desired height, skeletal branches are formed by pruning and coring. If somewhere to create a “correct” crown it is necessary to shorten an elongated shoot or stop its growth, pinching is carried out. It can be done at any time, so the shefflera will always look neat.
Ball on a trunk
The trunk is tied to a support and allowed to stretch to the desired size. The top of the head is trimmed a little higher. A fork will appear.
They continue to form a crown, shortening new apical shoots to several nodes every spring. Then you just have to pinch them regularly so that the shefflera resembles a ball strung on a stick, and not an umbrella or a tent. Dormant buds that have awakened on the trunk are recommended to be completely removed.
Types of pruning Kalanchoe
There are several stages in this process and each of them has different goals.
It’s worth paying attention to this, because both the appearance of the plant and its health depend on timely and competent pruning and formation of the bush.
Forming a bush correctly
This procedure has its own subtleties that should be studied in more detail.
- Before you start pruning, you need to know exactly the varietal identity of the plant. The features of crown formation also depend on this.
- If you have just recently purchased a flower, then you should not start pruning right away. The plant must take root in its new location. Take a break.
- In winter, when Kalanchoe is dormant, pruning is not recommended.
- All instruments must be disinfected before and after procedures to avoid infection. The knife, pruning shears or scissors must be sharp.
- If you manually pick off the leaves and inflorescences, the Kalanchoe may begin to fade.
- It is recommended to carry out the pruning procedure either in the morning or in the evening. During this period, try to place the pot with the bush in a place where the sun's rays do not fall on it.
- When you have trimmed, the cut areas should be immediately sprinkled with crushed charcoal or activated carbon.
- If the flower has just been transplanted, wait a few weeks to prune it so that the plant can take root and adapt.
- When you see that a bush is suffering from an invasion of pests, then only after they have been completely destroyed is it worth pruning.
First trim
It is carried out for preventive purposes. The most suitable period for this procedure is spring. Here's what you need to know.
- When the flower wakes up, after 30 days the first pruning should be done. At this stage, several leaves at the tops of the shoots are removed.
- After the procedure, it is not recommended to place the bush on the south or southeast side of the room so that it does not begin to grow too actively. The appearance of the Kalanchoe will then quickly lose its neatness.
Sample for preventive purposes
As the plant grows quite actively, this type of pruning is relevant. There are several reasons why this procedure is necessary.
- In places where shoots and leaves were previously cut off, new shoots begin to form in the axils and buds. It is also necessary to remove several leaves from them so that the crown remains formed according to your idea.
- Inspect the plant regularly and remove all dry or rotten parts immediately, then the Kalanchoe will be healthy and you don’t have to be afraid of the appearance of various rots.
- The lower shoots of the bush gradually shed their leaves and become bare. The view is unattractive. Therefore, the recommendation is this: as the flower grows, remove the bare lower branches. In this case, only fresh and juicy green young foliage will remain.
- In summer, the upper shoots begin to stretch out very actively. In order for the laterals to grow and the shape of the bush to be lush, the tops should be pinched.
If the top shoots have grown to 10 - 12 cm, then they can safely be used for propagation. This is very simple and does not require any effort - placed in water at room temperature, the leaves and cuttings sprout roots after a while. You can plant a young plant in the ground.
What to do after flowering
The active flowering period of this decorative flower begins at the end of winter and continues into the spring months. The specificity of the development of Kalanchoe is such that peduncles are formed precisely at a time when daylight hours are short.
- In the case when the second half of the spring period has already begun, but flowering does not occur, then 3 - 4 upper leaves on each shoot are pruned - this procedure will force the bush to develop flower stalks more actively.
- There is no need to wait for all the branches to dry out and all the petals to fall off after flowering. Prune as soon as you see the flowering has finished. Then, at the cut site, young branches with leaves and new buds will immediately begin to form. It is better to remove faded shoots at the root to prevent the entire plant from drying out.
- After pruning the Kalanchoe after the flowering period is completed, it is necessary to give it time to rest and rest. To do this, place the flower in a dark and cool place where there is no sun and the air temperature does not exceed + 15 - 17 degrees Celsius. At this time, you need to water very little - only once every 20 days.
Shefflera propagation
Schefflera propagates in two main ways: cuttings and layering.
Shefflera propagation by cuttings
Semi-lignified cuttings from the top of the shefflera are suitable for propagation. They are cut at an angle with a sharp knife. The lower leaves are removed. There should be 3-4 leaves left on the cuttings.
After treatment with a root formation stimulator (Epin or Zircon), the cuttings are planted in a mixture of peat and sand (1:1). The container is covered with polyethylene and placed in a warm (22 degrees) place. The soil must be regularly moistened so that it does not dry out, the cuttings must be sprayed every other day, and the greenhouse must be ventilated daily.
Rooted young specimens can be transplanted into separate pots after 3 months.
Reproduction by layering
A large, healthy plant is suitable for producing cuttings. In early spring, two circular cuts are made on the semi-lignified trunk, the distance between which will be 3 cm.
The bark between the cuts is removed. This place is wrapped in moss moistened in a solution of a growth stimulator (Zircon or Epin) and wrapped in plastic film. You should wet the moss with water from time to time to keep it moist.
After 3-5 months, roots should appear. After they grow and become stronger (another 1.5-2 months), the film and moss are removed, and the trunk of the plant is carefully cut below the level of root growth. The young specimen is planted in a new pot.
The remaining part of the “mother” plant is cut off at the root and continues to be watered. After some time it will give young shoots.