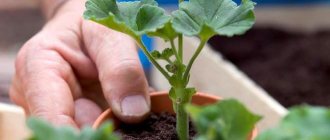
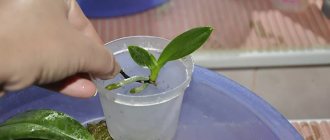
Calla is a plant native to South Africa, a member of the araceae family. Even beginners can easily cope with its breeding. Multi-colored and bright calla lilies will undoubtedly decorate any garden . Their tubers are planted in early May, and after 30 days the first buds can be seen. The question of how to store calla lilies at home in winter requires special lighting so that the beds will delight you with beautiful flowers in summer.
The main stages of preparing for winter
Experienced gardeners do not have a question about whether they need to dig up callas for the coming winter. The plant is stored exclusively indoors; the necessary conditions are created for this. Tubers must be properly prepared for storage. The timing of this work also differs. You should focus on the onset of the first frost.
- In the middle zone they begin in mid-October.
- In the southern regions, persistent cold snaps occur in early November.
How to dig calla lilies correctly
Digging of calla bulbs begins with the first drop in temperature to sub-zero levels. They will not damage the plants. The process of ending the growing season will begin. The nutrients of the flower will not be used to maintain leaves or form new ones. Gardeners have several recommendations for properly preparing the plant before digging it up.
- Watering must be stopped approximately 2-3 weeks before the tubers are removed.
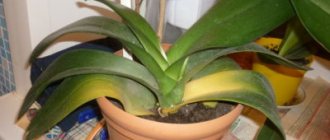
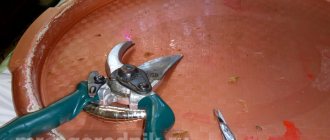
- The leaves need to be trimmed, leaving them at a level of 7-8 cm. After the first frost, this can be easily done with pruning shears or scissors.
- It is better to dig up tubers with a pitchfork. This reduces the risk of damage to the part that is underground.
- It is better to make the hole around the root system larger. After completing the process, carefully remove the soil from the tubers.
Drying callas
Planting material needs to be thoroughly dried. The tubers should first be inspected and damaged tissue or parts should be removed. A healthy foundation must remain. To remove individual areas, it is better to use a garden shovel or a teaspoon. After removing the damaged tissue, healthy areas must be treated with a solution of brilliant green and sprinkled with crushed activated carbon. This will eliminate the risk of developing diseases that affect the root system. Dispose of removed areas. They are not used for future fertilizer that will be applied to the garden bed. So, the disease can easily spread throughout the area.
It is better to dry the bulbs in low cardboard boxes or plastic boxes that are used for storing fruit. The bottom of the container should be lined with paper. Drying is carried out:
- in a dark and cool place;
- subject to free air circulation;
- in the absence of sunlight;
- The temperature in the room should be 15-20 degrees.
Gardeners prefer to place boxes with tubers of harvested calla lilies in the basement or well-ventilated garage. After a week, you can easily remove all remaining leaves. In another week, the roots will completely separate from the tubers. Young “children” should not be removed from the mother plant. They do not have a separate partition. When dividing, it is easy to injure the plant. This process is carried out in winter, when the “kids” are already mature.
If the mother plant is damaged at the time of separation, the injured area must be treated with brilliant green and sprinkled with coal. On average, drying time for planting material takes from 2 to 3 weeks.
When should you dig up calla lilies for the winter?
It is necessary to dig up a flower within a certain period of time. If you dig it up earlier, the immature tubers will not be able to overwinter normally. If you dig it up too late, when the first frost occurs, the plant may die. Therefore, we dig up calla lilies before the first frost.
Photo: Dig up flowers before the first frost.
| In the middle zone and Moscow region, digging begins from late September to mid-October. Everything depends on weather conditions. The southern regions carry out this work one month later, usually in early November. |
What types of calla lilies are dug up first?
A little theory: 8 types of calla lilies have been identified. They are divided into two groups - tuberous and rhizomatous.
Tuberous callas shed their foliage during the dormant period, but rhizomatous callas do not. The second group includes Ethiopian calla. It does not have a pronounced dormant period; in winter it grows in a pot, like a house flower - with green leaves.
Tuberous callas are the first to emerge from the ground. As soon as the first frost is announced, start digging. Rhizomatous callas can easily survive low sub-zero temperatures. But be careful, it's better not to experiment. With the first slight cold snap, start digging, otherwise you may lose everything.
How to store it correctly
Selected material for planting in winter must be periodically inspected. This will prevent any rot that has formed from being missed and, if necessary, remove damaged areas in a timely manner. Bulbs should be stored in cardboard boxes in a cool, dry place. They are dormant from October to April. Of course, these dates vary depending on the region. Indeed, in the northern regions, plants need to be dug up already in August, and planted when constant warmth has established. Gardeners believe that the best place for growing flowers is the Middle Zone, Southern regions.
Wintering a plant in a pot
Calla lilies have successfully become plants found in many homes. They must also be periodically at rest. It is artificially necessary to stimulate the cessation of the vegetative period of the plant. To do this, the pot should simply be placed in a dark, cool place. Watering the flower is also reduced. Many people doubt whether it is necessary to dig calla lilies out of the pot for the winter and store them according to the established technology. Experts say this procedure is not necessary. The tubers will overwinter well in a pot or container.
Choosing a storage location
Proper storage will ensure continued good flowering of the plant. For storage, you can place containers with tubers in your apartment, basement, refrigerator or loggia. Each place has certain features that are important to consider.
Contents in the basement
This place is the most common for wintering planting material. This storage technique requires certain rules to be followed.
- It is important to observe the temperature regime. Boxes with bulbs should be kept in the basement at a temperature not lower than +5 and not higher than +10 degrees.
- Excessive temperature conditions can cause premature germination of tubers.
- The storage period should last until the end of March. Afterwards, the bulbs need to be transplanted into soil and pots.
Winter accommodation on the loggia
A loggia is one of the most common places where it is very convenient to store flower bulbs. This is a great way to grow flowers in pots at home. This technique requires the following conditions to be met:
- by the onset of autumn it is necessary to reduce watering, gradually preparing the plant for hibernation;
- when the leaves die, the flower pot needs to be moved to a balcony (necessarily glazed) or loggia. There they are stored until spring.
Read also Dishes from red viburnum balan katygy
Location until spring in the apartment
You can store prepared tubers in an apartment for those who do not have the opportunity to place the plant in the basement or on the balcony. Flat storage is a risky storage method. It requires certain conditions:
- The container with tubers should be in the coldest place in the apartment. For example, on window sills, away from the radiator, near the balcony doors;
- It is important to ensure temperature conditions (not higher than +20 degrees). Even at this temperature, the tubers can withstand the winter, however, closer to spring they will dry out and wrinkle. This can negatively affect the flowering process in summer.
In a refrigerator
If you need to overwinter a small number of tubers, then a refrigerator is suitable for this at home. This is the second method of storing flowers after the basement. It requires compliance with two important conditions:
- the tubers must be wrapped in paper and placed in a separate compartment of the refrigerator, in which vegetables are usually stored;
- the temperature should be between +5-7 degrees.
How to store calla bulbs in an apartment until spring
If there is no other choice, but it is necessary to preserve the bulbs, then you can use an ordinary apartment as a storage place. With this method, the box with tubers is placed in the coolest place, near a window or balcony door.
But it is necessary, if possible, to isolate the bulbs from the warm air of the room; it is important to place them away from radiators. At temperatures above +20 C degrees, the tubers can overwinter, but they will dry out and wrinkle, and this will affect the health of the plant in the future and the abundance of flowering. And at elevated temperatures and high humidity, the tubers will quickly grow.
In a refrigerator
If there are only a few tubers, you can use a regular home refrigerator for storage. The bulbs are wrapped in paper or newspaper, sprinkled with sawdust, and then placed in the lower compartment of the refrigerator, where vegetables are usually stored. With this type of storage, periodic inspections of the condition of the tubers are also necessary.
Let's wake up the callas with the arrival of spring
The middle zone completes wintering of callas at the beginning of April, the southern regions with the onset of March. To do this, you need to remove the roots and conduct a thorough inspection for damage. Then they need to be treated with potassium permanganate and a fungicide - this will help avoid the development of a fungal infection. If the babies were not separated from the calla lilies before wintering, you can do this now. The flower is then transplanted into a pot for further growth and flowering.
Common mistakes made by newbies
In order for the flower to grow actively, you must adhere to certain recommendations. However, most novice gardeners often make mistakes, which later lead to disastrous consequences and the plant cannot achieve the desired result.
- You need to dig up the tubers carefully - the root system is very delicate, the slightest sudden movement will lead to damage.
- If there are children on the roots, it is better to wait for them to separate on their own, then remove them from the main bulb.
- If you do not remove the small roots from the tuber, they will germinate during the wintering period.
- At the storage location, the temperature should be between 3-7 degrees above zero with a minimum level of humidity.
The main mistakes of novice flower growers
Many beginners make mistakes that cause negative consequences. It is important to adhere to several rules:
- Do not put too much pressure on the shovel when digging tubers out of the soil - they are delicate and may break.
- If there are unseparated babies on the root, it takes time until they can separate themselves using thin scales. Only after this can they be plucked from the bulb.
- All roots from the tuber must be cut off, otherwise the callas will sprout in winter.
- It is necessary to adhere to temperature indicators. The storage temperature should be +3...+7 degrees, and the humidity should be low.
Calla lily tubers must be dug up for the winter, otherwise you should not expect flowering in the spring. Following simple rules will help you get beautiful flowers that will definitely decorate your area.
Results
- Callas do not survive wintering outside, so they need to be dug up.
- Before storage, planting material must be prepared.
- You can choose any of the ways to store the plant - in the basement, apartment, refrigerator or on the loggia.
- It is important to provide suitable conditions.
- Following the recommendations of experienced gardeners will help you get beautiful flowering plants in the spring and summer.
How to dig up callas correctly?
The time for this technological operation is after the first frost, approximately:
- early October in the middle zone,
- early November - in more southern regions.
There is no need to be afraid that the first small frosts will damage the plant. On the contrary, this will be a signal for him about the end of the vegetative period. The plant will stop using nutrients to produce leaves as it begins to prepare for dormancy.
Before digging up calla lilies, you need to prepare the plant. To do this, stop watering it if the weather is dry, about 2-3 weeks before the expected harvest for the winter. This advice is relevant for the southern regions, where a dry climate in the fall is far from uncommon. Before digging, you need to cut the calla lilies leaves above the soil level by about 7-8 cm. After the first frost, the foliage has already dried out, and this operation is easy to carry out with ordinary scissors.
It is best to dig up calla lilies with a garden fork. This way there is less chance of damaging the delicate parts of the plant.
When digging calla lilies, it is advisable to leave a fairly large distance around their roots. It is better to play it safe and dig a hole of a larger diameter than to treat a plant injured by a shovel or pitchfork. After digging, you need to carefully remove the soil from its roots, being careful not to damage them. You can wash off the remaining soil with running water under a tap or a garden hose. Try not to let the stream be too strong. High water pressure can damage the “children” of calla lilies that have not yet separated from the adult plant.
Drying callas
Having dug up calla lily tubers that you have grown yourself, you will most likely be surprised by their striking difference from the planting material that you purchased before planting in your own garden. Now these are strong, large and beautiful specimens. Before setting aside the root tubers to dry, you need to carefully inspect them.
It is advisable to discard tubers with signs of rotting. If this is a particularly valuable variety and the damage is minor, you need to strip the damaged tissue to a healthy base. It is best to do this with a teaspoon or a sharp garden tool.
Damaged and peeled tuber tissue must be disinfected with a solution of ordinary brilliant green or sprinkled with crushed coal. You can use activated carbon for this purpose.
Rejected material must be disposed of, but under no circumstances should it be placed in a compost heap. Such actions can contribute to the spread of the disease to other plants. Low cardboard or wooden boxes are best suited for drying root tubers at home. You can use plastic fruit boxes lined with cardboard or old newspapers.
Conditions for high-quality drying of calla lilies:
- dark and cool place;
- good air circulation;
- lack of sunlight;
- temperature not higher than 15-20⁰С.
Read also Spruce pine and larch differences
The best premises may be a garage, a ventilated dry cellar or basement, or a barn. It is better to place boxes with calla lilies rhizomes in one row. After a few days, you need to completely remove the dry leaves, and after another week, the roots, which by this time will be removed very easily. When the roots are not removed, the plant may not begin to grow in time, without going through a full dormant period.
During this period, you should not separate the “babies” from the mother plant. They have not yet fenced themselves off from it with a special film - there is a great danger of causing injury to the plant. It is rational to separate the “babies” in winter. Then they ripen and can serve as full-fledged planting material. If this happens, the damaged area is dried and again disinfected with brilliant green or charcoal. The drying period can take from two to three weeks, depending on the ambient humidity.
How to care for calla lilies
It's nice to watch pink, red, yellow potted calla lilies, as well as a flowerpot or flower in a vase. All this will be interesting, but do not forget that you need to properly care for the plant, ensure proper watering, feeding must also be in accordance with the established feeding standards per day in winter, summer, spring and autumn.
It is worth paying attention to everything that makes it possible to grow kala at home without problems, and this is achieved by using the practical recommendations available in this article and other articles on this site, including the article on caring for Yuka.
Caring for calla lilies at home
Swamp calla loves moisture, but too much of it can cause the plant to die. Therefore, the planted tuber must be watered carefully. In order for the calla lily to bloom as early as possible and its flowers to have a rich color, the plant is kept at a temperature of +16 ° C at night, and during the day the maximum illuminated and warmer place is allocated for it. Daylight hours for marsh calla should last at least 10 hours. Feeding calla lilies with liquid balanced fertilizer is combined with every fifth watering of the plant.
How to properly care for home, tuberous, indoor calla lilies in winter
Calla is unpretentious and will not require special attention if its tubers are replanted annually in new soil. In this way, it is easier to decide on feeding the plant, because you will be sure that the layer of fertilizer is not in the soil, or, on the contrary, the plant has exhausted its supply of nutrients. In addition, calla lilies love space and will not bloom if the pot is less than 20 cm in diameter.
The container with the plant is placed in a bright place, but calla lilies can also tolerate partial shade. Watering is plentiful, except for the dormant period. From time to time, calla lily leaves can be additionally sprayed. Peduncles begin to form when daylight reaches 12 hours. During budding and flowering, watering and fertilizing do not stop. During the dormant period, dead leaves are cut off from the plant and watering is significantly reduced.
How to care for calla mix at home in the fall, after flowering, replanting
In autumn, calla lilies fade and lose their leaves. The dried leaf is cut off, the plant is watered abundantly and removed from the pot without disturbing the earthen ball. Then the children are carefully separated from the mother bulb, and new and old tubers are transplanted into fresh soil. Transplanted plants are watered moderately. In winter, feces feel comfortable at a temperature of 12-14°C; in spring and summer, it is advisable to maintain a higher temperature of 18-26°C. Kala mix loves bright sunlight and rare but plentiful watering, and is not afraid of dry air.
Caring for Ethiopian calla lilies at home
Ethiopian kala grows well in normal indoor conditions. In summer, if desired, the pot with calla lilies can be placed outside, protecting the plant from the scorching sun. If the air temperature rises above the 25° mark, then the leaves of the flower should be lightly sprayed, since the scorching dry air can destroy the plant. Calla lilies are watered regularly so that the soil in the pot does not dry out. Fertilizers are applied once a month. With proper care, Ethiopian kala can bloom all year round.
How to care for Zantede kala flower in a pot of their variety
Kala Zantedeschia differs from other varieties in its resistance to cold and high peduncle, up to 90 cm. The dormant period of this calla lily is 1.5-2 months, after which it blooms again. Caring for the plant involves removing small sprouts with weak foliage, faded flowers and dried leaves - then the plant will look truly decorative. When watering, you need to find a “golden mean” so that the soil is moist and at the same time the roots do not rot. There are 8 varieties in the Zantedes kala genus, the care of which is identical and is carried out according to the above principle.
Caring for calla lilies in autumn at a summer cottage and watering
You can plant feces sprouted in a pot in advance at your summer cottage, or immediately plant the plant in a permanent place. In the second case, the sprout may not appear for up to 4 weeks, but then the feces catches up with its fellows in growth, but its flowering period occurs a little later than that of a pre-sprouted plant. Thus, you can artificially extend the opportunity to admire the blooming callas in your flower garden.
The feces should be watered 2 times a week. If complex mineral fertilizer is applied to the hole before planting feces tubers in it, then during the season it will no longer be necessary to fertilize with this type of fertilizer. Maybe sometimes add a little citric acid to the water for irrigation (1 tablespoon per 1 bucket of water). At the end of September, the tubers are dug up and laid to dry for 2 weeks, the leaves and roots are not cut off. Dried plants are washed from the ground, treated with a solution of potassium permanganate, dried again and stored in the basement or refrigerator until spring.
Caring for calla lilies after purchase so that they bloom
After purchasing the calla lily, it is advisable to transplant it into a larger pot (by the way, this is the surest way to ensure the healthy condition of the root tuber). Place the transplanted plant in a bright place where there are no drafts. Water 2 times a week, when the air temperature rises above 24°, additionally spray the leaves, apply fertilizer once a month. With proper care, feces bloom 9-10 months a year.
Caring for Ethiopian, Eliot, white calla lilies from the store
It is advisable to immediately transplant calla lilies purchased in a store into a new pot. Firstly, you will be confident in the condition of its root system, and secondly, you will renew the soil, which may be depleted or, conversely, over-fertilized.
Further care for Ethiopian or Eliot calla lilies consists of: - maintaining a temperature of 18-26° during the growth and flowering period and 12-15° during the dormant period; - regular and abundant watering (during the dormant period, reduce watering to a minimum); — applying fertilizers 2 times a month (when the plant is resting, there is no need to fertilize it).
How to care for calla lilies: leaves disappear during the dormant period in an apartment or open ground
Calla is a rather unpretentious plant, and if its leaves begin to disappear, it means something has been done wrong. Typically, this flower reaction can be caused by over- or under-watering. Sometimes withered leaves may indicate a lack of nitrogen. For calla lilies living in an apartment, the loss of foliage may be due to insufficient pot volume. Then the plant must be replanted.
Callas how to properly care for a bouquet
To preserve a bouquet of calla lilies longer, you need to: - update the cut of the stem, cutting off its edge at an acute angle; - trim the stem under water, using a sharp knife for this purpose; - add a pinch of sugar and a drop of bleach to the water where the bouquet will stand; - keep a vase with a bouquet of callas in a cool and not too lit place; - change the water in the vase daily.
How to plant and care for decorative calla lilies, tuberous, root, bulbous
Callas can be roughly divided into 2 subgroups. The first group includes plants whose rhizomes are located underground. These callas love water and do not shed their leaves during the dormant period. The second group is represented by callas whose root resembles a potato tuber. Such callas are less moisture-loving and during the period of “hibernation” they completely retire, shedding all their foliage. In the fall, bulbous callas need to be dug up and stored in a cool place until the next season.
How to care for a black calla remani plant
Calla Remani does not tolerate too wet soil, drafts and bright sun. The plant should be watered moderately, otherwise its roots may rot. Twice a month, fertilize with fertilizer specially designed for this flower. During the dormant period, the plant sheds leaves and watering is reduced to a minimum. Calla Remani reproduces by tubers.
Add a comment Cancel reply
Storing callas for winter storage
So, what do you need to prepare for wintering? First of all – suitable containers. The best option for this would be thick paper bags or cardboard boxes with ventilation holes. If you store a large collection of various varieties, you need to label them so that in the spring you do not make mistakes in choosing the color scheme when composing a composition of calla lilies. The best material for this would be thick foil - a material that does not rot or deteriorate.
The name of the variety can be written on foil by squeezing out the letters with a regular pen or knitting needle. The tag is attached to the package or to the side of the box.
The main condition for proper storage is the isolation of root tubers from each other and air circulation between them. In order to isolate the tubers from each other, a substrate is poured into a bag or box between the tubers, which can be used as:
If a sick specimen ends up in such a storage facility at home, the insulation will reliably protect other tubers from rot.
Although high humidity is not welcome, wrinkled and overly dried tubers should be sprinkled with water from a spray bottle to prevent them from drying out.
The optimal temperature for storing calla root tubers is 5-7⁰C. Ideal conditions for storing them are a fairly dry room that has good ventilation. If this is a basement, then the harvest should not be stored in it. During storage, fruits and vegetables release moisture and ethylene gas. These factors provoke the awakening of tubers too early, as well as their rotting. If it is impossible to allocate a separate room, then you should at least try to equip a separate compartment in the basement with an exhaust or supply ventilation.
It is advisable to have no lighting so as not to provoke the plants to start the growing season too early. The rest period takes two months or more. This is exactly how long the plant needs to fully recover. All this time you need to closely monitor their health, periodically inspecting the tubers.
Overwintering a potted plant
When calla lilies are grown as a houseplant, they also need a period of rest. To do this, the pot with the plant after flowering is moved to a cool and dark place in order to stimulate the end of the growing season. Watering the plant also needs to be reduced. You can dig up the tubers and process them using the above technology, or you can leave them to overwinter directly in a pot or container.
Let's wake up the callas with the arrival of spring
In order to complete wintering, the best time for the middle zone will be the beginning of April, for the southern regions - the beginning of March. Calla lilies root tubers are taken out, carefully examined, and treated with a solution of manganese or any fungicide against fungal diseases. If you didn’t separate the “babies” from the calla lilies in winter, you can separate them now.
“Children” are not cut off from the mother plant, but broken off. The separation area must be disinfected, treated with brilliant green, and sprinkled with ash.
In order for these beautiful plants to safely endure the period of winter dormancy, you need to properly dig them up, dry them and ensure they are stored in a dry and cool place.
The perennial calla flower, which many consider to be a houseplant, thrives in open ground and decorates many garden areas. Unfortunately, this plant is not resistant to cold weather and cannot overwinter in the ground. Therefore, flower growers dig up these flowers for the winter. But in order to see flowering next year, you need to know how to store callas in winter at home. We'll talk about this today.
Selection of planting material
A high-quality, healthy tuber is the key to the normal development of the plant. Therefore, the choice of planting material must be approached very responsibly. The tuber should not be soft or show signs of disease or mechanical damage.
The size of the tubers plays an equally important role. The larger they are, the faster flowering will begin, and the more inflorescences there will be. The number of inflorescences in a plant with a large tuber can exceed 20 pieces.
Before planting in the soil, the tubers are washed in a weak solution of potassium permanganate, then rinsed with clean water and dried.
Preparation
In order for the wintering of plants to be successful, they should be dug out of the soil at a certain time. Harvesting tubers too early will lead to the fact that the plant, whose growing season has not yet ended, will not be able to survive wintering normally. And if you wait until severe frosts to dig it up, the flower may die from the cold.
Read also Celandine with alcohol reviews
In the climate of the middle zone, calla lily tubers are collected with the onset of the first night frosts (the first days of October). And in more southern areas this can be done a month later: in early November.
With the arrival of the first frost, plants need to be pruned. Dry leaves are cut so that they are visible 5-7 cm above the ground.
You should dig up the rhizomes very carefully, using a garden fork, so as not to harm the plants. The flower is dug up at a safe distance from the roots, after which it is pryed up with a pitchfork along with a lump of earth.
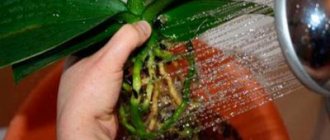
Root tubers need to be cleared of soil residues. To do this, they are placed in a container with water, after which they are gently washed under a small running stream.
When the tubers are cleaned, they are carefully inspected. Planting material that has damage, rotten areas and signs of disease is discarded.
Small damaged areas can be removed with a sharp knife, and then treated with brilliant green or crushed coal.
Drying the tubers
The next stage of preparation is drying the tubers. This should be done in places with good ventilation, away from sunlight. In such places it is necessary to maintain a constant temperature within +20°C - +25°C.
Drying of planting material should continue for at least 2 - 3 weeks , after which calla lilies can be stored all winter.
Remnants of dry leaves must be completely removed from the tubers. This is done a few days after the start of storage. After which, after about a week, the roots are removed. By this time, the roots will separate easily. This must be done so that the flower does not begin to grow prematurely without spending enough time in “cool dormancy.”
During this period, small tubers (babies) have not yet formed a special film that allows them to “live independently.” Therefore, it is impossible to separate them from the mother tubers. This should be done in winter, when they are already stronger. Then it will be a full-fledged planting material.
If the babies were separated from the tubers ahead of time and were damaged, they can be treated with brilliant green (coal dust) and dried. Calla lily bulbs should be stored in winter until the last days of March.
Digging calla lilies for storage: main steps
They are dug out in stages. To successfully cultivate calla lilies, a gardener needs to know all the stages: when to start, what to do, how long each period lasts.
Stage 1 - the flower is preparing for winter
With the onset of the first frost, the flower receives a signal that cold weather is approaching. The leaves of the plant wither and dry out. Such changes are a signal: it’s time to dig up the calla lilies. Withered foliage must be cut to the base, leaving stubs 5 - 7 cm long.
Photo: Stop watering the flower 2-3 weeks before the intended digging.
2 - 3 weeks before digging, we stop watering the plant. Since autumn is the rainy season, it is advisable to build a small hut over the bush, which will protect the rhizome from excess moisture. This design can be easily made from available materials - sticks and branches, and wrapped with film or roofing felt on top.
Stage 2 - digging the plant out of the ground
- In dry weather, we dig with a garden fork, with a large lump of earth. With a shovel, you have a better chance of cutting off a lot of the roots that will remain in the ground.
Photo: Photo: Use a shovel to cut off the remaining roots in the ground.
- You need to dig very carefully so as not to damage the roots. First, the plant is dug around the perimeter, and then lifted from below and removed from the ground.
- We shake off the soil from the tubers and wash them in water to keep the roots and children as intact as possible. A lump of earth can be placed in water, soaked, and then rinsed under running water.
Photo: Calla lily tubers must be cleared of soil and washed.
- We inspect for diseases and rot.
- If there is damage, they can be sprinkled with crushed charcoal or anointed with brilliant green.
Photo: If the tubers are damaged, coat them with brilliant green.
- We cut off diseased tubers and areas with a sharp, disinfected instrument to healthy tissue. Let the cuts dry a little, sprinkle them with charcoal.
- We place all root tubers for 15 - 20 minutes in a medium solution of potassium permanganate or Fitosporin, diluted according to the instructions.
- Place the corms in cardboard or plastic boxes in one layer. Try to arrange them so that they do not touch each other.
- We line the bottom of the boxes with a layer of newspapers or agrofibre. They will absorb excess moisture.
- Place in a dark, dry, ventilated room out of direct sunlight for one week. The room temperature should be +20…+ 25 degrees.
Stage 3 – final drying of the corms
This is the next stage after excavation and preliminary preparation. It needs to dry for another 2 - 3 weeks. 2 - 4 days after the start of drying, remove all dry parts from the tubers.
Photo: All dry parts from the tubers must be removed.
After 7 days from the start of storage, we remove all the roots of the tubers. This is necessary so that the plant does not begin to grow prematurely.
| Tip : Adult large corms produce babies over the summer. In the first year of appearance, small tubers do not need to be removed from the mother corm. They have not yet developed a protective shell that will allow them to grow separately. They are separated in the second year of life. By this time you will have excellent fresh planting material. |
Sometimes a baby breaks off by accident. The damaged area needs to be dried a little, and then powdered with crushed charcoal or anointed with brilliant green.
After thorough drying, you can safely put the callas for long-term storage.
Under what conditions should it be stored?
Conditions for storing calla lilies in winter are as follows:
- constant temperature within +5°C - +10°C;
- ensuring ventilation in places where planting material is stored;
- low level of humidity to prevent mold from forming;
- storing rhizomes at some distance from each other, sprinkled with sand, wood shavings or covered with moss and peat;
- regular inspection of planting material for timely identification of diseased tubers.
The container in which the rhizomes are located can be placed on an insulated balcony, in a cellar, basement, cool pantry, or refrigerator.
In the basement
Storing calla lilies at home is best done in drawers, in a basement or cellar. Good ventilation and constant temperature are a must. The optimal storage temperature for calla lilies is +5°C - +10°C.
If the room is warmer, the tubers may begin to germinate prematurely, so maintaining the correct temperature is very important. The air should also not be too humid. The development of fungus in this case will destroy the tubers. Therefore, calla lilies can only be preserved in a dry room in winter.
Necessary conditions for wintering the plant
For proper and safe wintering, several conditions must be met. Moreover, fulfillment of these conditions by the gardener must be mandatory.
- In winter, when storing tubers, the temperature should be in the range from +5 C to +10 C degrees.
- Carrying out humidity control. Storing tubers and rhizomes in dry rooms will prevent the appearance of rot and possible death of plants.
- Storing plants in well and regularly ventilated areas.
- Periodic sanitary inspections help keep planting material healthy and detect the onset of the disease in time.
- When storing calla rhizomes in a substrate or pots, it is necessary to monitor its moisture content.
- For rhizomatous callas, care comes down to periodically lightly moistening the substrate.
- In tuberous callas, to prevent premature growth, the leaves and roots are removed.
- The tubers must be properly dried before storing. The safety of planting material in winter depends on this.
For successful wintering, it is advisable to sprinkle the tubers (bulbs) so that they do not come into contact with each other with one of the following materials:
- peat;
- small wood shavings;
- sphagnum moss;
- sand.
In the apartment
When there are no other options, you can store calla tubers in a city apartment in winter. To do this, boxes with planting material are placed in the coolest places. A vestibule, a pantry, a place near the balcony door, etc. are best suited.
To prevent the tubers from drying out and shriveling, they should be kept as far as possible from hot radiators and other heat sources. Even if planting material that has been exposed to temperatures above +20°C can maintain viability, flowering will not be as abundant as we would like. If the warm place is also damp, the flowers will quickly begin to sprout.
How do tubers overwinter?
It is very important to check each individual root for rot and damage. When answering the question of how to store calla tubers in winter, competent gardeners focus on the integrity of the planting material. If black spots appear, they should certainly be scraped off with a regular teaspoon or a special tool. After this, the tuber is left for 3-3.5 hours so that the damaged areas dry out a little.
Afterwards, each “scratch” must be treated with crushed activated carbon or brilliant green for disinfection. The same is done when it is necessary to break the mother root in order to separate the “children”. At the end of the procedure, the tubers are placed in napkins made of natural materials and stored in this form, packaged in cardboard boxes. From time to time it is necessary to inspect the planting material for integrity and monitor whether it has any rot or infection. However, if handled correctly, such “complications” should not arise.
The box is placed in a fairly cool and dry place. The container must have a tight lid. When deciding how to store calla lilies at home, you should not forget the time when to take them out. This is usually done in the spring. This method of keeping tubers allows the plant to be viable and healthy for quite a long time, until the time comes for planting in the ground.
Flowers in pots
How to store calla bulbs, if they are indoor plants, worries many housewives. After all, these flowers also require a period of rest.
When flowering is finished, containers with callas are placed in a dark place with a low temperature so that their growing season ends faster. In this case, watering the plants should be reduced to a minimum.
You can store tubers of indoor calla lilies in winter directly in pots. Or you can dig up the bulbs, carry out the treatment as indicated above, and keep them in the general conditions for this plant.
Premature growth
When one of the tubers begins to germinate ahead of schedule, it is planted in the soil and grown in a pot as an indoor flower. And with the arrival of spring warmth, it is transplanted into open ground. After which the calla lily will again become a garden plant.
To ensure that calla lilies bloom as early and luxuriant as possible, the tubers of this plant should be dug up every autumn at a certain time and stored in proper conditions. And those who decide to leave them in the soil may be left without this beauty in the new season.
Storing callas in winter is not at all difficult, you just need to follow the tips given in this article.