Phalaenopsis is one of the most common varieties of orchids. It is considered unpretentious in comparison with other varieties, but if the flower is transplanted incorrectly, it can get sick or even die. The procedure is required in two cases: if the pot has become too small for the plant or the root system of the flower is damaged.
When is it right and how often is it required?
It is not recommended to replant the orchid immediately after purchase. As a rule, manufacturers add fertilizers to the substrate that are necessary for full development and flowering. This supply of nutrients will last for about a year. After this, the flower is replanted.
In addition, replanting is necessary if the pot has become too small for the plant. Phalaenopsis feels comfortable if only part of the roots are buried in the substrate, so it is better to choose a spacious container for the flower.
Usually, an orchid is transplanted into a new pot every 3-4 years.
Preparing for transplant
Before you start transplanting, you need to ensure that you have:
- insecticide - a product such as Alatar has proven itself very well;
- Fitosporin, Alirin and Gamair, Fundazol, Ordan or another remedy for fungal, viral and other infections;
- crushed activated carbon tablet or ground cinnamon without sugar;
- the drug for gardeners Maxim or human Fukortsin, brilliant green or iodine;
- disinfected with sharp pruning shears and small scissors.
It is also necessary to prepare the soil, drainage and pots in which the Phalaenopsis will be planted.
Nowadays there are many different substrates for orchids in flower shops and supermarkets. But not all of them are suitable for Phalaenopsis, so when choosing it, you should pay attention to the composition. It may be wiser to buy all the ingredients separately and mix them at home.
The composition of this substrate includes: pine bark – 60%, high peat – 20%, charcoal – 10%, perlite – 10%.
Is it possible to replant a blooming orchid?
Transplantation is a serious stress for the plant, so it is not recommended to carry out the procedure during flowering.
But if rot has appeared on the roots or pests have settled on the flower, you cannot postpone planting it in a new container. If you wait until flowering is complete, the plant may die. Therefore, it is better to sacrifice one flowering period and plant the crop in a new container with fresh substrate to maintain its health in the future.
Read here how and when you can replant a flowering plant.
Pests and diseases of phalaenopsis
An orchid does not get sick very often, but there is still a risk of infection if not properly cared for.
If the temperature is too high or low, as well as with a large amount of moisture, the roots may develop gray and black rot.
This can be understood by the following signs:
- slow orchid growth;
- soft roots and the presence of liquid in them, if pressed;
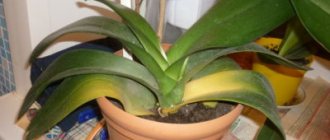
- the leaves begin to turn brown.
If a phalaenopsis orchid is infected with gray mold, fluffy, white spots may be visible on its flowers. This happens in humid environments and at low temperatures. It is necessary to cut off the diseased parts and treat them with ash. In addition, you can apply Topsin 2% and use it with a break of 2 weeks.
Black rot appears as spots on the leaves of the rosette, and this is a reason to isolate the flower from other plants. Treatment of black rot is carried out with Topsin or Fundazol.
If the room is poorly ventilated or has high humidity, the phalaenopsis orchid may develop anthracnose. During this disease, black spots appear on the shoots. An indoor flower can be treated with copper-based preparations, and the affected parts are removed.
To prevent pests from spreading throughout the orchid, the flower must be inspected periodically.
Attention! When replanting, there is a risk of pests appearing that may be in the new soil; to avoid this, it must be scalded with boiling water.
Scale insects on an orchid may look like specks, so you may not immediately understand what it really is. You can wash scale insects off the leaves using water and a toothbrush. If damage appears on the leaves, they are sprinkled with coal or colloidal sulfur. To protect other plants, the infected flower must be moved to another place and replanted in a clean pot and soil.
Priming
The soil for an orchid should consist of crushed tree bark with a small amount of charcoal, perlite and sphagnum moss. The amount of moss depends on the humidity level in the room. In most apartments the air is dry, so a third of the moss is added to the soil when planting. It absorbs water and gradually releases it to the roots.
Reasons for replanting an orchid: when does a phalaenopsis need to be rehoused?
Transplantation is a mandatory step in caring for an orchid.
There are several reasons for replanting an orchid:
- Replacing a substrate that has become depleted of nutrients. As a rule, this happens every 2–3 years. An orchid needs a substrate with a high level of breathability. Usually pine is used for this purpose. But the bark cannot remain intact forever. Over time, wood fragments are destroyed, which leads to compaction of the substrate and a decrease in its breathability. In such soil, the roots of the flower cannot dry out quickly, which increases the likelihood of them rotting. Therefore, the soil mixture must be changed systematically.
- In addition to breathability, the substrate must have a certain level of acidity - pH 5.5–6.5. At higher rates, the roots stop absorbing some essential substances, such as iron. The consequence of this is yellowing and falling leaves.
- The soil must also contain a certain amount of salts. As a result of watering with tap water and regular fertilizing, this figure also increases. Due to excessive accumulation of salts, the roots cannot fully develop, and in some cases they even get burned. Such a lesion leads to rotting of the flower.
- Another reason for replanting is the insufficient size of the pot, when the flower literally “outgrows” it. As the orchid develops, it grows, and the container in which it grows becomes small for it after 2 years. The need for replanting may be indicated by the roots displacing the substrate from the pot.
- There are also emergency reasons for transplantation. These include root rot, which can be caused by poor-quality substrate or violations of watering rules. The orchid is also replanted if pests appear: scale insects, mites, thrips, nematodes, whiteflies, slugs.
How should I choose another pot?
It is believed that phalaenopsis roots develop better in the light. For this reason, the crop is planted in a container made of glass or transparent plastic.
Advantage should be given to plastic containers: they are more stable and do not break if accidentally dropped.
How not to care for an orchid
When growing Phalaenopsis, some gardeners may make mistakes that lead to the death of the plant.
There are actions that are strictly prohibited in care:
- night watering can provoke a fungal infection, as well as hypothermia of the orchid;
- tap water is too hard and can leave sediment on the roots; it is better to use filtered or settled water;
- You cannot apply fertilizer by eye, it will harm the flower, especially if the dose is higher than necessary;
- recently purchased phalaenopsis specimens cannot be placed in the same place where adapted orchids grow; it is important to undergo a two-week quarantine;
- Keeping an orchid in direct sunlight leads to damage and loss of leaves.
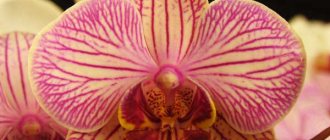
Phalaenopsis is the most unpretentious variety of orchid, moreover, it is very beautiful. Flowering attracts with its abundance and longevity. Proper care of a houseplant can guarantee its healthy appearance and regular flowering for many years.
Instructions at home step by step
To make it easier to move the orchid to a new pot, we recommend using step-by-step instructions:
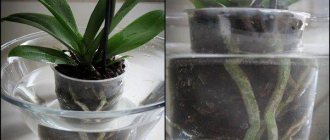
- The plant is carefully removed from the pot. To do this, its walls are slightly kneaded with your hands, and the substrate is watered generously. After this, the orchid can be easily pulled out of the pot along with the earthen lump. But if these manipulations do not help, it is better to carefully cut the wall of the container.
- The roots are washed under running water and cleared of any remaining substrate.
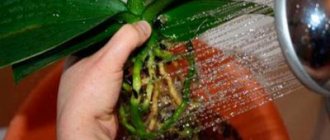
- The roots are carefully examined, all rotten and dry parts are removed. To identify the diseased root, you need to lightly squeeze it with your fingers. A healthy root is dense and hard, while diseased ones are usually hollow in the middle.
- All old yellow leaves are also cut off. After this, the plant is left outdoors for 2 hours to dry.
- Next, the flower is placed in a new container filled with fresh substrate. In this case, the roots should not be completely buried in the substrate. They take part in photosynthesis, absorb water and provide the plant with nutrients. Therefore, it is enough to immerse only a few roots in the soil to stabilize the plant, and the rest can be left outside.
How to determine when it’s time to replant an orchid
Like all living things, phalaenopsis lives in its own cycle and develops. After store flowering, as a rule, there is a period of complete dormancy. It can last from 6 to 12 months, which is very scary for novice orchid lovers. A burning topic on the forums is what kind of care at home needs to be provided to the phalaenopsis orchid so that it pleases its owners with beautiful and fragrant flowers.
It is important to understand here that each plant has its own natural cycles and it is better not to interfere with natural processes. However, over time, your flower will begin to actively grow roots, both inside the pot and aerial ones, and will begin to produce new leaves, after which the phalaenopsis will put out flower stalks, where the orchid may subsequently have babies.
During home flowering, it is better not to touch the orchid unless absolutely necessary. If the plant has good leaf turgor, if the roots look dense and have a normal color - green when wet or silver when dry - then it is better to leave it alone and enjoy its wonderful flowers. The following phenomena may alert you and serve as a reason for transplantation:
- the orchid has lost leaf turgor;
- dark dry or wet spots appear on the leaves and trunk of the plant;
- roots look weak or have lost velamen.
Important! Many inexperienced orchid owners mistakenly believe that if the roots come out of the pot, then it’s time to replant it. In fact, the growth of aerial, so-called adventitious roots, indicates that the flower is feeling well and developing.
Next, we’ll talk about how to transplant a phalaenopsis orchid at home.
After care
It is extremely important to properly care for your orchid after transplantation to minimize stress:
- The first watering is carried out no earlier than 5 days after the procedure. The fact is that pathogens can get into wounds on the roots along with water.
- The plant itself is sprayed daily with water at room temperature.
- It is not recommended to fertilize the plant immediately after planting. The flower needs to adapt to a new place, so the first feeding is carried out no earlier than a month later.
After transplanting, a bamboo stick is installed in the new pot. It is needed to support the peduncle, since it can break under the weight of the buds.
A Step-by-Step Guide to Replanting for a Beginner
The only conditions for proper planting are sterility and accuracy. First, let's prepare everything you need. We will need:
- Pot.
- Priming.
- Sharp scissors or utility knife.
- Alcohol for sterilizing instruments.
So, let's go!
Choosing a pot and soil
Wondering how to transplant phalaenopsis into a larger pot, many users would like to understand how to choose a container for planting. If you are replanting a plant for the first time, immediately after the store, the pot must be changed without fail.
The fact is that shipping pots all have a small lip that prevents a lot of moisture from getting into the pot from below. The disadvantage of such a container is the possibility of injury to the roots and insufficient moisture.
Quite often during the year the root system grows and it is necessary to transplant the flower from one pot to another, larger one. It is necessary to choose a container that is 0.5-1 cm larger in diameter than the previous one; this will reduce the level of stress for the plant and increase the chances of rapid flowering.
As for the substrate, it is necessary to make a decision depending on the situation - to replace the old soil with a new one or leave it. In case of low moisture resistance, it is recommended to replace it completely, however, in case of a number of plant health problems, you should mix old and new soil 50/50.
Advice! To avoid infection by parasites, the bark can be kept for 5-10 minutes in an oven heated to 200 degrees.
You can prepare the substrate yourself. To do this, you need to collect the bark from the non-living parts of the pine tree and cut them into medium-fraction pieces. But the easiest way is to buy the substrate in specialized stores. Orchids do well in the following types of bark:
- Durpeta is a fortified substrate containing bark, charcoal, agroperlite and peat moss.
- Compo Sana is a soil containing pine bark and peat.
- Orchid is a Ukrainian-made substrate based on steam-treated pine bark, sphagnum moss and vitamin supplements.
Inspection of the root system
Before planting phalaenopsis, it is necessary to check the root system of the plant. Using a sterile instrument, remove dry, wrinkled roots, as well as threads without velamen. All roots should be dense, without blackness or soft wet spots.
If possible, aerial roots that are too long can be placed in a pot, but it is important not to deepen the neck of the plant too much. The drier it is in this area, the better.
Important! The soil and pot must be disinfected before use: put the soil in the oven, wash the pot well with warm water and soap.
Transplant plan
After preparing everything necessary, the action plan should be as follows:
- Using gentle movements, we take the plant by the trunk with one hand, the pot with the other and lightly scroll. If the planting is tight, you can cut the pot and remove the flower from there.
- Easily shake off all the old soil into a separate bag, check to see if there is a cup of peat or foam rubber under the neck; if there is, remove it.
- We put the plant in a new pot and add a completely new substrate or old and new mixed in equal proportions if this is the first transplant.
- After replanting, you need to make sure that the plant is firmly planted, does not wobble or tilt in different directions.
Peculiarities
In some cases, there are features of orchid transplantation.
- In a glass vase. Sometimes orchids are planted in glass vases. In these cases, the plant can only be watered from above due to the lack of drainage holes at the bottom of the glass container. This must be done with great care to prevent excess moisture.
- Old orchid. The process of replanting an old orchid is basically the same as a regular phalaenopsis. Here, sometimes it is necessary to remove a large part of the root system due to the many dried and dead parts of it. It is also often necessary to trim yellowed or severely damaged plant leaves.
- Mini orchids. Dwarf orchids are replanted at the same frequency as ordinary phalaenopsis. The transplant procedure is similar for all varieties of this plant.
- During flowering. In cases where more than 50% of the orchid's roots are affected by rot, an urgent replanting of the plant is required, despite the flowering period. The peduncle and all unhealthy roots are removed from the orchid. Then the plant is washed and treated with a fungicide. Afterwards, all sections are also treated with activated carbon powder. Within 2-3 hours, the flower is dried and transplanted into a clean, disinfected substrate.
How to cook it yourself?
If you are not sure of the quality of the finished mixture for orchids, it would be better to prepare it yourself. This method has its positive sides:
ease of preparation;- low cost;
- quality assurance;
- selection of components according to the variety of orchids.
There are quite a few recipes for preparing a substrate for exotic flowers . It will not be difficult to complete them, even for an inexperienced gardener. The main thing in the process is to maintain the specified proportions of ingredients.
Main components of the substrate:
- Pine bark , you can use the bark of any tree. Grind to a size of 2-3 cm.
- Sphagnum moss grows in forests and lowlands. Used fresh and dry.
- Wood ash , the size needed is approximately the same as bark.
- Fern roots are used exclusively in dry form.
- Expanded clay granules are excellent for drainage.
Various variations of mixtures may contain additional components: coarse sand, pieces of foam, cork material, turf or deciduous soil, gravel, perlite, vermiculite, walnut shells, humus, coconut fiber and others.
We invite you to watch a video about preparing a substrate for orchids:
What conditions are required for growing?
When growing phalaenopsis, how to care for it at home? This question interests many people who want to grow these amazing flowers on their windowsill. The humid subtropical climate, which is mainly familiar to orchids, differs from the conditions of apartments. Nevertheless, the flowers have adapted well to them. When caring for phalaenopsis, nothing special is required.
It is best to place the flower on a windowsill whose windows face east or west. It is important to take into account that the plant does not tolerate cold drafts at all, but it still needs access to fresh air. The plant should not be exposed to direct sunlight, but it is worth remembering that the orchid needs good lighting. In winter, additional lighting is desirable.
When growing phalaenopsis flowers, you need to maintain an optimal temperature of 23-25 degrees throughout the year. The difference can be 5-7 degrees. Good ventilation and humidity levels are required.
Transplantation before, after and during flowering - what's the difference?
The process of transplanting phalaenopsis itself consists of standard steps, so there is no difference in transplanting a flowering or faded plant.
Transshipment of blooming phalaenopsis is an emergency measure to save the flower. A plant that is ready to bloom or is in flower may shed its buds or flowers and its further growth will slow down. Therefore, if possible, a flowering plant should not be disturbed.
A faded orchid that is entering a dormant state should also not be replanted. But if there is a need for this (bark decomposition, root disease), then replanting should be done in the same way as working with a flower that has entered a period of active growth. The only difference is the trimming of the peduncle.
Attention! The green peduncle should not be cut off - children or new buds may form on it. A dry arrow can be completely cut off. If the peduncle is partially dry, then only the dry part needs to be trimmed.
Criteria that the correct composition must meet
What kind of soil does an orchid need for replanting? When choosing a substrate, you need to pay attention to the following qualities:
good water permeability;- environmentally friendly, without toxic elements;
- looseness;
- ease;
- optimal acidity;
- breathability;
- complex mineral composition.
Representatives of the Orchidaceae family, which are grown at home, are divided into 2 groups: epiphytic and terrestrial. The difference from each other is not only in name and appearance, but also in the growing environment. Therefore, the substrate for terrestrial and epiphytic orchids is significantly different .
Varieties of epiphytic plants:
- Dendrobium.
- Cattleya.
- Lycastes.
- Phalaenopsis.
- Cumbria.
- Zygopetalum.
- Masdevallia.
For such flowers, the soil first of all serves as a support, and then as a source of nutrition and moisture. It can be concluded that the soil base does not need to be included in the soil mixture for epiphytes. Organic and mineral components will be sufficient.
Substrate options: 1 part charcoal and 5 parts bark.
Sphagnum moss, ash and small pieces of pine bark in proportions 2:1:5. As additional components, you can use dry fern roots , natural leavening agents, and drainage.
Terrestrial orchids: Cymbidium and Paphiopedilum. They need increased nutrition. The following soil composition is suitable:
- leaf humus;
- peat;
- pine bark;
- crushed coal;
- moss.
You can improve the finished mixture a little more by adding sphagnum moss, cork material cut into plates and part of the turf soil.