In order to stimulate the growth of a bonsai tree, it is necessary to form it in a timely and correct manner. In this case, they use two main directions: regular trimming of the already formed crown and global pruning to create the desired style. This article discusses both methods and answers the most frequently asked questions by beginners: How to trim a bonsai correctly and how to prune a bonsai correctly? Detailed instructions, advice from professionals and experienced amateur plant growers will help everyone cope with the simple task of growing their own original bonsai tree.
screenshot_1.jpg
Before delving seriously into questions about the formation of a lush, neat crown of a bonsai tree, it is better to remember the fourth grade course in the natural history school curriculum and refresh your memory of general information about tree growth. This knowledge will be a good help in effectively treating your own pet.
Any tree instinctively grows upward, a natural tendency that helps the plant survive in the harsh competitive conditions of the wild. The top and side branches grow fastest, while the bottom and side branches often atrophy and die. It is important to take these features into account when creating your botanical masterpiece.
Based on the knowledge gained, we can conclude that in order to maintain the shape of the tree, it is necessary to regularly cut off the top and side shoots, stimulating the growth of internal branches.
screenshot_3.jpg
Bonsai placement
The placement of the bonsai depends primarily on the type of plant being grown in the bonsai style.
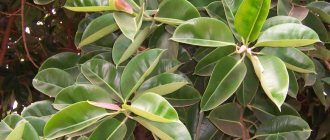
So, if you are growing, for example, a crassula tree, milkweed or adenium, then you need a well-lit place with some direct sunlight. Cypress and rhododendron trees will require shading or light partial shade. It must be said right away that bonsai bought in a store are grown under conditions of so-called filtered lighting, i.e. in diffused light. If you grow bonsai from trees and shrubs taken from nature, then the conditions should be as close to natural as possible. This means a lot of fresh air, and enough light. The location chosen for the bonsai largely determines the formation of the crown. If the plant faces one side towards the light, this will lead to the development of stronger, more leafy branches on the sunnier side. Therefore, the container must be rotated periodically so as not to disturb the formed style. It is best if the plant receives sunbathing early in the morning - on the east window or in the evening on the west. In the period from 11 to 16 hours of the day, shading is desirable.
If for some reason there is not enough natural light, the plant will respond well to additional illumination with fluorescent lamps or phytolamps. It is easy to determine the lack of light: the leaves turn towards the light source, the shoots are thinner, the petioles of the leaves are longer than usual.
Do not place the container in a windy location or under intense air flow from an air conditioner or fan.
Items in cart: 0
- Bonsai website
Bonsai formation, bonsai pruning
Bonsai placement
The placement of the bonsai depends primarily on the type of plant being grown in the bonsai style. So, if you are growing, for example, a crassula tree, milkweed or adenium, then you need a well-lit place with some direct sunlight. Cypress and rhododendron trees will require shading or light partial shade. We must immediately make a reservation that bonsai purchased in a store are grown under conditions of so-called filtered lighting, i.e. in diffused light. If you grow bonsai from trees and shrubs taken from nature, then the conditions should be as close to natural as possible. This means a lot of fresh air, and enough light.
The location chosen for the bonsai largely determines the formation of the crown. If the plant faces one side towards the light, this will lead to the development of stronger, more leafy branches on the sunnier side. Therefore, the container must be rotated periodically so as not to disturb the formed style. It is best if the plant receives sunbathing early in the morning - on the east window or in the evening on the west. In the period from 11 to 16 hours of the day, shading is desirable.
If for some reason there is not enough natural light, the plant will respond well to additional illumination with fluorescent lamps or phytolamps. It is easy to determine the lack of light: the leaves turn towards the light source, the shoots are thinner, the petioles of the leaves are longer than usual.
Do not place the container in a windy location or under intense air flow from an air conditioner or fan.
Creating a Traditional Bonsai
What distinguishes a ficus in a pot from the same ficus formed in the form of a bonsai? Miniature sizes? No, not only. As mentioned above, these are signs of a centuries-old tree that has been grown for years. You can give the appearance of such a tree from a plant that is 2-3 years old and one that is 10-20 years old. It all depends on the desired thickness of the barrel. It is clear that the thicker the trunk, the older the plant. In an old plant it is not only thickened, but also covered with bark. To have such a plant, you need to either grow it for many years or find it in nature. The found tree is dug up, the roots and some of the foliage are cut off and planted in a container.
In order to thicken the trunk, they resort to certain techniques. The first is that the trunk of the tree at the base is tightly tied with wire, but not to such an extent as to break it, but so that only the upper tissues are compressed and the flow of sap is not disturbed. When the trunk thickens above the tightened area, the bonsai wire is removed. Another technique is suitable when the barrel is too long. The bark is trimmed in the right place, i.e. remove a circular strip of bark (cambium) about 1-1.5 cm, and plant the tree in a deep pot so that the place with the cut is underground. After some time, roots will form in this place. Then the trunk below these roots is cut off and the plant is transplanted into a bonsai container. It may take a year for new roots to develop.
Another feature of a true bonsai is the roots that rise above the surface of the ground. This is achieved by raising the roots higher when replanting and not covering them with soil. You can also form the desired shape of the roots using wire.
In nature, as a rule, on a tree one can distinguish the main branches that grow not strictly upward, but obliquely or almost horizontally. When forming a bonsai, this is achieved by pruning, when two or three main branches are left on the trunk, and direction is given to them using wire. In addition, the outlines of these main branches should be clearly visible, so excessive leafiness interferes, the foliage is thinned out, and new shoots and leaves are removed from the base of the main branches.
The final look of a bonsai is achieved by covering the soil with natural elements. It is either covered with moss or sprinkled with sand or gravel. What to cover the soil with depends on the type of plant. So coniferous trees will look more natural on white sand, deciduous trees on soil covered with moss. Succulents look beautiful on gravel.
Very often, a bonsai composition is supplemented with various figures, representing a Chinese peasant, a Chinese girl, a house in a Chinese or Japanese style, etc.
Plant formation and planting
I repeat - there can only be two options for obtaining a bonsai - if you bought an already formed bonsai, then you just have to continue to care for it, and if you yourself form a bonsai from a suitable indoor plant or specially grown seedlings. In any case, only healthy plants with a strong and well-developed root system and a clearly defined line of branches are suitable for growing bonsai. Plant formation can begin at two or three years of age. It is carried out in the spring, when buds appear on the tree.
The first step is to determine the style of bonsai, which depends on the appearance of the plant. Sometimes difficulties in shaping the appearance are due to the fact that a person has little idea which branches will begin to grow and in which direction after pruning. Therefore, it is worth remembering one simple rule: shoots from the uppermost buds on the shoots grow stronger and more actively. Those. on the plant as a whole, the top stretches and bushes faster and the tree grows in height faster than in width. The same applies to the lateral branches, the buds at the ends of the shoots grow more actively than the lower ones. If you cut off the top bud, the one that remains below will begin to grow more actively. All this is due to the fact that the outer buds and leaves around them receive more light. That is why the buds on the shoot develop more actively, which are located on the upper side of the branch and grow upward, and if we talk about the plant as a whole, the side facing the light grows thicker and faster.
Step by step
1.
First, let's inspect the tree and remove all dry branches. As well as branches at the bottom of the trunk. Let's select three main branches on the crown of the tree; usually we leave those three branches whose vertices form an equilateral triangle. Now you need to delete all branches between the selected three.
2.
If you want to grow a leaning tree, you will need wire that is soft enough to bend with your hands, but strong enough that it will not bend under the weight of the branches and trunk.
3.
Now you need to free the upper part of the roots from the ground and carefully tilt the trunk to the required degree. One end of the wire is buried and fixed in the soil at the base of the trunk on the inside of the bend. If the tree is not just inclined, but made in a cascading style, then the trunk will be bent quite strongly. Holding the tree trunk tightly, we wrap it with wire, which should fit quite tightly, but without injuring or tearing off the bark. The coils should not be placed too sparingly, so that the bent trunk does not come out of the coils. In this way, the trunk is wrapped around the base of the remaining branches. To prevent the crown of a tilted tree from hanging down like a broom, the wire must support them in the right direction.
4.
Making a coil of wire around the branch, we carefully straighten the thin and fragile shoots so as not to break them. Moreover, more pieces of wire will have to be wound to the main wire, creating a frame of the desired bonsai shape. The ends of the wire can be bent downwards or pieces of a regular eraser can be put on them so that they do not scratch your hands or damage the plant. The length of the wire should be at least one and a half times the area to be wrapped. The bending angle of the wire relative to the shoot or trunk line determines the frequency of turns - ideally it should be 45°. Here it is necessary to make a reservation that when forming a tree or bush with thin and delicate bark or with fragile leaves, as well as bonsai with thorny shoots, the wire is not wrapped around the stems and trunk, but simply applied to it and fastened or tied (with woolen threads or pieces of wire in the winding).
5.
The tree bent in the wire should be kept for at least 1.5-2 years. If you remove the wire earlier, the barrel may return to its original position. The wire on the branches is removed earlier than from the trunk - 6-8 months are enough for it. When shaping the direction of thin and delicate branches, you cannot use ordinary wire, but you can use braided wire - the kind that is usually used to tie the cords of household appliances and computers. In some rather complex bonsai forms, in addition to the trunk and branches, the direction and shape of the roots are also formed with the help of wire, usually if they protrude bizarrely above the soil surface.
6.
When the desired shape of the plant is achieved, you can transplant it from the pot to the bowl. First, the drainage holes are closed with clay shards, the convex side up. Then a layer of moss or chopped fern roots is placed on the bottom. Then a small layer of prepared soil mixture.
7.
Now you need to trim the roots. To do this, first examine the root system, determining whether the roots are healthy - healthy roots have a light cut (white or light yellow). Trim damaged roots. Your task is to form the root system so that it is evenly distributed in all directions. If the root system is fibrous, i.e. has a weakly defined central root and many small roots, then it is simply trimmed and thinned evenly. If there is a long tap root and weak side shoots, then additional techniques are required. First, the lower part of the root is cut off, and the rest is formed. To do this, you can use the same wire, or U-shaped wire brackets - for plants with soft and plastic roots. The root is fixed in the soil with a bracket from the edge of the bowl, then bends horizontally towards the center of the bowl. The prepared plant must be carefully placed in a container, straighten the roots and fill with soil mixture. If there is a possibility that the plant trunk is not firmly held in the ground and may move and wobble, then additional fixation is required. It is difficult to do this using a peg like with ordinary indoor plants, because... The depth of the bowl is small, so the most painless way is to fix the trunk after transplantation with heavy stones. After transplantation, the plant is carefully watered. Plants from which many roots have been removed are watered with great care at first, so as not to cause rotting. It is possible that the earth will settle and become compacted and will have to be topped up. When the earth settles, it will become sufficiently compacted and the stones securing the tree can be removed.
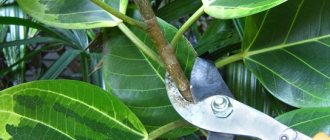
Bonsai crown formation
The main techniques for giving and maintaining the desired shape to miniature trees are pruning and pinching.
The main thing you need to know: pruning and pinching lead not just to branching, but to the growth of new, thinner shoots with small leaves.
Pruning is the removal of large branches and shoots and is carried out annually, usually in mid- or late winter. Before cutting the branches, you need to imagine the final shape of the plant, because the shoots will not grow back in the same place like the hair on a person’s head. The real art of bonsai involves long contemplation, studying the appearance of the plant, and imagining its form. Every leaf or twig deserves the thought “to be or not to be.”
An important rule is that flowering plants are pruned only after flowering has ended, most often this happens in the fall at the end of September - October. Accuracy in everything related to pruning - a sharpened and disinfected tool is the key to health. The cut areas should dry out and heal, so it is best if a garden varnish is prepared. A thin layer of it is applied to the cut site. It disinfects and dries, and in addition, the cut site remains almost invisible on the bark, which allows it not to spoil the appearance. If there is no garden varnish, then the cut site can be sealed with a medical plaster until it heals.
Pruning is simply trimming or shortening elongated shoots in order to maintain shape throughout the entire growth period. Pinching is carried out in the spring, with the growth of new shoots, it allows the crown to branch and form the plant in the desired style.
Giving plants a miniature head start is achieved by pinching new shoots every year. The frequency of pinching and its advisability depend on the type of plant being grown. For some trees, just pinching in the spring is enough, for others you will need to repeatedly pinch the tops of the shoots to give them the desired shape over the summer, or even throughout the year. The more often the bonsai is pruned and pinched, the smaller and denser the crown is formed.
Source iplants.ru
Creating a Traditional Bonsai
What distinguishes a ficus in a pot from the same ficus formed in the form of a bonsai? Miniature sizes? No, not only. As mentioned above, these are signs of a centuries-old tree that has been grown for years. You can give the appearance of such a tree from a plant that is 2-3 years old and one that is 10-20 years old. It all depends on the desired thickness of the barrel. It is clear that the thicker the trunk, the older the plant. In an old plant it is not only thickened, but also covered with bark. To have such a plant, you either need to grow it for many years or find it in nature. The found tree is dug up, the roots and some of the foliage are cut off and planted in a container.
In order to thicken the trunk, they resort to certain techniques. The first is that the trunk of the tree at the base is tightly tied with wire, but not to such an extent as to break it, but so that only the upper tissues are compressed and the flow of sap is not disturbed. When the trunk thickens above the tightened area, the wire is removed. Another technique is suitable when the barrel is too long. The bark is trimmed in the right place, i.e. remove a circular strip of bark (cambium) about 1-1.5 cm, and plant the tree in a deep pot so that the place with the cut is underground. After some time, roots will form in this place. Then the trunk below these roots is cut off and the plant is transplanted into a bonsai container. It may take a year for new roots to develop.
Another difference between bonsai is the roots that rise above the surface of the ground. This is achieved by raising the roots higher when replanting and not covering them with soil. You can also form the desired shape of the roots using wire.
In nature, as a rule, a tree can be distinguished by main branches that do not grow strictly upward, but obliquely or almost horizontally. When forming a bonsai, this is achieved by pruning, when two or three main branches are left on the trunk, and direction is given to them using wire. In addition, the outlines of these main branches should be clearly visible, so excessive leafiness interferes, the foliage is thinned out, and new shoots and leaves are removed from the base of the main branches.
The final look of a bonsai is achieved by covering the soil with natural elements. It is either covered with moss or sprinkled with sand or gravel. What to cover the soil with depends on the type of plant. So coniferous trees will look more natural on white sand, deciduous trees on soil covered with moss. Succulents look beautiful on gravel.
Very often, a bonsai composition is supplemented with various figures representing a Chinese peasant, a Chinese girl, a house in the Chinese or Japanese style, etc.
Bonsai maintenance pruning
The purpose of bonsai maintenance pruning, as the name suggests, is to maintain and refine the shape of the tree's crown. As stated above, trees grow primarily from the crown and branch tips, so it is important to regularly prune these areas of active growth to encourage growth within the canopy.
Timing for bonsai pruning
Maintenance pruning can be done throughout the growing season.
Features of maintenance pruning
As mentioned above, maintenance pruning is necessary to maintain the overall shape of the tree's canopy by simply cutting off branches/shoots that have become elongated and protruding beyond the intended size and shape of the crown using bonsai shears or regular pruning shears. Using a good bonsai tool makes this job much easier. Don't be afraid to prune your bonsai! Regular pruning at the top of the tree and along the edges of the crown is especially important in order to force it to more evenly distribute its growth energy and ensure dense branching.
Unlike deciduous trees, coniferous shoots are often pinched by hand. If you trim the needles with scissors, the tips will turn brown at the cutting site. To prevent this from happening, pinch the young shoot between the thumb and forefinger of one hand and gently pull the tip of the shoot with the other hand. At the weakest point of the joint of the scales, the needles will break off, but the tip will not turn brown later.
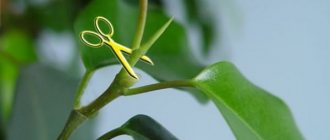
Improper pinching of bonsai
Correct pinching of bonsai
Another method of bonsai pruning is defoliation, which involves removing leaves from deciduous trees in the summer to force the tree to produce new leaves. This method ultimately leads to a reduction in the size of the leaf blade and increased branching.
Bonsai formation and planting
I repeat - there can only be two options for obtaining a bonsai - if you bought an already formed bonsai, then you just have to continue to care for it, maintain the created style, and if you yourself form a bonsai from a suitable indoor plant or specially grown seedlings. In any case, only healthy plants with a strong and well-developed root system and a clearly defined line of branches are suitable for growing bonsai. Plant formation can begin at two or three years of age. All actions begin in the spring, when buds appear on the tree.
The first step is to determine the style of bonsai, which depends on the appearance of the plant. Sometimes difficulties in shaping the appearance are due to the fact that a person has little idea which branches will begin to grow and in which direction after pruning. Therefore, it is worth remembering one simple rule: shoots from the uppermost buds on the shoots grow stronger and more actively. Those. on the plant as a whole, the top stretches and bushes faster and the tree grows in height faster than in width. The same applies to the lateral branches, the buds at the ends of the shoots grow more actively than the lower ones. If you cut off the top bud, the one that remains below will begin to grow more actively. All this is due to the fact that the outer buds and leaves around them receive more light. That is why the buds on the shoot develop more actively, which are located on the upper side of the branch and grow upward, and if we talk about the plant as a whole, the side facing the light grows thicker and faster.
Bonsai step by step
1 step.
First, let's inspect the tree and remove all dry branches. As well as branches at the bottom of the trunk. Let's select three main branches on the crown of the tree; usually we leave those three branches whose vertices form an equilateral triangle. Now you need to delete all branches between the selected three.
Step 2.
If you want to grow a leaning tree, you will need wire that is soft enough to bend with your hands, but strong enough that it will not bend under the weight of the branches and trunk.
Step 3.
Now you need to free the upper part of the roots from the ground and carefully tilt the trunk to the required degree. One end of the wire is buried and fixed in the soil at the base of the trunk on the inside of the bend. If the tree is not just inclined, but made in a cascading style, then the trunk will be bent quite strongly. Holding the tree trunk tightly, we wrap it with wire, which should fit quite tightly, but without injuring or tearing off the bark. The coils should not be placed too often, so that the bent trunk does not come out of the coils. In this way, the trunk is wrapped around the base of the remaining branches. To prevent the crown of a tilted tree from hanging down like a broom, the wire must support them in the right direction.
Step 4
Making a coil of wire around the branch, we carefully straighten the thin and fragile shoots so as not to break them. Moreover, more pieces of wire will have to be wound to the main wire, creating a frame of the desired bonsai shape. The ends of the wire can be bent downwards or pieces of a regular eraser can be put on them so that they do not scratch your hands or damage the plant. The length of the wire should be at least one and a half times the area to be wrapped. The bending angle of the wire relative to the shoot or trunk line determines the frequency of turns - ideally it should be 45°. Note that when forming a tree or bush with thin and delicate bark, or with fragile leaves, as well as bonsai with thorny shoots, the wire is not wrapped around the stems and trunk, but is simply applied to it and fastened or tied (with woolen threads or pieces of wire in winding).
Step 5
The tree bent in the wire should be kept for at least 1.5-2 years. If you remove the wire earlier, the barrel may return to its original position. The wire on the branches is removed earlier than from the trunk - 6-8 months are enough for it. When shaping the direction of thin and delicate branches, you cannot use ordinary wire, but you can use braided wire - the kind that is usually used to tie the cords of household appliances and computers. In some rather complex bonsai forms, in addition to the trunk and branches, the direction and shape of the roots are also formed with the help of wire, usually if they protrude bizarrely above the soil surface.
Step 6
When the desired shape of the plant is achieved, you can transplant it from the pot to the bowl. First, the drainage holes are closed with clay shards, the convex side up. Then a layer of moss or chopped fern roots is placed on the bottom. Then a small layer of prepared soil mixture.
Step 7
Now you need to trim the roots. To do this, first examine the root system, determining whether the roots are healthy - healthy roots have a light cut (white or light yellow). Trim damaged roots. Your task is to form the root system so that it is evenly distributed in all directions.
If the root system is fibrous, i.e. has a weakly defined central root and many small roots, then it is simply trimmed and thinned evenly. If there is a long tap root and weak side shoots, then additional techniques are required. First, the lower part of the root is cut off, and the rest is formed. To do this, you can use the same wire, or U-shaped wire brackets - for plants with soft and plastic roots. The root is fixed in the soil with a bracket from the edge of the bowl, then bends horizontally towards the center of the bowl.
The prepared plant must be carefully placed in a container, straighten the roots and fill with soil mixture. If there is a possibility that the plant trunk is not firmly held in the ground and may move and wobble, then additional fixation is required. It is difficult to do this using a peg like with ordinary indoor plants, because... The depth of the bowl is small, so the most painless way is to fix the trunk after transplantation with heavy stones.
After transplantation, the plant is carefully watered. Plants from which many roots have been removed are watered with great care at first, so as not to cause rotting. It is possible that the earth will settle and become compacted and will have to be topped up. When the earth settles, it will become sufficiently compacted and the stones securing the tree can be removed.
Trunk trimming
Where should you start? And for no reason. You just need to grow the tree by caring for it and feeding it with fertilizers. This will be discussed in more detail later. And wait until the lower part of the trunk of your favorite tree reaches approximately two-thirds of its required thickness .
The height of its location should be approximately a third of the entire expected height of the future trunk. You need to cut it obliquely (the cutting angle should be approximately 45 degrees). And the bottom of the cut should then become the outer side of the bend that should appear. In this case, ideally, in the upper half of the cut there should be an already formed thin branch, which is located at an acute angle to the trunk. She should be groomed as the new future leader. But when such a branch is not available, then all that remains is to wait, the buds will begin to sprout from the top of the cut. Of these shoots, one will then become the leader and continue the trunk.
Bonsai crown formation
The main techniques for giving and maintaining the desired shape to miniature trees are pruning and pinching.
The main thing you need to know: pruning and pinching lead not just to branching, but to the growth of new, thinner shoots with small leaves.
Pruning is the removal of large branches and shoots and is carried out annually, usually in mid- or late winter. Before cutting the branches, you need to imagine the final shape of the plant, because the shoots will not grow back in the same place like the hair on a person’s head. The real art of bonsai involves long contemplation, studying the appearance of the plant, and imagining its form. Every leaf or twig deserves the thought “to be or not to be.”
An important rule is that flowering plants are pruned only after flowering has ended, most often this happens in the fall at the end of September - October. Accuracy in everything related to pruning - a sharpened and disinfected tool is the key to health. The cut areas should dry out and heal, so it is best if a garden varnish is prepared. A thin layer of it is applied to the cut site. It disinfects and dries, and in addition, the cut site remains almost invisible on the bark, which allows it not to spoil the appearance. If there is no garden varnish, then the cut site can be sealed with a medical plaster until it heals.
Pruning is simply trimming or shortening elongated shoots in order to maintain shape throughout the entire growth period. Pinching is carried out in the spring, with the growth of new shoots, it allows the crown to branch and form the plant in the desired style.
Giving plants a miniature head start is achieved by pinching new shoots every year. The frequency of pinching and its advisability depend on the type of plant being grown. For some trees, just pinching in the spring is enough, for others you will need to repeatedly pinch the tops of the shoots to give them the desired shape over the summer, or even throughout the year. The more often the bonsai is pruned and pinched, the smaller and denser the crown is formed.
- Selection of container, soil, replanting, watering, fertilizing
- Indoor bonsai
Bonsai structural pruning
To give a tree the intended shape, it is often necessary to cut out large branches. Deciding which branches to keep and which to remove can be difficult, not only because the action is irreversible, but also because it depends on visualizing the future appearance of the tree. Before you continue learning about bonsai pruning techniques, you may want to take a look at our blog article on bonsai shaping step by step to see examples of structural bonsai pruning by an experienced bonsai artist.
Timing of structural pruning
In general, the best time for structural pruning of a bonsai is early spring or late fall (before or after the start of the growing season). This question can be clarified in the section on tree types. For example, the time to trim a ficus tree is different from the time to trim a juniper tree.