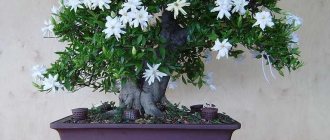
Azaleas are beautiful, but capricious.
In order for the plant to be healthy and bloom profusely, its owner will have to be patient, have a lot of theoretical and practical skills, and also create comfortable conditions for the living window sill decoration. The azalea flower requires attention from the first days of its stay in the house. Often, a bush brought from the store, covered with a lush head of flowers, literally after a few days or weeks begins to wither, sheds flowers and foliage, and then dies. Some azaleas cannot recover after flowering and also dry out.
When faced with a similar situation, a novice gardener blames himself or is convinced that the azalea is a disposable flower and cannot be kept at home. This opinion is wrong! With proper preparation and diligence, beautiful azaleas actively bloom, grow and even reproduce.
When to replant an azalea at home
Beginner flower growers often wonder when is the best time to replant an azalea. Experts say that this is strictly prohibited in winter. During the dormant period, all processes slow down, buds are formed, and the plant remains in a dormant state. If you replant it, it will negatively affect flowering. It may be completely absent or become too scarce. Transplanting azaleas in winter is a big stress for the crop.
Azalea - a beautiful flowering crop
After the purchase
After purchase, the plant must be carefully inspected. If mold, fungi, or disturbances in the structure of the root system are detected, the plant is replanted in high-quality soil. In this case, you need to get rid of the affected fragments.
After flowering
It is best to move an azalea to a new location in the spring. This is recommended to be done after the flowering period has ended. It is strictly not recommended to carry out the procedure during flowering or bud formation. This usually occurs at the end of June or beginning of August.
Replanting a crop during flowering and budding is possible only in extreme cases. Most often, this procedure leads to the discarding of flowers. A sick azalea may even die.
Important! If you cannot do without replanting, you must first trim the flowers and peduncles. You also need to remove dry branches and foliage to reduce stress on the plant.
Young crops should be replanted every year; adults should be moved to a new location at intervals of 2 years. If the bush has been flooded or the pot has become too small, an unscheduled transplant is carried out.
Plant life cycle
The azalea's life cycle is different from many of the flowers we are used to. Depending on the variety, it blooms from December to May (depending on the variety, flowering can last from 2 weeks to 2 months).
In summer and autumn, azaleas need a rest in cool conditions, then (in late winter and spring) it is time to bloom. After flowering, the formation of flower buds occurs and after this the dormant period begins.
How to properly replant an azalea indoors
Many people are interested in how to properly transplant an azalea at home. To do this, you need to prepare the right pot and soil.
Selection and preparation of soil
How to propagate azalea at home
Azaleas need soil with high acidity parameters. Therefore, it is important to choose the right substrate for the plant. It should be quite loose and allow air to pass well to the root system. To maintain the desired parameters, the plant must be periodically watered with a solution of citric acid.
It is best to make the soil yourself. To do this, you need to take the following ingredients in a ratio of 2:1:1:1:1:
- special substrate for azaleas;
- small tree bark;
- fresh or dry sphagnum moss;
- fine sand;
- charcoal and vermiculite.
You can also mix coniferous soil, peat and sand in a ratio of 2:1:1. A composition based on pine needles, high peat, sand and leaf soil will be no less effective. They are mixed in a ratio of 2:3:1:1.
The prepared substrate must be watered with a special product - “Fitosporin” and its analogues. You can also process the mixture in the oven or steam it over boiling water.
Important! Untreated soil can be a source of pests or fungi that will lead to contamination of the crop. Therefore, the substrate must be disinfected.
You can make soil for azaleas yourself
Selection of pot
The choice of pot for azaleas is of great importance. It should not be very large in size so that the roots feel as comfortable as possible. It is best to choose a container 2 cm larger than the previous one. This will help the root system to settle in faster and minimize the risk of soil flooding.
It is desirable that the pot has low edges and is wide enough. The root system of the plant is characterized by horizontal development, so it requires optimal conditions.
The pot material can be anything. Plastic or ceramic are perfect. At the same time, natural container is still more preferable. There should be drainage holes at the bottom to remove excess moisture.
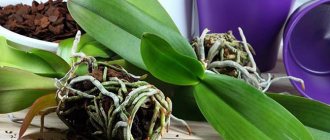
Renewal root pruning
Carrying out sanitary pruning has a good effect on the condition of the crop. To begin with, the flower with a lump of soil needs to be pulled out of the pot. It must be inspected for external damage and dead fragments removed.
You should not try to separate a dense lump of earth with your hands. This can cause root damage. Before trimming, they need to be soaked in a warm Zircon solution. Then you can carry out renewal pruning. To do this, the roots on each side should be trimmed by 1-1.5 cm.
The roots need to be trimmed a little before transplanting.
Azalea division
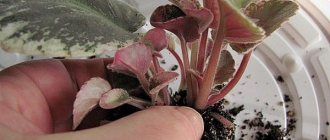
By dividing the bush, the plant you like is propagated. Also, the procedure can be carried out due to the impressive size of the bush. How to plant azaleas at home?
To do this, you need to carefully remove the flower from the pot, inspect the roots and, if necessary, trim off diseased or dry fragments. The earthen lump needs to be cut into several fragments.
Important! There must be at least 1 shoot left on each fragment. Each plant needs an individual pot.
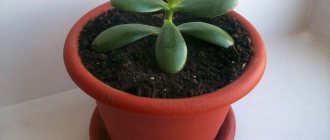
Planting in another pot
The step-by-step process of planting a plant looks like this:
- A drainage layer 3 cm thick is poured onto the bottom of the container. It should consist of small stones.
- You need to put wood chips, sand or pine bark on top. The thickness of this layer should be 2 cm.
- Then sprinkle the layer with Trichodermin, which helps to avoid the development of fungi and rot.
- Pour soil on top and distribute evenly throughout the container.
- Remove the azalea from the container with the growth stimulator solution, squeeze out the earth a little and let the liquid drain.
- Place in the center of the prepared soil.
- Sprinkle fresh soil around the azalea. In this case, the root collar of the crop should not be touched.
- Gently add soil to the sides and compact it slightly.
- Lightly water the soil with the solution in which the roots were soaked.
Important! After replanting, it is forbidden to water the bush abundantly. The root system dries more slowly than the soil, so there is a risk of root rot.
What are the basic rules for pruning azaleas after flowering?
Trimming azalea branches is a very important action in caring for this plant. In order to obtain high-quality decorative results every year, it is necessary to regularly shorten young shoots. This procedure helps the plant and directs its forces to the development of buds, and not to the development of green mass. Some gardeners believe that to form a crown, it is enough to just pinch the azalea after flowering. But this is a fundamentally wrong idea, because you need to care not only for the youngest shoots, but also for those that have been growing for several years.
Pruning is carried out immediately after the last flower on the plant has faded. Never prune a rhododendron that has already switched to rest mode. Such a plant is unlikely to recover from such a procedure.
Before pruning, all sepals that could not fall off on their own are manually removed from the azalea. To do this, use a fairly sharp garden pruner of a suitable size. It is necessary to disinfect it before the procedure of shortening the branches, for example, with alcohol. If this is not done or done poorly, then there is a risk of introducing some kind of infection or disease to a fresh cut of the plant.
Pruning is carried out for absolutely all shoots. First, all branches that grow incorrectly are removed, directed inward, and aggressively prevent other branches from developing. After this, it is worth inspecting the azalea for dried shoots, weak, undeveloped, broken or injured in any other way. All these branches also need to be removed, since they provide neither practical nor aesthetic benefit to the gardener and his home. After pruning all unsuitable shoots, you can begin to shorten healthy ones. They also require care, because without regular pruning, they will begin to grow green mass instead of forming flower buds. And if you miss one procedure, you will definitely lose a beautifully formed rhododendron. After all, without these actions, this bush looks very untidy. Shortening is carried out so that at least three to five nodes remain on each branch. In extreme cases, you can leave about six buds.
After scheduled pruning, it is also worth disinfecting each cut. To do this, you can purchase specially designed medications that will prevent infections and bacteria from getting inside the rhododendron. But there is a more budget option - crushed coal (black). Disinfection is most often carried out for thicker and lignified branches. Since for thin young people there is simply practically no need for this.
These are the rules for caring for rhododendron after flowering. Each action must be performed consistently and correctly, because not only the appearance of the bush depends on it, but also its health and life expectancy. However, this is not all that azaleas may need after the flower period. In the second part we will talk about other, no less necessary actions, which also need to be done only in this short period of time.
Features of transplanting azaleas in the garden
How to replant a cactus: options at home
Transplanting the plant into the garden should be done in early spring - before the active movement of juices. As a last resort, you can replant the crop in early autumn. Street azaleas are characterized by a superficial location of the root system. Therefore, it does not need a deep hole for planting. The depth should not be more than 50 cm, and the width - 70-80.
It is worth considering that the use of lime chips changes the acidity parameters. This negatively affects the development of the bush. When planting, it is worth considering that the root collar of the plant should be above the surface of the earth. After planting, the soil must be compacted and watered.
Azaleas can be planted in the garden
Photo
See more photos of blooming azaleas:
You may be interested in reading our other materials about the nuances of caring for rhododendron in the fall, methods of propagation, as well as planting and replanting this green beauty in your home.
Typical mistakes during transplantation
Violating the rules for transplanting and caring for azaleas at home can provoke infection with fungi or parasite attacks.
If there is excess moisture, there is a risk of developing rust or root rot. To cope with problems, you need to use any fungicide. A solution of copper sulfate is also suitable. When pests attack, you should immediately treat the bushes with insecticides.
If the azalea does not bloom after transplantation, the cause of the problem may be the following:
- incorrect soil composition;
- improper watering;
- increased air dryness;
- violation of the fertilizer application regime.
Correct actions are the key to success
The plant is planted and replanted, having the entire above set at hand. This is necessary so that the flower subsequently grows well and delights with flowering. Replanting is usually combined with pruning. Spring is the best time for this. Pruning bushes after flowering is an individual process. Sometimes the best solution is to remove the dried buds by hand.
To get an excellent result in the form of a strong flowering plant, you need to provide complete care for it.
Care during transplantation and propagation will help ensure excellent growth and good development of the plant. Beauty requires taking into account even the most inconspicuous nuances.
Further flower care
Knowing how to plant azaleas correctly is not enough. The culture needs proper care. It is recommended to treat a weakened plant with growth stimulants. After transplantation, the culture needs optimal conditions:
- Choosing a location. After transplantation, it is recommended to place the azalea in a warm and bright place, protected from direct sunlight. The crop should not be affected by heating sources or drafts. The optimal solution would be a western or northern window.
- Illumination. The culture needs a lot of light. However, it does not tolerate direct rays of the sun. To compensate for the lack of lighting, artificial lighting should be used. In warm weather, you can take the bush to the balcony, slightly shading it.
For lush flowering, the crop requires high-quality care.
- Humidity. The plant needs high humidity. If the air is very dry, you need to pour expanded clay into the pan and pour water. To prevent leaf dryness, azaleas are sprayed every other day.
- Temperature. From October to December, the suitable temperature range is +6-10 degrees. Under such conditions, the process of bud formation proceeds well. As the buds bloom, the temperature is increased to +17 degrees. In summer, the parameters should not be more than +18 degrees. In winter they cannot be less than +5.
- Watering. Potted azaleas need to be watered in the morning. This is done at intervals of 2-3 days. Water should be poured through the tray. After 15 minutes, excess water must be drained.
- Feeding. The azalea should not be fertilized 1-2 months after planting. The procedure provokes a weakening of the culture. As a result, the roots may burn. When the bush recovers, it is fertilized every 2 weeks.
Azalea is a beautiful ornamental plant. In order for the plant to develop normally, it must be replanted periodically. It is important to carry out the procedure correctly.
Calendar for transplanting indoor crops for August 2022
Anyone who says that August is the time to harvest a great harvest will be right. However, you need to remember that you need to prepare for next year. In August, you need to start laying the foundations for the future harvest, for example, feeding stone fruit trees. Strawberries and wild strawberries, raspberries and currants need special attention. Remember the flowers too.
| August 1 | New moon. Do some preparation and planning |
| August 2 | Waxing Crescent. Day of collecting heart medicinal herbs, prepare, dry the berries |
| August 3rd | Waxing Crescent. You can sow dill, parsley and celery. Watering is favorable |
| August 4 | Waxing Crescent. Dedicate the day to strawberries, wild strawberries and raspberries. Don’t make preparations |
| 5th of August | Waxing Crescent. Take care of current garden chores to put things in order |
| August 6 | Waxing Crescent. Do not pick berries and fruits for harvesting today |
| August 7 | Waxing Crescent. You can mow the lawn, water and fertilize shrubs and decorative flowers |
| 8 August | First quarter. You can’t pick or pinch, or disturb the leaves of plants. |
| August 9 | Waxing Crescent. A good day to harvest berries and fruits for drying |
| 10th of August | Waxing Crescent. Continue to harvest vegetables and fruits. Control pests |
| 11th August | Waxing Crescent. Favorable day for digging up root crops and hilling bushes |
| 12th of August | Waxing Crescent. Make winter preparations from root vegetables. You can do some weeding |
| August 13 | Waxing Crescent. Grafting fruit trees is appropriate, as is sowing and planting medicinal herbs |
| August 14 | Waxing Crescent. Loosen the soil and mulch the soil. You can dig up root vegetables |
| August 15 | Full moon. Do some preparation and planning |
| August 16 | Waning moon. Remove excess shoots, prune bushes |
| August 17 | Waning moon. Day for abundant watering - spray and feed with organic matter |
| August 18 | Waning moon. Watering and fertilizing are very appropriate. Don't harvest yet |
| August 19 | Waning moon. You can start fumigating your garden from pests and diseases |
| August 20 | Waning moon. Day for harvesting - fruits and berries for drying and preparations for the winter |
| August 21 | Waning moon. Dig up root vegetables and bulbs. Nightshades need to be watered |
| August 22 | Waning moon. Collect tomatoes for long-term storage and for winter preparations |
| August 23 | Third quarter. Dig up potatoes, onions and garlic, but only in the morning |
| 24 August | Waning moon. Pest Control Day: Kill Them by Spraying and Fumigating |
| 25-th of August | Waning moon. Take care of strawberries, wild strawberries, plant them. Replant roses, don't forget about cacti |
| August, 26th | Waning moon. This is not the time to collect seeds. Water and feed both fruit and vegetable crops and your “indoor” pets today with organic fertilizers |
| August 27 | Waning moon. Water young trees and shrubs. Don't forget about pests |
| August 28 | Waning moon. Water and fertilize ornamental shrubs and plants in the house |
| August 29 | Waning moon. Trim dried flowers, prepare cuttings, collect seeds |
| August 30 | New moon. Do some preparation and planning |
| August 31 | Waxing Crescent. Collect and dry herbs, medicinal herbs and berries |
On the days of the full moon and new moon, it is better to plan planting
Diseases and pests
Azaleas are rarely exposed to infections and insect infestations, but improper care, growing outdoors, and an unfavorable neighborhood can cause problems with the health of the flower.
Late blight
Late blight disease is rotting of the root system caused by fungal infection due to excessive moisture. Gradually, the disease is transmitted to the stem and shoots of the plant, which can lead to the death of the flower. First symptoms:
- loss of kidneys;
- leaf curling.
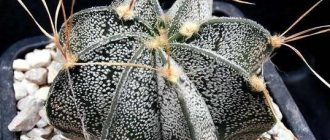
Rust
Anthracnose or azalea rust can develop when the temperature regime is violated. If the air is heated above 23 °C for a long time, then symptoms characteristic of the disease appear:
- swollen spots of a brownish-red or yellow hue;
- leaves fall from the plant.
Products based on copper compounds will help cure azalea. The simplest preparations are Bordeaux mixture and Camulus.
Gray rot
The appearance of gray rot on azaleas is associated with infection with a fungus of the genus botrytis with poor ventilation and stagnant air. The spores affect the entire green part of the plant, including unopened buds. Symptoms of the disease:
- brown-brown spots without a clear outline;
- rapid drying of damaged areas.
To eliminate the problem, it is necessary to remove the diseased parts of the plant, and for prevention, spray the soil and bushes with a solution of Fundazol.
Spider mite
Symptoms of the appearance of spider mite larvae:
- yellowness of the plant;
- darkening, deformation and drying of leaves;
- the appearance of cobwebs.
To combat the pest, you can use insecticides such as Fitoverm, Karbofos or colloidal sulfur.
Strawberry mite
Signs of azalea infestation with strawberry mite are:
- slowing down plant development;
- buds of irregular shape;
- twisted petals;
- the appearance of a brown tint to the leaves.
You can get rid of the pest by washing the bush with soapy water and using Actellika solution.
Shchitovka
Insects, better known as acacia scale insects, are widespread in the middle zone. The pests pierce the bark of the plant with a sharp proboscis and hold on tightly, consuming nutrients from the azalea juice. Symptoms of damage:
- general weakness of the bushes;
- unhealthy appearance;
- gradual drying.
Control measures involve treatment with organic preparations based on phosphorus, Actellik, Karbofos or neonicotinoids.