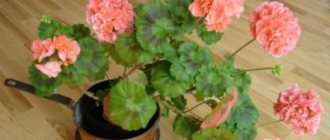
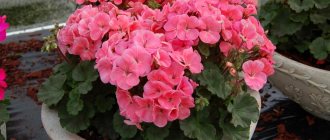
More recently, geranium was extremely popular, since geranium or pelargonium, as it is also called, was found everywhere, from the greenhouses of aristocrats to the window sills of ordinary people. Then for some reason this unique flower received the status of a sign of “dilapidated philistinism” and its popularity fell sharply. Fortunately, this did not last long, and geranium gradually began to gain its well-deserved popularity.
It shouldn’t be any other way, since this flower has a number of advantages. This unique flower can be grown both on the windowsill and in the garden. There are so many varieties and varieties that everyone can choose a flower to suit their taste, while geranium can take its well-deserved place in any flower arrangement. In addition, this flower has a number of healing properties. Moreover, many pests are afraid of this plant like fire. If geranium is placed next to other indoor flowers, then a pest such as aphids will never appear on them.
Many believe that its main advantage is that caring for it is so simple that even a novice gardener can do it. In this case, you need to make a lot of effort so that geranium does not take root in the house or apartment.
Why replant?
Transplantation (transfer) of compact plants is carried out when the flower becomes cramped in the old pot. This is evidenced by the roots that begin to crawl out of the ground. Due to the overgrown root system, pelargonium experiences a lack of nutrients in the soil, which may lead to its death in the future.
In addition, transplantation should be performed in the following situations:
- Due to carelessness, a lot of water was poured into the container with the flower. High soil moisture causes root rot;
- despite proper and balanced care (watering, fertilizing), geranium grows poorly and does not bloom;
- the shoot was exposed from below;
- soil contamination by parasites and pathogens is observed. In this case, transshipment is of a preventive nature in order to prevent the development of the disease after treatment of geranium;
- damage to the pot. It can be damaged due to physical impact (falling from a windowsill) or due to prolonged exposure to sunlight;
- soil depletion, which is not removed by fertilizing. Periodically, you need to add new soil to the pot in order to naturally replenish its nutritional composition and prevent the appearance of pests;
- the need to propagate the plant by dividing the rhizome.
As you can see, there are many reasons for transplanting geraniums.
Planting methods
It is best to plant geranium seeds in flat containers approximately 4-5 centimeters high. For this purpose, it is good to prepare transparent food containers with lids.
The container is filled with soil, not reaching the edge a centimeter and a half, compacted a little by hand, and leveled. Then, with a stick or finger, small indentations are made at a distance of 4-5 centimeters from each other. Seeds are placed in the holes and sprinkled with a thin layer of soil. Lightly compact and moisten with a sprayer.
It is necessary to maintain a constant temperature and humidity of the crops, and provide air ventilation. To do this, the container is covered on top with a lid or plastic film, in which small holes are pierced.
To make seedlings appear faster, you can use a simple method - germination on toilet paper. The processed, soaked seeds are laid out on a moistened strip of paper, placed in a container with a lid, and placed in a warm place. As soon as the white sprouts hatch, the seeds are carefully planted in the ground, trying not to damage them. Also, for hardening and better growth, crops can be kept in the refrigerator for 7-10 days.
It is convenient to grow geranium using peat tablets. In this case, the plant will not be injured when transplanted into a larger pot; the root system develops without damage. It is best to buy small tablets. To prepare the tablets for planting, they need to be soaked; for this, the products are placed in a wide and deep bowl (taking into account that when they swell, they will increase in size by about six times) and fill with warm water.
As soon as the peat is wet, depressions are made in the tablets and the seeds are planted, sprinkled with soil or peat. It should be remembered that you cannot keep the crops on the windowsill until shoots appear, especially in bright sun.
Transplant timing
Typically, compact plants are replanted in the spring. However, there is no strictly defined time for performing this procedure. Therefore, if necessary, transshipment can be carried out at any time of the year. But it’s worth knowing that the speed of the flower’s establishment in the new soil directly depends on the season.
Plants adapt worst and longest to new conditions in winter. This is due to the fact that in cold weather all processes in geraniums slow down. During the summer months the flower blooms almost all the time. During this period, it is not recommended to touch pelargonium, as stress may cause it to stop blooming. So it turns out that it is best to transship in late winter, spring or autumn. It is noted that the fastest adaptation of the plant to a new pot and soil is observed in February, March and April.
Many gardeners plant pelargonium in the garden during the warm season. Typically, planting in open ground is carried out in May. During such transshipment, the plant can be propagated by dividing the rhizomes. In the fall, the flower is transferred from the garden to the house for wintering. You need to have time to carry out this procedure before the start of cold weather and the first frost. Otherwise, the geranium will freeze and is unlikely to grow at home.
Sowing seeds
The main disadvantage of obtaining geraniums from seeds is that in this case it is not always possible to preserve varietal characteristics, and the process takes a lot of time. The most famous zonal geranium is most easily propagated by them from November to April.
Seed preparation (step-by-step instructions):
- the shell is removed from the surface (geranium seeds have a very dense top layer, partial destruction of the integrity of the peel helps speed up their germination);
- each seed is lightly rubbed with fine sandpaper;
- planting material is treated with phytohormones “Epin” or “Zircon”;
- then it is soaked in a weak solution of manganese for 20 minutes (to do this, dilute a pinch with 1.5 liters of water);
- pour warm water for 2-3 hours.
For germination, it is better to buy a ready-made mixture with nutrients, or make the right clay substrate yourself from peat, sand, humus (1: 1: 2).
Additional Information! Before growing geranium from seeds, it is necessary to carry out a procedure for disinfecting the soil. The fungicides “Trichodermin”, “Baktofit”, “Fitotsid-M”, “Fitosporin-M”, and copper sulfate are suitable for this.
Growing geraniums from seeds
Sowing process:
- a flat container is filled with drainage and soil;
- you need to sow seeds at a distance of 5-7 cm from each other;
- on top of the grains are sprinkled with soil or sand in a layer of 3-4 cm;
- the surface of the earth is moistened with a spray bottle.
The container is covered with a membrane or glass and placed in a well-lit place with a temperature of +23 degrees. Geranium seeds will sprout after 14 days. Young seedlings need to be protected from direct sunlight, drafts and drops during watering. After 30 days, when 2-3 leaves appear on the seedlings, they can be transplanted.
What do geranium seeds look like?
Material for planting can be purchased at the store, or collected independently from a pollinated plant. Brown seeds are 6-7 mm long. There are small depressions on the sides of the grains, and they feel hard to the touch. When selecting specimens for propagation, it is necessary to remove soft, deformed and tarnished grains. Many flower growers order material from China. For better germination, such seeds must be wrapped in a damp cloth and a plastic bag, and then placed in the refrigerator for 2-3 months for stratification.
When to plant so that geranium blooms in summer
Seed development occurs in any case: both in winter and in summer. Geranium from seeds - when to plant so that it blooms in pots and flower beds in summer? It is optimal to start sowing in March, when there is already enough sunlight. Then you will probably get blooming bushes this year. For successful summer flowering, the shoot will have enough time to take root and gain strength. A delay of just a month will move the flowering period of the bushes to next year.
Soil selection
To minimize the stress that pelargonium will receive during transfer to a new pot, you need to choose the right nutrient soil for it. When choosing soil for this indoor plant, you can consider different soils. The simplest option is to use standard ordinary soil for universal purposes. It is suitable for most plants grown in apartment conditions. Perlite and river sand should be added to the universal soil. The mixture should be thoroughly mixed.
Relevant: Why geraniums don’t bloom and which of the 8 reasons is to blame?
Special soil for geraniums can be purchased at any flower shop. It is allowed to use land intended for begonias. You can also take garden soil or make your own soil mixture. In the latter case, it is necessary to remember that the soil should not only be rich in various nutrients, but also loose. It is also necessary that the soil has a light consistency.
The soil mixture for growing pelargonium at home should include the following components:
- turf land (2 parts);
- humus (2 parts);
- river sand (1 part).
You can also prepare a soil mixture of sand, humus, peat and turf soil.
Types of indoor plants
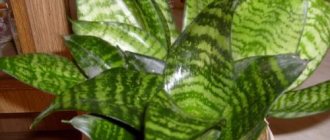
Zonal is the most popular type of geranium. The leaves of such a bush are lowered down, in the center of the plate there is a pronounced zone of a different shade.
This feature appears only during the growing season. In winter, with a lack of lighting, the difference in color disappears.
Fragrant pelargoniums are branched bushes with a minimal number of buds. Their leaves are of different sizes, palmate or lobed. A characteristic feature of the species is its pungent aroma, herbaceous or fruity.
Among the fragrant ones, for example, is curly or curly pelargonium, which is characterized by highly corrugated leaves.
The leaves of ivy-leaved pelargoniums are smooth, with a bright surface, reminiscent of ivy leaves. Creeping shoots grow up to 1 m long.
Royal pelargoniums (Regal Pelargonium) differ in size and look as impressive as possible. Bushes can grow up to 0.5 m high.
They are covered with many large flowers, the petals of which are often non-uniform. The leaves are wide and serrated. The disadvantage of this species is its short flowering time.
Unicums are hybrid varieties bred by breeders. In terms of size and number of buds, they are almost as good as royal pelargoniums. Angels are ampelous hybrids obtained by crossing royal and curly house geraniums.
Variegated geraniums include many varieties that differ in their leaf patterns. The shape of the plates also differs.
To maintain decorativeness, a sufficient amount of natural light is necessary. In winter, the leaves can take on a normal color even with additional lighting. Some varieties of this species do not bloom; they are cultivated only for their decorative foliage, it looks so elegant.
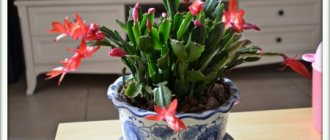
Rosaceae get their name from the shape of their flowers. Their double buds resemble miniature roses.
Petals can be either single-color or two-color with a smooth gradient. Such varieties are found among zonal and ivy-leaved varieties.
In tulip-shaped pelargonium, the flowers do not bloom completely, but remain half-closed. Therefore, breeders formed associations with the tulip. Another characteristic feature of the species is a large number (up to 40) of buds in one inflorescence.
Cactus geraniums have flower petals curled into cones. This is a fairly rare species.
Dwarf varieties are those whose specimens grow no higher than 30 cm. Their standard height is 12-15 cm. Such bushes require almost no formative pruning and are distinguished by abundant flowering.
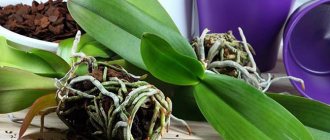
Pot size and material
If the transfer will be carried out due to the fact that the geranium has simply become crowded in the old pot, you need to responsibly approach the choice of container. The intensity of growth and quality of flowering of pelargonium directly depends on the correctness of this choice. First of all, the container should be slightly larger than the previous pot. You should not choose a container that is too large, as the flower will not grow well in it. It will form many shoots that will stop blooming and begin to stretch. As a result, instead of a beautiful flowering plant, you will get an overgrown bush. The new container in diameter should be only a couple of centimeters larger than the old one.
The pot can be either plastic or clay. Plastic is more practical in terms of care, but it impairs root aeration. Clay containers are prettier and better for plants. But it is more difficult to remove flowers from such pots, since the roots are often strongly attached to the inner surface of such a container.
It is important that there are drainage holes at the bottom of the pot through which excess moisture in the soil will be removed.
Care
In order for a young plant to take root and bloom faster, you should follow several recommendations:
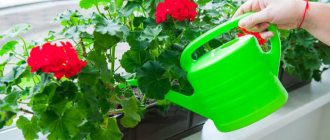
- Timely watering is necessary - make sure that the soil does not dry out. It should be done along the edge of the pot. Do not pour water on the stem or leaves of the plant.
- You can water it once a week with Kornevin solution - this drug stimulates the growth of the horse system.
- Geranium is photophilous. As soon as the young plant takes root, it should be placed in the brightest windows.
- Fertilizing is carried out three months after planting. Until this time, pelargonium will have enough nutrients directly from the soil. Avoid fertilizers with a high nitrogen content - they lead to lush green growth, but deprive you of the desired flowers.
- After new leaves appear, you need to pinch the pelargonium to form a beautiful lush bush.
- Do not be alarmed if the leaves of the pelargonium turn pale after replanting. It is better to remove yellowed and dying ones. The plant will gradually recover.
If you want to have an attractive and abundantly flowering bush on your windowsill, do not neglect the timely rejuvenation of pelargonium. Even a novice gardener can handle the planting procedure. The main thing is to follow our simple recommendations. And geranium will thank you for your care and decorate the interior of your home with its bright flowers.
How to transplant? detailed instructions
So, let's move on to action. How does the transplantation process actually take place? Carefully read each step from the instructions to avoid mistakes and not kill the flower:
- First, you should know that transplantation is mainly carried out in the spring.
- Take care of the size of the pot into which your geranium will be transplanted. It should be a little larger than before, but not huge.
- Prepare the following items that will be needed during replanting: soil, a watering can filled with water and a pot.
- If the pot into which you are transplanting the geranium is old, then you need to treat it. It is best to soak it in a bleach solution. This will rid it of infection, and also cleanse it of those contaminants that are very difficult to remove manually.
- After the cleansing procedure, we place a layer of drainage on the bottom of the pot (this can be broken bricks or pieces of foam).
- Let's start removing the geranium from the old pot. It should be removed strictly with a lump of earth, otherwise there is a risk of damaging the plant. To ensure that the plant comes out of the pot easily, be sure to water it before doing so. When water is absorbed, you need to hold the plant with one hand, and hold the pot with the other. If the plant does not come out of the pot very well, then tap the pot a little to lightly shake the soil. But if this does not help, then take a knife and use it to separate the soil from the pot.
- After removing the plant, inspect its root system to ensure there is no damage. Anything that makes you suspicious must be removed using garden shears, while trying not to damage healthy roots.
- We place our plant in a new pot. We fill the empty spaces between the walls of the pot and the old soil with new and moistened soil.
- The soil around the root must be compacted. The final step will be watering the plant.
- Then we put it in the shade for about a week.
After a week, we can already put the geranium in its permanent place and begin to care for it. But it should be noted that there is no need to fertilize for the first 2 or 3 months.
How to care?
Humidity
Geranium does not have any special requirements for humidity, but it loves fresh air. The culture tolerates humid and dry atmospheres.
Note! You should not spray it, otherwise it will lead to burns.
Temperature
It is necessary to grow geraniums outdoors at an air temperature of at least 12 degrees. If this indicator decreases, the leaves will begin to fall off and droop.
Watering
It is necessary to moisten the plant regularly, but avoid standing water, as this can lead to the development of root rot. But drought is also undesirable, otherwise the flower will not bloom or its inflorescences will become smaller and the leaves will begin to fade. But after watering, all elements of the plant will be restored.
It is best to moisten the soil after the top layer has dried. Excessive soil irrigation causes the cessation of flowering.
Feeding
Geranium does not need abundant nutrition. It is quite enough to use compost and peat that were added to the hole before planting. An excess of fertilizers will have a detrimental effect on the formation of flowers.
Before flowering, you need to apply fertilizer containing phosphorus. Potassium compounds should be used once every 2 weeks during the formation of inflorescences and during active flowering, as they will provide large lush inflorescences.
Trimming
With the onset of autumn, you can move on to forming the geranium crown. Then it will be thicker and begin to bloom profusely. During pruning, it is necessary to leave the stem with 6-7 leaves.
Recommendation. You need to remove shoots that grow not from the roots, but from the leaf axils.
If the bush has grown greatly for the winter, then at the end of February or at the beginning of March it can be pruned again. Cut shoots are perfect for cuttings.
Subsequently, to improve flowering and create a beautiful crown shape, cut off geranium shoots when 4-5 leaves appear. But only from December to January it is better not to touch the plant, as it enters a dormant period. There are many benefits to pruning geraniums:
- the bush turns out to be dense, as a result of which it acquires a compact and decorative appearance;
- pruning helps protect young leaves and shoots from diseases, since dried flowers and leaves are often affected by gray rot.
We have prepared a lot of useful tips about geraniums: pinching, ideal soil for an indoor flower and pot, feeding with iodine, planting geraniums.
How to care for your garden in summer?
Summer care for geraniums grown outdoors is not very different from the standard. At this time, it is necessary to increase the amount of watering; the soil should not be allowed to dry out. Do not apply nitrogen-containing fertilizers anymore, as they promote the development of foliage, and flowering will be poor and unsightly. In the summer you need to add compounds rich in potassium, then the bush will bloom for a long time.
How to care for geranium seedlings
Correctly carried out planting procedure is part of a good result. Seedlings need to be grown in favorable conditions. Geraniums require timely watering, correct temperature conditions and good feeding.
First shoots
Watering
The amount and frequency of watering directly depend on the time of year. In hot summers, moisturizing is carried out every 3 days. In winter - once a week. The bottom of the container is laid with a thick layer of drainage. The plant categorically does not tolerate excess moisture. Watering is carried out only when the top layer of soil dries.
Feeding
The first feeding is carried out only 14 days after picking. At this stage, the plant requires potassium and phosphorus. Agricola and Effecton are well suited for these purposes. Fertilizers are applied to the soil from March to October. Frequency – once every 20 days.
On a note! In winter, any feeding is suspended.
External factors
Before growing geranium from seeds, it is important to create the right climatic conditions for it. The flower grows only in well-lit places
But, as with other indoor species, direct sunlight should be avoided. Daylight hours for pelargonium should be at least 15-16 hours. In summer, the plant is taken out into the fresh air.
Due to the fact that geranium leaves are covered with a special protective layer, it is strictly not recommended to spray the species. Any moisture on the stem and leaves can lead to rot on the flower.
The flower painfully tolerates temperature changes. For young shoots this is unacceptable. The optimal air temperature is 20-22 degrees above zero, the minimum is +7 ℃.
Picking
After the first sprouts appear, the seedlings are picked and transplanted into individual containers. The depth should be 2-3 cm. Young flowers are transplanted into small and shallow containers.
Picking a view
Pinching
It is recommended to pinch geraniums at the level of 6-8 leaves. Adult species must be pruned in spring and autumn. Timely pruning of weak and damaged shoots will allow you to get an unusually beautiful plant that will delight you with lush flowering for a long time.
On a note! Pinching should not be carried out during the formation of buds and during the flowering period.